
User Guide
Page 1
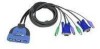
ProConnect™ Series Integrated KVM 2-Port Switch Use this Guide to install: KVM2KIT Installation Guide
ProConnect™ Series Integrated KVM 2-Port Switch Use this Guide to install: KVM2KIT Installation Guide
User Guide
Page 2
... harmful interference in a particular installation. Linksys is a trademarks of the following standards: • EN55022 Emission • EN55024 Immunity IG-KVM2KIT-112102NC KL 1 These limits are the property of the FCC Rules. ProConnect is a registered trademark of Microsoft Corporation. FCC STATEMENT The ProConnect™ Integrated KVM 2-Port Switch has been tested and complies with the specifications for assistance EC Declaration...
... harmful interference in a particular installation. Linksys is a trademarks of the following standards: • EN55022 Emission • EN55024 Immunity IG-KVM2KIT-112102NC KL 1 These limits are the property of the FCC Rules. ProConnect is a registered trademark of Microsoft Corporation. FCC STATEMENT The ProConnect™ Integrated KVM 2-Port Switch has been tested and complies with the specifications for assistance EC Declaration...
User Guide
Page 3
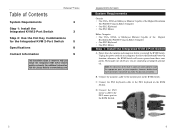
... KVM 2-Port Switch 3 Step 2: Use the Hot Key Combinations for the Integrated KVM 2-Port Switch 5 Specifications 8 Contact Information 9 This Installation Guide is meant to the monitor port on the KVM Switch. Connect the monitor's cable to help you install the KVM Switch. D. Table of any computers that have the Keyboard Power On function; Connect the PS/2 keyboard's cable to the PS/2 mouse port on the KVM Switch. 2 3 however, double-check each connector's icon before you install the Integrated KVM 2-Port Switch quickly and easily. Connect...
... KVM 2-Port Switch 3 Step 2: Use the Hot Key Combinations for the Integrated KVM 2-Port Switch 5 Specifications 8 Contact Information 9 This Installation Guide is meant to the monitor port on the KVM Switch. Connect the monitor's cable to help you install the KVM Switch. D. Table of any computers that have the Keyboard Power On function; Connect the PS/2 keyboard's cable to the PS/2 mouse port on the KVM Switch. 2 3 however, double-check each connector's icon before you install the Integrated KVM 2-Port Switch quickly and easily. Connect...

User Guide
Page 4
... 1's mouse port. H. The PC 1 LED will light up automatically, and PC 1 will be displayed on the monitor and computers. Using hot keys, you to conveniently access either computer directly from the keyboard. To learn about the hot key combinations used to control the KVM Switch, proceed to the Other Computer To toggle between computers at a preset time interval. G. Your installation is controlled by hot key commands, also...
... 1's mouse port. H. The PC 1 LED will light up automatically, and PC 1 will be displayed on the monitor and computers. Using hot keys, you to conveniently access either computer directly from the keyboard. To learn about the hot key combinations used to control the KVM Switch, proceed to the Other Computer To toggle between computers at a preset time interval. G. Your installation is controlled by hot key commands, also...
User Guide
Page 5
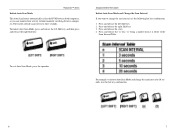
... right Shift key. 3. To exit Auto Scan Mode, press the spacebar. Press and release the "n" key, "n" being a number from 1-4. Press and release the s key. 4. For example, to initiate Auto Scan Mode and change the can monitor their activity without manually switching between computers. Integrated KVM 2-Port Switch Initiate Auto Scan Mode and Change the Scan Interval If you can interval, use this hot key combination: 6 7 ProConnect™ Series Initiate Auto Scan Mode The Auto Scan feature...
... right Shift key. 3. To exit Auto Scan Mode, press the spacebar. Press and release the "n" key, "n" being a number from 1-4. Press and release the s key. 4. For example, to initiate Auto Scan Mode and change the can monitor their activity without manually switching between computers. Integrated KVM 2-Port Switch Initiate Auto Scan Mode and Change the Scan Interval If you can interval, use this hot key combination: 6 7 ProConnect™ Series Initiate Auto Scan Mode The Auto Scan feature...
User Guide
Page 6
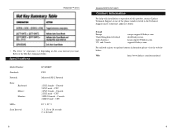
... default) 8 Integrated KVM 2-Port Switch Contact Information For help with installation or operation of this product, contact Linksys Technical Support at one of the phone numbers listed in the Technical Support insert or Internet addresses below : Web http://www.linksys.com/international 9 Specifications Model Number: Standards: Protocol: Ports: Keyboard: Mouse: Monitor: LEDs: Scan Interval: KVM2KIT PS/2 Microsoft PS/2 Protocol 1 PS/2 female - Console 2 PS/2 male - Console 2 PS/2 male - Console 2 HD15 male - Refer to the Hot Key Summary Table...
... default) 8 Integrated KVM 2-Port Switch Contact Information For help with installation or operation of this product, contact Linksys Technical Support at one of the phone numbers listed in the Technical Support insert or Internet addresses below : Web http://www.linksys.com/international 9 Specifications Model Number: Standards: Protocol: Ports: Keyboard: Mouse: Monitor: LEDs: Scan Interval: KVM2KIT PS/2 Microsoft PS/2 Protocol 1 PS/2 female - Console 2 PS/2 male - Console 2 PS/2 male - Console 2 HD15 male - Refer to the Hot Key Summary Table...

User Guide
Page 7
www.linksys.com © Copyright 2003 Linksys, All Rights Reserved. Printed in the USA.
www.linksys.com © Copyright 2003 Linksys, All Rights Reserved. Printed in the USA.


