User Guide
Page 3
...Linksys EtherFast® II Series Introduction 1 Package Contents 2 Getting to Know the GigaSwitch 3 LEDs 3 The RJ-45 Ports 4 The Gigabit Expansion Ports 4 The Console Port 4 Installing the GigaSwitch 5 Pre-Installation Considerations 5 Rack-Mounting the GigaSwitch 6 Powering on and Resetting the GigaSwitch 7 Uplinking the GigaSwitch 7 Installing the Gigabit Expansion Modules 7 Switch...the System Name 12 Changing the Location 13 Changing the Administration Password 13 Changing the Guest Password 15 Statistic Collection 15 Reboot-on-Error 16 Remote Telnet ...
...Linksys EtherFast® II Series Introduction 1 Package Contents 2 Getting to Know the GigaSwitch 3 LEDs 3 The RJ-45 Ports 4 The Gigabit Expansion Ports 4 The Console Port 4 Installing the GigaSwitch 5 Pre-Installation Considerations 5 Rack-Mounting the GigaSwitch 6 Powering on and Resetting the GigaSwitch 7 Uplinking the GigaSwitch 7 Installing the Gigabit Expansion Modules 7 Switch...the System Name 12 Changing the Location 13 Changing the Administration Password 13 Changing the Guest Password 15 Statistic Collection 15 Reboot-on-Error 16 Remote Telnet ...
User Guide
Page 8
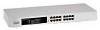
...the console port or with an SNMP Management Station, you must assign an IP address to the GigaSwitch. Switch Management Linksys EtherFast® II Series Overview The Linksys EtherFast II 10/100 24-Port Managed GigaSwitch offers an easyto-use the IP protocol • The GigaSwitch must be... • Setting packet filtration • Configuring STP and SNMP parameters • Upgrading software There are as "admin" and the password is identical in the Configuring the GigaSwitch section. Logging On to the Local Console Management interface. This management method allows you log ...
...the console port or with an SNMP Management Station, you must assign an IP address to the GigaSwitch. Switch Management Linksys EtherFast® II Series Overview The Linksys EtherFast II 10/100 24-Port Managed GigaSwitch offers an easyto-use the IP protocol • The GigaSwitch must be... • Setting packet filtration • Configuring STP and SNMP parameters • Upgrading software There are as "admin" and the password is identical in the Configuring the GigaSwitch section. Logging On to the Local Console Management interface. This management method allows you log ...
User Guide
Page 9
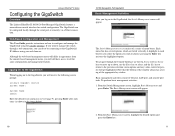
...a Telnet connection. The Basic Management screen will get highlighted. Linksys EtherFast® II Series Configuring the GigaSwitch Overview The Linksys EtherFast II 10/100 24-Port Managed GigaSwitch features a menu-driven console interface for switch configuration. Web-Based Configuration and Management This User Guide provides ...menu, you log on to the GigaSwitch, you will receive the following screen prompt: Linksys Gigabit Switch Screen Name: System Name Login: Enter the default login and password (see page 9), pressing Enter after each box lets you select the option you ...
...a Telnet connection. The Basic Management screen will get highlighted. Linksys EtherFast® II Series Configuring the GigaSwitch Overview The Linksys EtherFast II 10/100 24-Port Managed GigaSwitch features a menu-driven console interface for switch configuration. Web-Based Configuration and Management This User Guide provides ...menu, you log on to the GigaSwitch, you will receive the following screen prompt: Linksys Gigabit Switch Screen Name: System Name Login: Enter the default login and password (see page 9), pressing Enter after each box lets you select the option you ...

User Guide
Page 10
... System Name and press the Enter key. From the General screen, move the cursor to delete the error. 3. Linksys EtherFast® II Series • General allows you change the system name, location, administration and guest passwords, statistics collection, reboot-on System Name, with the cursor on -error, and remote Telnet login. • LAN Port...
... System Name and press the Enter key. From the General screen, move the cursor to delete the error. 3. Linksys EtherFast® II Series • General allows you change the system name, location, administration and guest passwords, statistics collection, reboot-on System Name, with the cursor on -error, and remote Telnet login. • LAN Port...

User Guide
Page 11
... the GigaSwitch) Enabled (allows statistic collection to re-enter the new password. 6. The admin password will appear, confirming that the new password is case-sensitive, can be no more than 16 characters (only ...password. Highlight one of the following screen will appear. 2. The password is case-sensitive, can be no more than 16 characters (only alphanumeric characters and the underscore "_" character can be used ). 3. Press Enter to return to the General screen. Press Enter to remove the message and return to the General screen. Linksys EtherFast® II...
... the GigaSwitch) Enabled (allows statistic collection to re-enter the new password. 6. The admin password will appear, confirming that the new password is case-sensitive, can be no more than 16 characters (only ...password. Highlight one of the following screen will appear. 2. The password is case-sensitive, can be no more than 16 characters (only alphanumeric characters and the underscore "_" character can be used ). 3. Press Enter to return to the General screen. Press Enter to remove the message and return to the General screen. Linksys EtherFast® II...
User Guide
Page 15
... in the Baud Rate field. A screen similar to the console port. 3. Linksys EtherFast® II Series Changing the Console Baud Rate 1. From the Console Port Configurations screen, highlight...the Console Port Configurations screen, highlight Flow Control and press the Enter key. Press Enter. Note: Switch setup, when accessed through a modem or SLIP account, is enabled or disabled. 2. All other selections..., press the Enter key one or more times until the prompt Linksys GigaSwitch Login Password appears on your configuration selections. Highlight the desired flow control method...
... in the Baud Rate field. A screen similar to the console port. 3. Linksys EtherFast® II Series Changing the Console Baud Rate 1. From the Console Port Configurations screen, highlight...the Console Port Configurations screen, highlight Flow Control and press the Enter key. Press Enter. Note: Switch setup, when accessed through a modem or SLIP account, is enabled or disabled. 2. All other selections..., press the Enter key one or more times until the prompt Linksys GigaSwitch Login Password appears on your configuration selections. Highlight the desired flow control method...


