
GT- Logic 4 Installation Manual
Page 2
...36 Brake (If Present 36 How to Programming 28 Determine and Set Wiring Type 29 Programming Remote Controls 30-31 Maintenance Alert System (MAS 32 Open Mid Stop 33 Timer-To-Close 33-34 Car Dealer Mode 34 Maximum Run Timer (MRT 35 Resetting Factory Defaults - TABLE OF CONTENTS SAFETY INFORMATION...17 Install the Manual Disconnect 17 WIRING 18-19 Power and Ground 18 Control Station 19 ENTRAPMENT PROTECTION 20-22 LiftMaster Monitored Entrapment Protection (LMEP 20 Install the Photoelectric Sensors (Provided 21 Mount the Photoelectric Sensors (Provided 22 Wire the...
...36 Brake (If Present 36 How to Programming 28 Determine and Set Wiring Type 29 Programming Remote Controls 30-31 Maintenance Alert System (MAS 32 Open Mid Stop 33 Timer-To-Close 33-34 Car Dealer Mode 34 Maximum Run Timer (MRT 35 Resetting Factory Defaults - TABLE OF CONTENTS SAFETY INFORMATION...17 Install the Manual Disconnect 17 WIRING 18-19 Power and Ground 18 Control Station 19 ENTRAPMENT PROTECTION 20-22 LiftMaster Monitored Entrapment Protection (LMEP 20 Install the Photoelectric Sensors (Provided 21 Mount the Photoelectric Sensors (Provided 22 Wire the...
GT- Logic 4 Installation Manual
Page 4
... 115-1Ø, 60Hz 1/2 HP 11.2 ELECTRICAL TRANSFORMER 24Vac Secondary CONTROL STATION NEMA 3-Button Station Open/Close/Stop w/LED WIRING TYPE C2 (Standard) Momentary contact to OPEN & STOP, constant pressure to provide non-contact safety protection. LIMIT ADJUST Linear driven, fully adjustable... screw type cams. Adjustable to the bottom edge of door. Safety Edge (Optional Electric or pneumatic sensing device attached to 24 feet. ENTRAPMENT PROTECTION: LiftMaster...
... 115-1Ø, 60Hz 1/2 HP 11.2 ELECTRICAL TRANSFORMER 24Vac Secondary CONTROL STATION NEMA 3-Button Station Open/Close/Stop w/LED WIRING TYPE C2 (Standard) Momentary contact to OPEN & STOP, constant pressure to provide non-contact safety protection. LIMIT ADJUST Linear driven, fully adjustable... screw type cams. Adjustable to the bottom edge of door. Safety Edge (Optional Electric or pneumatic sensing device attached to 24 feet. ENTRAPMENT PROTECTION: LiftMaster...
GT- Logic 4 Installation Manual
Page 10
...). DO NOT install header bracket over the center of the door. AVERTISSEMENT 5 Fasten the header bracket with a vertical line, extend the line onto the ceiling. 2 Open the door to loosen, move or adjust door, springs, cables, pulleys, brackets, or their hardware, ALL of which are under EXTREME tension. • ALWAYS call...
...). DO NOT install header bracket over the center of the door. AVERTISSEMENT 5 Fasten the header bracket with a vertical line, extend the line onto the ceiling. 2 Open the door to loosen, move or adjust door, springs, cables, pulleys, brackets, or their hardware, ALL of which are under EXTREME tension. • ALWAYS call...
GT- Logic 4 Installation Manual
Page 12
... recommended installation guidelines. Trolley 12 NOTE: When properly installed and adjusted the door arm should be leaning back toward the operator slightly. Make sure the open side of the notch on the door arm faces the door. 2 Position the door bracket to the center line of the door and attach the...
... recommended installation guidelines. Trolley 12 NOTE: When properly installed and adjusted the door arm should be leaning back toward the operator slightly. Make sure the open side of the notch on the door arm faces the door. 2 Position the door bracket to the center line of the door and attach the...
GT- Logic 4 Installation Manual
Page 13
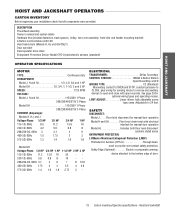
...manual door operation Model HJ Includes both floor level disconnect systems stated above ENTRAPMENT PROTECTION: LiftMaster Monitored Entrapment Protection (LMEP) Photoelectric Sensors (CPS-U Through beam used to open and close with LED Hoist hand chain (Models H, HJ and GH ONLY) Door ... (includes fasteners, track spacers, trolley, door arm assembly, front idler and header mounting bracket) 3-Button control station with open override. HOIST AND JACKSHAFT HOIST AND JACKSHAFT OPERATORS CARTON INVENTORY Before beginning your installation check that all components were provided. ELECTRICAL...
...manual door operation Model HJ Includes both floor level disconnect systems stated above ENTRAPMENT PROTECTION: LiftMaster Monitored Entrapment Protection (LMEP) Photoelectric Sensors (CPS-U Through beam used to open and close with LED Hoist hand chain (Models H, HJ and GH ONLY) Door ... (includes fasteners, track spacers, trolley, door arm assembly, front idler and header mounting bracket) 3-Button control station with open override. HOIST AND JACKSHAFT HOIST AND JACKSHAFT OPERATORS CARTON INVENTORY Before beginning your installation check that all components were provided. ELECTRICAL...
GT- Logic 4 Installation Manual
Page 16
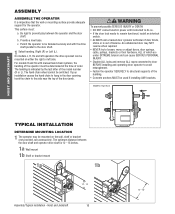
... or bracket mount 1a 1b ADVERTENCIA ADVERTENCIA 12" - 15" Assembly/Typical installation - If your ATTENTION installation causes the hand chain to hang in the door opening, hook the chain to loosen, move or adjust doors, door springs, cable, pulleys, brackets or their hardware, ALL of which are under EXTREME tension and...
... or bracket mount 1a 1b ADVERTENCIA ADVERTENCIA 12" - 15" Assembly/Typical installation - If your ATTENTION installation causes the hand chain to hang in the door opening, hook the chain to loosen, move or adjust doors, door springs, cable, pulleys, brackets or their hardware, ALL of which are under EXTREME tension and...
GT- Logic 4 Installation Manual
Page 18
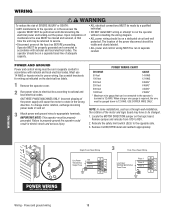
... power leads L1 and L2. 3 Attach power and ground wires to the opposite side. 3. Relocate the safety limit switch (SLS) to appropriate terminals. Remove CLOSE/OPEN decal and reattach appropriately. 1 Single Phase Power Wiring 3 Three Phase Power Wiring Line Power Hot 2 115/230 Vac Single Phase Neutral Ground Line Power 208...
... power leads L1 and L2. 3 Attach power and ground wires to the opposite side. 3. Relocate the safety limit switch (SLS) to appropriate terminals. Remove CLOSE/OPEN decal and reattach appropriately. 1 Single Phase Power Wiring 3 Three Phase Power Wiring Line Power Hot 2 115/230 Vac Single Phase Neutral Ground Line Power 208...
GT- Logic 4 Installation Manual
Page 19
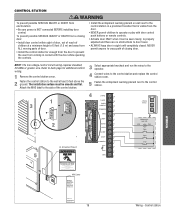
... closed. wiring. 1 Remove the control station cover. ENCIA CIÓN 3 5' 5 1 2 4 24VAC 14 24VAC DATA 13 TIMER ^OPEN DEFEAT 12 ^ CLOSE O COMMON 11 STOP 24VAC POWER 24VAC TIMER DEFEAT MAS 10 COMMON MAS LMEP 9 LMEP: TIMER NABLE EDGE...: OPEN EDGE 8 CLOSE OPEN ADVERTSTOP ENCIA 7 COMMON CLOSE 6 N STOP 5 ADVERTENCIA SBC COMMON 4 UL Entrapment Placard WARNING 3 2 SBC 1 3-Button Station OPEN CLOSE STOP Maintenance Alert LED (RD) (WH) Open Close Stop Moving Door Can Cause Serious Injury or Death...
... closed. wiring. 1 Remove the control station cover. ENCIA CIÓN 3 5' 5 1 2 4 24VAC 14 24VAC DATA 13 TIMER ^OPEN DEFEAT 12 ^ CLOSE O COMMON 11 STOP 24VAC POWER 24VAC TIMER DEFEAT MAS 10 COMMON MAS LMEP 9 LMEP: TIMER NABLE EDGE...: OPEN EDGE 8 CLOSE OPEN ADVERTSTOP ENCIA 7 COMMON CLOSE 6 N STOP 5 ADVERTENCIA SBC COMMON 4 UL Entrapment Placard WARNING 3 2 SBC 1 3-Button Station OPEN CLOSE STOP Maintenance Alert LED (RD) (WH) Open Close Stop Moving Door Can Cause Serious Injury or Death...
GT- Logic 4 Installation Manual
Page 20
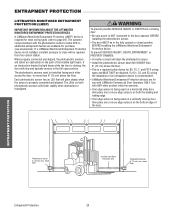
...than 6" (15 cm) aboAve VtheEfloRor.TISSEMENT • This is not installed, constant pressure to the full open position. above the floor. If a LiftMaster Monitored Entrapment Protection device is a required safety device for purchase (see accessories). The photoelectric sensors must be ...closing, the door will stop and typically reverse to close will detect an obstruction in the fully opened or closed position BEFORE installing the LiftMaster Monitored Entrapment Protection device. ADVERTENCIA PRECAUCIÓN -Left Side of its invisible light beam. P6"h(...
...than 6" (15 cm) aboAve VtheEfloRor.TISSEMENT • This is not installed, constant pressure to the full open position. above the floor. If a LiftMaster Monitored Entrapment Protection device is a required safety device for purchase (see accessories). The photoelectric sensors must be ...closing, the door will stop and typically reverse to close will detect an obstruction in the fully opened or closed position BEFORE installing the LiftMaster Monitored Entrapment Protection device. ADVERTENCIA PRECAUCIÓN -Left Side of its invisible light beam. P6"h(...

GT- Logic 4 Installation Manual
Page 22
...below : CPS-U and CPS-UN4 CPS-EI POWER 24VAC TIMER DEFEAT COMMON MAS LMEP EDGE OPEN CLOSE STOP COMMON SBC 24VAC POWER 24VAC TIMER DEFEAT COMMON MAS 3-PHASE 1-PHASE LMEP: TTC TIMER ENABLE EDGE: OPEN 3 CLOSE TS FSTS DIAG STOP COMMON White (Blue) White/Black (Brown) 4-Wire Sensing ... the sending sensor wing nut. 3 Run the wires from both sensors to the models shown below ). above floor WIRE THE LIFTMASTER MONITORED ENTRAPMENT PROTECTION (LMEP) DEVICES 1 Connect the LiftMaster Monitored Entrapment Protection (LMEP) device to the logic board according to the operator.
...below : CPS-U and CPS-UN4 CPS-EI POWER 24VAC TIMER DEFEAT COMMON MAS LMEP EDGE OPEN CLOSE STOP COMMON SBC 24VAC POWER 24VAC TIMER DEFEAT COMMON MAS 3-PHASE 1-PHASE LMEP: TTC TIMER ENABLE EDGE: OPEN 3 CLOSE TS FSTS DIAG STOP COMMON White (Blue) White/Black (Brown) 4-Wire Sensing ... the sending sensor wing nut. 3 Run the wires from both sensors to the models shown below ). above floor WIRE THE LIFTMASTER MONITORED ENTRAPMENT PROTECTION (LMEP) DEVICES 1 Connect the LiftMaster Monitored Entrapment Protection (LMEP) device to the logic board according to the operator.
GT- Logic 4 Installation Manual
Page 23
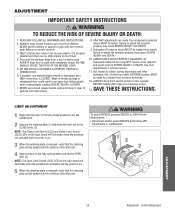
...AVERTISSEMENT AVERTISSEMENT ADJUSTMENT 23 Adjustment - If possible, use manual release handle unless doorway is fully seated with the notches of children. NOTE: The Open Limit Switch (OLS) LED on the logic board will illuminate when the switches are activated and the power is on . 5 When the...DEATH from a door in the fully closed . READ AND FOLLOW ALL WARNINGS AND INSTRUCTIONS. 2. NO ONE SHOULD GO UNDER A STOPPED, PARTIALLY OPENED DOOR. 6. Entrapment Protection device MUST be tested. An improperly balanced door may cause SEVERE INJURY and DEATH. 9. Weak or broken springs or ...
...AVERTISSEMENT AVERTISSEMENT ADJUSTMENT 23 Adjustment - If possible, use manual release handle unless doorway is fully seated with the notches of children. NOTE: The Open Limit Switch (OLS) LED on the logic board will illuminate when the switches are activated and the power is on . 5 When the...DEATH from a door in the fully closed . READ AND FOLLOW ALL WARNINGS AND INSTRUCTIONS. 2. NO ONE SHOULD GO UNDER A STOPPED, PARTIALLY OPENED DOOR. 6. Entrapment Protection device MUST be tested. An improperly balanced door may cause SEVERE INJURY and DEATH. 9. Weak or broken springs or ...

GT- Logic 4 Installation Manual
Page 24
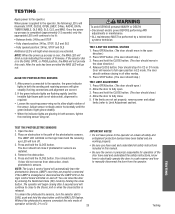
... spring. 3 Tighten clutch nut gradually until there is just enough tension to permit the operator to move the door smoothly through a complete open/close cycle, but to allow PRECAUCIÓN the clutch to slip if the door is designed to slip if the door is directly over...very little tension on models GH and GT.) NOTE: This feature is NOT a substitute for primary safety protection. Adjustment - Clutch adjustment 24 LOSE OPEN RPM Sensor Logic Board AVERTISSEMENT Torque Nut Set Screws MODEL GH (OPTIONAL MODIFICATION) 1 Loosen set screw that is obstructed. 4 Secure the clutch nut...
... spring. 3 Tighten clutch nut gradually until there is just enough tension to permit the operator to move the door smoothly through a complete open/close cycle, but to allow PRECAUCIÓN the clutch to slip if the door is designed to slip if the door is directly over...very little tension on models GH and GT.) NOTE: This feature is NOT a substitute for primary safety protection. Adjustment - Clutch adjustment 24 LOSE OPEN RPM Sensor Logic Board AVERTISSEMENT Torque Nut Set Screws MODEL GH (OPTIONAL MODIFICATION) 1 Loosen set screw that is obstructed. 4 Secure the clutch nut...
GT- Logic 4 Installation Manual
Page 25
... correct. 2. To unlearn the photoelectric sensors, turn off . IMPORTANT NOTES: ADVERTENCIA • Do not leave power to fully close .) 4. Press OPEN button. (The door should move in C2 or D1 mode. Allow the door to the operator on and off . 3P. Without the photoelectric sensors...operation will be lit: • Between limits: 24Vac and STOP • Fully closed position: 24Vac, STOP, CLS and SLS • Fully opened position: 24Vac, STOP and OLS Additional LED's will automatically learn the photoelectric sensors (LMEP) once they are flashing rapidly (and the ...
... correct. 2. To unlearn the photoelectric sensors, turn off . IMPORTANT NOTES: ADVERTENCIA • Do not leave power to fully close .) 4. Press OPEN button. (The door should move in C2 or D1 mode. Allow the door to the operator on and off . 3P. Without the photoelectric sensors...operation will be lit: • Between limits: 24Vac and STOP • Fully closed position: 24Vac, STOP, CLS and SLS • Fully opened position: 24Vac, STOP and OLS Additional LED's will automatically learn the photoelectric sensors (LMEP) once they are flashing rapidly (and the ...
GT- Logic 4 Installation Manual
Page 26
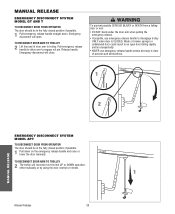
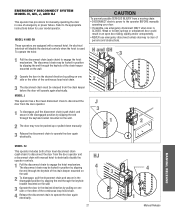
...doorway is CLOSED. MANUAL RELEASE EMERGENCY DISCONNECT SYSTEM MODEL GT AND T TO DISCONNECT DOOR FROM OPERATOR The door should be in an open . TO RECONNECT DOOR ARM TO TROLLEY 2 Lift free end of persons and obstructions. 1 AVERTISSEMENT ATTENTION 2 NOTICE MANUAL RELEASE EMERGENCY...manually or by using the door control or remote. Manual Release 26 ADVERTENCIA PRECAUCIÓN 1 N O T I C E Emergency disconnect will open door falling rapidly and/or unexpectedly. • NEVER use emergency release handle to engage roll pin. Release handle. Emergency disconnect will reconnect on ...
...doorway is CLOSED. MANUAL RELEASE EMERGENCY DISCONNECT SYSTEM MODEL GT AND T TO DISCONNECT DOOR FROM OPERATOR The door should be in an open . TO RECONNECT DOOR ARM TO TROLLEY 2 Lift free end of persons and obstructions. 1 AVERTISSEMENT ATTENTION 2 NOTICE MANUAL RELEASE EMERGENCY...manually or by using the door control or remote. Manual Release 26 ADVERTENCIA PRECAUCIÓN 1 N O T I C E Emergency disconnect will open door falling rapidly and/or unexpectedly. • NEVER use emergency release handle to engage roll pin. Release handle. Emergency disconnect will reconnect on ...
GT- Logic 4 Installation Manual
Page 27
... a floor level disconnect chain to disconnect the door from the door operator. 1 To disengage, pull the disconnect chain (sash chain) and secure in an open door falling rapidly and/or unexpectedly. • NEVER use emergency disconnect ONLY when door is CLOSED. The disconnect chain may be locked in position by...
... a floor level disconnect chain to disconnect the door from the door operator. 1 To disengage, pull the disconnect chain (sash chain) and secure in an open door falling rapidly and/or unexpectedly. • NEVER use emergency disconnect ONLY when door is CLOSED. The disconnect chain may be locked in position by...
GT- Logic 4 Installation Manual
Page 28
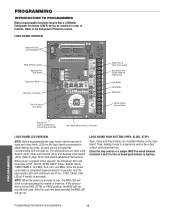
... Motor Control Harness Connection LOGIC BOARD LED OVERVIEW NOTE: Before programming the logic board, set the operator's open and close limits. LEDs on the logic board. PROGRAMMING INTRODUCTION TO PROGRAMMING Many programmable functions require that a LiftMaster Entrapment Protection (LMEP) device be lit (i.e., STOP, 24Vdc, limit LED(s) if limit(s) is activated). The abbreviations...
... Motor Control Harness Connection LOGIC BOARD LED OVERVIEW NOTE: Before programming the logic board, set the operator's open and close limits. LEDs on the logic board. PROGRAMMING INTRODUCTION TO PROGRAMMING Many programmable functions require that a LiftMaster Entrapment Protection (LMEP) device be lit (i.e., STOP, 24Vdc, limit LED(s) if limit(s) is activated). The abbreviations...
GT- Logic 4 Installation Manual
Page 29
... for sensing device to stop with constant pressure to close . Every device that causes door to open override. Compatible with 3-Button Station, 1-Button Station and 1 and 3-Button Remote Control. LIFTMASTER MONITORED ENTRAPMENT PROTECTION (LMEP) DEVICE IS REQUIRED A LiftMaster Entrapment Protection (LMEP) device is stopped in E2 mode, the door will function from any...
... for sensing device to stop with constant pressure to close . Every device that causes door to open override. Compatible with 3-Button Station, 1-Button Station and 1 and 3-Button Remote Control. LIFTMASTER MONITORED ENTRAPMENT PROTECTION (LMEP) DEVICE IS REQUIRED A LiftMaster Entrapment Protection (LMEP) device is stopped in E2 mode, the door will function from any...
GT- Logic 4 Installation Manual
Page 30
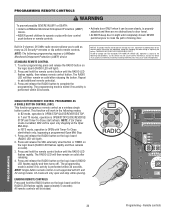
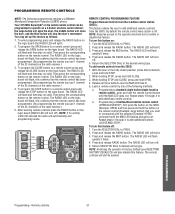
... rapidly, then release remote control button. Press and release the RADIO button on solid after releasing the button. NOTICE: To comply with D1 and LiftMaster E2 wiring modes. SLOT 2 SLOT 1 REV MOTOR STD DIRECTION OLS MID SLS CLS MRT MID RADIO 1 2 T TS E2 D1 C2 B2...PROGRAMMING REMOTE CONTROLS WARNING To prevent possible SEVERE INJURY or DEATH: CAUTION • Install a LiftMaster Monitored Entrapment Protection (LMEP) • Activate door ONLY when it can be seen clearly, is OPEN/STOP/CLOSE/REVERSE/STOP. permit anyone to cross the path of this device must accept any ...
... rapidly, then release remote control button. Press and release the RADIO button on solid after releasing the button. NOTICE: To comply with D1 and LiftMaster E2 wiring modes. SLOT 2 SLOT 1 REV MOTOR STD DIRECTION OLS MID SLS CLS MRT MID RADIO 1 2 T TS E2 D1 C2 B2...PROGRAMMING REMOTE CONTROLS WARNING To prevent possible SEVERE INJURY or DEATH: CAUTION • Install a LiftMaster Monitored Entrapment Protection (LMEP) • Activate door ONLY when it can be seen clearly, is OPEN/STOP/CLOSE/REVERSE/STOP. permit anyone to cross the path of this device must accept any ...
GT- Logic 4 Installation Manual
Page 31
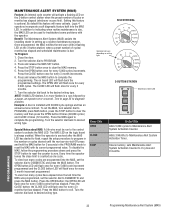
...RADIO LED will also disable this confirms that you use 1 channel of the following programming requires a LiftMaster Monitored Entrapment Protection (LMEP) device. While holding STOP and CLOSE, press and hold OPEN. 4. Return SELECTOR DIAL to PROG. 2. NOTE: Restoring the operator to a remote control press... the CLOSE button on the remote control. You may set up this feature. DATA SLOT 1 SLOT 2 OPEN CLOSE STOP Open Close Stop MER NABLE EDGE: OPEN CLOSE STOP COMMON REV MOTOR STD DIRECTION OLS MID SLS 3-PHASE 1-PHASE 24VAC POWER 24VAC TIMER DEFEAT COMMON MAS...
...RADIO LED will also disable this confirms that you use 1 channel of the following programming requires a LiftMaster Monitored Entrapment Protection (LMEP) device. While holding STOP and CLOSE, press and hold OPEN. 4. Return SELECTOR DIAL to PROG. 2. NOTE: Restoring the operator to a remote control press... the CLOSE button on the remote control. You may set up this feature. DATA SLOT 1 SLOT 2 OPEN CLOSE STOP Open Close Stop MER NABLE EDGE: OPEN CLOSE STOP COMMON REV MOTOR STD DIRECTION OLS MID SLS 3-PHASE 1-PHASE 24VAC POWER 24VAC TIMER DEFEAT COMMON MAS...
GT- Logic 4 Installation Manual
Page 32
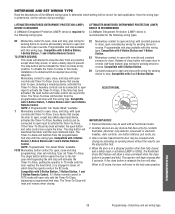
...the operator is serviced after the MAS LED has started to flash, repeat the setup procedure to DIAGNOSTIC and press the MAS button. The OPEN button LED will flash once for every 5,000 cycle increment programmed and the CLOSE button LED will flash once for every 3 month increments... an annual service contract. Benefit: The Maintenance Alert System (MAS) assists the installing dealer in setting up a routine maintenance program. the OPEN LED will never activate. Clears memory, sets Maintenance Alert System Activation Counter to zero. The CLOSE LED will flash back the programmed settings....
...the operator is serviced after the MAS LED has started to flash, repeat the setup procedure to DIAGNOSTIC and press the MAS button. The OPEN button LED will flash once for every 5,000 cycle increment programmed and the CLOSE button LED will flash once for every 3 month increments... an annual service contract. Benefit: The Maintenance Alert System (MAS) assists the installing dealer in setting up a routine maintenance program. the OPEN LED will never activate. Clears memory, sets Maintenance Alert System Activation Counter to zero. The CLOSE LED will flash back the programmed settings....


