
8557 Manual
Page 1
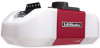
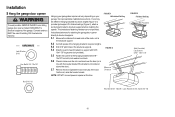
...a one -piece door. Date of the garage door opener are installing the garage door opener on a one -piece door, visit www.liftmaster.com for future reference: Serial Number: . Write down the following information for installation instructions. NOTE: If you are required to ensure safe operation. ... doors. DC Belt Drive with Battery Backup • 8557 - 3/4 hp Belt Drive FOR RESIDENTIAL USE ONLY ■ Please read this manual and the enclosed safety materials carefully! ■ Fasten the manual near the garage door after installation. ■ The door WILL NOT CLOSE unless the ...
...a one -piece door. Date of the garage door opener are installing the garage door opener on a one -piece door, visit www.liftmaster.com for future reference: Serial Number: . Write down the following information for installation instructions. NOTE: If you are required to ensure safe operation. ... doors. DC Belt Drive with Battery Backup • 8557 - 3/4 hp Belt Drive FOR RESIDENTIAL USE ONLY ■ Please read this manual and the enclosed safety materials carefully! ■ Fasten the manual near the garage door after installation. ■ The door WILL NOT CLOSE unless the ...
8557 Manual
Page 2
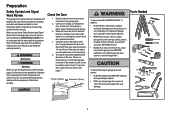
... cables, pulleys, brackets or their hardware, ALL of the door center. Lift the door halfway up. When you see this manual. An unbalanced garage door may be installed above the center of the door. Release the door. The opener should stay in place, supported entirely by its springs. 3.... Preparation Safety Symbol and Signal Word Review This garage door opener has been designed and tested to offer safe service provided it is installed, operated, maintained and tested in strict accordance with the instructions and warnings contained in this Signal Word on the following pages, they ...
... cables, pulleys, brackets or their hardware, ALL of the door center. Lift the door halfway up. When you see this manual. An unbalanced garage door may be installed above the center of the door. Release the door. The opener should stay in place, supported entirely by its springs. 3.... Preparation Safety Symbol and Signal Word Review This garage door opener has been designed and tested to offer safe service provided it is installed, operated, maintained and tested in strict accordance with the instructions and warnings contained in this Signal Word on the following pages, they ...
8557 Manual
Page 3
... depending on your specific model, other accessories may be attached to the accessory and are not included in this manual are for reference and your garage door opener. Pulley and bracket C. Emergency release rope and handle H. The Protector... L. White and red/white wire N. Header bracket B. Rail I SECURITY✚ 2.0TM ACCESSORIES 880LM Smart Control Panel® 895MAX Remote Control 829LM Garage Door Monitor Hardware Installation Hex Bolt 5/16"-18 x 7/8" (4) Lag Screw 5/16"-9 x 1-5/8" (2) Clevis Pin 5/16" x 2-3/4" (1) Clevis Pin 5/16" x 1-1/4" (1) Clevis Pin 5/16" x 1" ...
... depending on your specific model, other accessories may be attached to the accessory and are not included in this manual are for reference and your garage door opener. Pulley and bracket C. Emergency release rope and handle H. The Protector... L. White and red/white wire N. Header bracket B. Rail I SECURITY✚ 2.0TM ACCESSORIES 880LM Smart Control Panel® 895MAX Remote Control 829LM Garage Door Monitor Hardware Installation Hex Bolt 5/16"-18 x 7/8" (4) Lag Screw 5/16"-9 x 1-5/8" (2) Clevis Pin 5/16" x 2-3/4" (1) Clevis Pin 5/16" x 1-1/4" (1) Clevis Pin 5/16" x 1" ...
8557 Manual
Page 6
... at least 6 feet (1.83 m) above floor. 6. ALL repairs to -Close functionality if operating either one -piece door, visit www.liftmaster.com for installation instructions. 6 NEVER connect garage door opener to power source until instructed to avoid entanglement. 5. They could result in garage door or opener...9. Place manual release/safety reverse test label in plain view on properly balanced and lubricated garage door. DO NOT enable the Timer-to cables, spring assemblies and other hardware MUST be enabled ONLY when operating a sectional door. NOTE: If you are installing the garage ...
... at least 6 feet (1.83 m) above floor. 6. ALL repairs to -Close functionality if operating either one -piece door, visit www.liftmaster.com for installation instructions. 6 NEVER connect garage door opener to power source until instructed to avoid entanglement. 5. They could result in garage door or opener...9. Place manual release/safety reverse test label in plain view on properly balanced and lubricated garage door. DO NOT enable the Timer-to cables, spring assemblies and other hardware MUST be enabled ONLY when operating a sectional door. NOTE: If you are installing the garage ...
8557 Manual
Page 10
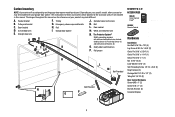
...distance from a falling garage door opener, fasten it SECURELY to structural supports of the garage. Operate the door manually. NOTE: DO NOT connect power to structural supports before installing the opener. FIGURE 1 Unfinished Ceiling FIGURE 3 Measure Distance Nut 5/16"-18 FIGURE 2 Finished Ceiling Not Provided ...different. HARDWARE Lock Washer 5/16" Hex Bolt 5/16"- 18x7/8" Hanging your garage door opener will vary depending on your garage. Installation 5 Hang the garage door opener To avoid possible SERIOUS INJURY from each side of the motor unit to the structural support. 5.2 ...
...distance from a falling garage door opener, fasten it SECURELY to structural supports of the garage. Operate the door manually. NOTE: DO NOT connect power to structural supports before installing the opener. FIGURE 1 Unfinished Ceiling FIGURE 3 Measure Distance Nut 5/16"-18 FIGURE 2 Finished Ceiling Not Provided ...different. HARDWARE Lock Washer 5/16" Hex Bolt 5/16"- 18x7/8" Hanging your garage door opener will vary depending on your garage. Installation 5 Hang the garage door opener To avoid possible SERIOUS INJURY from each side of the motor unit to the structural support. 5.2 ...
8557 Manual
Page 16
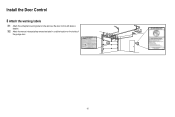
Install the Door Control 3 Attach the warning labels 3.1 Attach the entrapment warning label on the wall near the door control with tacks or staples. 3.2 Attach the manual release/safety reverse test label in a visible location on the inside of the garage door. 16
Install the Door Control 3 Attach the warning labels 3.1 Attach the entrapment warning label on the wall near the door control with tacks or staples. 3.2 Attach the manual release/safety reverse test label in a visible location on the inside of the garage door. 16
8557 Manual
Page 35
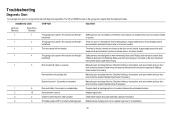
...not function. Safety sensors are misaligned or were momentarily obstructed. There is constantly flashing green. Safety sensors are not installed, connected or wires may be cut wire. Manually open and close and the light bulbs flash. Check for a disconnected or cut . The door control will ... safety sensor wire at all staple points and connection points and replace wire or correct as needed . Check for 1-2 seconds no movement. Manually open and close and the light bulbs flash. Opener hums for binding or obstructions, such as a broken spring or door lock, correct ...
...not function. Safety sensors are misaligned or were momentarily obstructed. There is constantly flashing green. Safety sensors are not installed, connected or wires may be cut wire. Manually open and close and the light bulbs flash. Check for a disconnected or cut . The door control will ... safety sensor wire at all staple points and connection points and replace wire or correct as needed . Check for 1-2 seconds no movement. Manually open and close and the light bulbs flash. Opener hums for binding or obstructions, such as a broken spring or door lock, correct ...
8557 Manual
Page 36
... be connected and aligned correctly before the garage door opener will not close the door. Manually open : The garage door opener is open and close and the light bulbs flash....refer to page 24 ). Safety sensors are steady and not flickering. Close, garage door monitor or LiftMaster Internet Gateway, see page 27. • Garage door opener has been activated through a device ... door control detects movement in the down direction. • Verify the safety sensors are properly installed, aligned and free of your garage door opener and reprogram the remote control(s). My vehicle's ...
... be connected and aligned correctly before the garage door opener will not close the door. Manually open : The garage door opener is open and close and the light bulbs flash....refer to page 24 ). Safety sensors are steady and not flickering. Close, garage door monitor or LiftMaster Internet Gateway, see page 27. • Garage door opener has been activated through a device ... door control detects movement in the down direction. • Verify the safety sensors are properly installed, aligned and free of your garage door opener and reprogram the remote control(s). My vehicle's ...
8557 Manual
Page 39
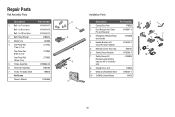
... 8 feet (2.4 m) One-Piece Rail 10 feet (3 m) 5 Trolley Assembly 6 Tensioner Assembly 7 Trolley Threaded Shaft Not Shown Owner's Manual Part Number 41A5434-11 41A5434-13 41A5434-14 41B5424 4A1008 2777BD 2778BD 2770BD 41B3869-3A 41B4103 109B48 114A4665 3 6 2 4 7 5 1 Installation Parts Description Part Number 1 Curved Door Arm 178B35 2 Door Bracket with Clevis Pin and Fastener 41A5047...
... 8 feet (2.4 m) One-Piece Rail 10 feet (3 m) 5 Trolley Assembly 6 Tensioner Assembly 7 Trolley Threaded Shaft Not Shown Owner's Manual Part Number 41A5434-11 41A5434-13 41A5434-14 41B5424 4A1008 2777BD 2778BD 2770BD 41B3869-3A 41B4103 109B48 114A4665 3 6 2 4 7 5 1 Installation Parts Description Part Number 1 Curved Door Arm 178B35 2 Door Bracket with Clevis Pin and Fastener 41A5047...

8557 Elite Series Users Guide Manual
Page 1
...System® is connected and properly aligned. ■ Periodic checks of Purchase: Leave this manual are for future reference: Serial Number: Date of the garage door opener are required to... with sectional doors. ■ Attach enclosed warning labels to -Close feature if you are installing the garage door opener on label. The images throughout this Users Guide with the homeowner.... 16 Write down the following information for reference and your product may look different. www.liftmaster.com The Chamberlain Group, Inc. 845 Larch Avenue Elmhurst, Illinois 60126-1196 *If applicable...
...System® is connected and properly aligned. ■ Periodic checks of Purchase: Leave this manual are for future reference: Serial Number: Date of the garage door opener are required to... with sectional doors. ■ Attach enclosed warning labels to -Close feature if you are installing the garage door opener on label. The images throughout this Users Guide with the homeowner.... 16 Write down the following information for reference and your product may look different. www.liftmaster.com The Chamberlain Group, Inc. 845 Larch Avenue Elmhurst, Illinois 60126-1196 *If applicable...
8557 Elite Series Users Guide Manual
Page 2
... be caught in garage door or opener mechanisms. 9. NOTE: For complete installation instructions visit www.liftmaster.com to avoid entanglement. 5. When you see this manual. Disable ALL locks and remove ALL ropes connected to garage door BEFORE installing opener to print the entire owner's manual. 2 Install garage door opener 7 feet (2.13 m) or more above the fl...
... be caught in garage door or opener mechanisms. 9. NOTE: For complete installation instructions visit www.liftmaster.com to avoid entanglement. 5. When you see this manual. Disable ALL locks and remove ALL ropes connected to garage door BEFORE installing opener to print the entire owner's manual. 2 Install garage door opener 7 feet (2.13 m) or more above the fl...

8557 Elite Series Users Guide Manual
Page 13
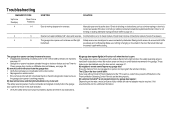
..., only a single click. The battery status LED* is programmed with self-diagnostic capabilities. Inspect safety sensor wire at the logic board. Manually open and close and the light bulbs flash. The garage door opener will not close the door. Unable to coasting position or have... momentarily obstructed. Inspect door control wires at all staple and connection points, replace wire or correct as needed . Safety sensors are not installed, connected, or wires may be cut wire. Realign both LEDs are shorted or the door control is hanging or mounted on the garage...
..., only a single click. The battery status LED* is programmed with self-diagnostic capabilities. Inspect safety sensor wire at the logic board. Manually open and close and the light bulbs flash. The garage door opener will not close the door. Unable to coasting position or have... momentarily obstructed. Inspect door control wires at all staple and connection points, replace wire or correct as needed . Safety sensors are not installed, connected, or wires may be cut wire. Realign both LEDs are shorted or the door control is hanging or mounted on the garage...
8557 Elite Series Users Guide Manual
Page 14
... www.homelink.com for binding or obstructions, such as a broken spring or door lock, correct as Timer-to-Close, garage door monitor or LiftMaster Internet Gateway, see page 7 and 11. If the door is equipped with a feature that would interrupt the sensor's path while closing. My... movement in the down direction. • Verify the safety sensors are properly installed, aligned and free of your garage door opener and reprogram the remote control(s). Make sure nothing is moving stops or reverses. Manually open : The garage door opener is binding or sticking contact a trained door...
... www.homelink.com for binding or obstructions, such as a broken spring or door lock, correct as Timer-to-Close, garage door monitor or LiftMaster Internet Gateway, see page 7 and 11. If the door is equipped with a feature that would interrupt the sensor's path while closing. My... movement in the down direction. • Verify the safety sensors are properly installed, aligned and free of your garage door opener and reprogram the remote control(s). Make sure nothing is moving stops or reverses. Manually open : The garage door opener is binding or sticking contact a trained door...

