
8557 Manual
Page 1
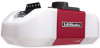
...• 8550 - DC Belt Drive with sectional doors. NOTE: If you are installing the garage door opener on a one -piece door, visit www.liftmaster.com for ...future reference: Serial Number: . Write down the following information for installation instructions. The Timer-to-Close is ONLY compatible with MyQ® and Security✚ 2.0™ accessories. ■ DO NOT enable the Timer-to be used ONLY with Battery Backup • 8557...Warranty 38 Repair Parts 39-41 * If applicable www.liftmaster.com The Chamberlain Group, Inc. 845 Larch Avenue Elmhurst,...
...• 8550 - DC Belt Drive with sectional doors. NOTE: If you are installing the garage door opener on a one -piece door, visit www.liftmaster.com for ...future reference: Serial Number: . Write down the following information for installation instructions. The Timer-to-Close is ONLY compatible with MyQ® and Security✚ 2.0™ accessories. ■ DO NOT enable the Timer-to be used ONLY with Battery Backup • 8557...Warranty 38 Repair Parts 39-41 * If applicable www.liftmaster.com The Chamberlain Group, Inc. 845 Larch Avenue Elmhurst,...
8557 Manual
Page 21
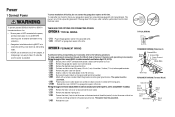
...green ground screw. Strip away 1/2 inch (1 cm) of electric shock, your local code, refer to proper length and strip insulation. 1.8B Attach with moving parts. 1.10B Reinstall the cover. To reduce the risk of insulation, 3 inches (7.5 cm) before April 12, 2013): 1.1B Be sure power is NOT ...3-prong cord. 1.3B Connect the black (line) wire to the 7/8 inch hole. 1.7B Run wires through a terminal block (8550 models manufactured after April 12, 2013 and all 8557 models): 1.1B Remove the motor unit cover screws and set aside. 1.3B Remove the attached green ground terminal. 1.4B Cut black...
...green ground screw. Strip away 1/2 inch (1 cm) of electric shock, your local code, refer to proper length and strip insulation. 1.8B Attach with moving parts. 1.10B Reinstall the cover. To reduce the risk of insulation, 3 inches (7.5 cm) before April 12, 2013): 1.1B Be sure power is NOT ...3-prong cord. 1.3B Connect the black (line) wire to the 7/8 inch hole. 1.7B Run wires through a terminal block (8550 models manufactured after April 12, 2013 and all 8557 models): 1.1B Remove the motor unit cover screws and set aside. 1.3B Remove the attached green ground terminal. 1.4B Cut black...
8557 Manual
Page 40
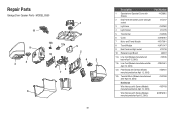
MODEL 8550 1 11 9 4 3 12b 12a 10 8 7 5 2 4 3 6 40 Description 1 Sprocket and Sprocket Cover with Screws 2 End Panel with battery cover and light socket 3 Light Lens 4 Light Socket 5 Transformer 6 ... April 12, 2013) Not Shown Wire Harness with Screws (Models manufactured before April 12, 2013) Wire Harness with Screws (Models manufactured after April 12, 2013) Part Number 41C589-2 41D217 41A7562 41C279 41A7635 41A7619-2 41D1739-1 41A7114-7 41D216 45DCT 41B135 41B4245-1 41B7611 41A3150 41B7418 041B7610-1 Repair...
MODEL 8550 1 11 9 4 3 12b 12a 10 8 7 5 2 4 3 6 40 Description 1 Sprocket and Sprocket Cover with Screws 2 End Panel with battery cover and light socket 3 Light Lens 4 Light Socket 5 Transformer 6 ... April 12, 2013) Not Shown Wire Harness with Screws (Models manufactured before April 12, 2013) Wire Harness with Screws (Models manufactured after April 12, 2013) Part Number 41C589-2 41D217 41A7562 41C279 41A7635 41A7619-2 41D1739-1 41A7114-7 41D216 45DCT 41B135 41B4245-1 41B7611 41A3150 41B7418 041B7610-1 Repair...
8557 Elite Series Users Guide Manual
Page 15
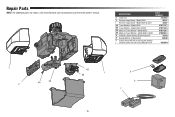
...-5 41D1739-1 41D5563-3 10A19 485LM 41A5034 1 2 3A 4A 4B 1 3B 5 6 7 15 Model 8550 4B Motor w/Travel Module - Model 8550 Receiver Logic Board - Model 8587 & 8557 4A Motor w/Travel Module - Model 8587 & 8557 3A Travel Module - Repair Parts NOTE: For additional parts not shown, visit www.liftmaster.com to download or print the full owner's manual. DESCRIPTION 1 Light Lens...
...-5 41D1739-1 41D5563-3 10A19 485LM 41A5034 1 2 3A 4A 4B 1 3B 5 6 7 15 Model 8550 4B Motor w/Travel Module - Model 8550 Receiver Logic Board - Model 8587 & 8557 4A Motor w/Travel Module - Model 8587 & 8557 3A Travel Module - Repair Parts NOTE: For additional parts not shown, visit www.liftmaster.com to download or print the full owner's manual. DESCRIPTION 1 Light Lens...


