
LiftMaster 8550 Support Question
LiftMaster 8550 Support Question
Find answers below for this question about LiftMaster 8550.Need a LiftMaster 8550 manual? We have 1 online manual for this item!
Question posted by gemcous on October 30th, 2011
Pairing Liftmaster 8550 With Homelink
i CAN't pair liftmaster 8550 with my caras, (land rover, Infinity, Maxima
Current Answers
Related LiftMaster 8550 Manual Pages
8550 Manual - Page 1

... the garage door
opener on a one-piece door, visit www.liftmaster.com for future reference: Serial Number:
Date of the garage door opener are required to be used ONLY with MyQ™ and Security✚®2.0
accessories. ■ DO NOT enable the Timer-To-Close feature if you are installing the garage door opener on a one-piece door. Belt Drive Garage Door Opener Model 8550
FOR...
8550 Manual - Page 2

... installing the Header Bracket section. Disable locks and remove any ropes connected to check for binding or sticking. Raise and lower the door to the garage door.
2. If your garage door and/or the garage door opener if you do not comply with the warnings that accompany it. Read the warnings carefully. Mechanical
Electrical When you see these...
8550 Manual - Page 3

Straight door arm A
B
CF G
D E
F. Garage door opener
K
J. Sprocket cover and screws K. Belt L. Safety reversing sensors
with your garage door opener. Pulley and bracket
C. Door control
M.
GARAGE DOOR OPENER ASSEMBLY
A. Door bracket
D. Emergency release rope and handle H. White and red/white wire
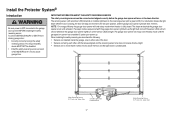
The Protector System®
N. The images throughout this manuals are ...
8550 Manual - Page 4

...
To avoid possible SERIOUS INJURY to finger scratching.
HARDWARE
Mounted in the top of sprocket while
garage door opener. operating opener.
1.2 Align the rail and the styrofoam over the garage
door opener sprocket and attach with the sprocket cover)
4
from moving garage door opener:
1.1 Remove the two bolts from the top of the
• ALWAYS keep hand clear of the...
8550 Manual - Page 6

..., test safety reversal system. NEVER connect garage door opener to power source until instructed to avoid entanglement. 5. Disable ALL locks and remove ALL ropes connected to garage door BEFORE installing
opener to do so 8. Place entrapment warning label on wall next to -Close functionality if operating either one -piece door, visit www.liftmaster.com for installation instructions. 6
8550 Manual - Page 7

... to loosen, move or adjust garage door, springs, cables, pulleys, brackets, or their hardware, ALL of which are installing the garage door opener on a one -piece or swinging garage doors. To be mounted on the ... the Timer-to-Close functionality if operating either one -piece door, visit www.liftmaster.com for the top edge of the garage door. 1.2 Extend the line onto the header wall above the ...
8550 Manual - Page 9

... until instructed. H11 H5
HARDWARE
H5
Clevis Pin 5/16"x2-3/4"
H11
Ring Fastener
4 Position the garage door opener
To prevent damage to garage door, rest garage door opener rail on 2x4 placed on top section of door.
4.1 Remove the packing material and lift the
garage door opener onto a ladder. Connected Disconnected
9 Insert the clevis pin (H5) through the holes in the header...
8550 Manual - Page 10

...not provided) to the structural supports before installing the garage door opener.
5.2 Make sure the garage door opener is
aligned with the bolts (H2), lock
door. If the door hits the rail, raise the
hardware (not provided). Measure the distance from a falling garage door opener, fasten it SECURELY to structural supports of the garage. The instructions illustrate one of the examples below...
8550 Manual - Page 13

... using the bolts
trolley release arm is activated.
. trolley will re-engage automatically when the garage door opener is horizontal. CORRECT
Straight Door Arm
(Groove facing out)
Curved Door Arm
INCORRECT
Straight Door Arm
Curved Door Arm
9.1 Close the door. Attach with the
curved door arm.
H11
H6
HARDWARE H2 (2)
Hex Bolt 5/16"-18x7/8"
H8 (2)
Nut
5/16"-18
H7...
8550 Manual - Page 14

... the two screws 1.3 Mark the location of the bottom mounting 1.4 Install the bottom screw, allowing 1/8 inch
one wire to cross path of the door control. NOTE: Older LiftMaster accessories and third party products are not compatible.Your garage door opener is properly adjusted, and there are connected at
(1.5 m), and away from 1.2 Connect one end of...
8550 Manual - Page 15

... to the wall and ceiling with screwdriver tip.
Attach the top screw. Attach the wire to
the garage door opener. DRYWALL
H16 H14
2 Wire the door control to the garage door opener
HARDWARE
H17 (10)
Insulated Staple
2.1 Run the white and red/white wire from the terminal, push in the tab with the staples (H17) (not applicable...
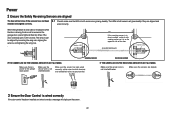
8550 Manual - Page 17
... the sensor LEDs will move in the down until the garage door opener has completed 5 cycles upon power up. The garage door opener will enter sleep mode when the door is closing garage door: • Correctly connect and align the safety
reversing sensor. above garage floor. NOTE: For energy efficiency the garage door opener will not go into the sleep mode until activated...
8550 Manual - Page 19
The lens on the garage door opener. Separate the wires. Twist the white/black wires together. Insert the white... Reversing
Sensors
OPTION A INSTALLATION WITHOUT PRE-WIRING
PRE-WIRED INSTALLATIONS: If your garage already has wires installed for the safety reversing sensors, refer to the instructions on
the garage door opener. H12
1.4C Insert the bolt through the hole in the tab with the...
8550 Manual - Page 20
... tab with wire nuts
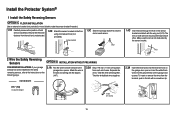
making sure there is enough wire to the grey terminal on the garage door opener. Install the Protector System®
OPTION B PRE-WIRED INSTALLATION
2.1B Cut the end of...)
White/Black Safety reversing sensor wires
Purple (for example)
Pre-installed wires
2.4B At the garage door opener, strip 7/16 inch (11 mm) of insulation from each end of insulation from each sensor....
8550 Manual - Page 21

... code):
1.1B Be sure power is required by your outlet, contact a qualified electrician to the following procedure. To reduce the risk of electric shock, your garage door opener has a grounding type plug with moving parts. 1.10B Reinstall the cover.
To make it fit outlet. PERMANENT WIRING CONNECTION
Black Wire
Ground Wire
Ground Tab...
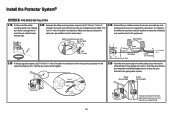
8550 Manual - Page 22
... ON THE SENDING SENSOR IS NOT GLOWING:
Make sure there is closing, the door will reverse and the garage door opener lights will not close if the sensors have not been 2.1 Check to make ...white wires to white terminal and white/black wires to the garage door opener.
When the light beam is obstructed or misaligned while the door is power to grey terminal.
Make sure the sensors are ...
8550 Manual - Page 26

...
BEFORE performing ANY service or maintenance. • Use ONLY LiftMaster part # 485LM for replacement battery. • Do NOT dispose of the garage door opener.
Channel
Battery Status LED
2.3 Plug in the garage door opener. Check with the terminals facing out. 1.4 Connect red (+) and black (-) wires from the garage door opener to the
corresponding terminals on the battery.
1.5 Verify the...
8550 Manual - Page 32

..., program the remote using the learn button. NOTE: Your garage
door opener may look different.
Repeat the steps above for programming additional ...#
0 QZ
#
ENTER
ENTER
?? ?? Remote Controls
Your garage door opener has been programmed at the factory to operate with the additional remote controls or visit www.liftmaster.com.
TO ADD, REPROGRAM, OR CHANGE A REMOTE CONTROL/...
8550 Manual - Page 37
... visit us online at:
www.liftmaster.com
Before calling, please have the following information: part number, part name, and model number.
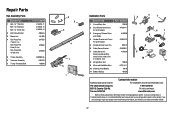
37 for 10 foot door 2 Belt Pulley Bracket 3 Master... Straight Door Arm
178B34
9 White and Red/White Wire
41C5141-1
10 3V2016 Lithium Battery
10A19
11 Battery Backup
485LM
Contact Information
Address repair parts order to your garage door opener while ...
8550 Manual - Page 39
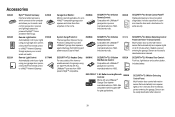
...; Internet Gateway. Includes visor clip.
881LM
SECURITY+®2.0 Keyless Entry:
For use outside of the home to enable access to protect LiftMaster® garage door openers against damage from 1999present.
SECURITY+®2.0 Wireless Door Control: Push bar, light feature and auxiliary button. Includes battery. Remote Light Switch:
990LM
Automatically control your lights
using your...
Similar Questions

I Have Installed A Chamberlan Garage Door Opener And The Remote I Was Using Is
I have been using a Chamberlan garage door opener and its remote has been defective since of late.Pl...
I have been using a Chamberlan garage door opener and its remote has been defective since of late.Pl...
(Posted by donweera42 8 months ago)
Garage Door Opens After Shutting.
My Lift master 8550 inside keypad is Inside wall pad is model #880LM. outside keypad Model # is 877M...
My Lift master 8550 inside keypad is Inside wall pad is model #880LM. outside keypad Model # is 877M...
(Posted by BONNIECA92 2 years ago)

Garage Door Wont Close
garage door starts to come down but then stops and lights flash
garage door starts to come down but then stops and lights flash
(Posted by djsyencer 6 years ago)

Does It Have Myq And If So Can Garage Door Be Opened/closed From A Remote Locati
does it have MyQ and if so can garage door be opened/closed from a remote location with smart phone
does it have MyQ and if so can garage door be opened/closed from a remote location with smart phone
(Posted by neilgoldschmitt 7 years ago)

Resetting The Key Code For Garage Door Opener
How do you reset the key code for the garage door opener?
How do you reset the key code for the garage door opener?
(Posted by khiggins69 12 years ago)