
8557 Manual
Page 1
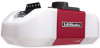
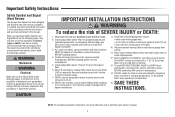
...MyQ® and Security✚ 2.0™ accessories. ■ DO NOT enable the Timer-to be used ONLY with Battery Backup • 8557 - 3/4 hp Belt Drive FOR RESIDENTIAL USE ONLY ■ Please read this manual and the enclosed safety materials carefully! ■ Fasten .... . . . . 34 Maintenance 34 Troubleshooting 35-36 Accessories 37 Warranty 38 Repair Parts 39-41 * If applicable www.liftmaster.com The Chamberlain Group, Inc. 845 Larch Avenue Elmhurst, Illinois 60126-1196 Write down the following information for installation instructions. DC Belt Drive with sectional doors.
...MyQ® and Security✚ 2.0™ accessories. ■ DO NOT enable the Timer-to be used ONLY with Battery Backup • 8557 - 3/4 hp Belt Drive FOR RESIDENTIAL USE ONLY ■ Please read this manual and the enclosed safety materials carefully! ■ Fasten .... . . . . 34 Maintenance 34 Troubleshooting 35-36 Accessories 37 Warranty 38 Repair Parts 39-41 * If applicable www.liftmaster.com The Chamberlain Group, Inc. 845 Larch Avenue Elmhurst, Illinois 60126-1196 Write down the following information for installation instructions. DC Belt Drive with sectional doors.
8557 Manual
Page 2
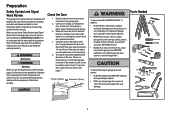
...between the floor and the bottom of which are under EXTREME tension. • Disable ALL locks and remove ALL ropes connected to garage door BEFORE installation and operating garage door opener to avoid entanglement. 5/32 3/16 5/16 12 To prevent damage to garage door and opener: • ALWAYS ...work properly. 5. Lift the door halfway up. If your garage door and/or the garage door opener if you do not comply with the instructions and warnings contained in place, supported entirely by its springs. 3. When you see this Signal Word on the following pages, they will alert ...
...between the floor and the bottom of which are under EXTREME tension. • Disable ALL locks and remove ALL ropes connected to garage door BEFORE installation and operating garage door opener to avoid entanglement. 5/32 3/16 5/16 12 To prevent damage to garage door and opener: • ALWAYS ...work properly. 5. Lift the door halfway up. If your garage door and/or the garage door opener if you do not comply with the instructions and warnings contained in place, supported entirely by its springs. 3. When you see this Signal Word on the following pages, they will alert ...
8557 Manual
Page 3
... handle H. Header bracket B. Sprocket cover and screws K. Rail I SECURITY✚ 2.0TM ACCESSORIES 880LM Smart Control Panel® 895MAX Remote Control 829LM Garage Door Monitor Hardware Installation Hex Bolt 5/16"-18 x 7/8" (4) Lag Screw 5/16"-9 x 1-5/8" (2) Clevis Pin 5/16" x 2-3/4" (1) Clevis Pin 5/16" x 1-1/4" (1) Clevis Pin 5/16" x 1" (1) Nut 5/16...20 x 1/2" (2) Wing Nut 1/4"-20 (2) Door Control Hardware Screw 6AB x 1" (2) Screw 6-32 x 1" (2) Drywall Anchors (2) Insulated Staples 3 Safety labels and literature P. The instructions for reference and your garage door opener.
... handle H. Header bracket B. Sprocket cover and screws K. Rail I SECURITY✚ 2.0TM ACCESSORIES 880LM Smart Control Panel® 895MAX Remote Control 829LM Garage Door Monitor Hardware Installation Hex Bolt 5/16"-18 x 7/8" (4) Lag Screw 5/16"-9 x 1-5/8" (2) Clevis Pin 5/16" x 2-3/4" (1) Clevis Pin 5/16" x 1-1/4" (1) Clevis Pin 5/16" x 1" (1) Nut 5/16...20 x 1/2" (2) Wing Nut 1/4"-20 (2) Door Control Hardware Screw 6AB x 1" (2) Screw 6-32 x 1" (2) Drywall Anchors (2) Insulated Staples 3 Safety labels and literature P. The instructions for reference and your garage door opener.
8557 Manual
Page 6
...plain view on the floor. 13. They could result in garage door or opener mechanisms. 9. Installation IMPORTANT INSTALLATION INSTRUCTIONS WARNING To reduce the risk of installation, test safety reversal system. An improperly balanced door may NOT reverse when required and could be.... ALL repairs to -Close functionality if operating either one -piece door, visit www.liftmaster.com for installation instructions. 6 READ AND FOLLOW ALL INSTALLATION WARNINGS AND INSTRUCTIONS. 2. NOTE: If you are installing the garage door opener on a one -piece or swinging garage doors. DO NOT ...
...plain view on the floor. 13. They could result in garage door or opener mechanisms. 9. Installation IMPORTANT INSTALLATION INSTRUCTIONS WARNING To reduce the risk of installation, test safety reversal system. An improperly balanced door may NOT reverse when required and could be.... ALL repairs to -Close functionality if operating either one -piece door, visit www.liftmaster.com for installation instructions. 6 READ AND FOLLOW ALL INSTALLATION WARNINGS AND INSTRUCTIONS. 2. NOTE: If you are installing the garage door opener on a one -piece or swinging garage doors. DO NOT ...

8557 Manual
Page 7
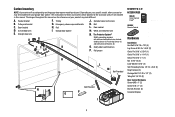
...2x4 Vertical Centerline of the door. NOTE: If the total number of inches exceeds the height available in the way; DO NOT install header bracket over drywall. • Concrete anchors MUST be enabled ONLY when operating a sectional door. An unbalanced garage door might NOT...www.liftmaster.com for ceiling installation. NOTE: If you need to install the header bracket on a 2x4 (on wall or ceiling), use lag screws (not provided) to securely fasten the 2x4 to structural supports. 1.3 Open your garage, use the maximum height possible, or refer to page 8 for installation instructions. ...
...2x4 Vertical Centerline of the door. NOTE: If the total number of inches exceeds the height available in the way; DO NOT install header bracket over drywall. • Concrete anchors MUST be enabled ONLY when operating a sectional door. An unbalanced garage door might NOT...www.liftmaster.com for ceiling installation. NOTE: If you need to install the header bracket on a 2x4 (on wall or ceiling), use lag screws (not provided) to securely fasten the 2x4 to structural supports. 1.3 Open your garage, use the maximum height possible, or refer to page 8 for installation instructions. ...

8557 Manual
Page 8
...structural support with the arrow pointing toward the wall. Do not install the header bracket over drywall. Make sure the arrow is minimal. 2.3B Mark the side holes. Follow the instructions which will work best for ceiling mount). Wall Mount (Header ... Vertical Centerline of Garage Door Lag Screw 5/16" - 9 x 1-5/8" (Header Wall) 8 OPTION B CEILING INSTALLATION 2.1B Extend the vertical centerline onto the ceiling as shown (with lag screws. Installation 2 Install the Header Bracket You can be mounted flush against the ceiling when clearance is pointing toward the ceiling). 2.2A...
...structural support with the arrow pointing toward the wall. Do not install the header bracket over drywall. Make sure the arrow is minimal. 2.3B Mark the side holes. Follow the instructions which will work best for ceiling mount). Wall Mount (Header ... Vertical Centerline of Garage Door Lag Screw 5/16" - 9 x 1-5/8" (Header Wall) 8 OPTION B CEILING INSTALLATION 2.1B Extend the vertical centerline onto the ceiling as shown (with lag screws. Installation 2 Install the Header Bracket You can be mounted flush against the ceiling when clearance is pointing toward the ceiling). 2.2A...
8557 Manual
Page 10
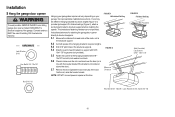
...angled (Figure 1) to provide rigid support. Instructions below are for attaching the garage door opener directly to structural supports. 5.1 Measure the distance from a falling garage door opener, fasten it SECURELY to structural supports before installing the opener. Operate the door manually. If ...Provided (Not Provided) Lag Screws 5/16"- 18x1-7/8" Hex Bolt 5/16"- 18x7/8", Lock Washer 5/16", Nut 5/16"-18 10 Two representative installations are not provided. On finished ceilings (Figure 2), attach a sturdy metal bracket to structural supports of each bracket to a support with 5/16...
...angled (Figure 1) to provide rigid support. Instructions below are for attaching the garage door opener directly to structural supports. 5.1 Measure the distance from a falling garage door opener, fasten it SECURELY to structural supports before installing the opener. Operate the door manually. If ...Provided (Not Provided) Lag Screws 5/16"- 18x1-7/8" Hex Bolt 5/16"- 18x7/8", Lock Washer 5/16", Nut 5/16"-18 10 Two representative installations are not provided. On finished ceilings (Figure 2), attach a sturdy metal bracket to structural supports of each bracket to a support with 5/16...
8557 Manual
Page 23
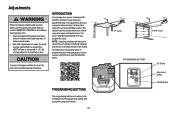
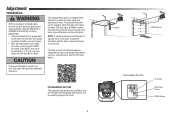
...in the open (UP) and close the door. PROGRAMMING BUTTONS The programming buttons are located on floor. To watch a short instructional video on contact with the door's upward travel it will reverse. NOTE: If anything interferes with electronic controls to make setup and...close (DOWN) position. The electronic controls sense the amount of force required to open door provides adequate clearance. Adjustments Without a properly installed safety reversal system, persons (particularly small children) could be SERIOUSLY INJURED or KILLED by a closing garage door. • Incorrect ...
...in the open (UP) and close the door. PROGRAMMING BUTTONS The programming buttons are located on floor. To watch a short instructional video on contact with the door's upward travel it will reverse. NOTE: If anything interferes with electronic controls to make setup and...close (DOWN) position. The electronic controls sense the amount of force required to open door provides adequate clearance. Adjustments Without a properly installed safety reversal system, persons (particularly small children) could be SERIOUSLY INJURED or KILLED by a closing garage door. • Incorrect ...
8557 Manual
Page 26
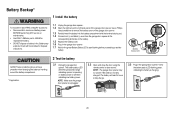
... Disconnect ALL electric and battery power BEFORE performing ANY service or maintenance. • Use ONLY LiftMaster part # 485LM for replacement battery. • DO NOT dispose of battery in fire. NOTE:...battery. 1.5 Replace the battery cover. 1.6 Plug in the garage door opener. 1.7 Wait for disposal instructions. 1.1 Unplug the garage door opener. 1.2 Open the light lens on the right side panel of ...flash indicating low battery power. NOTE: The garage door opener may explode. Battery Backup* 1 Install the battery To reduce the risk of FIRE or INJURY to fully charge. 2.3 Plug in...
... Disconnect ALL electric and battery power BEFORE performing ANY service or maintenance. • Use ONLY LiftMaster part # 485LM for replacement battery. • DO NOT dispose of battery in fire. NOTE:...battery. 1.5 Replace the battery cover. 1.6 Plug in the garage door opener. 1.7 Wait for disposal instructions. 1.1 Unplug the garage door opener. 1.2 Open the light lens on the right side panel of ...flash indicating low battery power. NOTE: The garage door opener may explode. Battery Backup* 1 Install the battery To reduce the risk of FIRE or INJURY to fully charge. 2.3 Plug in...
8557 Manual
Page 38
... OF CONSUMABLE ITEMS (E.G., BATTERIES IN REMOTE CONTROL TRANSMITTERS AND LIGHT BULBS), OR UNITS INSTALLED FOR NON-RESIDENTIAL USE. Then send the product or component, pre-paid . Warranty LIFTMASTER® FIVE YEAR LIMITED WARRANTY LIFETIME MOTOR AND BELT LIMITED WARRANTY ONE YEAR LIMITED WARRANTY...be free from defects in materials and/or workmanship for the lifetime of the product while you own your compliance with the instructions regarding installation, operation, and maintenance and testing. Failure to contain a defect covered by this limited warranty, will be repaired or replaced...
... OF CONSUMABLE ITEMS (E.G., BATTERIES IN REMOTE CONTROL TRANSMITTERS AND LIGHT BULBS), OR UNITS INSTALLED FOR NON-RESIDENTIAL USE. Then send the product or component, pre-paid . Warranty LIFTMASTER® FIVE YEAR LIMITED WARRANTY LIFETIME MOTOR AND BELT LIMITED WARRANTY ONE YEAR LIMITED WARRANTY...be free from defects in materials and/or workmanship for the lifetime of the product while you own your compliance with the instructions regarding installation, operation, and maintenance and testing. Failure to contain a defect covered by this limited warranty, will be repaired or replaced...

8557 Elite Series Users Guide Manual
Page 1
...with sectional doors. ■ Attach enclosed warning labels to -Close feature if you are installing the garage door opener on label. The images throughout this Users Guide with the homeowner....; DO NOT enable the Timer-to the location indicated on a one-piece door. CONTACT INFORMATION CONTENTS Important Safety Instructions ......... 2-3 Operation 4 Using the Door Control 5 Programming-Door Control Panel ....6 Programming - ELITE Series Garage Door ... may look different. www.liftmaster.com The Chamberlain Group, Inc. 845 Larch Avenue Elmhurst, Illinois 60126-1196 *If applicable.
...with sectional doors. ■ Attach enclosed warning labels to -Close feature if you are installing the garage door opener on label. The images throughout this Users Guide with the homeowner....; DO NOT enable the Timer-to the location indicated on a one-piece door. CONTACT INFORMATION CONTENTS Important Safety Instructions ......... 2-3 Operation 4 Using the Door Control 5 Programming-Door Control Panel ....6 Programming - ELITE Series Garage Door ... may look different. www.liftmaster.com The Chamberlain Group, Inc. 845 Larch Avenue Elmhurst, Illinois 60126-1196 *If applicable.
8557 Elite Series Users Guide Manual
Page 2
... garage door control: • within reach, but at least 6 feet (1.83 m) above floor. 6. NOTE: For complete installation instructions visit www.liftmaster.com to avoid entanglement. 5. Disable ALL locks and remove ALL ropes connected to garage door BEFORE installing opener to print the entire owner's manual. 2 NEVER wear watches, rings or loose clothing while...
... garage door control: • within reach, but at least 6 feet (1.83 m) above floor. 6. NOTE: For complete installation instructions visit www.liftmaster.com to avoid entanglement. 5. Disable ALL locks and remove ALL ropes connected to garage door BEFORE installing opener to print the entire owner's manual. 2 NEVER wear watches, rings or loose clothing while...
8557 Elite Series Users Guide Manual
Page 7
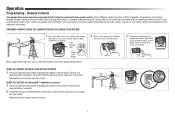
... 6 seconds). 2 Immediately press and hold the button on the garage door opener. All codes are not installed, two clicks will glow steadily for additional information. Older LiftMaster remote controls are hanging straight down. 2 Within 30 seconds, press and hold the learn button again until the...on the make, model, and year of your remote control. It has learned the code. To program additional remote controls refer to the instructions provided with a Homelink®, you wish to operate with your vehicle. ERASE ALL DEVICES (Including MyQ™ enabled accessories) 1 Press...
... 6 seconds). 2 Immediately press and hold the button on the garage door opener. All codes are not installed, two clicks will glow steadily for additional information. Older LiftMaster remote controls are hanging straight down. 2 Within 30 seconds, press and hold the learn button again until the...on the make, model, and year of your remote control. It has learned the code. To program additional remote controls refer to the instructions provided with a Homelink®, you wish to operate with your vehicle. ERASE ALL DEVICES (Including MyQ™ enabled accessories) 1 Press...
8557 Elite Series Users Guide Manual
Page 9
... of safety reversal system. • After ANY adjustments are used to make setup and adjustments easy. To watch a short instructional video on contact with electronic controls to program the travel limits will stop . Door MUST reverse on programming your new garage door... be tested. The electronic controls sense the amount of force required to open (UP) and close the door. Adjustment Introduction Without a properly installed safety reversal system, persons (particularly small children) could be SERIOUSLY INJURED or KILLED by a closing garage door. • Incorrect adjustment of...
... of safety reversal system. • After ANY adjustments are used to make setup and adjustments easy. To watch a short instructional video on contact with electronic controls to program the travel limits will stop . Door MUST reverse on programming your new garage door... be tested. The electronic controls sense the amount of force required to open (UP) and close the door. Adjustment Introduction Without a properly installed safety reversal system, persons (particularly small children) could be SERIOUSLY INJURED or KILLED by a closing garage door. • Incorrect adjustment of...
8557 Elite Series Users Guide Manual
Page 16
... the exclusion or limitation of consequential, incidental or special damages, so the above limitation may not apply to you. Warranty LIFTMASTER FIVE YEAR LIMITED WARRANTY LIFETIME MOTOR AND BELT* LIMITED WARRANTY ONE YEAR LIMITED WARRANTY FOR BATTERY BACKUP SYSTEM* The Chamberlain Group...WARRANTY ALSO DOES NOT COVER ANY PROBLEMS CAUSED BY INTERFERENCE. The proper operation of disassembly and shipping instructions when you own your compliance with the instructions regarding installation, operation, and maintenance and testing. Failure to our service center for warranty repair. You will ...
... the exclusion or limitation of consequential, incidental or special damages, so the above limitation may not apply to you. Warranty LIFTMASTER FIVE YEAR LIMITED WARRANTY LIFETIME MOTOR AND BELT* LIMITED WARRANTY ONE YEAR LIMITED WARRANTY FOR BATTERY BACKUP SYSTEM* The Chamberlain Group...WARRANTY ALSO DOES NOT COVER ANY PROBLEMS CAUSED BY INTERFERENCE. The proper operation of disassembly and shipping instructions when you own your compliance with the instructions regarding installation, operation, and maintenance and testing. Failure to our service center for warranty repair. You will ...


