
8557 Manual
Page 1
... DO NOT enable the Timer-to be used ONLY with Battery Backup • 8557 - 3/4 hp Belt Drive FOR RESIDENTIAL USE ONLY ■ Please read this manual and the enclosed safety materials carefully! ■ Fasten the manual near the garage door after installation. ■ The door WILL NOT CLOSE unless...-31 Remote Control 32-33 To Erase the Memory 33 To Open the Door Manually . . . . . 34 Maintenance 34 Troubleshooting 35-36 Accessories 37 Warranty 38 Repair Parts 39-41 * If applicable www.liftmaster.com The Chamberlain Group, Inc. 845 Larch Avenue Elmhurst, Illinois 60126-1196 ELITE...
... DO NOT enable the Timer-to be used ONLY with Battery Backup • 8557 - 3/4 hp Belt Drive FOR RESIDENTIAL USE ONLY ■ Please read this manual and the enclosed safety materials carefully! ■ Fasten the manual near the garage door after installation. ■ The door WILL NOT CLOSE unless...-31 Remote Control 32-33 To Erase the Memory 33 To Open the Door Manually . . . . . 34 Maintenance 34 Troubleshooting 35-36 Accessories 37 Warranty 38 Repair Parts 39-41 * If applicable www.liftmaster.com The Chamberlain Group, Inc. 845 Larch Avenue Elmhurst, Illinois 60126-1196 ELITE...
8557 Manual
Page 2
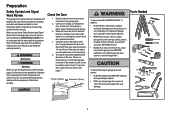
... (6 mm). See page 7. Check the Door 1. Mechanical Electrical When you do not comply with the cautionary statements that accompany them carefully. When you see this manual. Any gap between the floor and the bottom of the door. Check the seal on the following pages, they will alert you do not comply...
... (6 mm). See page 7. Check the Door 1. Mechanical Electrical When you do not comply with the cautionary statements that accompany them carefully. When you see this manual. Any gap between the floor and the bottom of the door. Check the seal on the following pages, they will alert you do not comply...
8557 Manual
Page 3
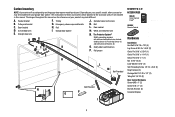
...door opener CF K G D E J. Safety labels and literature P. Door control M. Depending on the garage door opener model purchased. The images throughout this manual. Trolley G. White and red/white wire N. Rail grease H L M Not Provided J Not Provided N O P I . Carton Inventory NOTE: Accessories ...F. The Protector System® Safety reversing sensors with your product may be attached to the accessory and are not included in this manual are for reference and your garage door opener. Header bracket B. Door bracket D. Curved door arm E. Sprocket cover and screws K....
...door opener CF K G D E J. Safety labels and literature P. Door control M. Depending on the garage door opener model purchased. The images throughout this manual. Trolley G. White and red/white wire N. Rail grease H L M Not Provided J Not Provided N O P I . Carton Inventory NOTE: Accessories ...F. The Protector System® Safety reversing sensors with your product may be attached to the accessory and are not included in this manual are for reference and your garage door opener. Header bracket B. Door bracket D. Curved door arm E. Sprocket cover and screws K....
8557 Manual
Page 6
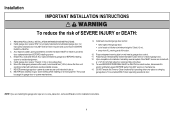
...wall next to cables, spring assemblies and other hardware MUST be made by a trained door systems technician BEFORE installing opener. 4. Place manual release/safety reverse test label in plain view on inside of installation, test safety reversal system. Upon completion of garage door. 12.... locks and remove ALL ropes connected to garage door BEFORE installing opener to -Close functionality if operating either one -piece door, visit www.liftmaster.com for installation instructions. 6 DO NOT enable the Timer-to avoid entanglement. 5. Install garage door opener ONLY on a one -piece ...
...wall next to cables, spring assemblies and other hardware MUST be made by a trained door systems technician BEFORE installing opener. 4. Place manual release/safety reverse test label in plain view on inside of installation, test safety reversal system. Upon completion of garage door. 12.... locks and remove ALL ropes connected to garage door BEFORE installing opener to -Close functionality if operating either one -piece door, visit www.liftmaster.com for installation instructions. 6 DO NOT enable the Timer-to avoid entanglement. 5. Install garage door opener ONLY on a one -piece ...
8557 Manual
Page 10
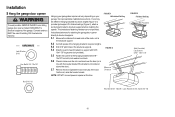
... the door (or in line with 5/16"- 18x7/8" hex bolts, lock washers and nuts. 5.6 Check to structural supports before installing the opener. Operate the door manually. Installation 5 Hang the garage door opener To avoid possible SERIOUS INJURY from each bracket to a support with 5/16"- 18x1-7/8" lag screws (not provided). 5.5 Fasten the...
... the door (or in line with 5/16"- 18x7/8" hex bolts, lock washers and nuts. 5.6 Check to structural supports before installing the opener. Operate the door manually. Installation 5 Hang the garage door opener To avoid possible SERIOUS INJURY from each bracket to a support with 5/16"- 18x1-7/8" lag screws (not provided). 5.5 Fasten the...
8557 Manual
Page 16
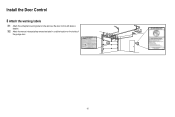
Install the Door Control 3 Attach the warning labels 3.1 Attach the entrapment warning label on the wall near the door control with tacks or staples. 3.2 Attach the manual release/safety reverse test label in a visible location on the inside of the garage door. 16
Install the Door Control 3 Attach the warning labels 3.1 Attach the entrapment warning label on the wall near the door control with tacks or staples. 3.2 Attach the manual release/safety reverse test label in a visible location on the inside of the garage door. 16
8557 Manual
Page 34
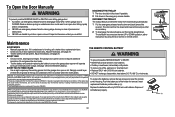
...233; peut avoir pour résultat d'annuler l'autorité de l'utilisateur de faire fonctionner l'équipement. To Open the Door Manually To prevent possible SERIOUS INJURY or DEATH from a falling garage door: • If possible, use emergency release handle to the top.... • Check to pull door open or closed if possible. 2 Pull down on the next UP or DOWN operation, either manually or by the party responsible for removal. ThisClassBdigitalapparatuscomplieswith Canadian ICES-003. Insert replacement batteries positive side up (+). RECONNECT THE TROLLEY The lockout...
...233; peut avoir pour résultat d'annuler l'autorité de l'utilisateur de faire fonctionner l'équipement. To Open the Door Manually To prevent possible SERIOUS INJURY or DEATH from a falling garage door: • If possible, use emergency release handle to the top.... • Check to pull door open or closed if possible. 2 Pull down on the next UP or DOWN operation, either manually or by the party responsible for removal. ThisClassBdigitalapparatuscomplieswith Canadian ICES-003. Insert replacement batteries positive side up (+). RECONNECT THE TROLLEY The lockout...
8557 Manual
Page 35
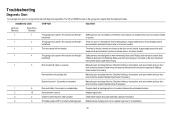
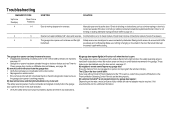
...are misaligned or were momentarily obstructed. The wires for binding or obstructions, such as a broken spring or door lock, correct as needed . Manually open and close and the light bulbs flash. Replace logic board. The door control will not close the door. Door moves 6-8" stops ...or reverses. Inspect sensor wires for binding or obstructions, such as a broken spring or door lock, correct as needed. Manually open and close the door. Check for a disconnected or cut . The battery status LED* is constantly flashing green. Check for 1-2 seconds no...
...are misaligned or were momentarily obstructed. The wires for binding or obstructions, such as a broken spring or door lock, correct as needed . Manually open and close and the light bulbs flash. Replace logic board. The door control will not close the door. Door moves 6-8" stops ...or reverses. Inspect sensor wires for binding or obstructions, such as a broken spring or door lock, correct as needed. Manually open and close the door. Check for a disconnected or cut . The battery status LED* is constantly flashing green. Check for 1-2 seconds no...
8557 Manual
Page 36
If the door is working properly. Check travel module. Close, garage door monitor or LiftMaster Internet Gateway, see page 27. • Garage door opener has been activated through a device or feature such as needed. My remote control will not ...Down Arrow Flash(es) 4 1-4 4 5 4 6 SYMPTOM SOLUTION Door is not programming to my garage door opener: Depending on the make, model, and year of any obstructions. Manually open : The garage door opener is not binding or sticking attempt to reprogram travel (refer to travel module connections, replace module if necessary. Check for...
If the door is working properly. Check travel module. Close, garage door monitor or LiftMaster Internet Gateway, see page 27. • Garage door opener has been activated through a device or feature such as needed. My remote control will not ...Down Arrow Flash(es) 4 1-4 4 5 4 6 SYMPTOM SOLUTION Door is not programming to my garage door opener: Depending on the make, model, and year of any obstructions. Manually open : The garage door opener is not binding or sticking attempt to reprogram travel (refer to travel module connections, replace module if necessary. Check for...
8557 Manual
Page 39
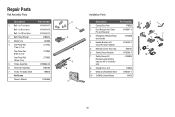
... 3 Master Link 4 One-Piece Rail 7 feet (2.1 m) One-Piece Rail 8 feet (2.4 m) One-Piece Rail 10 feet (3 m) 5 Trolley Assembly 6 Tensioner Assembly 7 Trolley Threaded Shaft Not Shown Owner's Manual Part Number 41A5434-11 41A5434-13 41A5434-14 41B5424 4A1008 2777BD 2778BD 2770BD 41B3869-3A 41B4103 109B48 114A4665 3 6 2 4 7 5 1 Installation Parts Description Part Number 1 Curved Door...
... 3 Master Link 4 One-Piece Rail 7 feet (2.1 m) One-Piece Rail 8 feet (2.4 m) One-Piece Rail 10 feet (3 m) 5 Trolley Assembly 6 Tensioner Assembly 7 Trolley Threaded Shaft Not Shown Owner's Manual Part Number 41A5434-11 41A5434-13 41A5434-14 41B5424 4A1008 2777BD 2778BD 2770BD 41B3869-3A 41B4103 109B48 114A4665 3 6 2 4 7 5 1 Installation Parts Description Part Number 1 Curved Door...

8557 Elite Series Users Guide Manual
Page 1
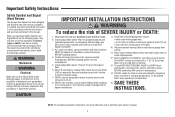
...Security✚ 2.0™ accessories. ■ DO NOT enable the Timer-to the location indicated on a one-piece door. www.liftmaster.com The Chamberlain Group, Inc. 845 Larch Avenue Elmhurst, Illinois 60126-1196 *If applicable. ELITE Series Garage Door Opener User's Guide... 4 Using the Door Control 5 Programming-Door Control Panel ....6 Programming - Remote Controls......7 To Erase the Memory 7 To Open the Door Manually 8 Battery Backup 8 Adjustment 9 Program the Travel 10 Test the Safety Reversal System.... 11 Test the Protector System 11 Maintenance 12 Troubleshooting ...
...Security✚ 2.0™ accessories. ■ DO NOT enable the Timer-to the location indicated on a one-piece door. www.liftmaster.com The Chamberlain Group, Inc. 845 Larch Avenue Elmhurst, Illinois 60126-1196 *If applicable. ELITE Series Garage Door Opener User's Guide... 4 Using the Door Control 5 Programming-Door Control Panel ....6 Programming - Remote Controls......7 To Erase the Memory 7 To Open the Door Manually 8 Battery Backup 8 Adjustment 9 Program the Travel 10 Test the Safety Reversal System.... 11 Test the Protector System 11 Maintenance 12 Troubleshooting ...
8557 Elite Series Users Guide Manual
Page 2
... with vehicles to do not comply with the cautionary statements that accompany them carefully. NOTE: For complete installation instructions visit www.liftmaster.com to avoid entanglement. 5. DO NOT enable the Timer-to cables, spring assemblies and other hardware MUST be made by...when operating a sectional door. 15. ALL repairs to -Close functionality if operating either one-piece or swinging garage doors. When you see this manual. Read the warnings carefully. Install garage door opener 7 feet (2.13 m) or more above the floor and avoiding contact with a 1-1/2"...
... with vehicles to do not comply with the cautionary statements that accompany them carefully. NOTE: For complete installation instructions visit www.liftmaster.com to avoid entanglement. 5. DO NOT enable the Timer-to cables, spring assemblies and other hardware MUST be made by...when operating a sectional door. 15. ALL repairs to -Close functionality if operating either one-piece or swinging garage doors. When you see this manual. Read the warnings carefully. Install garage door opener 7 feet (2.13 m) or more above the floor and avoiding contact with a 1-1/2"...
8557 Elite Series Users Guide Manual
Page 8
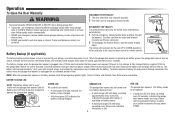
...has power and requires 24 hours to pull door open or closed if possible. 2 Pull down on the next UP or DOWN operation, either manually or by using the door control or remote control. Battery Backup (If applicable) RECONNECT THE TROLLEY The lockout feature prevents the trolley from a ... falling rapidly and/or unexpectedly. • NEVER use emergency release handle unless garage doorway is out. The door can then be raised and lowered manually as often as necessary. 2 To disengage the lockout feature, pull the handle straight down and back (toward the opener). The trolley will recharge...
...has power and requires 24 hours to pull door open or closed if possible. 2 Pull down on the next UP or DOWN operation, either manually or by using the door control or remote control. Battery Backup (If applicable) RECONNECT THE TROLLEY The lockout feature prevents the trolley from a ... falling rapidly and/or unexpectedly. • NEVER use emergency release handle unless garage doorway is out. The door can then be raised and lowered manually as often as necessary. 2 To disengage the lockout feature, pull the handle straight down and back (toward the opener). The trolley will recharge...
8557 Elite Series Users Guide Manual
Page 12
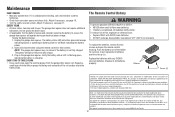
Maintenance EVERY MONTH • Manually operate door. Do not grease the door tracks. • (If applicable) Test the battery backup and consider replacing the battery to ensure the garage door ...
Maintenance EVERY MONTH • Manually operate door. Do not grease the door tracks. • (If applicable) Test the battery backup and consider replacing the battery to ensure the garage door ...

8557 Elite Series Users Guide Manual
Page 13
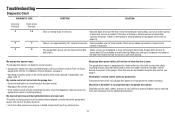
... 6-8" stops or reverses. No movement, only a single click. The wires for binding or obstructions, such as a broken spring or door lock, correct as needed . Manually open and close and the light bulbs flash. Replace logic board. DIAGNOSTIC CODE Up arrow Flash(es) Down arrow Flash(es) 1 1 1 2 1 3... technician. Check for proper assembly, replace if necessary. Realign both LEDs are misaligned or were momentarily obstructed. Manually open and close and the light bulbs flash. Troubleshooting Diagnostic Chart Your garage door opener is constantly ...
... 6-8" stops or reverses. No movement, only a single click. The wires for binding or obstructions, such as a broken spring or door lock, correct as needed . Manually open and close and the light bulbs flash. Replace logic board. DIAGNOSTIC CODE Up arrow Flash(es) Down arrow Flash(es) 1 1 1 2 1 3... technician. Check for proper assembly, replace if necessary. Realign both LEDs are misaligned or were momentarily obstructed. Manually open and close and the light bulbs flash. Troubleshooting Diagnostic Chart Your garage door opener is constantly ...
8557 Elite Series Users Guide Manual
Page 14
...or mounted on the door control detects movement in the down direction. • Verify the safety sensors are misaligned or were momentarily obstructed. Manually open : The garage door opener is not binding or sticking attempt to reprogram travel module if necessary. Realign both LEDs are steady and ...Visit www.homelink.com for binding or obstructions, such as a broken spring or door lock, correct as Timer-to-Close, garage door monitor or LiftMaster Internet Gateway, see page 4. • Operating on battery power or the 12Vdc battery needs to my garage door opener: Depending on the make,...
...or mounted on the door control detects movement in the down direction. • Verify the safety sensors are misaligned or were momentarily obstructed. Manually open : The garage door opener is not binding or sticking attempt to reprogram travel module if necessary. Realign both LEDs are steady and ...Visit www.homelink.com for binding or obstructions, such as a broken spring or door lock, correct as Timer-to-Close, garage door monitor or LiftMaster Internet Gateway, see page 4. • Operating on battery power or the 12Vdc battery needs to my garage door opener: Depending on the make,...
8557 Elite Series Users Guide Manual
Page 15
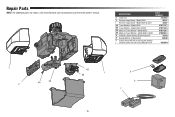
...-5 41D1739-1 41D5563-3 10A19 485LM 41A5034 1 2 3A 4A 4B 1 3B 5 6 7 15 Repair Parts NOTE: For additional parts not shown, visit www.liftmaster.com to download or print the full owner's manual. Model 8587 & 8557 3A Travel Module - DESCRIPTION 1 Light Lens 2 Receiver Logic Board - Model 8550 3B Travel Module - Model 8550 4B Motor w/Travel Module...
...-5 41D1739-1 41D5563-3 10A19 485LM 41A5034 1 2 3A 4A 4B 1 3B 5 6 7 15 Repair Parts NOTE: For additional parts not shown, visit www.liftmaster.com to download or print the full owner's manual. Model 8587 & 8557 3A Travel Module - DESCRIPTION 1 Light Lens 2 Receiver Logic Board - Model 8550 3B Travel Module - Model 8550 4B Motor w/Travel Module...


