
8360WLB Product Guide
Page 1
...SMART BUILT-IN WI-FI FOR THE EASIEST WAY TO CONNECT THE GARAGE. MOTION D E T E C TO R L I G H T S T H E WAY A U T O MAT IC A LLY. PRODUCT GUIDE 8360WLB DC BATTERY BACKUP CHAIN DRIVE WI-FI GARAGE DOOR OPENER WIRELESS KEYLESS ENTRY Provides convenient, secure access from home requires an ...fee. ***Controlling this device to control it closes. Cellular data or Wi-Fi connection required. 8360WLB DC BATTERY BACKUP CHAIN DRIVE WI-FI® GARAGE DOOR OPENER 886LMW 893LM 485LM Customizable advanced security and reliability. DC MOTOR IS PURPOSEFULLY DESIGNED FOR QUIET PERFORMANCE...
...SMART BUILT-IN WI-FI FOR THE EASIEST WAY TO CONNECT THE GARAGE. MOTION D E T E C TO R L I G H T S T H E WAY A U T O MAT IC A LLY. PRODUCT GUIDE 8360WLB DC BATTERY BACKUP CHAIN DRIVE WI-FI GARAGE DOOR OPENER WIRELESS KEYLESS ENTRY Provides convenient, secure access from home requires an ...fee. ***Controlling this device to control it closes. Cellular data or Wi-Fi connection required. 8360WLB DC BATTERY BACKUP CHAIN DRIVE WI-FI® GARAGE DOOR OPENER 886LMW 893LM 485LM Customizable advanced security and reliability. DC MOTOR IS PURPOSEFULLY DESIGNED FOR QUIET PERFORMANCE...
8360WLB Product Guide
Page 2
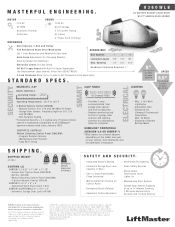
... January 1993. LiftMaster, the LiftMaster logo, myQ and the myQ logo are trademarks of Google Inc. Ventilation/Pet Opening -- P r on a sectional door. © 2019 The Chamberlain Group, Inc. Enhanced CFL (Compact Fluorescent) Compatible, Max. 26 Watts -- Automatic Garage Door Lock Capable (2 Max.) -- MOTOR --12V D C POWER - -120V A C 8360WLB DC BATTERY BACKUP CHAIN DRIVE WI-FI® GARAGE DOOR OPENER --53 RPM...
... January 1993. LiftMaster, the LiftMaster logo, myQ and the myQ logo are trademarks of Google Inc. Ventilation/Pet Opening -- P r on a sectional door. © 2019 The Chamberlain Group, Inc. Enhanced CFL (Compact Fluorescent) Compatible, Max. 26 Watts -- Automatic Garage Door Lock Capable (2 Max.) -- MOTOR --12V D C POWER - -120V A C 8360WLB DC BATTERY BACKUP CHAIN DRIVE WI-FI® GARAGE DOOR OPENER --53 RPM...
Owners Manual
Page 1
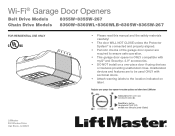
... 60523 Register your garage door opener to receive updates and offers from LiftMaster Take a photo of the garage door opener are to be used ONLY with myQ® and Security+ 2.0® accessories. • DO NOT install on label. Wi-Fi® Garage Door Openers Belt Drive Models 8355W•8355W-267 Chain Drive Models 8360W•8360WL•8360WLB•8365W...
... 60523 Register your garage door opener to receive updates and offers from LiftMaster Take a photo of the garage door opener are to be used ONLY with myQ® and Security+ 2.0® accessories. • DO NOT install on label. Wi-Fi® Garage Door Openers Belt Drive Models 8355W•8355W-267 Chain Drive Models 8360W•8360WL•8360WLB•8365W...
Owners Manual
Page 3
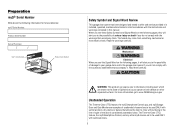
... Number: Product Serial Number: Date of Purchase: / / myQ® Serial Number Product Serial Number Safety Symbol and Signal Word Review This garage door opener has been designed and tested to offer safe service provided it . For more information go to www.P65Warnings.ca.gov Unattended Operation The Timer...accompany it is considered unattended close and are to your garage door and/or the garage door opener if you do not comply with the instructions and warnings contained in this manual. Any device or feature that allows the door to close without being in the line of sight of...
... Number: Product Serial Number: Date of Purchase: / / myQ® Serial Number Product Serial Number Safety Symbol and Signal Word Review This garage door opener has been designed and tested to offer safe service provided it . For more information go to www.P65Warnings.ca.gov Unattended Operation The Timer...accompany it is considered unattended close and are to your garage door and/or the garage door opener if you do not comply with the instructions and warnings contained in this manual. Any device or feature that allows the door to close without being in the line of sight of...
Owners Manual
Page 4
...compatible router specifications and help, visit LiftMaster.com/customer-support. Try one -piece door if using the myQ app. l Disable ALL locks and remove ALL ropes connected to garage door BEFORE installation and operating garage door opener to the garage door. 2. Unattended devices and features are...way of the options below to minimize interference from anywhere using devices or features providing unattended close. The garage door opener will connect to your garage door opener will need: l Wi-Fi enabled smartphone, tablet or laptop l Broadband Internet Connection l Wi-Fi ...
...compatible router specifications and help, visit LiftMaster.com/customer-support. Try one -piece door if using the myQ app. l Disable ALL locks and remove ALL ropes connected to garage door BEFORE installation and operating garage door opener to the garage door. 2. Unattended devices and features are...way of the options below to minimize interference from anywhere using devices or features providing unattended close. The garage door opener will connect to your garage door opener will need: l Wi-Fi enabled smartphone, tablet or laptop l Broadband Internet Connection l Wi-Fi ...
Owners Manual
Page 6
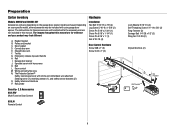
...throughout this manual. Pulley and bracket C. Trolley G. Garage door opener J. The Protector System® Safety reversing sensors with hex screws K. Safety labels and literature P. Header bracket B. Curved door arm E. Sprocket cover with white and white/black wire...Anchors (2) K H L M Not Provided J Not Provided P O I . The instructions for reference and your garage door opener. White and red/white wire N. Straight door arm F. Door control M. Belt L. Preparation Carton Inventory Hardware Models 8355W and 8355W-267 Accessories will be included with your product may ...
...throughout this manual. Pulley and bracket C. Trolley G. Garage door opener J. The Protector System® Safety reversing sensors with hex screws K. Safety labels and literature P. Header bracket B. Curved door arm E. Sprocket cover with white and white/black wire...Anchors (2) K H L M Not Provided J Not Provided P O I . The instructions for reference and your garage door opener. White and red/white wire N. Straight door arm F. Door control M. Belt L. Preparation Carton Inventory Hardware Models 8355W and 8355W-267 Accessories will be included with your product may ...
Owners Manual
Page 7
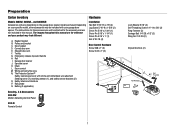
... M. The Protector System® Safety reversing sensors with your product may look different. Depending on the garage door opener model purchased. Pulley and bracket C. Curved door arm E. Rail I 7 Chain L. Safety labels and literature P. Battery (if applicable) Installation Hex Bolt 5/16"-18 x 7/8" (4) Lag Screw 5/16... manual are for reference and your garage door opener. The images throughout this manual. Emergency release rope and handle H. Sprocket cover K. Preparation Carton Inventory Hardware Models 8360W, 8360WL, and 8360WLB Accessories will be included with white ...
... M. The Protector System® Safety reversing sensors with your product may look different. Depending on the garage door opener model purchased. Pulley and bracket C. Curved door arm E. Rail I 7 Chain L. Safety labels and literature P. Battery (if applicable) Installation Hex Bolt 5/16"-18 x 7/8" (4) Lag Screw 5/16... manual are for reference and your garage door opener. The images throughout this manual. Emergency release rope and handle H. Sprocket cover K. Preparation Carton Inventory Hardware Models 8360W, 8360WL, and 8360WLB Accessories will be included with white ...
Owners Manual
Page 8
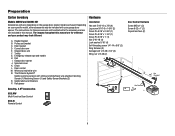
... your specific model, other accessories may be attached to the accessory and are for reference and your garage door opener. Chain L. Safety labels and literature P. The images throughout this manual are not included in this manual. Door bracket D. Sprocket cover K. The Protector System® Safety reversing sensors with your product may look different. Preparation...
... your specific model, other accessories may be attached to the accessory and are for reference and your garage door opener. Chain L. Safety labels and literature P. The images throughout this manual are not included in this manual. Door bracket D. Sprocket cover K. The Protector System® Safety reversing sensors with your product may look different. Preparation...
Owners Manual
Page 9
..., and styrofoam. 3. Cut the tape from the top of the garage door opener. 2. To avoid SERIOUS damage to garage door opener, use the bolts removed from moving garage door opener: l ALWAYS keep hand clear of the opener. Assembly for Models 8355W and 8355W-267 1 Attach the Rail to the Garage Door Opener Models 8355W and 8355W-267 To avoid possible SERIOUS INJURY to...
..., and styrofoam. 3. Cut the tape from the top of the garage door opener. 2. To avoid SERIOUS damage to garage door opener, use the bolts removed from moving garage door opener: l ALWAYS keep hand clear of the opener. Assembly for Models 8355W and 8355W-267 1 Attach the Rail to the Garage Door Opener Models 8355W and 8355W-267 To avoid possible SERIOUS INJURY to...
Owners Manual
Page 11
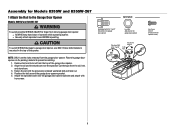
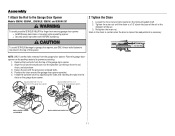
... the rail and the styrofoam over the sprocket. Assembly 1 Attach the Rail to the Garage Door Opener Models 8360W, 8360WL, 8360WLB, 8365W, and 8365W-267 To avoid possible SERIOUS INJURY to finger from moving garage door opener: l ALWAYS keep hand clear of the garage door opener. 2. Re-tighten the inner nut. To avoid SERIOUS damage to prevent scratching. 1. Cut the...
... the rail and the styrofoam over the sprocket. Assembly 1 Attach the Rail to the Garage Door Opener Models 8360W, 8360WL, 8360WLB, 8365W, and 8365W-267 To avoid possible SERIOUS INJURY to finger from moving garage door opener: l ALWAYS keep hand clear of the garage door opener. 2. Re-tighten the inner nut. To avoid SERIOUS damage to prevent scratching. 1. Cut the...
Owners Manual
Page 12
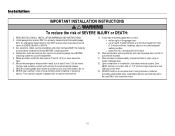
ALL repairs to cables, spring assemblies and other adjacent walking surface. Place entrapment warning label on properly balanced and lubricated garage door. Install garage door opener ONLY on wall next to avoid accidental release. 7. Where possible, install the door opener 7 feet (2.13 m) or more above floors, landings, steps or any other hardware MUST be caught in SEVERE INJURY...
ALL repairs to cables, spring assemblies and other adjacent walking surface. Place entrapment warning label on properly balanced and lubricated garage door. Install garage door opener ONLY on wall next to avoid accidental release. 7. Where possible, install the door opener 7 feet (2.13 m) or more above floors, landings, steps or any other hardware MUST be caught in SEVERE INJURY...
Owners Manual
Page 15
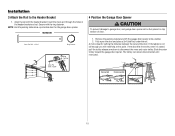
... fastener. HARDWARE Clevis Pin 5/16" x 2-3/4" Ring Fastener Ring Fastener 4 Position the Garage Door Opener To prevent damage to the Header Bracket 1. Fully open the door and place a 2x4 (laid flat) under the rail. A 2x4 is ideal for the garage door opener. Slide the outer trolley toward the garage door opener. The trolley can remain disconnected until instructed. Insert the clevis pin...
... fastener. HARDWARE Clevis Pin 5/16" x 2-3/4" Ring Fastener Ring Fastener 4 Position the Garage Door Opener To prevent damage to the Header Bracket 1. Fully open the door and place a 2x4 (laid flat) under the rail. A 2x4 is ideal for the garage door opener. Slide the outer trolley toward the garage door opener. The trolley can remain disconnected until instructed. Insert the clevis pin...
Owners Manual
Page 16
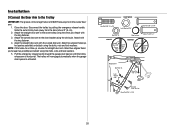
...brackets into masonry. Hanging brackets should be angled (Figure 1) to structural supports before installing the opener. Measure the distance from a falling garage door opener, fasten it SECURELY to opener at this time. Drill 3/16" pilot holes in line with the header bracket if the ...one end of each side of the hanging bracket to the structural support. 2. Remove the 2x4. Hanging your garage door opener will vary depending on your garage. Installation 5 Hang the Garage Door Opener To avoid possible SERIOUS INJURY from each bracket to a support with 5/16"-18 x 1-7/8" lag screws (not...
...brackets into masonry. Hanging brackets should be angled (Figure 1) to structural supports before installing the opener. Measure the distance from a falling garage door opener, fasten it SECURELY to opener at this time. Drill 3/16" pilot holes in line with the header bracket if the ...one end of each side of the hanging bracket to the structural support. 2. Remove the 2x4. Hanging your garage door opener will vary depending on your garage. Installation 5 Hang the Garage Door Opener To avoid possible SERIOUS INJURY from each bracket to a support with 5/16"-18 x 1-7/8" lag screws (not...

Owners Manual
Page 17
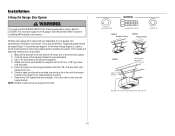
...lit for approximately 4-1/2 minutes when power is in each socket. Installation 6 Install the Light Bulbs Models 8355W, 8355-267, 8360W, 8360WL, and 8360WLB To prevent possible OVERHEATING of the light lens and rotate the light lens down. 2. l DO NOT use short neck or specialty light bulbs. 1....your remote control(s). 3. l ONLY use bulbs larger than 26W (100W equivalent). To prevent damage to vibration, replace with A19, standard neck garage door opener bulbs. Press the release tabs on the top center of the end panel or light socket: l Use ONLY A19 incandescent (100W maximum) or...
...lit for approximately 4-1/2 minutes when power is in each socket. Installation 6 Install the Light Bulbs Models 8355W, 8355-267, 8360W, 8360WL, and 8360WLB To prevent possible OVERHEATING of the light lens and rotate the light lens down. 2. l DO NOT use short neck or specialty light bulbs. 1....your remote control(s). 3. l ONLY use bulbs larger than 26W (100W equivalent). To prevent damage to vibration, replace with A19, standard neck garage door opener bulbs. Press the release tabs on the top center of the end panel or light socket: l Use ONLY A19 incandescent (100W maximum) or...
Owners Manual
Page 20
...18 x 7/8" Lock Washer 5/16" Clevis Pin 5/16" x 1-1/4" Nut 5/16"-18 Ring Fastener CORRECT Straight Door Arm (Groove facing out) INCORRECT Curved Door Arm Straight Door Arm Clevis Pin 5/16" x 1" Curved Door Arm Ring Fastener Nut 5/16"-18 Lock Washer 5/16" Clevis Pin 5/16" x 1" Hex Bolt 5/16...emergency release handle toward the garage door opener until the trolley release arm is activated. The trolley will re-engage automatically when the garage door opener is horizontal. Slide the outer trolley back (away from the curved door arm. 1. Attach the straight door arm to the outer ...
...18 x 7/8" Lock Washer 5/16" Clevis Pin 5/16" x 1-1/4" Nut 5/16"-18 Ring Fastener CORRECT Straight Door Arm (Groove facing out) INCORRECT Curved Door Arm Straight Door Arm Clevis Pin 5/16" x 1" Curved Door Arm Ring Fastener Nut 5/16"-18 Lock Washer 5/16" Clevis Pin 5/16" x 1" Hex Bolt 5/16...emergency release handle toward the garage door opener until the trolley release arm is activated. The trolley will re-engage automatically when the garage door opener is horizontal. Slide the outer trolley back (away from the curved door arm. 1. Attach the straight door arm to the outer ...
Owners Manual
Page 21
...separate the wires. 2. Position the bottom hole of door. l ALWAYS keep garage door in the gang box. NEVER permit anyone to protrude from electrocution: l Be sure power is not necessary to door travel. NOTE: Older LiftMaster door controls and third party products are no obstructions to...down into place. l Activate door ONLY when it is NOT connected BEFORE installing door control. Install door control within sight of garage door, out of reach of door. Strip 7/16" (11 mm) of insulation from ALL moving parts of small children at the garage door opener in a later step. 3....
...separate the wires. 2. Position the bottom hole of door. l ALWAYS keep garage door in the gang box. NEVER permit anyone to protrude from electrocution: l Be sure power is not necessary to door travel. NOTE: Older LiftMaster door controls and third party products are no obstructions to...down into place. l Activate door ONLY when it is NOT connected BEFORE installing door control. Install door control within sight of garage door, out of reach of door. Strip 7/16" (11 mm) of insulation from ALL moving parts of small children at the garage door opener in a later step. 3....
Owners Manual
Page 22
...entrapment warning label on the wall near the garage door opener. 3. Attach the manual release/safety reverse test label in the tab with the staple as this may cause a short or an open circuit. 2. Attach the wire to the garage door opener. Run the white and red/white wire... from the end of the garage door. Connect the wire to the door control. 1. Install the Door Control 2 Wire the door control to the garage door opener HARDWARE Insulated Staple (Not Shown) PRE-WIRED INSTALLATIONS: When wiring the door control to the garage door opener make sure you use the same wires...
...entrapment warning label on the wall near the garage door opener. 3. Attach the manual release/safety reverse test label in the tab with the staple as this may cause a short or an open circuit. 2. Attach the wire to the garage door opener. Run the white and red/white wire... from the end of the garage door. Connect the wire to the door control. 1. Install the Door Control 2 Wire the door control to the garage door opener HARDWARE Insulated Staple (Not Shown) PRE-WIRED INSTALLATIONS: When wiring the door control to the garage door opener make sure you use the same wires...
Owners Manual
Page 23
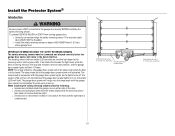
The sending sensor (with a green LED). NOTE: For energy efficiency the garage door opener will flash 10 times. The garage door opener will light. above floor 23 This required safety device MUST NOT be connected and aligned correctly before the garage door opener will stop and reverse to the receiving sensor (with an amber LED) transmits an invisible light...
The sending sensor (with a green LED). NOTE: For energy efficiency the garage door opener will flash 10 times. The garage door opener will light. above floor 23 This required safety device MUST NOT be connected and aligned correctly before the garage door opener will stop and reverse to the receiving sensor (with an amber LED) transmits an invisible light...
Owners Manual
Page 25
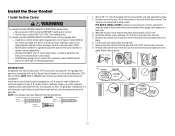
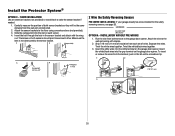
... each sensor. 4. Insert the white/black wires into the slot on the garage door opener. Attach the sensor brackets to raise the sensor bracket if needed. 1. The lenses on the garage door opener. Attach the wire to the garage door opener. INSTALLATION WITHOUT PRE-WIRING 1. Twist the white/black wires together. 3. Insert... (Not provided) IGWnasarildal ege 3 4 Carriage Bolt 1/4"-20 x 1/2" Wing Nut 1/4"-20 2 Wire the Safety Reversing Sensors PRE-WIRED INSTALLATIONS: If your garage already has wires installed for the safety reversing sensors, see page 26.
... each sensor. 4. Insert the white/black wires into the slot on the garage door opener. Attach the sensor brackets to raise the sensor bracket if needed. 1. The lenses on the garage door opener. Attach the wire to the garage door opener. INSTALLATION WITHOUT PRE-WIRING 1. Twist the white/black wires together. 3. Insert... (Not provided) IGWnasarildal ege 3 4 Carriage Bolt 1/4"-20 x 1/2" Wing Nut 1/4"-20 2 Wire the Safety Reversing Sensors PRE-WIRED INSTALLATIONS: If your garage already has wires installed for the safety reversing sensors, see page 26.
Owners Manual
Page 26
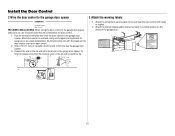
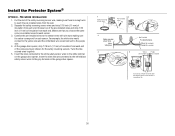
Make sure that are connected to the white/black safety sensor wires to the purple wire. 4. At the garage door opener, strip 7/16 inch (11 mm) of insulation from each end. Insert the wires that you choose the same color pre-installed wires for each ... wire would connect to the yellow wire and the white/black wire would connect to the grey terminal on the garage door opener. Connect the pre-installed wires to the white terminal on the garage door opener. 1 Safety reversing sensor wires 2 Pre-installed wires 7/16" (11 mm) 3 Safety reversing sensor wires White White/Black 4 5 ...
Make sure that are connected to the white/black safety sensor wires to the purple wire. 4. At the garage door opener, strip 7/16 inch (11 mm) of insulation from each end. Insert the wires that you choose the same color pre-installed wires for each ... wire would connect to the yellow wire and the white/black wire would connect to the grey terminal on the garage door opener. Connect the pre-installed wires to the white terminal on the garage door opener. 1 Safety reversing sensor wires 2 Pre-installed wires 7/16" (11 mm) 3 Safety reversing sensor wires White White/Black 4 5 ...

