8355W Users Guide Manual
Page 1
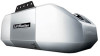
...used ONLY with MyQ® and Security+ 2.0® accessories. • DO NOT install on label. Register your garage door opener to 71403 (US) or visit www.liftmaster.photo (Global) LiftMaster.com LiftMaster 845 Larch Avenue Elmhurst, Illinois 60126-1196 Unattended devices and features are required to ensure... using devices or features providing unattended close. USER'S GUIDE FOR RESIDENTIAL USE ONLY PREMIUM Series Wi-Fi® Garage Door Opener MODELS 8355W • 8360W • Please read this guide and the enclosed safety materials carefully! • The door WILL NOT CLOSE unless ...
...used ONLY with MyQ® and Security+ 2.0® accessories. • DO NOT install on label. Register your garage door opener to 71403 (US) or visit www.liftmaster.photo (Global) LiftMaster.com LiftMaster 845 Larch Avenue Elmhurst, Illinois 60126-1196 Unattended devices and features are required to ensure... using devices or features providing unattended close. USER'S GUIDE FOR RESIDENTIAL USE ONLY PREMIUM Series Wi-Fi® Garage Door Opener MODELS 8355W • 8360W • Please read this guide and the enclosed safety materials carefully! • The door WILL NOT CLOSE unless ...
8355W Users Guide Manual
Page 2
... are to be used ONLY with sectional doors. Read the warnings carefully. Read them . Product Serial Number 2 For the complete manual visit LiftMaster.com/Customer-Support When you see this manual. Any device or feature that accompany them carefully. Write down the following information for future reference... in strict accordance with the warnings that allows the door to close without being in the line of sight of the door is installed, operated, maintained and tested in this Signal Word on the following pages, they will alert you see these Safety Symbols and Signal...
... are to be used ONLY with sectional doors. Read the warnings carefully. Read them . Product Serial Number 2 For the complete manual visit LiftMaster.com/Customer-Support When you see this manual. Any device or feature that accompany them carefully. Write down the following information for future reference... in strict accordance with the warnings that allows the door to close without being in the line of sight of the door is installed, operated, maintained and tested in this Signal Word on the following pages, they will alert you see these Safety Symbols and Signal...

8355W Users Guide Manual
Page 3
...or DEATH. 3. Unattended devices and features are to cables, spring assemblies and other hardware MUST be made by a trained door systems technician BEFORE installing opener. 4. Mount the emergency release within sight of the garage door. • out of reach of the door. 10. NEVER wear watches,... rings or loose clothing while installing or servicing opener. Install garage door opener ONLY on the floor. 13. Place entrapment warning label on inside of 5 feet (1.5 m). • away from...
...or DEATH. 3. Unattended devices and features are to cables, spring assemblies and other hardware MUST be made by a trained door systems technician BEFORE installing opener. 4. Mount the emergency release within sight of the garage door. • out of reach of the door. 10. NEVER wear watches,... rings or loose clothing while installing or servicing opener. Install garage door opener ONLY on the floor. 13. Place entrapment warning label on inside of 5 feet (1.5 m). • away from...
8355W Users Guide Manual
Page 4
... activate garage door when it is clear of SEVERE INJURY or DEATH. 11. SAVE THESE INSTRUCTIONS. 4 For the complete manual visit LiftMaster.com/Customer-Support An improperly balanced door may NOT reverse when required and could result in sight and away from people and objects until... or DEATH: 1. NO ONE SHOULD CROSS THE PATH OF THE MOVING DOOR. 15. ALWAYS keep garage door in an open . DO NOT install on the floor. READ AND FOLLOW ALL WARNINGS AND INSTRUCTIONS. 2. WARNING Important Safety Instructions IMPORTANT SAFETY INSTRUCTIONS WARNING To reduce the risk...
... activate garage door when it is clear of SEVERE INJURY or DEATH. 11. SAVE THESE INSTRUCTIONS. 4 For the complete manual visit LiftMaster.com/Customer-Support An improperly balanced door may NOT reverse when required and could result in sight and away from people and objects until... or DEATH: 1. NO ONE SHOULD CROSS THE PATH OF THE MOVING DOOR. 15. ALWAYS keep garage door in an open . DO NOT install on the floor. READ AND FOLLOW ALL WARNINGS AND INSTRUCTIONS. 2. WARNING Important Safety Instructions IMPORTANT SAFETY INSTRUCTIONS WARNING To reduce the risk...
8355W Users Guide Manual
Page 5
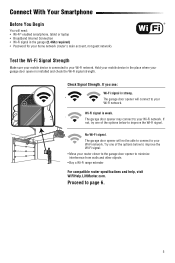
...opener to minimize interference from walls and other objects • Buy a Wi-Fi range extender For compatible router specifications and help, visit WiFiHelp.LiftMaster.com. Try one of the options below to your Wi-Fi network. Connect With Your Smartphone Before You Begin You will need: • Wi-...Fi® enabled smartphone, tablet or laptop • Broadband Internet Connection • Wi-Fi signal in the place where your garage door opener is installed and check the Wi-Fi signal strength. The garage door opener will not be able to connect to improve the Wi-Fi signal. Wi-Fi...
...opener to minimize interference from walls and other objects • Buy a Wi-Fi range extender For compatible router specifications and help, visit WiFiHelp.LiftMaster.com. Try one of the options below to your Wi-Fi network. Connect With Your Smartphone Before You Begin You will need: • Wi-...Fi® enabled smartphone, tablet or laptop • Broadband Internet Connection • Wi-Fi signal in the place where your garage door opener is installed and check the Wi-Fi signal strength. The garage door opener will not be able to connect to improve the Wi-Fi signal. Wi-Fi...
8355W Users Guide Manual
Page 10
...beam is obstructed or misaligned while the door is already open, it will flash ten times. Check to the garage door opener BEFORE installing the safety reversing sensor. The LEDs in the down direction. This required safety device MUST NOT be aligned by loosening the wing nuts, ...LEDs in both sensors will move in both sensors are aligned and wired correctly. above floor 10 For the complete manual visit LiftMaster.com/Customer-Support The safety reversing sensors must be connected and aligned correctly before the garage door opener will glow steadily if they are...
...beam is obstructed or misaligned while the door is already open, it will flash ten times. Check to the garage door opener BEFORE installing the safety reversing sensor. The LEDs in the down direction. This required safety device MUST NOT be aligned by loosening the wing nuts, ...LEDs in both sensors will move in both sensors are aligned and wired correctly. above floor 10 For the complete manual visit LiftMaster.com/Customer-Support The safety reversing sensors must be connected and aligned correctly before the garage door opener will glow steadily if they are...
8355W Users Guide Manual
Page 11
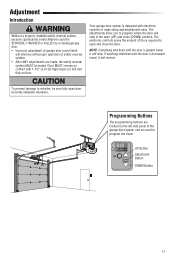
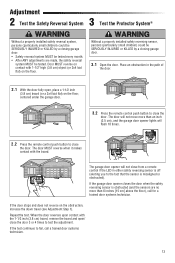
... door's upward travel it will stop in the open (UP) and close the door. UP Button Adjustment Button DOWN Button 11 Adjustment Introduction Without a properly installed safety reversal system, persons (particularly small children) could be SERIOUSLY INJURED or KILLED by a closing garage door. • Incorrect adjustment of garage door travel limits...
... door's upward travel it will stop in the open (UP) and close the door. UP Button Adjustment Button DOWN Button 11 Adjustment Introduction Without a properly installed safety reversal system, persons (particularly small children) could be SERIOUSLY INJURED or KILLED by a closing garage door. • Incorrect adjustment of garage door travel limits...
8355W Users Guide Manual
Page 12
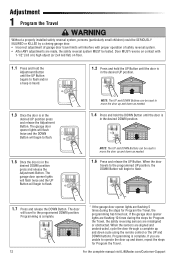
...safety reversing sensors are flashing 5 times during the steps for Program the Travel. 12 For the complete manual visit LiftMaster.com/Customer-Support Programming is in the desired DOWN position press and release the Adjustment Button. Programming is in the desired ...and the UP Button will begin to flash. 1.7 Press and release the DOWN Button. Adjustment 1 Program the Travel Without a properly installed safety reversal system, persons (particularly small children) could be SERIOUSLY INJURED or KILLED by a closing garage door. • Incorrect adjustment of ...
...safety reversing sensors are flashing 5 times during the steps for Program the Travel. 12 For the complete manual visit LiftMaster.com/Customer-Support Programming is in the desired DOWN position press and release the Adjustment Button. Programming is in the desired ...and the UP Button will begin to flash. 1.7 Press and release the DOWN Button. Adjustment 1 Program the Travel Without a properly installed safety reversal system, persons (particularly small children) could be SERIOUSLY INJURED or KILLED by a closing garage door. • Incorrect adjustment of ...
8355W Users Guide Manual
Page 13
...64258;ash 10 times. 2.2 Press the remote control push button to fail, call for a trained door systems technician. Without a properly installed safety reversing sensor, persons (particularly small children) could be SERIOUSLY INJURED or KILLED by a closing garage door. • Safety reversal ... garage door. 3.1 Open the door. Adjustment 2 3 Test the Safety Reversal System Test the Protector System® Without a properly installed safety reversal system, persons (particularly small children) could be tested. If the garage door opener closes the door when the safety reversing...
...64258;ash 10 times. 2.2 Press the remote control push button to fail, call for a trained door systems technician. Without a properly installed safety reversing sensor, persons (particularly small children) could be SERIOUSLY INJURED or KILLED by a closing garage door. • Safety reversal ... garage door. 3.1 Open the door. Adjustment 2 3 Test the Safety Reversal System Test the Protector System® Without a properly installed safety reversal system, persons (particularly small children) could be tested. If the garage door opener closes the door when the safety reversing...
8355W Users Guide Manual
Page 14
... several reasons: • Garage door opener has been activated through a device or feature such as Timer-to-Close, garage door monitor or LiftMaster Internet Gateway. • Operating on battery power or the battery needs to the following two conditions: (1) this device may not cause harmful ...and closes fully. THERE ARE NO USER SERVICEABLE PARTS. EVERY YEAR • Oil door rollers, bearings and hinges. Cet appareil doit être installé de manière à laisser une distance d'au moins 20 cm (8 po) entre celui-ci et l'utilisateur ou toute personne....
... several reasons: • Garage door opener has been activated through a device or feature such as Timer-to-Close, garage door monitor or LiftMaster Internet Gateway. • Operating on battery power or the battery needs to the following two conditions: (1) this device may not cause harmful ...and closes fully. THERE ARE NO USER SERVICEABLE PARTS. EVERY YEAR • Oil door rollers, bearings and hinges. Cet appareil doit être installé de manière à laisser une distance d'au moins 20 cm (8 po) entre celui-ci et l'utilisateur ou toute personne....

8355W Users Guide Manual
Page 16
... period commences from the date of purchase. 8355W 8360W Parts 1 year 1 year WARRANTY PERIOD Motor Accessories Lifetime 1 year Lifetime 1 year Belt Lifetime - Warranty LIFTMASTER® LIMITED WARRANTY LiftMaster ("Seller") warrants to the first retail purchaser of this product, for the residence in which this product is originally installed, that it is free from defects...
... period commences from the date of purchase. 8355W 8360W Parts 1 year 1 year WARRANTY PERIOD Motor Accessories Lifetime 1 year Lifetime 1 year Belt Lifetime - Warranty LIFTMASTER® LIMITED WARRANTY LiftMaster ("Seller") warrants to the first retail purchaser of this product, for the residence in which this product is originally installed, that it is free from defects...
8355W Product Guide Manual
Page 2
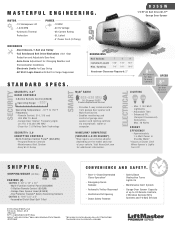
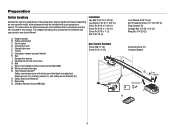
...Wireless Keyless Entry Systems and 16 MyQ Devices © 2016 LiftMaster All Rights Reserved 845 Larch Ave., Elmhurst, IL 60126 LiftMaster.com Wi-Fi® is t e d --4' Po... 1: 20" x 12" x 10" --M ul ti -Fun ction Con tr ol Pa ne l ( 882L MW) --3 -Button Remote Contr ol ( 893L M) --G a ra ge Door O pen er Hea d ( 8355W) - -T h e P r o t e c t o r S y s t e m ® S a f e t y R e v e r s i n g S e n s o r s CARTON 2: 10'4" x 5" x ...installed with a sectional door. Rail Options Installed Length Max. Alert-2-Close/Unattended Close Operation† -- MASTERFUL ENGINEERING.
...Wireless Keyless Entry Systems and 16 MyQ Devices © 2016 LiftMaster All Rights Reserved 845 Larch Ave., Elmhurst, IL 60126 LiftMaster.com Wi-Fi® is t e d --4' Po... 1: 20" x 12" x 10" --M ul ti -Fun ction Con tr ol Pa ne l ( 882L MW) --3 -Button Remote Contr ol ( 893L M) --G a ra ge Door O pen er Hea d ( 8355W) - -T h e P r o t e c t o r S y s t e m ® S a f e t y R e v e r s i n g S e n s o r s CARTON 2: 10'4" x 5" x ...installed with a sectional door. Rail Options Installed Length Max. Alert-2-Close/Unattended Close Operation† -- MASTERFUL ENGINEERING.

8355W Installation Manual
Page 1
...photo to be used ONLY with MyQ® and Security+ 2.0® accessories. • DO NOT install on label. Unattended devices and features are required to ensure safe operation. • This garage door ...using devices or features providing unattended close. Wi-Fi® Garage Door Opener Premium Series Belt Drive Model 8355W FOR RESIDENTIAL USE ONLY • Please read this manual and the safety materials carefully! • The door... ). Register your garage door opener to receive updates and offers from LiftMaster Take a photo of the garage door opener are to 71403 (US) or visit www...
...photo to be used ONLY with MyQ® and Security+ 2.0® accessories. • DO NOT install on label. Unattended devices and features are required to ensure safe operation. • This garage door ...using devices or features providing unattended close. Wi-Fi® Garage Door Opener Premium Series Belt Drive Model 8355W FOR RESIDENTIAL USE ONLY • Please read this manual and the safety materials carefully! • The door... ). Register your garage door opener to receive updates and offers from LiftMaster Take a photo of the garage door opener are to 71403 (US) or visit www...

8355W Installation Manual
Page 2
Contents Preparation 3 Assembly 7 Installation 9 Install the Door Control 17 Install the Protector System 19 Power 23 Adjustments 25 Operation 28 Maintenance 35 Troubleshooting 36 Accessories 38 Warranty 39 Repair Parts 40 2
Contents Preparation 3 Assembly 7 Installation 9 Install the Door Control 17 Install the Protector System 19 Power 23 Adjustments 25 Operation 28 Maintenance 35 Troubleshooting 36 Accessories 38 Warranty 39 Repair Parts 40 2
8355W Installation Manual
Page 3
... this manual. The Timer-to-Close (TTC) feature, the MyQ® Smartphone Control, and any other MyQ® devices are examples of the door is installed, operated, maintained and tested in this Signal Word on the following pages, it .
... this manual. The Timer-to-Close (TTC) feature, the MyQ® Smartphone Control, and any other MyQ® devices are examples of the door is installed, operated, maintained and tested in this Signal Word on the following pages, it .

8355W Installation Manual
Page 4
... at 120V, 60 Hz to a mobile device. Disable locks and remove any ropes connected to garage door and opener: l ALWAYS disable locks BEFORE installing and operating the opener. Check the seal on a one of balance, call a trained door systems technician. 4. Check Signal Strength. The garage door...interference from walls and other objects • Buy a Wi-Fi range extender For compatible router specifications and help, visit WiFiHelp.LiftMaster.com. The garage door opener may be installed within 4 feet (1.2 m) to the left or right of the door center. Any gap between the floor and the ...
... at 120V, 60 Hz to a mobile device. Disable locks and remove any ropes connected to garage door and opener: l ALWAYS disable locks BEFORE installing and operating the opener. Check the seal on a one of balance, call a trained door systems technician. 4. Check Signal Strength. The garage door...interference from walls and other objects • Buy a Wi-Fi range extender For compatible router specifications and help, visit WiFiHelp.LiftMaster.com. The garage door opener may be installed within 4 feet (1.2 m) to the left or right of the door center. Any gap between the floor and the ...
8355W Installation Manual
Page 6
... different. The images throughout this manual are not included in this manual. White and red/white wire N. Depending on the garage door opener model purchased. Installation Hex Bolt 5/16"-18 x 7/8" (4) Lag Screw 5/16"-9 x 1-5/8" (2) Clevis Pin 5/16" x 2-3/4" (1) Clevis Pin 5/16" x 1-1/4" (1) Clevis Pin 5/16" x 1" (1) Nut 5/16"-18 (4) A. Header bracket B. Trolley G. Emergency release rope...
... different. The images throughout this manual are not included in this manual. White and red/white wire N. Depending on the garage door opener model purchased. Installation Hex Bolt 5/16"-18 x 7/8" (4) Lag Screw 5/16"-9 x 1-5/8" (2) Clevis Pin 5/16" x 2-3/4" (1) Clevis Pin 5/16" x 1-1/4" (1) Clevis Pin 5/16" x 1" (1) Nut 5/16"-18 (4) A. Header bracket B. Trolley G. Emergency release rope...
8355W Installation Manual
Page 9
...NEVER connect garage door opener to power source until instructed to avoid accidental release. 7. NEVER wear watches, rings or loose clothing while installing or servicing opener. l away from electrocution, disconnect ALL electric power BEFORE performing ANY service or maintenance. 14. Upon completion of the ...door. 10. To avoid SERIOUS PERSONAL INJURY or DEATH from ALL moving parts of installation, test safety reversal system. Unattended devices and features are to cables, spring assemblies and other hardware MUST be caught in ...
...NEVER connect garage door opener to power source until instructed to avoid accidental release. 7. NEVER wear watches, rings or loose clothing while installing or servicing opener. l away from electrocution, disconnect ALL electric power BEFORE performing ANY service or maintenance. 14. Upon completion of the ...door. 10. To avoid SERIOUS PERSONAL INJURY or DEATH from ALL moving parts of installation, test safety reversal system. Unattended devices and features are to cables, spring assemblies and other hardware MUST be caught in ...
8355W Installation Manual
Page 10
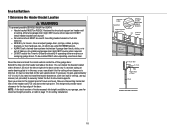
...move or adjust garage door, springs, cables, pulleys, brackets, or their hardware, ALL of Travel Door Sectional door with curved track 10 Installation 1 Determine the Header Bracket Location To prevent possible SERIOUS INJURY or DEATH: l Header bracket MUST be RIGIDLY fastened to structural support on ...the wall upside down if necessary, to gain approximately 1/2" (1 cm). DO NOT install header bracket over drywall. To be used if mounting header bracket or 2x4 into masonry. Close the door and mark the inside vertical ...
...move or adjust garage door, springs, cables, pulleys, brackets, or their hardware, ALL of Travel Door Sectional door with curved track 10 Installation 1 Determine the Header Bracket Location To prevent possible SERIOUS INJURY or DEATH: l Header bracket MUST be RIGIDLY fastened to structural support on ...the wall upside down if necessary, to gain approximately 1/2" (1 cm). DO NOT install header bracket over drywall. To be used if mounting header bracket or 2x4 into masonry. Close the door and mark the inside vertical ...
8355W Installation Manual
Page 11
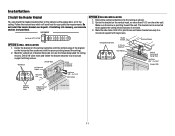
...9 x 1-5/8" (Header Wall) Optional Mounting Holes Highest Point of bracket holes (do not use concrete anchors (not provided). HARDWARE OPTION B CEILING INSTALLATION 1. Make sure the arrow is minimal. 3. Center the bracket on the vertical centerline with the bottom edge of the bracket on the vertical mark..., no more than 6" (15 cm) from the wall. Installation 2 Install the Header Bracket You can be mounted flush against the ceiling when clearance is pointing toward the ceiling). 2. Extend the vertical centerline...
...9 x 1-5/8" (Header Wall) Optional Mounting Holes Highest Point of bracket holes (do not use concrete anchors (not provided). HARDWARE OPTION B CEILING INSTALLATION 1. Make sure the arrow is minimal. 3. Center the bracket on the vertical centerline with the bottom edge of the bracket on the vertical mark..., no more than 6" (15 cm) from the wall. Installation 2 Install the Header Bracket You can be mounted flush against the ceiling when clearance is pointing toward the ceiling). 2. Extend the vertical centerline...


