
LiftMaster 3240 Support Question
LiftMaster 3240 Support Question
Find answers below for this question about LiftMaster 3240.Need a LiftMaster 3240 manual? We have 1 online manual for this item!
Question posted by DIRKRIPSON on May 28th, 2012
Cost Of Installation 3240m System?
Under ideal conditions, what is the approximate cost to buy and have installed a LiftMaster 3240M for a roll up door which has previously had a Sears opener? The price on the Sears unit alone is less than $200 which includes TWO remotes AND a number pad. A tech just installed a 3240M with two remotes and NO number pad. The total bill was OVER EIGHT HUNDRED DOLLARS! The tech did a great job, but for three hours work, the labor cost OVER SIX HUNDRED DOLLARS!
Current Answers

Related LiftMaster 3240 Manual Pages
3240 Manual - Page 1
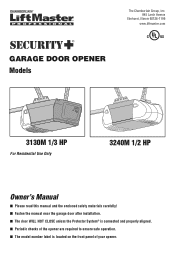
®
GARAGE DOOR OPENER Models
The Chamberlain Group, Inc. 845 Larch Avenue
Elmhurst, Illinois 60126-1196
www.liftmaster.com
3130M 1/3 HP
For Residential Use Only
3240M 1/2 HP
Owner's Manual
■ Please read this manual and the enclosed safety materials carefully! ■ Fasten the manual near the garage door after installation. ■ The door WILL NOT CLOSE unless the Protector System...
3240 Manual - Page 2
... or change a Keyless Entry PIN . . . . . 32
Repair Parts
33-34
Rail assembly parts 33
Installation parts 33
Motor unit assembly parts 34
Accessories
35
Repair Parts and Service
Back page
Warranty
Back page
INTRODUCTION
Safety Symbol and Signal Word Review
This garage door opener has been designed and tested to offer safe service provided it .
3240 Manual - Page 3
... under EXTREME tension.
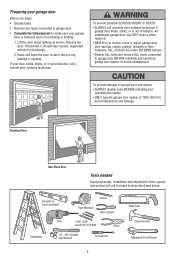
• Disable ALL locks and remove ALL ropes connected to garage door BEFORE installing and operating garage door opener to avoid malfunction and damage. Preparing your garage door
Before you begin:
• Disable locks.
• Remove any binding or sticking. If your garage door is balanced and is out of balance, call for hand tools as shown...
3240 Manual - Page 4
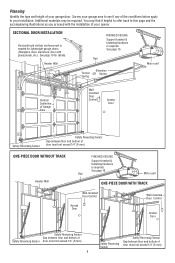
...19 for lightweight garage doors (fiberglass, steel, aluminum, door with the installation of your garage area to see if any of the conditions below apply ...unit
Vertical Centerline of Garage Door
Wallmounted Door Control
Access Door
--- --- -- Survey your opener.
Rail
Motor unit
ONE-PIECE DOOR WITH TRACK
Wall-mounted Door Control
Access Door
Wall-mounted Door Control
Access Door...
3240 Manual - Page 5
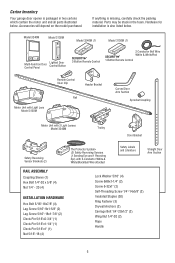
Hardware for installation is missing, carefully check the packing material. If anything is also listed below . Accessories will depend on the model purchased. Parts may be stuck in two cartons which contain the motor unit and all parts illustrated below . Carton Inventory
Your garage door opener is packaged in the foam. Model 3240M
Model 3130M
Model 3240M (1)
Model...
3240 Manual - Page 6

... to do not run the garage door opener until the coupling fits securely over the motor unit sprocket.
• Align the two bolt holes in the rail with those in assembly and installation, replace the foam packing around the motor unit. ASSEMBLY STEP 1
Fasten the Rail to the Motor Unit
To avoid installation difficulties, do...
3240 Manual - Page 7
...and remove ALL ropes connected to garage door BEFORE installing opener to do so.
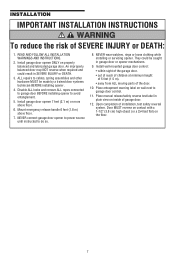
8. NEVER wear watches, rings or loose clothing while installing or servicing opener. Upon completion of SEVERE INJURY or DEATH:
1. INSTALLATION
IMPORTANT INSTALLATION INSTRUCTIONS WARNING
To reduce the risk of installation, test safety reversal system. Install garage door opener 7 feet (2.1 m) or more above...
3240 Manual - Page 8

... supports as shown.
Installation procedures vary according to garage door types. Close the door and mark the inside vertical centerline of the door.
Open your door.
1. INSTALLATION STEP 1
Determine the Header Bracket Location
To prevent possible SERIOUS INJURY or DEATH: • Header bracket MUST be mounted on the wall upside down if necessary, to gain approximately 1/2" (1 cm).
3240 Manual - Page 10

... someone hold the opener securely on the garage floor below the header bracket. Garage Door
Rail
Ring Fastener Header Bracket
Clevis Pin 5/16"x2-3/4"
Spacer
Rail Bracket
Rail
Spacer
Opener Carton or Temporary Support
HARDWARE SHOWN ACTUAL SIZE
Clevis Pin 5/16"x2-3/4"
Ring Fastener
10
Spacer Header Wall
Header Bracket Rail Bracket
INSTALLATION STEP 3
Attach...
3240 Manual - Page 11
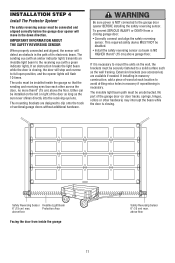
... that the sending and receiving eyes face each location to the garage door opener BEFORE installing the safety reversing sensor. The invisible light beam path must be installed on the wall, the brackets must be installed inside the garage
11
Safety Reversing Sensor 6" (15 cm) max. Safety Reversing Sensor Invisible Light Beam
6" (15 cm) max.
The mounting...
3240 Manual - Page 12
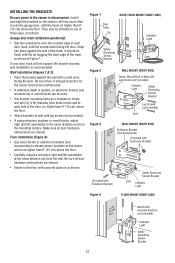
... in one of three ways, as follows:
Garage door track installation (preferred):
• Slip the curved arms over the rounded edge of each other across the garage door, with curved arms facing the door. INSTALLING THE BRACKETS
Be sure power to the opener is recommended. If your door track will face each door track, with the lip hugging the back...
3240 Manual - Page 14
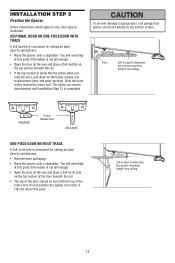
... its side on top section of Door
Door
2x4 is not tall enough.
• Open the door all the way and place a 2x4 on the trolley release arm to -rail distance.
• Remove foam packaging.
• Raise the opener onto a stepladder. Top of the motor unit.
To prevent damage to garage door, rest garage door opener rail on 2x4 placed on...
3240 Manual - Page 15
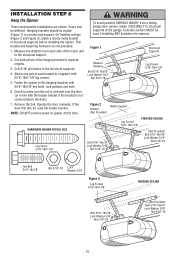
... possible SERIOUS INJURY from each side of each bracket to required lengths.
3. Remove the 2x4. Yours may be used if installing ANY brackets into masonry. Measure the distance from a falling garage door opener, fasten it SECURELY to structural supports of the hanging bracket to a support with the header bracket if the bracket is not...
3240 Manual - Page 16

... each set of the cover with
Multi-Function (std installation) 6ABx1-1/4" Screw
Multi-Function (pre-wired) Screw 6-32x1"
Figure 1 STANDARD INSTALLATION
Figure 2 PRE-WIRED INSTALLATION
a staple, creating a short or open position but will travel .
• ALWAYS keep garage door in tab with screwdriver tip
at this wire with door control push buttons or remote control transmitters.
•...
3240 Manual - Page 17
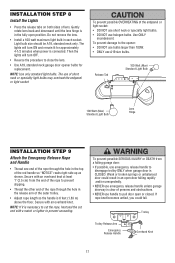
... the lens.
• Use A19, standard neck garage door opener bulbs for approximately 4-1/2 minutes when power is necessary to cut the rope, heat seal the cut end with a match or lighter to prevent unraveling.
NOTE: Use only standard light bulbs. NOTE: If it is connected. INSTALLATION STEP 8
Install the Lights
• Press the release tabs on...
3240 Manual - Page 18
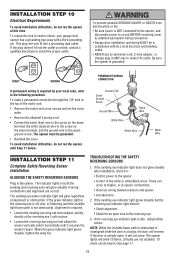
...to the green ground screw. The opener lights will glow regardless of alignment or obstruction. To reduce the risk of the motor unit:
• Remove the motor unit cover screws and set the cover ... after installation, check for an open , it receives the sender's beam. NOTE: When the invisible beam path is obstructed or misaligned while the door is required by your garage door opener has ...
3240 Manual - Page 19

... best solution is to two or three vertical supports. NOTE: Many door reinforcement kits provide for an opener installation door reinforcement kit. proceed to side door bracket holes. SECTIONAL DOORS
1. Center the door bracket on wood doors. Drill 5/16" holes through the door and secure bracket with your garage door manufacturer for direct attachment of angle iron are not intended for...
3240 Manual - Page 21

...opener is fully closed. HARDWARE SHOWN ACTUAL SIZE
Figure 1
Outer Trolley Inner Trolley
Figure 2
Ring Fastener
Clevis Pin 5/16"x1"
Straight Door Arm
Door Bracket
Emergency Release Handle
Curved Door... back (away from the door) about 6" (15 cm) from the curved door arm (Figure 4). • Figure 2:
-
SECTIONAL DOORS ONLY
• Make sure garage door is operated. IMPORTANT: The...
3240 Manual - Page 23

...After ANY adjustments are either not installed, misaligned, or obstructed. See Adjustment Step 2.
23 To operate the opener, press the Door Control push bar.
Test the door for a trained door systems technician. ADJUSTMENT STEP 1
...force or travel .
One turn equals 2" (5 cm) of garage door travel limits
will stop .
Limit Adjustment Screws
Left Side Panel
ADJUSTMENT LABEL
• If the...
3240 Manual - Page 36

...NUMBER:
1-800-528-9131
LIFTMASTER 1 YEAR LIMITED WARRANTY LIFETIME MOTOR WARRANTY (MODEL 3240M) 2 YEAR LIMITED MOTOR ...COST OF THE PRODUCT COVERED HEREBY. All Rig3h6ts Reserved HOW TO ORDER REPAIR PARTS
Selling prices...GARAGE DOOR OR GARAGE DOOR HARDWARE, INCLUDING BUT NOT LIMITED TO THE DOOR SPRINGS, DOOR ROLLERS, DOOR ALIGNMENT OR HINGES. ALL IMPLIED WARRANTIES FOR THE PRODUCT, INCLUDING...
Similar Questions

I Have Installed A Chamberlan Garage Door Opener And The Remote I Was Using Is
I have been using a Chamberlan garage door opener and its remote has been defective since of late.Pl...
I have been using a Chamberlan garage door opener and its remote has been defective since of late.Pl...
(Posted by donweera42 8 months ago)

Liftmaster 3240 Has No Power
While trying to pair a new remote the unit stopped working like it has blown a fuse. No power
While trying to pair a new remote the unit stopped working like it has blown a fuse. No power
(Posted by steve9800 10 years ago)

How Do I Get Face Off The Multi Fuction Door Control Pannel
(Posted by mdf42 11 years ago)
Mh Liftmaster Garage Door Will Not Open Intermittently.
On the occasion when the garage door will not open, there is power to the opener. Both leds on the p...
On the occasion when the garage door will not open, there is power to the opener. Both leds on the p...
(Posted by kellhowarda 11 years ago)

Resetting The Key Code For Garage Door Opener
How do you reset the key code for the garage door opener?
How do you reset the key code for the garage door opener?
(Posted by khiggins69 12 years ago)