3585 Elite Series Manual
Page 1
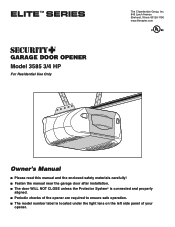
® GARAGE DOOR OPENER Model 3585 3/4 HP For Residential Use Only The Chamberlain Group, Inc. 845 Larch Avenue Elmhurst, Illinois 60126-1196 www.liftmaster.com Owner's Manual ■ Please read this manual and the enclosed safety materials carefully! ■ Fasten the manual near the garage door after installation. ■ ... door WILL NOT CLOSE unless the Protector System® is connected and properly aligned. ■ Periodic checks of the opener are required to ensure safe operation. ■ The model number label is located under the light lens on the left side panel of your opener.
® GARAGE DOOR OPENER Model 3585 3/4 HP For Residential Use Only The Chamberlain Group, Inc. 845 Larch Avenue Elmhurst, Illinois 60126-1196 www.liftmaster.com Owner's Manual ■ Please read this manual and the enclosed safety materials carefully! ■ Fasten the manual near the garage door after installation. ■ ... door WILL NOT CLOSE unless the Protector System® is connected and properly aligned. ■ Periodic checks of the opener are required to ensure safe operation. ■ The model number label is located under the light lens on the left side panel of your opener.
3585 Elite Series Manual
Page 2
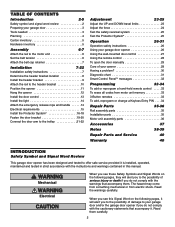
...INTRODUCTION Safety Symbol and Signal Word Review This garage door opener has been designed and tested to offer safe service provided it is installed, operated, maintained and tested in strict accordance with the instructions and warnings contained in this Signal Word on the following pages, it . When you... the UP and DOWN travel limits 23 Adjust the force 24 Test the safety reversal system 25 Test the Protector System 25 Operation 26-31 Operation safety instructions 26 Using your garage door opener 26 Using the wall-mounted door control 27 Using the remote control 28 To ...
...INTRODUCTION Safety Symbol and Signal Word Review This garage door opener has been designed and tested to offer safe service provided it is installed, operated, maintained and tested in strict accordance with the instructions and warnings contained in this Signal Word on the following pages, it . When you... the UP and DOWN travel limits 23 Adjust the force 24 Test the safety reversal system 25 Test the Protector System 25 Operation 26-31 Operation safety instructions 26 Using your garage door opener 26 Using the wall-mounted door control 27 Using the remote control 28 To ...

3585 Elite Series Manual
Page 3
... as illustrated below. Release the door. To prevent damage to garage door and opener: • ALWAYS disable locks BEFORE installing and operating the opener. • ONLY operate garage door opener at 120V, 60 Hz to see if there is out of balance. An unbalanced garage door may not reverse when... hardware, all of which are under EXTREME tension. • Disable ALL locks and remove ALL ropes connected to garage door BEFORE installing and operating garage door opener to make sure your garage door is balanced and is out of balance, call for hand tools as shown. To prevent ...
... as illustrated below. Release the door. To prevent damage to garage door and opener: • ALWAYS disable locks BEFORE installing and operating the opener. • ONLY operate garage door opener at 120V, 60 Hz to see if there is out of balance. An unbalanced garage door may not reverse when... hardware, all of which are under EXTREME tension. • Disable ALL locks and remove ALL ropes connected to garage door BEFORE installing and operating garage door opener to make sure your garage door is balanced and is out of balance, call for hand tools as shown. To prevent ...
3585 Elite Series Manual
Page 7
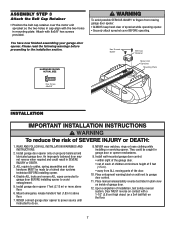
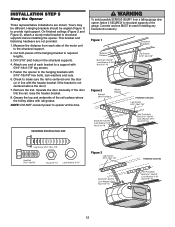
... Retainer Motor Unit Sprocket Mounting Plate Hex Screw #8x3/8" INSTALLATION WARNING IMPORTANT INSTALLATION INSTRUCTIONS WARNING To reduce the risk of sprocket while operating opener. • Securely attach sprocket cover BEFORE operating. Install garage door opener only on the floor. 7. Door MUST reverse on contact with a 1-1/2" (3.8 cm) high object (or a 2x4 laid flat...
... Retainer Motor Unit Sprocket Mounting Plate Hex Screw #8x3/8" INSTALLATION WARNING IMPORTANT INSTALLATION INSTRUCTIONS WARNING To reduce the risk of sprocket while operating opener. • Securely attach sprocket cover BEFORE operating. Install garage door opener only on the floor. 7. Door MUST reverse on contact with a 1-1/2" (3.8 cm) high object (or a 2x4 laid flat...
3585 Elite Series Manual
Page 12
... both pieces of the rail surface where the trolley slides with 5/16"-18x1-7/8" lag screws. 5. If the door hits the rail, raise the header bracket. 8. Operate the door manually. Yours may be used if installing any brackets into masonry. On finished ceilings (Figure 2 and Figure 3), attach a sturdy metal bracket to required...
... both pieces of the rail surface where the trolley slides with 5/16"-18x1-7/8" lag screws. 5. If the door hits the rail, raise the header bracket. 8. Operate the door manually. Yours may be used if installing any brackets into masonry. On finished ceilings (Figure 2 and Figure 3), attach a sturdy metal bracket to required...
3585 Elite Series Manual
Page 13
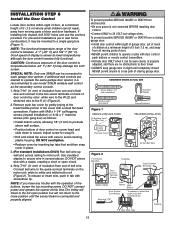
... in place. 3. (For standard installations ONLY) Run bell wire up wall and across ceiling to the R (1) (Figure 2). 2. Fasten with the operation of the buttons, loosen the top mounting screw. DO NOT overtighten. • Replace cover by color: white wire to the W (2) and white/...the door control to temperatures below -22° F (-30° C) may be connected to red (Figure 2). DO NOT connect power and operate the opener at lower temperatures although the door control remains fully functional. HARDWARE SHOWN ACTUAL SIZE Screw 6ABx1-1/4" (std installation) Screw 6-32x1" (pre...
... in place. 3. (For standard installations ONLY) Run bell wire up wall and across ceiling to the R (1) (Figure 2). 2. Fasten with the operation of the buttons, loosen the top mounting screw. DO NOT overtighten. • Replace cover by color: white wire to the W (2) and white/...the door control to temperatures below -22° F (-30° C) may be connected to red (Figure 2). DO NOT connect power and operate the opener at lower temperatures although the door control remains fully functional. HARDWARE SHOWN ACTUAL SIZE Screw 6ABx1-1/4" (std installation) Screw 6-32x1" (pre...

3585 Elite Series Manual
Page 21
... to Adjustment Step 1, page 23. Find two pairs of holes that the trolley release arm is horizontal. SECTIONAL DOORS ONLY Make sure garage door is operated.
... to Adjustment Step 1, page 23. Find two pairs of holes that the trolley release arm is horizontal. SECTIONAL DOORS ONLY Make sure garage door is operated.

3585 Elite Series Manual
Page 22
... open trolley/door arm positions in the illustration. One full turn equals 3" (7.5 cm) of trolley travel. 3. The trolley will cause unnecessary bucking and/or jerking operation as shown on the following page, the door should touch the trolley just ahead of the door arm connector hole. A slight backward slant will travel...
... open trolley/door arm positions in the illustration. One full turn equals 3" (7.5 cm) of trolley travel. 3. The trolley will cause unnecessary bucking and/or jerking operation as shown on the following page, the door should touch the trolley just ahead of the door arm connector hole. A slight backward slant will travel...

3585 Elite Series Manual
Page 23
...Run the opener through a complete travel cycle. • Does the door open and close ) force. If anything interferes with proper operation of garage door travel limits will interfere with the door's upward travel, it will reverse. Turn the down limit adjustment screw clockwise..... If the door is no limit adjustments are outlined below. Read the procedures carefully before proceeding to make limit adjustments. NOTE: Repeated operation of travel . One turn equals 3" (7.5 cm) of the opener during adjustment procedures may also need adjustment. • After ANY...
...Run the opener through a complete travel cycle. • Does the door open and close ) force. If anything interferes with proper operation of garage door travel limits will interfere with the door's upward travel, it will reverse. Turn the down limit adjustment screw clockwise..... If the door is no limit adjustments are outlined below. Read the procedures carefully before proceeding to make limit adjustments. NOTE: Repeated operation of travel . One turn equals 3" (7.5 cm) of the opener during adjustment procedures may also need adjustment. • After ANY...

3585 Elite Series Manual
Page 24
..., the safety reversal system MUST be SERIOUSLY INJURED or KILLED by a closing garage door. • Too much force on garage door will interfere with proper operation of power required to open ) force by turning the control clockwise. Right Panel Force Adjustment Controls 1 9 3 7 5 KG 1 9 3 7 5 KG Antenna FORCE ADJUSTMENT LABEL 9 1 7 3 5 KG Open Force...
..., the safety reversal system MUST be SERIOUSLY INJURED or KILLED by a closing garage door. • Too much force on garage door will interfere with proper operation of power required to open ) force by turning the control clockwise. Right Panel Force Adjustment Controls 1 9 3 7 5 KG 1 9 3 7 5 KG Antenna FORCE ADJUSTMENT LABEL 9 1 7 3 5 KG Open Force...
3585 Elite Series Manual
Page 25
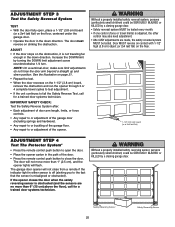
... Sensor See the illustration on page 21. • Repeat the test. • When the door reverses on the floor, centered under the garage door. • Operate the door in either sensor is off (alerting you to fail the Safety Reverse Test, call for a trained door systems technician. The garage door opener...
... Sensor See the illustration on page 21. • Repeat the test. • When the door reverses on the floor, centered under the garage door. • Operate the door in either sensor is off (alerting you to fail the Safety Reverse Test, call for a trained door systems technician. The garage door opener...
3585 Elite Series Manual
Page 26
...Your opener will reverse. When the opener is CLOSED. If you purchase a new remote, or if you activate them too soon, the door will operate with up to a matching code which are under the following : • The hand-held Remote Control: Hold the large push button down until...ONE SHOULD CROSS THE PATH OF THE MOVING DOOR. 5. NEVER use handle to deactivate any of children. They will reverse. ALWAYS disconnect electric power to operate or play with any remote, follow the instructions in a partially open position, it will open , the door will stop . 7. If closing , the...
...Your opener will reverse. When the opener is CLOSED. If you purchase a new remote, or if you activate them too soon, the door will operate with up to a matching code which are under the following : • The hand-held Remote Control: Hold the large push button down until...ONE SHOULD CROSS THE PATH OF THE MOVING DOOR. 5. NEVER use handle to deactivate any of children. They will reverse. ALWAYS disconnect electric power to operate or play with any remote, follow the instructions in a partially open position, it will open , the door will stop . 7. If closing , the...
3585 Elite Series Manual
Page 27
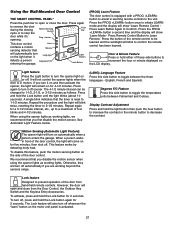
... to increment the hour or minute displayed on the side of the door control, the light will show 'Learn Mode - Lock feature Designed to prevent operation of these side buttons to assist in front of the door control. When using the opener lights as working lights. Otherwise, they will turn off...
... to increment the hour or minute displayed on the side of the door control, the light will show 'Learn Mode - Lock feature Designed to prevent operation of these side buttons to assist in front of the door control. When using the opener lights as working lights. Otherwise, they will turn off...

3585 Elite Series Manual
Page 28
... PARTS. Sit remote control undisturbed for the proximity lighting (marked "Proximity Battery") should last 5 years. This allows the sensor to operate the opener lights without activation of the holder for changing the code setting or replacing the battery. Replace two 3V2016 batteries with FCC... LED lights turn on or off the proximity lighting feature if the proximity lighting is equipped with same type 3V2450 coin cell. Operation is swallowed, immediately notify doctor. Replace two 3V2016 batteries with Batteries only 3V2016 or 3V2450 coin cell batteries. Using the Remote ...
... PARTS. Sit remote control undisturbed for the proximity lighting (marked "Proximity Battery") should last 5 years. This allows the sensor to operate the opener lights without activation of the holder for changing the code setting or replacing the battery. Replace two 3V2016 batteries with FCC... LED lights turn on or off the proximity lighting feature if the proximity lighting is equipped with same type 3V2450 coin cell. Operation is swallowed, immediately notify doctor. Replace two 3V2016 batteries with Batteries only 3V2016 or 3V2450 coin cell batteries. Using the Remote ...

3585 Elite Series Manual
Page 29
... Once a Year • Oil door rollers, bearings and hinges. If rope knot becomes untied, you could result in door operation requiring some minor changes in an open door falling rapidly and/or unexpectedly. • NEVER use handle to disengage trolley ONLY ...and obstructions. • NEVER use emergency release handle unless garage doorway is CLOSED. The opener does not require additional lubrication. Make any adjustment of operation. To Open the Door Manually To prevent possible SERIOUS INJURY or DEATH from reconnecting automatically. FORCE CONTROLS 9 1 7 3 5 KG 9 1 ...
... Once a Year • Oil door rollers, bearings and hinges. If rope knot becomes untied, you could result in door operation requiring some minor changes in an open door falling rapidly and/or unexpectedly. • NEVER use handle to disengage trolley ONLY ...and obstructions. • NEVER use emergency release handle unless garage doorway is CLOSED. The opener does not require additional lubrication. Make any adjustment of operation. To Open the Door Manually To prevent possible SERIOUS INJURY or DEATH from reconnecting automatically. FORCE CONTROLS 9 1 7 3 5 KG 9 1 ...

3585 Elite Series Manual
Page 30
Refer to disengage. • Decrease the UP travel . • Refer to Operation section; Bell Wire 9 1 7 3 5 KG 9 1 7 3 5 KG Safety Reversing Sensor "Learn" Button LED or Diagnostic LED Sending Eye Safety Reversing Sensor (Amber Indicator Light) Receiving Eye Safety ...
Refer to disengage. • Decrease the UP travel . • Refer to Operation section; Bell Wire 9 1 7 3 5 KG 9 1 7 3 5 KG Safety Reversing Sensor "Learn" Button LED or Diagnostic LED Sending Eye Safety Reversing Sensor (Amber Indicator Light) Receiving Eye Safety ...
3585 Elite Series Manual
Page 31
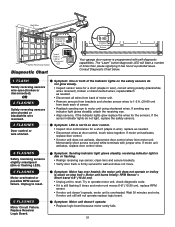
... pause signifying it is still flashing 5 times and motor unit moves 6-8" (15-20 cm), replace RPM sensor. • If motor unit doesn't operate, motor unit is overheated. Wait 30 minutes and retry. Consult Diagnostic Chart below. 1 FLASH Safety reversing sensors wire open (broken or disconnected). If.... • Remove sensors from brackets and shorten sensor wires to 1-2 ft. (30-60 cm) from motor unit. the motor unit does not operate or trolley is stuck on the safety sensors do not light, replace the safety sensors. Replace Receiver Logic Board. RPM Sensor = Short travel 6-8" ...
... pause signifying it is still flashing 5 times and motor unit moves 6-8" (15-20 cm), replace RPM sensor. • If motor unit doesn't operate, motor unit is overheated. Wait 30 minutes and retry. Consult Diagnostic Chart below. 1 FLASH Safety reversing sensors wire open (broken or disconnected). If.... • Remove sensors from brackets and shorten sensor wires to 1-2 ft. (30-60 cm) from motor unit. the motor unit does not operate or trolley is stuck on the safety sensors do not light, replace the safety sensors. Replace Receiver Logic Board. RPM Sensor = Short travel 6-8" ...
3585 Elite Series Manual
Page 32
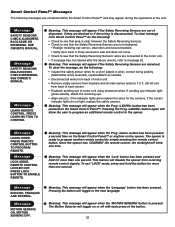
... to message #2. Meaning: This message will appear if the Safety Reversing Sensors are contained within the Smart Control Panel™ and may appear during the operations of the button. 32 REMOTE CONTROL LOCKED OUT. This feature will toggle to program another remote control by simply pressing the remote control button. The...
... to message #2. Meaning: This message will appear if the Safety Reversing Sensors are contained within the Smart Control Panel™ and may appear during the operations of the button. 32 REMOTE CONTROL LOCKED OUT. This feature will toggle to program another remote control by simply pressing the remote control button. The...

3585 Elite Series Manual
Page 33
...Release the button when the motor unit lights blink. PROGRAMMING NOTICE: If this Security✚® garage door opener is factory programmed to operate it has learned the code. Additional buttons on any unwanted remote, first erase all codes: Press and hold the button on the motor...). The learn indicator light will open and close when you wish to confirm Learn Mode. 3. Press the PROG button again to operate your opener to operate with a non-rolling code transmitter, the technical measure in the garage door opener does not authorize the purchaser or supplier of the...
...Release the button when the motor unit lights blink. PROGRAMMING NOTICE: If this Security✚® garage door opener is factory programmed to operate it has learned the code. Additional buttons on any unwanted remote, first erase all codes: Press and hold the button on the motor...). The learn indicator light will open and close when you wish to confirm Learn Mode. 3. Press the PROG button again to operate your opener to operate with a non-rolling code transmitter, the technical measure in the garage door opener does not authorize the purchaser or supplier of the...
3585 Elite Series Manual
Page 34
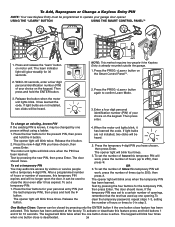
... people if the Keyless Entry is known, it has learned the code. Press the PROG button on the keypad. Press the PROG button again to operate your personal entry PIN (not the last temporary PIN), then press and hold buttons 1 and 9 for the present PIN, then press and hold the ENTER...
... people if the Keyless Entry is known, it has learned the code. Press the PROG button on the keypad. Press the PROG button again to operate your personal entry PIN (not the last temporary PIN), then press and hold buttons 1 and 9 for the present PIN, then press and hold the ENTER...


