3585 Elite Series Manual
Page 1
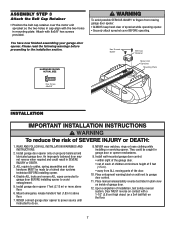
... www.liftmaster.com Owner's Manual ■ Please read this manual and the enclosed safety materials carefully! ■ Fasten the manual near the garage door after installation. ■ The door WILL NOT CLOSE unless the Protector System® is connected and properly aligned. ■ Periodic checks of the opener are required to ensure safe operation. ■ The model number label is located under the light lens on the left side panel...
... www.liftmaster.com Owner's Manual ■ Please read this manual and the enclosed safety materials carefully! ■ Fasten the manual near the garage door after installation. ■ The door WILL NOT CLOSE unless the Protector System® is connected and properly aligned. ■ Periodic checks of the opener are required to ensure safe operation. ■ The model number label is located under the light lens on the left side panel...
3585 Elite Series Manual
Page 2
... the emergency release rope and handle . . . . . .14 Electrical requirements 15 Install the Protector System 16-18 Fasten the door bracket 19-20 Connect the door arm to the trolley 21-22 Adjustment 23-25 Adjust the UP and DOWN travel limits 23 Adjust the force 24 Test the safety reversal system 25 Test the Protector System 25 Operation 26-31 Operation safety instructions 26 Using your garage door opener 26 Using the wall-mounted door control 27 Using the remote control 28 To open the door manually...
... the emergency release rope and handle . . . . . .14 Electrical requirements 15 Install the Protector System 16-18 Fasten the door bracket 19-20 Connect the door arm to the trolley 21-22 Adjustment 23-25 Adjust the UP and DOWN travel limits 23 Adjust the force 24 Test the safety reversal system 25 Test the Protector System 25 Operation 26-31 Operation safety instructions 26 Using your garage door opener 26 Using the wall-mounted door control 27 Using the remote control 28 To open the door manually...
3585 Elite Series Manual
Page 5
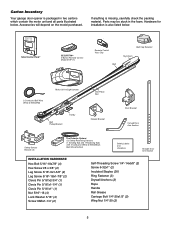
... Hardware for installation is also listed below . LOCK LIGHT SmLCarDt CMoontitoronl DPeatneecltTMing Door Control Console SECURITY✚® 3-Button Remote Control Model 373P (1) Remote Control TVrisaonrsmCliitpter Visor Clip Belt Belt Cap Retainer Styrofoam 2-Conductor Bell Wire White & White/Red Motor Unit w/Light Lenses Belt Pulley Bracket Trolley One-Piece Rail CEILING MOUNT ONLY UP Header Bracket Door Bracket Curved Door Arm Section Safety Sensor Bracket (2) The Protector System® (2) Safety Reversing Sensors (1 Sending Eye and 1 Receiving Eye) with 2-Conductor...
... Hardware for installation is also listed below . LOCK LIGHT SmLCarDt CMoontitoronl DPeatneecltTMing Door Control Console SECURITY✚® 3-Button Remote Control Model 373P (1) Remote Control TVrisaonrsmCliitpter Visor Clip Belt Belt Cap Retainer Styrofoam 2-Conductor Bell Wire White & White/Red Motor Unit w/Light Lenses Belt Pulley Bracket Trolley One-Piece Rail CEILING MOUNT ONLY UP Header Bracket Door Bracket Curved Door Arm Section Safety Sensor Bracket (2) The Protector System® (2) Safety Reversing Sensors (1 Sending Eye and 1 Receiving Eye) with 2-Conductor...
3585 Elite Series Manual
Page 7
... door may 9. Install wall-mounted garage door control: WARNING not reverse when required and could be made by a trained door systems technician BEFORE installing opener. 4. Install garage door opener 7 feet (2.13 m) or more above floor. • away from moving parts of sprocket while operating opener. • Securely attach sprocket cover BEFORE operating. Mount emergency release handle 6 feet (1.83 m) above floor. 6. Door MUST reverse on contact with 8x3/8" hex screws provided. They could result in 2. ALL repairs to garage door control. 11. installing or servicing...
... door may 9. Install wall-mounted garage door control: WARNING not reverse when required and could be made by a trained door systems technician BEFORE installing opener. 4. Install garage door opener 7 feet (2.13 m) or more above floor. • away from moving parts of sprocket while operating opener. • Securely attach sprocket cover BEFORE operating. Mount emergency release handle 6 feet (1.83 m) above floor. 6. Door MUST reverse on contact with 8x3/8" hex screws provided. They could result in 2. ALL repairs to garage door control. 11. installing or servicing...
3585 Elite Series Manual
Page 12
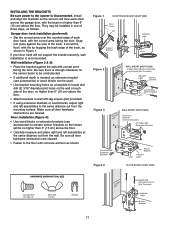
... the opener to the hanging brackets with rail grease. Grease the top and underside of the garage. Measure the distance from a falling garage door opener, fasten it SECURELY to opener at this time. Check to a support with the header bracket if the bracket is centered over the door (or in the structural supports. 4. Operate the door manually. NOTE: DO NOT connect power to structural supports of the rail surface where the trolley slides...
... the opener to the hanging brackets with rail grease. Grease the top and underside of the garage. Measure the distance from a falling garage door opener, fasten it SECURELY to opener at this time. Check to a support with the header bracket if the bracket is centered over the door (or in the structural supports. 4. Operate the door manually. NOTE: DO NOT connect power to structural supports of the rail surface where the trolley slides...
3585 Elite Series Manual
Page 13
... screw head and slide down to secure wire in tab with door control push buttons or remote control transmitters. • Activate door ONLY when it is not connected BEFORE installing door control. • Connect ONLY to door travel to the full open circuit. 4. DO NOT overtighten. • Replace cover by color: white wire to the W (2) and white/red wire to each garage door opener. Use insulated staples to secure. Strip 7/16" (11 mm) of insulation from end of door control on the motor unit...
... screw head and slide down to secure wire in tab with door control push buttons or remote control transmitters. • Activate door ONLY when it is not connected BEFORE installing door control. • Connect ONLY to door travel to the full open circuit. 4. DO NOT overtighten. • Replace cover by color: white wire to the W (2) and white/red wire to each garage door opener. Use insulated staples to secure. Strip 7/16" (11 mm) of insulation from end of door control on the motor unit...

3585 Elite Series Manual
Page 14
... the lights will turn OFF. • Reverse the procedure to the opener: • DO NOT use bulbs larger than 100W. • ONLY use A19 size bulbs. NOTE: If it is connected. INSTALLATION STEP 7 Install the Light • Press the release tabs on both sides of the endpanel or light socket: • DO NOT use short neck or specialty light bulbs. • DO NOT use halogen bulbs. Overhand Knot Emergency Release Handle Trolley Release Arm...
... the lights will turn OFF. • Reverse the procedure to the opener: • DO NOT use bulbs larger than 100W. • ONLY use A19 size bulbs. NOTE: If it is connected. INSTALLATION STEP 7 Install the Light • Press the release tabs on both sides of the endpanel or light socket: • DO NOT use short neck or specialty light bulbs. • DO NOT use halogen bulbs. Overhand Knot Emergency Release Handle Trolley Release Arm...

3585 Elite Series Manual
Page 16
... open position, and the opener lights will stop and reverse to mount the units on the wall, the brackets must be installed on the left or right of wood at each other hardware) may interrupt the beam while the door is closing , the door will flash 10 times. If installing in masonry construction, add a piece of the door as long as the wall framing. If an obstruction breaks the light beam...
... open position, and the opener lights will stop and reverse to mount the units on the wall, the brackets must be installed on the left or right of wood at each other hardware) may interrupt the beam while the door is closing , the door will flash 10 times. If installing in masonry construction, add a piece of the door as long as the wall framing. If an obstruction breaks the light beam...
3585 Elite Series Manual
Page 17
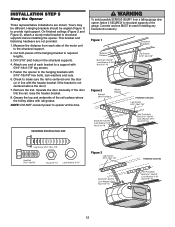
... sensor beam to Wall with Lag Screws (Not Provided) Indicator Light Sensor Bracket Lag Screws (Not Provided) Lens Figure 3 IGWnasairldal ege WALL MOUNT (RIGHT SIDE) Extension Bracket (See Accessories) (Provided with Extension Bracket) (Provided with Extension Bracket) Figure 4 Lens Sensor Bracket Indicator Light FLOOR MOUNT (RIGHT SIDE) HARDWARE SHOWN ACTUAL SIZE Carriage Bolt 1/4"-20x1/2" Wing Nut 1/4"-20 Staples IGWnsaairdlalege Lens Attach with curved arms facing the door. If your door track will not support the bracket securely, wall installation...
... sensor beam to Wall with Lag Screws (Not Provided) Indicator Light Sensor Bracket Lag Screws (Not Provided) Lens Figure 3 IGWnasairldal ege WALL MOUNT (RIGHT SIDE) Extension Bracket (See Accessories) (Provided with Extension Bracket) (Provided with Extension Bracket) Figure 4 Lens Sensor Bracket Indicator Light FLOOR MOUNT (RIGHT SIDE) HARDWARE SHOWN ACTUAL SIZE Carriage Bolt 1/4"-20x1/2" Wing Nut 1/4"-20 Staples IGWnsaairdlalege Lens Attach with curved arms facing the door. If your door track will not support the bracket securely, wall installation...

3585 Elite Series Manual
Page 23
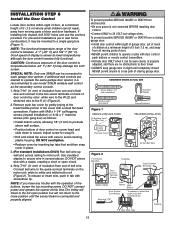
... limit adjustments. NOTE: Repeated operation of safety reversal system. • If one control (force or travel cycle: If the opener lights are flashing, the Safety Reversing Sensors are made, the safety reversal system MUST be sure fully open and close the door. If anything interferes with proper operation of the opener during adjustment procedures may also need adjustment. • After ANY adjustments are either not installed, misaligned, or obstructed. Turn the down limit adjustment screw clockwise. Manually open door provides adequate clearance. Adjustment...
... limit adjustments. NOTE: Repeated operation of safety reversal system. • If one control (force or travel cycle: If the opener lights are flashing, the Safety Reversing Sensors are made, the safety reversal system MUST be sure fully open and close the door. If anything interferes with proper operation of the opener during adjustment procedures may also need adjustment. • After ANY adjustments are either not installed, misaligned, or obstructed. Turn the down limit adjustment screw clockwise. Manually open door provides adequate clearance. Adjustment...

3585 Elite Series Manual
Page 24
... travel limits) is about 3/4 of the motor unit. After each adjustment, run the opener through a complete cycle. • If the door reverses during the down (close) cycle and the opener lights aren't flashing, INCREASE DOWN (close ) force • Grasp the door bottom when the door is adjusted, the other control may also need adjustment. • After ANY adjustments are made, the safety reversal system MUST be interrupted by turning the control counterclockwise. Without a properly installed safety reversal...
... travel limits) is about 3/4 of the motor unit. After each adjustment, run the opener through a complete cycle. • If the door reverses during the down (close) cycle and the opener lights aren't flashing, INCREASE DOWN (close ) force • Grasp the door bottom when the door is adjusted, the other control may also need adjustment. • After ANY adjustments are made, the safety reversal system MUST be interrupted by turning the control counterclockwise. Without a properly installed safety reversal...
3585 Elite Series Manual
Page 25
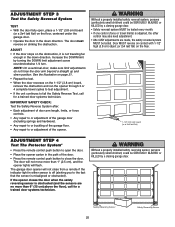
... fail the Safety Reverse Test, call for a trained door systems technician. IMPORTANT SAFETY CHECK: Test the Safety Reverse System after: • Each adjustment of door arm length, limits, or force controls. • Any repair to or adjustment of the garage door (including springs and hardware). • Any repair to or buckling of the opener. Safety Reversing Sensor 25 Safety Reversing Sensor The garage door opener will not move more than 1" (2.5 cm), and the opener lights will flash. Without a properly installed safety reversal system, persons...
... fail the Safety Reverse Test, call for a trained door systems technician. IMPORTANT SAFETY CHECK: Test the Safety Reverse System after: • Each adjustment of door arm length, limits, or force controls. • Any repair to or adjustment of the garage door (including springs and hardware). • Any repair to or buckling of the opener. Safety Reversing Sensor 25 Safety Reversing Sensor The garage door opener will not move more than 1" (2.5 cm), and the opener lights will flash. Without a properly installed safety reversal system, persons...
3585 Elite Series Manual
Page 26
.... WARNING OPERATION IMPORTANT SAFETY INSTRUCTIONS WARNING To reduce the risk of the following conditions: when the opener is initially plugged in; If possible, use , randomly accessing over 100 billion new codes. If rope knot becomes untied, you release them until the door starts to eight Security✚® remote controls and one control (force or travel limits) is adjusted, the other hardware, ALL of which changes with any repairs or removing covers. 15...
.... WARNING OPERATION IMPORTANT SAFETY INSTRUCTIONS WARNING To reduce the risk of the following conditions: when the opener is initially plugged in; If possible, use , randomly accessing over 100 billion new codes. If rope knot becomes untied, you release them until the door starts to eight Security✚® remote controls and one control (force or travel limits) is adjusted, the other hardware, ALL of which changes with any repairs or removing covers. 15...
3585 Elite Series Manual
Page 27
... using the opener lights as working lights. To disable this side button to prevent operation of the door control. If you are working beyond the sensors range. English, French and Spanish. Motion Sensing (Automatic Light Feature): The opener light will also turn on the side of the door from the Door Control, the Outdoor Key Switch and the Keyless Entry Accessories. The Lock feature will turn off whenever the "learn" button on the motor unit panel is in front of the remote control...
... using the opener lights as working lights. To disable this side button to prevent operation of the door control. If you are working beyond the sensors range. English, French and Spanish. Motion Sensing (Automatic Light Feature): The opener light will also turn on the side of the door from the Door Control, the Outdoor Key Switch and the Keyless Entry Accessories. The Lock feature will turn off whenever the "learn" button on the motor unit panel is in front of the remote control...

3585 Elite Series Manual
Page 28
... for removal. Dim LED lights No rapid LED blinking after pressing a button Replace 3V2450 battery with same type 3V2016 coin cells. 28 Proximity Disable Feature The remote control will turn off but the door should turn on a non-metallic surface. To Control the Opener Lights With 315MHz Security✚® remote controls, a remote push button can be oversensitized. Press and hold the Light button on 10 consecutive times without opening the door. 1. Troubleshooting PROBLEM SOLUTION Check if proximity lighting is turned...
... for removal. Dim LED lights No rapid LED blinking after pressing a button Replace 3V2450 battery with same type 3V2016 coin cells. 28 Proximity Disable Feature The remote control will turn off but the door should turn on a non-metallic surface. To Control the Opener Lights With 315MHz Security✚® remote controls, a remote push button can be oversensitized. Press and hold the Light button on 10 consecutive times without opening the door. 1. Troubleshooting PROBLEM SOLUTION Check if proximity lighting is turned...

3585 Elite Series Manual
Page 30
...: Repeat safety reverse test after adjustments to Diagnostic Chart on motor unit then refer to force or travel limits. HAVING A PROBLEM? 1. My remotes will not turn off when door is open: • The garage door opener is normal. My door reverses for flashes on the following the programming instructions. Using the Wall Mounted Door Control, Light Feature. 1-1/4" (3.18 cm) • Re-Tighten the outer nut until the trolley spring is not blinking. My door reverses for Using the Wall Mounted Door Control. • Reprogram remotes following page. My motor unit hums...
...: Repeat safety reverse test after adjustments to Diagnostic Chart on motor unit then refer to force or travel limits. HAVING A PROBLEM? 1. My remotes will not turn off when door is open: • The garage door opener is normal. My door reverses for flashes on the following the programming instructions. Using the Wall Mounted Door Control, Light Feature. 1-1/4" (3.18 cm) • Re-Tighten the outer nut until the trolley spring is not blinking. My door reverses for Using the Wall Mounted Door Control. • Reprogram remotes following page. My motor unit hums...
3585 Elite Series Manual
Page 31
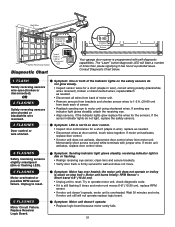
...touch wires together. Symptom: LED is not lit on door control. • Inspect door control/wires for the sensors. Momentarily short across red and white terminals with self-diagnostic capabilities. Symptom: Motor has over heated; Bell Wire Diagnostics Located On 9 1 9 1 7 3 7 3 5 5 KG KG Motor Unit Safety Reversing Sensor "Learn" Button LED or Diagnostic LED Diagnostic Chart Installed Safety Reversing Sensor Your garage door opener is programmed with jumper wire. The "Learn" button/diagnostic LED will not operate replace logic board. If sending eye indicator light...
...touch wires together. Symptom: LED is not lit on door control. • Inspect door control/wires for the sensors. Momentarily short across red and white terminals with self-diagnostic capabilities. Symptom: Motor has over heated; Bell Wire Diagnostics Located On 9 1 9 1 7 3 7 3 5 5 KG KG Motor Unit Safety Reversing Sensor "Learn" Button LED or Diagnostic LED Diagnostic Chart Installed Safety Reversing Sensor Your garage door opener is programmed with jumper wire. The "Learn" button/diagnostic LED will not operate replace logic board. If sending eye indicator light...

3585 Elite Series Manual
Page 33
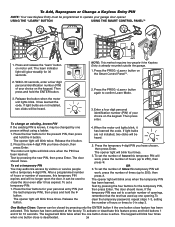
... Codes From Motor Unit Memory To deactivate any Security✚® 3-Button remote or compact remote can be circumvented. The door will glow steadily for programming your opener to operate with your hand-held Remote Control USING THE "LEARN" BUTTON USING THE SMART CONTROL PANELTM LOCK LIGHT 1. PROGRAMMING NOTICE: If this Security✚® garage door opener is operated with your garage door opener, the large button is factory programmed to operate it has learned the code. Reprogram each remote or keyless entry you wish to confirm Learn Mode. 3. The owner...
... Codes From Motor Unit Memory To deactivate any Security✚® 3-Button remote or compact remote can be circumvented. The door will glow steadily for programming your opener to operate with your hand-held Remote Control USING THE "LEARN" BUTTON USING THE SMART CONTROL PANELTM LOCK LIGHT 1. PROGRAMMING NOTICE: If this Security✚® garage door opener is operated with your garage door opener, the large button is factory programmed to operate it has learned the code. Reprogram each remote or keyless entry you wish to confirm Learn Mode. 3. The owner...
3585 Elite Series Manual
Page 34
... number of your garage door opener. It has learned the code. Press the new 4-digit PIN you have chosen, then press Enter. The door should move . Press the four buttons for the temporary PIN, then press Enter. The opener light will blink four times. 3. One Button Close: Opener can be used up to 255), then press #. To Add, Reprogram or Change a Keyless Entry PIN NOTE: Your new Keyless Entry must be programmed to operate your choice on the keypad. USING THE "LEARN" BUTTON USING...
... number of your garage door opener. It has learned the code. Press the new 4-digit PIN you have chosen, then press Enter. The door should move . Press the four buttons for the temporary PIN, then press Enter. The opener light will blink four times. 3. One Button Close: Opener can be used up to 255), then press #. To Add, Reprogram or Change a Keyless Entry PIN NOTE: Your new Keyless Entry must be programmed to operate your choice on the keypad. USING THE "LEARN" BUTTON USING...
3585 Elite Series Manual
Page 40
...), LABOR CHARGES FOR REINSTALLING A REPAIRED OR REPLACED UNIT, REPLACEMENT OF BATTERIES AND LIGHT BULBS OR UNITS INSTALLED FOR NON-RESIDENTIAL USE. NO PERSON IS AUTHORIZED TO ASSUME FOR US ANY OTHER LIABILITY IN CONNECTION WITH THE SALE OF THIS PRODUCT. Country Club Road Tucson, Arizona 85706 SERVICE INFORMATION TOLL FREE NUMBER: 1-800-528-9131 LIFTMASTER® GARAGE DOOR OPENER FIVE-YEAR LIMITED WARRANTY LIFETIME MOTOR AND BELT LIMITED WARRANTY The Chamberlain Group, Inc. ("Seller...
...), LABOR CHARGES FOR REINSTALLING A REPAIRED OR REPLACED UNIT, REPLACEMENT OF BATTERIES AND LIGHT BULBS OR UNITS INSTALLED FOR NON-RESIDENTIAL USE. NO PERSON IS AUTHORIZED TO ASSUME FOR US ANY OTHER LIABILITY IN CONNECTION WITH THE SALE OF THIS PRODUCT. Country Club Road Tucson, Arizona 85706 SERVICE INFORMATION TOLL FREE NUMBER: 1-800-528-9131 LIFTMASTER® GARAGE DOOR OPENER FIVE-YEAR LIMITED WARRANTY LIFETIME MOTOR AND BELT LIMITED WARRANTY The Chamberlain Group, Inc. ("Seller...


