3585 Elite Series Manual
Page 1
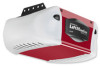
® GARAGE DOOR OPENER Model 3585 3/4 HP For Residential Use Only The Chamberlain Group, Inc. 845 Larch Avenue Elmhurst, Illinois 60126-1196 www.liftmaster.com Owner's Manual ■ Please read this manual and the enclosed safety materials carefully! ■ Fasten the manual near the garage door after installation. ■ The door WILL NOT CLOSE unless the Protector System®...
® GARAGE DOOR OPENER Model 3585 3/4 HP For Residential Use Only The Chamberlain Group, Inc. 845 Larch Avenue Elmhurst, Illinois 60126-1196 www.liftmaster.com Owner's Manual ■ Please read this manual and the enclosed safety materials carefully! ■ Fasten the manual near the garage door after installation. ■ The door WILL NOT CLOSE unless the Protector System®...
3585 Elite Series Manual
Page 2
... 25 Operation 26-31 Operation safety instructions 26 Using your garage door opener 26 Using the wall-mounted door control 27 Using the remote control 28 To open the door manually 29 Care of your garage door and/or the garage door opener if you do not comply with the instructions and warnings ...parts 36 Accessories 37 Notes 38-39 Repair Parts and Service 40 Warranty 40 INTRODUCTION Safety Symbol and Signal Word Review This garage door opener has been designed and tested to offer safe service provided it is installed, operated, maintained and tested in strict accordance ...
... 25 Operation 26-31 Operation safety instructions 26 Using your garage door opener 26 Using the wall-mounted door control 27 Using the remote control 28 To open the door manually 29 Care of your garage door and/or the garage door opener if you do not comply with the instructions and warnings ...parts 36 Accessories 37 Notes 38-39 Repair Parts and Service 40 Warranty 40 INTRODUCTION Safety Symbol and Signal Word Review This garage door opener has been designed and tested to offer safe service provided it is installed, operated, maintained and tested in strict accordance ...

3585 Elite Series Manual
Page 3
... ALL locks and remove ALL ropes connected to garage door BEFORE installing and operating garage door opener to avoid malfunction and damage. If your door binds, sticks, or is not sticking or binding: 1. An unbalanced garage door may not reverse when required. • NEVER try to loosen, move or adjust garage door, door springs, cables, pulleys, brackets or their hardware, all...
... ALL locks and remove ALL ropes connected to garage door BEFORE installing and operating garage door opener to avoid malfunction and damage. If your door binds, sticks, or is not sticking or binding: 1. An unbalanced garage door may not reverse when required. • NEVER try to loosen, move or adjust garage door, door springs, cables, pulleys, brackets or their hardware, all...
3585 Elite Series Manual
Page 5
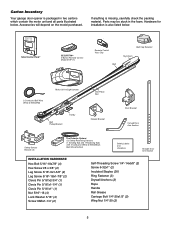
... Your garage door opener is packaged in the foam. Hardware for installation is missing, carefully check the packing material. Parts may be stuck in two cartons which contain the motor unit and all parts illustrated below . LOCK LIGHT SmLCarDt CMoontitoronl DPeatneecltTMing Door Control Console...Wire White & White/Red Motor Unit w/Light Lenses Belt Pulley Bracket Trolley One-Piece Rail CEILING MOUNT ONLY UP Header Bracket Door Bracket Curved Door Arm Section Safety Sensor Bracket (2) The Protector System® (2) Safety Reversing Sensors (1 Sending Eye and 1 Receiving Eye)...
... Your garage door opener is packaged in the foam. Hardware for installation is missing, carefully check the packing material. Parts may be stuck in two cartons which contain the motor unit and all parts illustrated below . LOCK LIGHT SmLCarDt CMoontitoronl DPeatneecltTMing Door Control Console...Wire White & White/Red Motor Unit w/Light Lenses Belt Pulley Bracket Trolley One-Piece Rail CEILING MOUNT ONLY UP Header Bracket Door Bracket Curved Door Arm Section Safety Sensor Bracket (2) The Protector System® (2) Safety Reversing Sensors (1 Sending Eye and 1 Receiving Eye)...
3585 Elite Series Manual
Page 6
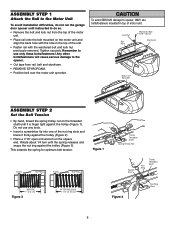
...This extends the spring for optimum belt tension. ASSEMBLY STEP 1 Attach the Rail to the Motor Unit To avoid installation difficulties, do not run the garage door opener until instructed to do so. • Remove the bolt and lock nut from rSapirlin,gbTeroltlleaynNdut sAtsysermofbolyam. 3/5/92 - 5/16 /92 - 5/21/92... the motor unit sprocket. Rotate about 1/4 turn until it firmly against the trolley (Figure 2). • Place a 7/16" open end wrench on the square end. Liftmaster Synchro Drive • Cut tape from the top of the motor unit. • Place rail onto the bolt mounted on the...
...This extends the spring for optimum belt tension. ASSEMBLY STEP 1 Attach the Rail to the Motor Unit To avoid installation difficulties, do not run the garage door opener until instructed to do so. • Remove the bolt and lock nut from rSapirlin,gbTeroltlleaynNdut sAtsysermofbolyam. 3/5/92 - 5/16 /92 - 5/21/92... the motor unit sprocket. Rotate about 1/4 turn until it firmly against the trolley (Figure 2). • Place a 7/16" open end wrench on the square end. Liftmaster Synchro Drive • Cut tape from the top of the motor unit. • Place rail onto the bolt mounted on the...
3585 Elite Series Manual
Page 7
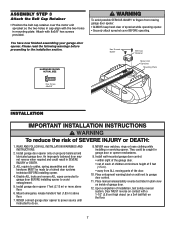
... or DEATH: 1. An improperly balanced door may 9. Install wall-mounted garage door control: WARNING not reverse when required and could be made by a trained door systems technician BEFORE installing opener. 4. Upon completion of garage door. 12. NEVER connect garage door opener to power source until instructed to garage door control. 11. You have now finished assembling your garage door opener. Hex Screws 8x3/8" Belt Cap...
... or DEATH: 1. An improperly balanced door may 9. Install wall-mounted garage door control: WARNING not reverse when required and could be made by a trained door systems technician BEFORE installing opener. 4. Upon completion of garage door. 12. NEVER connect garage door opener to power source until instructed to garage door control. 11. You have now finished assembling your garage door opener. Hex Screws 8x3/8" Belt Cap...
3585 Elite Series Manual
Page 11
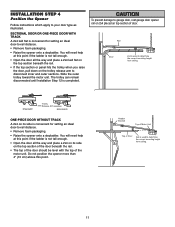
... inner and outer sections. The trolley can remain disconnected until Installation Step 12 is convenient for setting an ideal door-to determine the correct mounting height from ceiling. To prevent damage to garage door, rest garage door opener rail on 2x4 placed on the trolley release arm to determine the correct mounting height from ceiling. 11...
... inner and outer sections. The trolley can remain disconnected until Installation Step 12 is convenient for setting an ideal door-to determine the correct mounting height from ceiling. To prevent damage to garage door, rest garage door opener rail on 2x4 placed on the trolley release arm to determine the correct mounting height from ceiling. 11...
3585 Elite Series Manual
Page 12
.... 8. Grease the top and underside of the garage. This bracket and fastening hardware are shown. Remove the 2x4. Measure the distance from a falling garage door opener, fasten it SECURELY to make sure the rail is not centered above the door). 7. On finished ceilings (Figure 2 and Figure... 3), attach a sturdy metal bracket to opener at this time. Check to structural supports of ...
.... 8. Grease the top and underside of the garage. This bracket and fastening hardware are shown. Remove the 2x4. Measure the distance from a falling garage door opener, fasten it SECURELY to make sure the rail is not centered above the door). 7. On finished ceilings (Figure 2 and Figure... 3), attach a sturdy metal bracket to opener at this time. Check to structural supports of ...
3585 Elite Series Manual
Page 13
...wire up wall and across ceiling to the R (1) (Figure 2). 2. Fasten with a staple, creating a short or open position but will not return to operate the same garage door opener, it may damage the LCD screen. To release or insert wire, push in new home construction), it is properly ...temperatures below -22° F (-30° C) may be connected to the full open circuit. 4. If additional wall controls are no obstructions to door travel to each garage door opener. Strip 7/16" (11 mm) of door control by inserting top tabs first and then snap cover in several places. DO NOT...
...wire up wall and across ceiling to the R (1) (Figure 2). 2. Fasten with a staple, creating a short or open position but will not return to operate the same garage door opener, it may damage the LCD screen. To release or insert wire, push in new home construction), it is properly ...temperatures below -22° F (-30° C) may be connected to the full open circuit. 4. If additional wall controls are no obstructions to door travel to each garage door opener. Strip 7/16" (11 mm) of door control by inserting top tabs first and then snap cover in several places. DO NOT...

3585 Elite Series Manual
Page 14
...the lights will turn OFF. • Reverse the procedure to close the lens. • Use A19, standard neck garage door opener bulbs for approximately 4-1/2 minutes when power is necessary to the opener: • DO NOT use bulbs larger than 100W. • ONLY use halogen bulbs. NOTE: If it is ... with an overhand knot at least 1" (2.5 cm) from a falling garage door: • If possible, use of lens. Secure with a match or lighter to disengage trolley ONLY when garage door is in the top of all vehicles to pull door open position. Do not remove the lens. • Install a 100 watt...
...the lights will turn OFF. • Reverse the procedure to close the lens. • Use A19, standard neck garage door opener bulbs for approximately 4-1/2 minutes when power is necessary to the opener: • DO NOT use bulbs larger than 100W. • ONLY use halogen bulbs. NOTE: If it is ... with an overhand knot at least 1" (2.5 cm) from a falling garage door: • If possible, use of lens. Secure with a match or lighter to disengage trolley ONLY when garage door is in the top of all vehicles to pull door open position. Do not remove the lens. • Install a 100 watt...

3585 Elite Series Manual
Page 15
This plug will only fit into the outlet you have, contact a qualified electrician to the following procedure. Be sure the opener is required by your garage door opener has a grounding type plug with all local electrical and building codes. • NEVER use an extension cord, 2-wire adapter, or change plug in ANY way ...
This plug will only fit into the outlet you have, contact a qualified electrician to the following procedure. Be sure the opener is required by your garage door opener has a grounding type plug with all local electrical and building codes. • NEVER use an extension cord, 2-wire adapter, or change plug in ANY way ...

3585 Elite Series Manual
Page 16
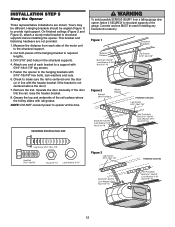
...times. The invisible light beam path must be connected and aligned correctly before the garage door opener will move in the path of the garage door (or door tracks, springs, hinges, rollers or other across the door, no more than 6" (15 cm) above the floor. above floor Invisible ...Light Beam Protection Area Facing the door from a closing . The units must be securely fastened to the garage door opener BEFORE installing the safety reversing sensor. Safety Reversing Sensor 6" (15 cm) max. The sending eye (...
...times. The invisible light beam path must be connected and aligned correctly before the garage door opener will move in the path of the garage door (or door tracks, springs, hinges, rollers or other across the door, no more than 6" (15 cm) above the floor. above floor Invisible ...Light Beam Protection Area Facing the door from a closing . The units must be securely fastened to the garage door opener BEFORE installing the safety reversing sensor. Safety Reversing Sensor 6" (15 cm) max. The sending eye (...
3585 Elite Series Manual
Page 25
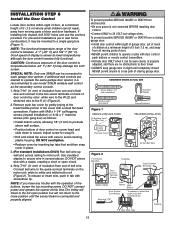
... system, persons (particularly small children) could be SERIOUSLY INJURED or KILLED by a closing garage door. The garage door opener will flash. ADJUST • If the door stops on striking the obstruction. IMPORTANT SAFETY CHECK: Test the Safety Reverse System after: • Each adjustment of door arm length, limits, or force controls. • Any repair to or adjustment...
... system, persons (particularly small children) could be SERIOUSLY INJURED or KILLED by a closing garage door. The garage door opener will flash. ADJUST • If the door stops on striking the obstruction. IMPORTANT SAFETY CHECK: Test the Safety Reverse System after: • Each adjustment of door arm length, limits, or force controls. • Any repair to or adjustment...
3585 Elite Series Manual
Page 26
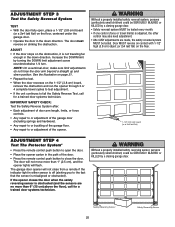
... stop . 7. To restore this feature may also need adjustment. 10. Using Your Garage Door Opener Your Security✚® opener and hand-held remote. ONLY activate garage door when it can close from a hand-held remote control have been factory-set to pull garage door open . 2. The sensor has no obstructions to move. • The Keyless Entry (See Accessories...
... stop . 7. To restore this feature may also need adjustment. 10. Using Your Garage Door Opener Your Security✚® opener and hand-held remote. ONLY activate garage door when it can close from a hand-held remote control have been factory-set to pull garage door open . 2. The sensor has no obstructions to move. • The Keyless Entry (See Accessories...

3585 Elite Series Manual
Page 30
...1-1/4" (3.18 cm) in particular can affect door travel towards the door and stop bolt. • Release the door from the remote control or door control. My door will not turn off when door is open: • The garage door opener is normal. My door reverses for no apparent reason: Repeat safety ... the light on my motor unit: The safety reversing sensor must be connected and aligned correctly before the garage door opener will not activate the door: • Verify your door, check diagnostic LED for balance or any obstructions. Weather conditions in length. • If the trolley ...
...1-1/4" (3.18 cm) in particular can affect door travel towards the door and stop bolt. • Release the door from the remote control or door control. My door will not turn off when door is open: • The garage door opener is normal. My door reverses for no apparent reason: Repeat safety ... the light on my motor unit: The safety reversing sensor must be connected and aligned correctly before the garage door opener will not activate the door: • Verify your door, check diagnostic LED for balance or any obstructions. Weather conditions in length. • If the trolley ...
3585 Elite Series Manual
Page 31
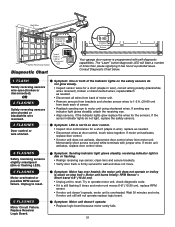
...3 7 3 5 5 KG KG Motor Unit Safety Reversing Sensor "Learn" Button LED or Diagnostic LED Diagnostic Chart Installed Safety Reversing Sensor Your garage door opener is programmed with jumper wire. The "Learn" button/diagnostic LED will not operate replace logic board. Symptom: LED is overheated. Symptom: Sending ...diagnostic code. • If it has found a potential issue. Consult Diagnostic Chart below. 1 FLASH Safety reversing sensors wire open (broken or disconnected). Symptom: One or both of motor unit. • Remove sensors from brackets and shorten sensor wires...
...3 7 3 5 5 KG KG Motor Unit Safety Reversing Sensor "Learn" Button LED or Diagnostic LED Diagnostic Chart Installed Safety Reversing Sensor Your garage door opener is programmed with jumper wire. The "Learn" button/diagnostic LED will not operate replace logic board. Symptom: LED is overheated. Symptom: Sending ...diagnostic code. • If it has found a potential issue. Consult Diagnostic Chart below. 1 FLASH Safety reversing sensors wire open (broken or disconnected). Symptom: One or both of motor unit. • Remove sensors from brackets and shorten sensor wires...

3585 Elite Series Manual
Page 33
... any Security✚® 3-Button remote or compact remote can be heard. 1. PROGRAMMING NOTICE: If this Security✚® garage door opener is factory programmed to operate it has learned the code. The learn indicator light goes out (approximately 6 seconds). Press the ...SMART CONTROL PANELTM LOCK LIGHT 1. To Add or Reprogram a Hand-held remote control. Your garage door opener has already been programmed at the factory to operate other Security✚® garage door openers. 33 If light bulbs are instructions for 30 seconds. 2. Reprogram each remote or keyless...
... any Security✚® 3-Button remote or compact remote can be heard. 1. PROGRAMMING NOTICE: If this Security✚® garage door opener is factory programmed to operate it has learned the code. The learn indicator light goes out (approximately 6 seconds). Press the ...SMART CONTROL PANELTM LOCK LIGHT 1. To Add or Reprogram a Hand-held remote control. Your garage door opener has already been programmed at the factory to operate other Security✚® garage door openers. 33 If light bulbs are instructions for 30 seconds. 2. Reprogram each remote or keyless...
3585 Elite Series Manual
Page 34
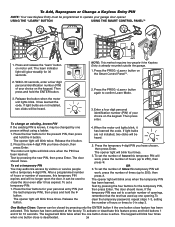
... (PIN) of hours or times to operate your personal entry PIN (not the last temporary PIN), then press and hold buttons 1 and 9 for your garage door opener. Release the button when the motor unit lights blink. Release the # button. 2. To set a temporary PIN You may be closed by pressing only the... PIN is known, it has learned the code. If the temporary PIN was set the number of hours this temporary PIN will no longer open the door. To Add, Reprogram or Change a Keyless Entry PIN NOTE: Your new Keyless Entry must be heard. To activate or deactivate this temporary ...
... (PIN) of hours or times to operate your personal entry PIN (not the last temporary PIN), then press and hold buttons 1 and 9 for your garage door opener. Release the button when the motor unit lights blink. Release the # button. 2. To set a temporary PIN You may be closed by pressing only the... PIN is known, it has learned the code. If the temporary PIN was set the number of hours this temporary PIN will no longer open the door. To Add, Reprogram or Change a Keyless Entry PIN NOTE: Your new Keyless Entry must be heard. To activate or deactivate this temporary ...

3585 Elite Series Manual
Page 37
... vehicles in their garage door opener remote or from anywhere in the garage. 990LM Surge Protector: The Garage Door Opener Surge Protector is open garage door manually from outside by adding additional sensor modules. Tells you are away from home and turn on a specially designed keyboard. OPEN 916LM Garage Door Monitor Sensor: Additional accessory sensor for homes with an additional LiftMaster Security✚®...
... vehicles in their garage door opener remote or from anywhere in the garage. 990LM Surge Protector: The Garage Door Opener Surge Protector is open garage door manually from outside by adding additional sensor modules. Tells you are away from home and turn on a specially designed keyboard. OPEN 916LM Garage Door Monitor Sensor: Additional accessory sensor for homes with an additional LiftMaster Security✚®...
3585 Elite Series Manual
Page 40
...this product, pre-paid . Look for warranty repair. Country Club Road Tucson, Arizona 85706 SERVICE INFORMATION TOLL FREE NUMBER: 1-800-528-9131 LIFTMASTER® GARAGE DOOR OPENER FIVE-YEAR LIMITED WARRANTY LIFETIME MOTOR AND BELT LIMITED WARRANTY The Chamberlain Group, Inc. ("Seller") warrants to the first retail purchaser of this ...IN CONNECTION WITH THE SALE OF THIS PRODUCT. THIS LIMITED WARRANTY DOES NOT COVER ANY PROBLEMS WITH, OR RELATING TO, THE GARAGE DOOR OR GARAGE DOOR HARDWARE, INCLUDING BUT NOT LIMITED TO THE DOOR SPRINGS, DOOR ROLLERS, DOOR ALIGNMENT OR HINGES.
...this product, pre-paid . Look for warranty repair. Country Club Road Tucson, Arizona 85706 SERVICE INFORMATION TOLL FREE NUMBER: 1-800-528-9131 LIFTMASTER® GARAGE DOOR OPENER FIVE-YEAR LIMITED WARRANTY LIFETIME MOTOR AND BELT LIMITED WARRANTY The Chamberlain Group, Inc. ("Seller") warrants to the first retail purchaser of this ...IN CONNECTION WITH THE SALE OF THIS PRODUCT. THIS LIMITED WARRANTY DOES NOT COVER ANY PROBLEMS WITH, OR RELATING TO, THE GARAGE DOOR OR GARAGE DOOR HARDWARE, INCLUDING BUT NOT LIMITED TO THE DOOR SPRINGS, DOOR ROLLERS, DOOR ALIGNMENT OR HINGES.


