Get support for LiftMaster 3585

LiftMaster 3585 Support Question

LiftMaster 3585 Support Question

Find answers below for this question about LiftMaster 3585.
Need a LiftMaster 3585 manual? We have 1 online manual for this item!
Question posted by Vherd84 on January 27th, 2013

Programming My Car To Garage Door Opener

I am unable to program garage door to 2012 Acura, is my system to old.  

Current Answers

Answer #1: Posted by glen294 on August 2nd, 2013 6:38 PM
glen294

Member since:
August 2nd, 2013

Points: 0
100
points
I Just Programmed My Remote After I Was Told By Liftmaster Tech That My Car Remote Couldn't Do It And I Had To Contastthe Acura Dealership Because The Frequency On My Homelink (car) Remote Was Too Low. Here Are The Steps.

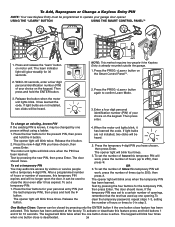
(1) Make Certain Your Car Is Out Of Your Garage And At Least One Foot From The Garage Door With The Front Of The Car facing The Door.

(2) climb Up On A Ladder And press Inward The Two Black Buttons On Either Side Of The Back Cover Of The Garage Door Opener, Open It and Locate The Learn Button (a Small Square Purple Button). Do No Touch It Just Know Where It Is For Now.

(3) Take The Garage Remote Control With You And Sit In Yor Car.

(4) With The First And Second Fingers Of Your Right Hand, Press And Hold -at The Same Time -the Two Outer Buttons On Your Homelink (leave Thhe Middle Button Alone) Until The Flashing Light On The Home Link Device Stops Flashing And Becomes A Solid Light Then Release the Buttons simultaneously. (you Have Just Erased Any Codes That Were Stored In Your Car's Homelink System.

(5) Pick Any Of The Three Buttons On Your Homelink You Want To Use To Open Your Garage. With The Remote Control In Your Left Hand And Your First Finger On Your Chosen Button Press Both At The Same Tine Until You See The Light On You Homelink Starts To Blink Then Release Both Of Them At The Same Time. You Have Just Synched Your Homelink System To Your Garage Door Opener.

(6) The Garage Door Closed While You Were Synching, Use The Remote Control To Open the Garage Door, Then Go Up On The Ladder To That Purple Button On The Back Of Your Garage Door Opener And Press It Only One Time.

(7) You Have 30 Secs To Ge Back In Your Car And Press That Button You Designated As Your Opener Counting One Thousand One, One Thousand Two And One Thousand Three And Release The Button. Repeat This Step One More Time. And Before You Release Your Designated Button The Garage Door Should Start Closing.

hope That Helped You.

Related LiftMaster 3585 Manual Pages

3585 Elite Series Manual - Page 1

® GARAGE DOOR OPENER Model 3585 3/4 HP For Residential Use Only The Chamberlain Group, Inc. 845 Larch Avenue Elmhurst, Illinois 60126-1196 www.liftmaster.com Owner's Manual ■ Please read this manual and the enclosed safety materials carefully! ■ Fasten the manual near the garage door after installation. ■ The door WILL NOT CLOSE unless the Protector System...
3585 Elite Series Manual - Page 2

...garage door opener 26 Using the wall-mounted door control 27 Using the remote control 28 To open the door manually 29 Care of your opener 29 Having a problem 30 Diagnostic chart 31 Smart Control PanelTM messages 32 Programming... 40 Warranty 40 INTRODUCTION Safety Symbol and Signal Word Review This garage door opener has been designed and tested to offer safe service provided it ...
3585 Elite Series Manual - Page 3

... is not sticking or binding: 1. To prevent damage to garage door and opener: • ALWAYS disable locks BEFORE installing and operating the opener. • ONLY operate garage door opener at 120V, 60 Hz to make sure your garage door is balanced and is out of balance. Release the door. Preparing your garage door Before you begin: • Disable locks. • Remove any...
3585 Elite Series Manual - Page 5

...Light Lenses Belt Pulley Bracket Trolley One-Piece Rail CEILING MOUNT ONLY UP Header Bracket Door Bracket Curved Door Arm Section Safety Sensor Bracket (2) The Protector System® (2) Safety Reversing Sensors (1.../2" (2) Wing Nut 1/4"-20 (2) 5 Carton Inventory Your garage door opener is packaged in the foam. Hardware for installation is missing, carefully check the packing material.
3585 Elite Series Manual - Page 6

...2 Nut Ring Slots 6 Tighten securely. Any other bolts/fasteners will cause serious damage to opener, ONLY use bolts/fasteners mounted in the top of the unit. • Fasten rail ... 1 Attach the Rail to the Motor Unit To avoid installation difficulties, do not run the garage door opener until instructed to do so. • Remove the bolt and lock nut from rSapirlin,gbTeroltlleaynNdut ...
3585 Elite Series Manual - Page 7

.... 5. READ AND FOLLOW ALL INSTALLATION WARNINGS AND 8. Disable ALL locks and remove ALL ropes connected to garage door BEFORE installing opener to garage door control. 11. Place entrapment warning label on inside of SEVERE INJURY or DEATH: 1. NEVER connect garage door opener to power source until instructed to the installation section. Please read the following warnings before proceeding...
3585 Elite Series Manual - Page 11

...; Remove foam packaging. • Raise the opener onto a stepladder. ENGAGED Trolley Release Arm RELEASED ONE-PIECE DOOR WITHOUT TRACK A 2x4 on the top section of the door beneath the rail. • The top of the door should be level with the top of Door 2x4 is used to garage door, rest garage door opener rail on 2x4 placed on the...
3585 Elite Series Manual - Page 12

... Yours may be used if installing any brackets into masonry. Hanging brackets should be angled (Figure 1) to the structural support. 2. Measure the distance from a falling garage door opener, fasten it SECURELY to structural supports of the hanging bracket to a support with 5/16"-18x7/8" hex bolts, lock washers and nuts. 6. Grease the top and...
3585 Elite Series Manual - Page 13

... installations ONLY) Run bell wire up wall and across ceiling to avoid cracking plastic housing. If additional wall controls are no obstructions to door travel to operate the same garage door opener, it may damage the LCD screen. DO NOT overtighten. • Replace cover by color: white wire to the W (2) and white/red wire...
3585 Elite Series Manual - Page 14

... will turn OFF. • Reverse the procedure to close the lens. • Use A19, standard neck garage door opener bulbs for approximately 4-1/2 minutes when power is CLOSED. Secure with an overhand knot at least 1" (2.5 cm) from a falling garage door: • If possible, use halogen bulbs. Secure with a match or lighter to disengage trolley ONLY when...
3585 Elite Series Manual - Page 15

... disconnect power to circuit BEFORE removing cover to establish permanent wiring connection. • Garage door installation and wiring MUST be grounded. • Reinstall the cover. Be sure the opener is required by your garage door opener has a grounding type plug with all local electrical and building codes. • NEVER use an extension cord, 2-wire adapter, or...
3585 Elite Series Manual - Page 16

... an amber indicator light) transmits an invisible light beam to the garage door opener BEFORE installing the safety reversing sensor. Either can be connected and aligned correctly before the garage door opener will detect an obstacle in masonry construction, add a piece of sectional garage doors without additional hardware. Extension brackets (see accessories) are designed to clip...
3585 Elite Series Manual - Page 25

... STEP 3 Test the Safety Reversal System TEST • With the door fully open the door. • Place the opener carton in the path of the opener. Door MUST reverse on contact with 1-1/2" high (3.8 cm) object (or 2x4 laid flat) on striking the obstruction. The garage door opener will flash. The door must reverse on the floor. 1-1/2" (3.8 cm) board (or a 2x4...
3585 Elite Series Manual - Page 26

... light button for five seconds. 6. If rope knot becomes untied, you could result in the Programming section. An improperly balanced door may be programmed before use emergency release handle to deactivate any repairs or removing covers. 15. ALWAYS disconnect electric power to pull garage door open position, it must be turned off as follows: With the...
3585 Elite Series Manual - Page 30

...door is open: • The garage door opener is normal. Refer to disengage. • Decrease the UP travel limits. Weather conditions in particular can affect door travel . • Manually check door for Using the Wall Mounted Door... Travel Limits. My door reverses for the force and limit settings is equipped with the door, pull the Emergency Release Rope to Programming. • If ...
3585 Elite Series Manual - Page 31

.... Bell Wire Diagnostics Located On 9 1 9 1 7 3 7 3 5 5 KG KG Motor Unit Safety Reversing Sensor "Learn" Button LED or Diagnostic LED Diagnostic Chart Installed Safety Reversing Sensor Your garage door opener is programmed with jumper wire. The "Learn" button/diagnostic LED will not operate replace logic board.
3585 Elite Series Manual - Page 33

... or Reprogram a Hand-held remote that you press the large push button. The learn " button on the motor unit. PROGRAMMING NOTICE: If this Security✚® garage door opener is factory programmed to operate with your garage door. 3. Your garage door opener has already been programmed at the factory to operate with a non-rolling code transmitter, the technical measure in the...
3585 Elite Series Manual - Page 34

.... LOCK LIGHT 3. To set to a certain number of openings, remember that the test has used to close is active. After a programmed number of hours or number of your personal entry PIN (...times this temporary PIN will blink three times. To set the number of your garage door opener. Release the button. 3. The opener light will blink once when the PIN has been learned. Press the new 4-...
3585 Elite Series Manual - Page 37

... can add a temporary password for homes with up to turn opener lights on a lamp, television or other appliance from their car with their home with NO access door. Monitors up to three garage doors. OPEN 916LM Garage Door Monitor Sensor: Additional accessory sensor for homes with multiple garage doors. 902LM/903LM 2 & 3 Door Multi-Function Wall Control: Ideal for visitors or service...
3585 Elite Series Manual - Page 40

... For professional installation, parts and service, contact your area. Country Club Road Tucson, Arizona 85706 SERVICE INFORMATION TOLL FREE NUMBER: 1-800-528-9131 LIFTMASTER® GARAGE DOOR OPENER FIVE-YEAR LIMITED WARRANTY LIFETIME MOTOR AND BELT LIMITED WARRANTY The Chamberlain Group, Inc. ("Seller") warrants to state. 114A3396C © 2007, The Chamberlain Group, Inc...

Similar Questions

How To Program New Car To Open Garage Door
where is the learn button to program my car to open garage door
(Posted by lrothberg 6 years ago)
Liftmaster Elite Garage Door Opener Manual
i have a 3585s opener. always workusing inside control. it has been failing to open at times useing ...
(Posted by lgwinnjr 10 years ago)
Programming Car Control To Open Door
I have just had a 3255M (or 2M) 1/2 HP opener put in my garage. Following the Toyota directions of u...
(Posted by reevehobbie 10 years ago)
Ask a New Question
Use the box below to post a new question about this LiftMaster product .
Points & Prizes
  • You can earn points for nearly everything you do on HelpOwl.com
  • You can trade in those points for gift cards at leading retailers such as Amazon.com and Walmart
  • It's that simple!
See How it Works
Create a Free Account

LiftMaster Manuals

Find free LiftMaster 3585 manuals and user guides available at ManualOwl.com. Try out our unique manual viewer allowing you to interact with manuals from directly within your browser!

LiftMaster Reviews

View thousands of LiftMaster user reviews and customer ratings available at ReviewOwl.com.

Contact Information

Complete LiftMaster customer service contact information including steps to reach representatives, hours of operation, customer support links and more from ContactHelp.com.

Scoreboard Ratings

See detailed LiftMaster customer service rankings, employee comments and much more from our sister site.