Owners Manual
Page 2
... assembly parts 34 Accessories 35 Repair Parts and Service Back page Warranty Back page INTRODUCTION Safety Symbol and Signal Word Review This garage door opener has been designed and tested to offer safe service provided it is installed, operated, maintained and tested in strict accordance with the instructions...24 Test the safety reversal system 25 Test the Protector System 25 Operation 26-30 Operation safety instructions 26 Using your garage door opener 26 Using the wall-mounted door control 27 To open the door manually 27 Care of your garage door and/or the garage door...
... assembly parts 34 Accessories 35 Repair Parts and Service Back page Warranty Back page INTRODUCTION Safety Symbol and Signal Word Review This garage door opener has been designed and tested to offer safe service provided it is installed, operated, maintained and tested in strict accordance with the instructions...24 Test the safety reversal system 25 Test the Protector System 25 Operation 26-30 Operation safety instructions 26 Using your garage door opener 26 Using the wall-mounted door control 27 To open the door manually 27 Care of your garage door and/or the garage door...
Owners Manual
Page 4
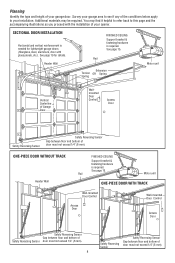
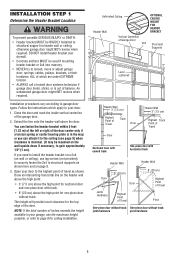
...64258;oor and bottom of door must not exceed 1/4" (6 mm). See page 15. Rail Motor unit ONE-PIECE DOOR WITH TRACK Wall-mounted Door Control Access Door Wall-mounted Door Control Access Door Safety Reversing Sensor Gap between floor and bottom of Safety Reversing Sensor door must not exceed 1/4" (6 ... exceed 1/4" (6 mm). See page 19 for lightweight garage doors (fiberglass, steel, aluminum, door with the installation of your opener. Header Wall FINISHED CEILING Support bracket & fastening hardware is required. Planning Identify the type and height of your installation.
...64258;oor and bottom of door must not exceed 1/4" (6 mm). See page 15. Rail Motor unit ONE-PIECE DOOR WITH TRACK Wall-mounted Door Control Access Door Wall-mounted Door Control Access Door Safety Reversing Sensor Gap between floor and bottom of Safety Reversing Sensor door must not exceed 1/4" (6 ... exceed 1/4" (6 mm). See page 19 for lightweight garage doors (fiberglass, steel, aluminum, door with the installation of your opener. Header Wall FINISHED CEILING Support bracket & fastening hardware is required. Planning Identify the type and height of your installation.
Owners Manual
Page 7
... hardware MUST be caught in SEVERE INJURY or DEATH. 3. Install garage door opener 7 feet (2.1 m) or more above the fl oor and avoiding contact with a 1-1/2" (3.8 cm) high object (or a 2x4 laid flat least 6 feet (1.83 m) above floor. 6. Install wall-mounted garage door control: • within reach, but at ) on contact with vehicles...
... hardware MUST be caught in SEVERE INJURY or DEATH. 3. Install garage door opener 7 feet (2.1 m) or more above the fl oor and avoiding contact with a 1-1/2" (3.8 cm) high object (or a 2x4 laid flat least 6 feet (1.83 m) above floor. 6. Install wall-mounted garage door control: • within reach, but at ) on contact with vehicles...
Owners Manual
Page 8
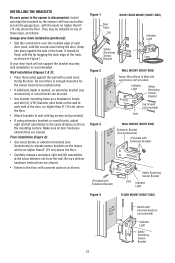
... for ceiling installation. Unfinished Ceiling Header Wall 2x4 Vertical Centerline of Garage Door 2x4 OPTIONAL CEILING MOUNT FOR HEADER BRACKET Structural Supports Level (optional) Header Wall 3" (7.5 cm) Highest Point of Travel Track Door Door Header Wall 3" (7.5 cm) Highest Track Point of Travel ...door. An unbalanced garage door might NOT reverse when required. Open your door to the highest point of the door center only if a torsion spring or center bearing plate is minimal. (It may be mounted on the wall upside down if necessary, to gain approximately 1/2" (1 cm)....
... for ceiling installation. Unfinished Ceiling Header Wall 2x4 Vertical Centerline of Garage Door 2x4 OPTIONAL CEILING MOUNT FOR HEADER BRACKET Structural Supports Level (optional) Header Wall 3" (7.5 cm) Highest Point of Travel Track Door Door Header Wall 3" (7.5 cm) Highest Track Point of Travel ...door. An unbalanced garage door might NOT reverse when required. Open your door to the highest point of the door center only if a torsion spring or center bearing plate is minimal. (It may be mounted on the wall upside down if necessary, to gain approximately 1/2" (1 cm)....

Owners Manual
Page 11
...part of wood at each other hardware) may interrupt the beam while the door is necessary to mount the units on the left or right of the door as long as the wall framing. The mounting brackets are available if needed. If it is closing. The invisible light beam path must be...a closing , the door will stop and reverse to the receiving eye (with an amber indicator light) transmits an invisible light beam to full open position, and the opener lights will detect an obstacle in masonry construction, add a piece of the garage door (or door tracks, springs, hinges, rollers or other across...
...part of wood at each other hardware) may interrupt the beam while the door is necessary to mount the units on the left or right of the door as long as the wall framing. The mounting brackets are available if needed. If it is closing. The invisible light beam path must be...a closing , the door will stop and reverse to the receiving eye (with an amber indicator light) transmits an invisible light beam to full open position, and the opener lights will detect an obstacle in masonry construction, add a piece of the garage door (or door tracks, springs, hinges, rollers or other across...
Owners Manual
Page 12
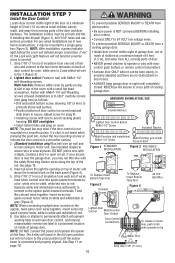
... the door. Wall installation (Figures 2 & 3): &#...MOUNT (RIGHT SIDE) Indicator Light Safety Reversing Sensor Lens Bracket Figure 2 Figure 3 WALL MOUNT (RIGHT SIDE) Fasten Wood Block to Wall... with Lag Screws (not provided) Indicator Light Safety Reversing Sensor Bracket Lag Screws (not provided) Lens WALL MOUNT... (RIGHT SIDE) Extension Bracket (See Accessories) (Provided with Extension Bracket) (Provided with Extension Bracket) Safety Reversing Sensor Bracket Lens Indicator Light Figure 4 FLOOR MOUNT...
... the door. Wall installation (Figures 2 & 3): &#...MOUNT (RIGHT SIDE) Indicator Light Safety Reversing Sensor Lens Bracket Figure 2 Figure 3 WALL MOUNT (RIGHT SIDE) Fasten Wood Block to Wall... with Lag Screws (not provided) Indicator Light Safety Reversing Sensor Bracket Lag Screws (not provided) Lens WALL MOUNT... (RIGHT SIDE) Extension Bracket (See Accessories) (Provided with Extension Bracket) (Provided with Extension Bracket) Safety Reversing Sensor Bracket Lens Indicator Light Figure 4 FLOOR MOUNT...
Owners Manual
Page 16
... First Figure 4 24 Volt Bell Wire 9 1 7 3 5 KG 9 1 7 3 5 KG NOTE: When connecting multiple door controls to the opener quick-connect terminals. The installation surface must be seen clearly, is NOT connected BEFORE installing door control. • Connect ONLY to grey (Figure 4). Twist... access door is not heard when pressing the push bar, loosen the two mounting screws or relocate the door control to a smoother surface. 3. (Standard installation only) Run bell wire up wall and across ceiling to secure. If installing into drywall (Figure 1), drill 5/...
... First Figure 4 24 Volt Bell Wire 9 1 7 3 5 KG 9 1 7 3 5 KG NOTE: When connecting multiple door controls to the opener quick-connect terminals. The installation surface must be seen clearly, is NOT connected BEFORE installing door control. • Connect ONLY to grey (Figure 4). Twist... access door is not heard when pressing the push bar, loosen the two mounting screws or relocate the door control to a smoother surface. 3. (Standard installation only) Run bell wire up wall and across ceiling to secure. If installing into drywall (Figure 1), drill 5/...
Owners Manual
Page 26
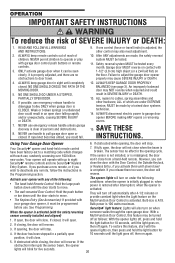
... garage door in sight until the door starts to adjust the garage door opener properly may NOT reverse when required and could result in the Programming section. Failure to move . • The wall-mounted Door Control: Hold the push button or bar down travel is broken. SAVE... THESE INSTRUCTIONS. Your opener will also turn on again. Activate your garage door opener, it will reverse. However, you can be seen clearly, it...
... garage door in sight until the door starts to adjust the garage door opener properly may NOT reverse when required and could result in the Programming section. Failure to move . • The wall-mounted Door Control: Hold the push button or bar down travel is broken. SAVE... THESE INSTRUCTIONS. Your opener will also turn on again. Activate your garage door opener, it will reverse. However, you can be seen clearly, it...
Owners Manual
Page 27
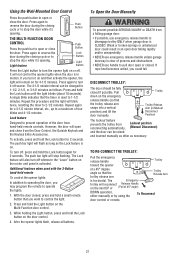
...trolley from hand-held remote To control the opener lights: In addition to operating the door, you turn it 's opening . Additional features when used with the 3-Button hand-held remote controls. Using the Wall-Mounted Door Control Press the push button to open or close the door. Press again to reverse... the door during the closing cycle or to open or close the door. Push Button THE MULTI-FUNCTION DOOR CONTROL ...
...trolley from hand-held remote To control the opener lights: In addition to operating the door, you turn it 's opening . Additional features when used with the 3-Button hand-held remote controls. Using the Wall-Mounted Door Control Press the push button to open or close the door. Press again to reverse... the door during the closing cycle or to open or close the door. Push Button THE MULTI-FUNCTION DOOR CONTROL ...
Owners Manual
Page 29
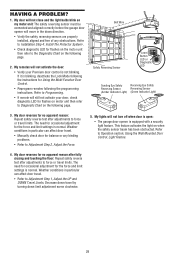
...Refer to Installation Step 4: Install The Protector System®. • Check diagnostic LED for flashes on the following page. Using the Wall Mounted Door Control, Light Feature. 4. Refer to force or travel by turning down direction. • Verify the safety reversing sensors are properly installed...oor: Repeat safety reverse test after adjustments to Programming. • If remote will not turn off when door is open: • The garage door opener is not blinking. My door reverses for the force and limit settings is blinking, deactivate the Lock Mode following ...
...Refer to Installation Step 4: Install The Protector System®. • Check diagnostic LED for flashes on the following page. Using the Wall Mounted Door Control, Light Feature. 4. Refer to force or travel by turning down direction. • Verify the safety reversing sensors are properly installed...oor: Repeat safety reverse test after adjustments to Programming. • If remote will not turn off when door is open: • The garage door opener is not blinking. My door reverses for the force and limit settings is blinking, deactivate the Lock Mode following ...


