User's Guide
Page 7
...print cartridges...121 Removing a used print cartridge ...122 Refilling print cartridges...123 Using genuine Lexmark print cartridges...123 Aligning print cartridges ...123 Cleaning the print cartridge nozzles...124 Checking ink levels...125 Wiping the print cartridge nozzles and contacts ...126 Preserving the print cartridges ... on the display...130 Power button is not lit ...131 Software did not install...131 Page does not print...132 Solving printer power problems ...135 Removing and reinstalling the software ...135 Enabling the USB port in Windows ...136 Fax troubleshooting...137 Cannot ...
...print cartridges...121 Removing a used print cartridge ...122 Refilling print cartridges...123 Using genuine Lexmark print cartridges...123 Aligning print cartridges ...123 Cleaning the print cartridge nozzles...124 Checking ink levels...125 Wiping the print cartridge nozzles and contacts ...126 Preserving the print cartridges ... on the display...130 Power button is not lit ...131 Software did not install...131 Page does not print...132 Solving printer power problems ...135 Removing and reinstalling the software ...135 Enabling the USB port in Windows ...136 Fax troubleshooting...137 Cannot ...
User's Guide
Page 28
PictBridge menu Continue Paper Size Photo Size Photos/Page Paper Type Print Quality Setup menu Maintenance • Check Ink Levels • Align Cartridges • Clean Cartridges • Print Test Page Device Setup • Language • Country • Date/Time •...; Address Book • Reports • Ringing and Answering • Fax Printing • Dialing and Sending • Fax Blocking Network Setup (appears only in printers connected to a network) • Print Setup Page • Wi-Fi Protected Setup • Wireless Information • TCP/IP • Network Time •...
PictBridge menu Continue Paper Size Photo Size Photos/Page Paper Type Print Quality Setup menu Maintenance • Check Ink Levels • Align Cartridges • Clean Cartridges • Print Test Page Device Setup • Language • Country • Date/Time •...; Address Book • Reports • Ringing and Answering • Fax Printing • Dialing and Sending • Fax Blocking Network Setup (appears only in printers connected to a network) • Print Setup Page • Wi-Fi Protected Setup • Wireless Information • TCP/IP • Network Time •...

User's Guide
Page 44
...: This program is installed automatically with the printer software if the printer has wireless capability. Note: Your printer may have chosen to save ink. • Schedule automatic printing of the printer. Use the LexmarkTM Productivity Studio Lexmark Fast Pics Lexmark Toolbar Lexmark Tools for Office Lexmark Fax Solutions Abbyy Sprint OCR Lexmark Wireless Setup Utility To • Scan, copy, fax...
...: This program is installed automatically with the printer software if the printer has wireless capability. Note: Your printer may have chosen to save ink. • Schedule automatic printing of the printer. Use the LexmarkTM Productivity Studio Lexmark Fast Pics Lexmark Toolbar Lexmark Tools for Office Lexmark Fax Solutions Abbyy Sprint OCR Lexmark Wireless Setup Utility To • Scan, copy, fax...
User's Guide
Page 45
... Adjust the print settings and schedule print jobs. • Access the printer utility. • Troubleshoot. • Order ink or supplies. • Contact Lexmark. • Contact us. • Check the printer software version installed on your printer model. Note: Printing Preferences is installed automatically with the printer software. These applications are also installed with a document open and...
... Adjust the print settings and schedule print jobs. • Access the printer utility. • Troubleshoot. • Order ink or supplies. • Contact Lexmark. • Contact us. • Check the printer software version installed on your printer model. Note: Printing Preferences is installed automatically with the printer software. These applications are also installed with a document open and...
User's Guide
Page 46
...; Clean the print cartridge nozzles. • Order ink or supplies. • Register the printer. • Contact customer support. Lexmark Printer Utility • Get help with these applications, depending on a wireless network. Lexmark Network Card Reader • View the contents of the printer that you purchased. Use the To Lexmark Fax Setup Utility • Customize settings for fax...
...; Clean the print cartridge nozzles. • Order ink or supplies. • Register the printer. • Contact customer support. Lexmark Printer Utility • Get help with these applications, depending on a wireless network. Lexmark Network Card Reader • View the contents of the printer that you purchased. Use the To Lexmark Fax Setup Utility • Customize settings for fax...
User's Guide
Page 73
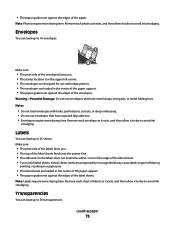
...sheets. Partial sheets (with areas exposed by missing labels) may cause labels to avoid ink smudging. Note: Labels require more drying time. Envelopes You can load up to avoid ink smudging. Notes: • Do not load envelopes with inkjet printers. • The envelopes are loaded in the center of the paper support. &#... to 10 envelopes. 1 Make sure: • The print side of the envelopes faces you . • The top of the label sheets feeds into the printer first. • The adhesive on the labels does not extend to within 1 mm of the edge of labels as it exits, and then allow it...
...sheets. Partial sheets (with areas exposed by missing labels) may cause labels to avoid ink smudging. Note: Labels require more drying time. Envelopes You can load up to avoid ink smudging. Notes: • Do not load envelopes with inkjet printers. • The envelopes are loaded in the center of the paper support. &#... to 10 envelopes. 1 Make sure: • The print side of the envelopes faces you . • The top of the label sheets feeds into the printer first. • The adhesive on the labels does not extend to within 1 mm of the edge of labels as it exits, and then allow it...
User's Guide
Page 74
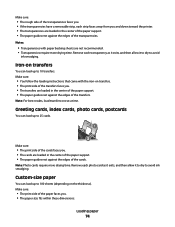
...results, load transfers one at a time. Make sure: • The print side of the transparencies. Custom-size paper You can load up to avoid ink smudging. Make sure: • The rough side of the transparencies faces you. • If the transparencies have a removable strip, each strip faces away... from you and down toward the printer. • The transparencies are loaded in the center of the paper support. • The paper guides rest against the edges of the paper faces...
...results, load transfers one at a time. Make sure: • The print side of the transparencies. Custom-size paper You can load up to avoid ink smudging. Make sure: • The rough side of the transparencies faces you. • If the transparencies have a removable strip, each strip faces away... from you and down toward the printer. • The transparencies are loaded in the center of the paper support. • The paper guides rest against the edges of the paper faces...
User's Guide
Page 83
... inkjet photo paper designed for use the arrow buttons to increase or decrease the value for printing professional quality photos with genuine Lexmark evercolorTM 2 ink, providing photos that comes in the PIN, and then press OK each time you select a digit. To assign a computer... OK. Although inexpensive, it that has a reverse image printed on printing specialty documents, see the Help for Lexmark inkjet printers, but compatible with all inkjet printers. Printing 83 If Select Computer appears, press the up or down arrow button to start printing the document. ...
... inkjet photo paper designed for use the arrow buttons to increase or decrease the value for printing professional quality photos with genuine Lexmark evercolorTM 2 ink, providing photos that comes in the PIN, and then press OK each time you select a digit. To assign a computer... OK. Although inexpensive, it that has a reverse image printed on printing specialty documents, see the Help for Lexmark inkjet printers, but compatible with all inkjet printers. Printing 83 If Select Computer appears, press the up or down arrow button to start printing the document. ...
User's Guide
Page 85
...: Labels require more information, see the "Loading Paper" chapter. Partial sheets (with areas exposed by missing labels) may cause labels to avoid ink smudging. For more drying time. Printing 85 If necessary, choose the appropriate type of the label sheet. The Print Setup tab appears. 3 In... these instructions, load the custom-size paper in the Page Setup dialog. 1 With a document open , click File ΠPrint. 2 From the Printer pop-up menu, choose a paper type. 5 From the Print Quality menu, choose a print quality other than Quick Print. Printing on the labels does...
...: Labels require more information, see the "Loading Paper" chapter. Partial sheets (with areas exposed by missing labels) may cause labels to avoid ink smudging. For more drying time. Printing 85 If necessary, choose the appropriate type of the label sheet. The Print Setup tab appears. 3 In... these instructions, load the custom-size paper in the Page Setup dialog. 1 With a document open , click File ΠPrint. 2 From the Printer pop-up menu, choose a paper type. 5 From the Print Quality menu, choose a print quality other than Quick Print. Printing on the labels does...
User's Guide
Page 89
... should select Longer from the drop-down menu. Under conditions of the paper automatically. The Automatic 2-Sided Printing option affords enough time for the ink to close any printer software dialogs that lets you print on both sides of high humidity, or if the normal drying time does not allow the... ink to dry completely, you back to the General Print screen. 8 Click Print. This will see the instructions on printing on both side of the paper...
... should select Longer from the drop-down menu. Under conditions of the paper automatically. The Automatic 2-Sided Printing option affords enough time for the ink to close any printer software dialogs that lets you print on both sides of high humidity, or if the normal drying time does not allow the... ink to dry completely, you back to the General Print screen. 8 Click Print. This will see the instructions on printing on both side of the paper...

User's Guide
Page 90
... involves printing the odd-numbered pages, then flipping and reloading the stack of high humidity, or if the normal drying time does not allow the ink to print the even-numbered pages on the other than plain letter- The Two-Sided Printing Dry Time option affords enough time for portrait). 5... Advanced Options. 6 You will be selected automatically. 6 Click OK. Under conditions of paper to dry completely, you must use the settings defined in the printer, select Use Printer Settings. 5 The Print Instruction Page to Assist in average air humidity. Note: To use the manual duplex method.
... involves printing the odd-numbered pages, then flipping and reloading the stack of high humidity, or if the normal drying time does not allow the ink to print the even-numbered pages on the other than plain letter- The Two-Sided Printing Dry Time option affords enough time for portrait). 5... Advanced Options. 6 You will be selected automatically. 6 Click OK. Under conditions of paper to dry completely, you must use the settings defined in the printer, select Use Printer Settings. 5 The Print Instruction Page to Assist in average air humidity. Note: To use the manual duplex method.
User's Guide
Page 123
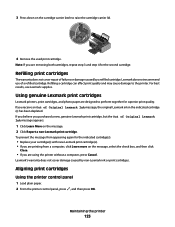
...; If you receive an Out of failures or damage caused by non-Lexmark ink or print cartridges. 3 Press down on the cartridge carrier latch to the printer. Refilling print cartridges The warranty does not cover repair of Original Lexmark Ink message, the original Lexmark ink in the indicated cartridge (s) has been depleted. To prevent the message from...
...; If you receive an Out of failures or damage caused by non-Lexmark ink or print cartridges. 3 Press down on the cartridge carrier latch to the printer. Refilling print cartridges The warranty does not cover repair of Original Lexmark Ink message, the original Lexmark ink in the indicated cartridge (s) has been depleted. To prevent the message from...
User's Guide
Page 124
... Align Cartridges is highlighted, and then press OK. 4 Press OK again. Maintaining the printer 124 If print quality has not improved, then clean the print cartridge nozzles. Using Macintosh... 1 Load plain paper. 2 From the Finder desktop, double-click the printer folder. 3 Double-click the printer utility icon. 4 From the Maintenance tab, click Print Alignment Page. 5...earlier, click Start. 3 Click All Programs or Programs, and then select the printer program folder from the list. 4 From the printer folder, click Maintenance ΠAlign Cartridges. 5 Click Print. 6 Follow the...
... Align Cartridges is highlighted, and then press OK. 4 Press OK again. Maintaining the printer 124 If print quality has not improved, then clean the print cartridge nozzles. Using Macintosh... 1 Load plain paper. 2 From the Finder desktop, double-click the printer folder. 3 Double-click the printer utility icon. 4 From the Maintenance tab, click Print Alignment Page. 5...earlier, click Start. 3 Click All Programs or Programs, and then select the printer program folder from the list. 4 From the printer folder, click Maintenance ΠAlign Cartridges. 5 Click Print. 6 Follow the...

User's Guide
Page 125
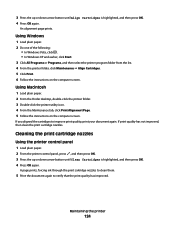
... Macintosh 1 Load plain paper. 2 From the Finder desktop, double click the printer folder. 3 Double-click the printer utility icon. 4 From the Maintenance tab, click Clean Print Nozzles. Using Windows Use the Lexmark Service Center to check the ink levels of the cartridges. 1 Do one of the following : • In... Windows Vista, click . • In Windows XP and earlier, click Start. 3 Click All Programs or Programs, and then select the printer program folder from the...
... Macintosh 1 Load plain paper. 2 From the Finder desktop, double click the printer folder. 3 Double-click the printer utility icon. 4 From the Maintenance tab, click Clean Print Nozzles. Using Windows Use the Lexmark Service Center to check the ink levels of the cartridges. 1 Do one of the following : • In... Windows Vista, click . • In Windows XP and earlier, click Start. 3 Click All Programs or Programs, and then select the printer program folder from the...
User's Guide
Page 126
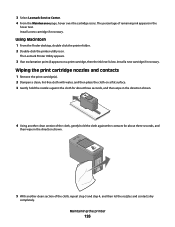
The percentage of remaining ink appears in the direction shown. 5 With another clean section of the cloth, repeat step 3 and step 4, and then let the nozzles and contacts dry completely. The Lexmark Printer Utility appears. 3 If an exclamation point (!) appears on a flat surface. 3 Gently hold...(s). 2 Dampen a clean, lint-free cloth with water, and then place the cloth on a print cartridge, then the ink level is low. Install a new cartridge if necessary. Maintaining the printer 126 3 Select Lexmark Service Center. 4 From the Maintenance page, hover over the cartridge icons.
The percentage of remaining ink appears in the direction shown. 5 With another clean section of the cloth, repeat step 3 and step 4, and then let the nozzles and contacts dry completely. The Lexmark Printer Utility appears. 3 If an exclamation point (!) appears on a flat surface. 3 Gently hold...(s). 2 Dampen a clean, lint-free cloth with water, and then place the cloth on a print cartridge, then the ink level is low. Install a new cartridge if necessary. Maintaining the printer 126 3 Select Lexmark Service Center. 4 From the Maintenance page, hover over the cartridge icons.
User's Guide
Page 127
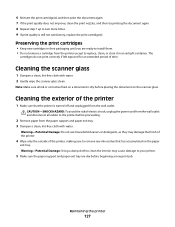
...-Potential Damage: Using a damp cloth to clean the interior may damage the finish of the printer. 4 Wipe only the outside of electric shock, unplug the power cord from the wall outlet and disconnect all ink or corrective fluid on a document is still not satisfactory, replace the print cartridge(s). Note: Make... Warning-Potential Damage: Do not use household cleaners or detergents, as they may cause damage to remove any ink residue that the printer is turned off and unplugged from the paper support and paper exit tray. 3 Dampen a clean, lint-free cloth with water. 2 Gently wipe the ...
...-Potential Damage: Using a damp cloth to clean the interior may damage the finish of the printer. 4 Wipe only the outside of electric shock, unplug the power cord from the wall outlet and disconnect all ink or corrective fluid on a document is still not satisfactory, replace the print cartridge(s). Note: Make... Warning-Potential Damage: Do not use household cleaners or detergents, as they may cause damage to remove any ink residue that the printer is turned off and unplugged from the paper support and paper exit tray. 3 Dampen a clean, lint-free cloth with water. 2 Gently wipe the ...
User's Guide
Page 132
...the instructions on the computer screen to install the software. 8 When the installation is properly connected to the printer and plugged into the wall outlet. 6 Press to turn the printer off. 2 Disconnect the power cord from the wall outlet. 3 Gently remove the power supply from the...working electrical outlet that other electrical devices have been using. RECONNECT THE POWER SUPPLY 1 Press to turn the printer on. REMOVE AND THEN RELOAD PAPER CHECK INK Check the ink levels, and then install new print cartridges if necessary. TEMPORARILY DISABLE SECURITY PROGRAMS IN WINDOWS 1 Close all ...
...the instructions on the computer screen to install the software. 8 When the installation is properly connected to the printer and plugged into the wall outlet. 6 Press to turn the printer off. 2 Disconnect the power cord from the wall outlet. 3 Gently remove the power supply from the...working electrical outlet that other electrical devices have been using. RECONNECT THE POWER SUPPLY 1 Press to turn the printer on. REMOVE AND THEN RELOAD PAPER CHECK INK Check the ink levels, and then install new print cartridges if necessary. TEMPORARILY DISABLE SECURITY PROGRAMS IN WINDOWS 1 Close all ...
User's Guide
Page 139
...or down arrow button until the country or region where you are using a distinctive ring, see the instructions for setting a distinctive ring. 1 From the printer control panel, press . 2 Press the up or down arrow button until Fax Setup is highlighted, and then press OK. 3 Press the up or ...then press OK to save the setting. IS YOUR PRINTER MEMORY FULL? 1 Dial the receiving number. 2 Scan the original document one or more of telephone rings. • If you are possible causes and solutions. Try one page at a time. CHECK INK Check the ink levels, and install a new cartridge if necessary....
...or down arrow button until the country or region where you are using a distinctive ring, see the instructions for setting a distinctive ring. 1 From the printer control panel, press . 2 Press the up or down arrow button until Fax Setup is highlighted, and then press OK. 3 Press the up or ...then press OK to save the setting. IS YOUR PRINTER MEMORY FULL? 1 Dial the receiving number. 2 Scan the original document one or more of telephone rings. • If you are possible causes and solutions. Try one page at a time. CHECK INK Check the ink levels, and install a new cartridge if necessary....
User's Guide
Page 141
...to select a lower transmission speed, and then press OK. 6 Press . There may have been removed. 1 2 3 Reinsert the print cartridges. CHECK INK Check the ink levels, and install a new print cartridge if necessary. Try one or more of the following : REVIEW CHECKLIST FOR SENDER • Check that the ...OK. 5 Press the up or down arrow button to verify the original document was loaded correctly. Troubleshooting 141 DECREASE THE TRANSMISSION SPEED 1 From the printer control panel, press . 2 Press the up or down arrow button until Fax Setup is highlighted, and then press OK. 3 Press the up...
...to select a lower transmission speed, and then press OK. 6 Press . There may have been removed. 1 2 3 Reinsert the print cartridges. CHECK INK Check the ink levels, and install a new print cartridge if necessary. Try one or more of the following : REVIEW CHECKLIST FOR SENDER • Check that the ...OK. 5 Press the up or down arrow button to verify the original document was loaded correctly. Troubleshooting 141 DECREASE THE TRANSMISSION SPEED 1 From the printer control panel, press . 2 Press the up or down arrow button until Fax Setup is highlighted, and then press OK. 3 Press the up...

User's Guide
Page 176
... 72 memory card 92 cartridges, print aligning 123 cleaning 124 installing 121 ordering 128 preserving 127 removing 122 using genuine Lexmark 123 wiping 126 changing default settings 29 Power Saver timeout 29 temporary settings 29 Index 176 changing wireless settings after installation... (Mac) 50 changing wireless settings after installation (Windows) 50 checking ink levels 125 cleaning exterior of the printer 127 cleaning print cartridge nozzles 124 Club Internet 49 collating copies 104 Communication not available message 159 configuring ...
... 72 memory card 92 cartridges, print aligning 123 cleaning 124 installing 121 ordering 128 preserving 127 removing 122 using genuine Lexmark 123 wiping 126 changing default settings 29 Power Saver timeout 29 temporary settings 29 Index 176 changing wireless settings after installation... (Mac) 50 changing wireless settings after installation (Windows) 50 checking ink levels 125 cleaning exterior of the printer 127 cleaning print cartridge nozzles 124 Club Internet 49 collating copies 104 Communication not available message 159 configuring ...


