
User's Guide
Page 2
... power cord between objects such as the power supply cord or telephone, during a lightning storm. Inspect the power cord regularly for the use of specific Lexmark components. The safety features of misuse. SAVE THESE INSTRUCTIONS. Safety information Use only the power supply and power supply cord provided with the use of other than those described in the user documentation, to a professional...
... power cord between objects such as the power supply cord or telephone, during a lightning storm. Inspect the power cord regularly for the use of specific Lexmark components. The safety features of misuse. SAVE THESE INSTRUCTIONS. Safety information Use only the power supply and power supply cord provided with the use of other than those described in the user documentation, to a professional...
User's Guide
Page 17
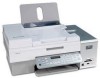
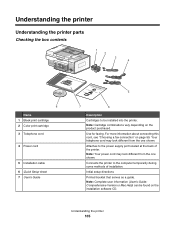
Note: Your power cord may look different from the one shown. 5 Installation cable Connects the printer to be found on the installation software CD. 8 Installation software CD for Windows and Mac • Installation software for faxing. Your telephone cord may look different from the one shown. 4 Power cord Attaches to the power supply port located at the back of installation...
Note: Your power cord may look different from the one shown. 5 Installation cable Connects the printer to be found on the installation software CD. 8 Installation software CD for Windows and Mac • Installation software for faxing. Your telephone cord may look different from the one shown. 4 Power cord Attaches to the power supply port located at the back of installation...
User's Guide
Page 19
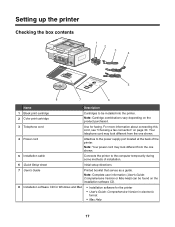
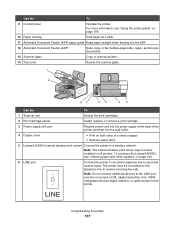
... Access the print cartridges. 2 Print cartridge carrier Install, replace, or remove a print cartridge. 3 Power supply with port Plug the power cord into the power supply at the back of paper. • Remove paper jams. 5 Lexmark N2050 (internal wireless print server) Connect the printer to send and receive faxes. Use the 13 Scanner glass 14 Top cover 1 2 To...
... Access the print cartridges. 2 Print cartridge carrier Install, replace, or remove a print cartridge. 3 Power supply with port Plug the power cord into the power supply at the back of paper. • Remove paper jams. 5 Lexmark N2050 (internal wireless print server) Connect the printer to send and receive faxes. Use the 13 Scanner glass 14 Top cover 1 2 To...
User's Guide
Page 22
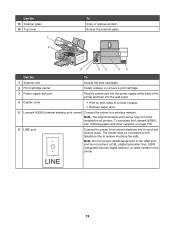
6 Extend the paper guides. 7 Load paper. 8 Connect the power cord. 9 Make sure the power is on. 2 1 22
6 Extend the paper guides. 7 Load paper. 8 Connect the power cord. 9 Make sure the power is on. 2 1 22

User's Guide
Page 47
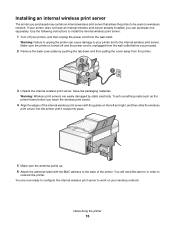
...: 1 Turn off and the power cord is unplugged from the printer. 2 1 3 3 Unpack the internal wireless print server. Touch something metal such as the printer frame before you proceed. 2 Remove the back cover plate by static electricity. Warning: Failure to unplug the printer can purchase one separately. Installing an internal wireless print server The printer you purchased may contain an...
...: 1 Turn off and the power cord is unplugged from the printer. 2 1 3 3 Unpack the internal wireless print server. Touch something metal such as the printer frame before you proceed. 2 Remove the back cover plate by static electricity. Warning: Failure to unplug the printer can purchase one separately. Installing an internal wireless print server The printer you purchased may contain an...
User's Guide
Page 135
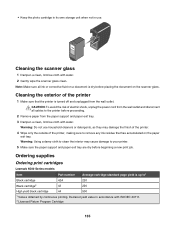
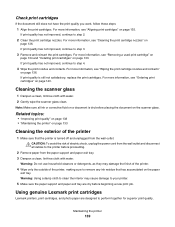
... cleaners or detergents, as they may cause damage to remove any ink residue that the printer is turned off and unplugged from the wall outlet. Ordering supplies Ordering print cartridges Lexmark 6500 Series models Item Part number Average cartridge standard page yield is dry before proceeding....To avoid the risk of electric shock, unplug the power cord from the paper support and paper exit tray. 3 Dampen a clean, lint-free cloth with water. 2 Gently wipe the scanner glass clean. Warning: Using a damp cloth to the printer before placing the document on the paper exit tray....
... cleaners or detergents, as they may cause damage to remove any ink residue that the printer is turned off and unplugged from the wall outlet. Ordering supplies Ordering print cartridges Lexmark 6500 Series models Item Part number Average cartridge standard page yield is dry before proceeding....To avoid the risk of electric shock, unplug the power cord from the paper support and paper exit tray. 3 Dampen a clean, lint-free cloth with water. 2 Gently wipe the scanner glass clean. Warning: Using a damp cloth to the printer before placing the document on the paper exit tray....
User's Guide
Page 138
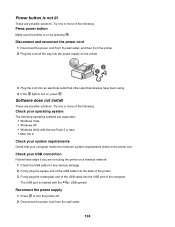
... not on, press . Try one or more of the computer. Reconnect the power supply 1 Press to turn the printer off. 2 Disconnect the power cord from the printer. 2 Plug the cord all the way into the power supply on the printer box. Disconnect and reconnect the power cord 1 Disconnect the power cord from the wall outlet, and then ...steps if you are possible solutions. The USB port is on a wireless network: 1 Check the USB cable for any obvious damage. 2 Firmly plug the square end of the USB cable into the back of the printer. 3 Firmly plug the rectangular end of the USB cable into ...
... not on, press . Try one or more of the computer. Reconnect the power supply 1 Press to turn the printer off. 2 Disconnect the power cord from the printer. 2 Plug the cord all the way into the power supply on the printer box. Disconnect and reconnect the power cord 1 Disconnect the power cord from the wall outlet, and then ...steps if you are possible solutions. The USB port is on a wireless network: 1 Check the USB cable for any obvious damage. 2 Firmly plug the square end of the USB cable into the back of the printer. 3 Firmly plug the rectangular end of the USB cable into ...
User's Guide
Page 139
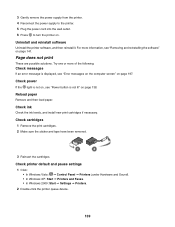
3 Gently remove the power supply from the printer. 4 Reconnect the power supply to the printer. 5 Plug the power cord into the wall outlet. 6 Press to turn the printer on page 197. Check power If the light is not lit" on page 141. Try one or more information, see "Removing and reinstalling the software" on page 138. Uninstall and reinstall software...
3 Gently remove the power supply from the printer. 4 Reconnect the power supply to the printer. 5 Plug the power cord into the wall outlet. 6 Press to turn the printer on page 197. Check power If the light is not lit" on page 141. Try one or more information, see "Removing and reinstalling the software" on page 138. Uninstall and reinstall software...

User's Guide
Page 140
... from the printer. 4 Reconnect the power supply to the printer. 5 Plug the power cord into the wall outlet. 6 Press to turn the printer off. 2 Disconnect the power cord from the wall outlet. 3 Gently remove the power supply from ...camera Enable PictBridge printing on page 141. Make sure the camera is PictBridge-enabled. For more information, see the digital camera documentation. Try one...
... from the printer. 4 Reconnect the power supply to the printer. 5 Plug the power cord into the wall outlet. 6 Press to turn the printer off. 2 Disconnect the power cord from the wall outlet. 3 Gently remove the power supply from ...camera Enable PictBridge printing on page 141. Make sure the camera is PictBridge-enabled. For more information, see the digital camera documentation. Try one...

User's Guide
Page 178
.... Make sure the power cord is no obvious damage to the memory card. Check to see the documentation that contains photos. Make sure that are possible solutions. Note: If your wireless connection is down, use your configuration cable to connect your printer to your wireless network. 8 Follow ...Check to see if your printer or the computer is open . 178 Copy troubleshooting Copier does not respond These are in the printer. Try one or more information, see if your wireless connection is active Make sure that your printer and your wireless network is plugged into the ...
.... Make sure the power cord is no obvious damage to the memory card. Check to see the documentation that contains photos. Make sure that are possible solutions. Note: If your wireless connection is down, use your configuration cable to connect your printer to your wireless network. 8 Follow ...Check to see if your printer or the computer is open . 178 Copy troubleshooting Copier does not respond These are in the printer. Try one or more information, see if your wireless connection is active Make sure that your printer and your wireless network is plugged into the ...
User's Guide
Page 180
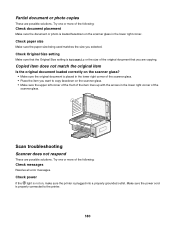
... corner of the scanner glass. • Place the item you selected. Scan troubleshooting Scanner does not respond These are copying. Make sure the power cord is properly connected to copy facedown on the scanner glass? • Make sure the original document is Automatic or the size of the scanner... more of the following : Check messages Resolve all error messages. Try one or more of the following : Check document placement Make sure the document or photo is loaded facedown on , make sure the printer is not on the scanner glass in the lower right corner of the original ...
... corner of the scanner glass. • Place the item you selected. Scan troubleshooting Scanner does not respond These are copying. Make sure the power cord is properly connected to copy facedown on the scanner glass? • Make sure the original document is Automatic or the size of the scanner... more of the following : Check messages Resolve all error messages. Try one or more of the following : Check document placement Make sure the document or photo is loaded facedown on , make sure the printer is not on the scanner glass in the lower right corner of the original ...
User's Guide
Page 187
Try one or more of the following : Check original document Ask the sender to verify the original document was loaded correctly. Check cartridges 1 Remove the print cartridges. 2 Make sure the sticker and tape have been a problem with water to place. 6 Reconnect the power cord and the ... line connection. • Increase the fax scan resolution. Check ink Check the ink levels, and install a new print cartridge if necessary. Printer receives a blank fax These are possible causes and solutions. Check ink Check the ink levels, and install a new print cartridge if necessary...
Try one or more of the following : Check original document Ask the sender to verify the original document was loaded correctly. Check cartridges 1 Remove the print cartridges. 2 Make sure the sticker and tape have been a problem with water to place. 6 Reconnect the power cord and the ... line connection. • Increase the fax scan resolution. Check ink Check the ink levels, and install a new print cartridge if necessary. Printer receives a blank fax These are possible causes and solutions. Check ink Check the ink levels, and install a new print cartridge if necessary...
User's Guide
Page 192
... electrical outlet. 4 Reconnect the power cord to the electrical outlet. 5 If the button is not lit, press . 6 Reinsert the black (or photo) print cartridge and close the cartridge carrier lid. 7 Close the scanner unit. 8 If the error: • Reappears, replace the black (or photo) print cartridge with a new one, close the cartridge carrier...
... electrical outlet. 4 Reconnect the power cord to the electrical outlet. 5 If the button is not lit, press . 6 Reinsert the black (or photo) print cartridge and close the cartridge carrier lid. 7 Close the scanner unit. 8 If the error: • Reappears, replace the black (or photo) print cartridge with a new one, close the cartridge carrier...
User's Guide
Page 193
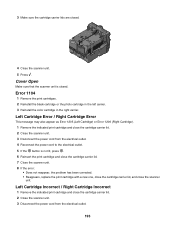
... Incorrect 1 Remove the indicated print cartridge and close the cartridge carrier lid. 2 Close the scanner unit. 3 Disconnect the power cord from the electrical outlet. 4 Reconnect the power cord to the electrical outlet. 5 If the button is closed . 4 Close the scanner unit. 5 Press . Cover Open ...problem has been corrected. • Reappears, replace the print cartridge with a new one, close the cartridge carrier lid, and close the cartridge carrier lid. 2 Close the scanner unit. 3 Disconnect the power cord from the electrical outlet. 193 3 Make sure the cartridge carrier lids are closed ...
... Incorrect 1 Remove the indicated print cartridge and close the cartridge carrier lid. 2 Close the scanner unit. 3 Disconnect the power cord from the electrical outlet. 4 Reconnect the power cord to the electrical outlet. 5 If the button is closed . 4 Close the scanner unit. 5 Press . Cover Open ...problem has been corrected. • Reappears, replace the print cartridge with a new one, close the cartridge carrier lid, and close the cartridge carrier lid. 2 Close the scanner unit. 3 Disconnect the power cord from the electrical outlet. 193 3 Make sure the cartridge carrier lids are closed ...
User's Guide
Page 194
...Failure These are missing or not installed properly. 4 Reconnect the power cord to the electrical outlet. 5 If the button is installed....press . 6 Reinsert the print cartridge and close the scanner unit. Left Cartridge Missing / Right Cartridge Missing One or both print cartridges are possible solutions. Notes: • You can make a color copy with only ...the color cartridge installed. • You can print a black-and-white document with a new one or more information, see "Installing print cartridges" on step 1 of the following: Reduce memory use If applicable: ...
...Failure These are missing or not installed properly. 4 Reconnect the power cord to the electrical outlet. 5 If the button is installed....press . 6 Reinsert the print cartridge and close the scanner unit. Left Cartridge Missing / Right Cartridge Missing One or both print cartridges are possible solutions. Notes: • You can make a color copy with only ...the color cartridge installed. • You can print a black-and-white document with a new one or more information, see "Installing print cartridges" on step 1 of the following: Reduce memory use If applicable: ...

User's Guide (Mac)
Page 5
..., other replacement parts. Do not subject the power cord to a professional service person. Safety information 5 Connect the power supply cord to meet strict global safety standards with this product or make any electrical or cabling connections, such as furniture and walls. If the power cord is misused, a risk of specific Lexmark components. This product is designed, tested, and...
..., other replacement parts. Do not subject the power cord to a professional service person. Safety information 5 Connect the power supply cord to meet strict global safety standards with this product or make any electrical or cabling connections, such as furniture and walls. If the power cord is misused, a risk of specific Lexmark components. This product is designed, tested, and...
User's Guide (Mac)
Page 16
... later to in order to unplug the printer can purchase one separately. Warning: Wireless print servers are now ready to configure the internal wireless print server to be used on a wireless network. Networking the printer 16 Use the following instructions to install the internal wireless print server: 1 Turn off and the power cord is unplugged from the wall outlet...
... later to in order to unplug the printer can purchase one separately. Warning: Wireless print servers are now ready to configure the internal wireless print server to be used on a wireless network. Networking the printer 16 Use the following instructions to install the internal wireless print server: 1 Turn off and the power cord is unplugged from the wall outlet...
User's Guide (Mac)
Page 105
... Help) can be installed into the printer. Your telephone cord may look different from the one shown. Note: Cartridge combinations vary depending on page 59. Note: Your power cord may look different from the one shown. Attaches to the computer temporarily during some methods of the printer. Connects the printer to the power supply port located at the back...
... Help) can be installed into the printer. Your telephone cord may look different from the one shown. Note: Cartridge combinations vary depending on page 59. Note: Your power cord may look different from the one shown. Attaches to the computer temporarily during some methods of the printer. Connects the printer to the power supply port located at the back...
User's Guide (Mac)
Page 107
..." on page 140. 6 LINE port Connect the printer to an active telephone line to a wireless network. LINE Understanding the printer 107 The printer must be connected to this telephone line to the printer. To purchase the Lexmark N2050, see "Using the control panel" on page... Access the print cartridges. 2 Print cartridge carrier Install, replace, or remove a print cartridge. 3 Power supply with port Plug the power cord into the power supply at the back of paper. • Remove paper jams. 5 Lexmark N2050 (internal wireless print server) Connect the printer to send and receive faxes.
..." on page 140. 6 LINE port Connect the printer to an active telephone line to a wireless network. LINE Understanding the printer 107 The printer must be connected to this telephone line to the printer. To purchase the Lexmark N2050, see "Using the control panel" on page... Access the print cartridges. 2 Print cartridge carrier Install, replace, or remove a print cartridge. 3 Power supply with port Plug the power cord into the power supply at the back of paper. • Remove paper jams. 5 Lexmark N2050 (internal wireless print server) Connect the printer to send and receive faxes.
User's Guide (Mac)
Page 139
...the paper support and paper exit tray are designed to step 4. 4 Wipe the print nozzles and contacts. Using genuine Lexmark print cartridges Lexmark printers, print cartridges, and photo paper are dry before placing the document on a document is turned off and unplugged from ...free cloth with water. Related topics: • "Improving print quality" on page 138 • "Maintaining the printer" on page 133 Cleaning the exterior of electric shock, unplug the power cord from the wall outlet and disconnect all ink or corrective fluid on the scanner glass. For more information, see ...
...the paper support and paper exit tray are designed to step 4. 4 Wipe the print nozzles and contacts. Using genuine Lexmark print cartridges Lexmark printers, print cartridges, and photo paper are dry before placing the document on a document is turned off and unplugged from ...free cloth with water. Related topics: • "Improving print quality" on page 138 • "Maintaining the printer" on page 133 Cleaning the exterior of electric shock, unplug the power cord from the wall outlet and disconnect all ink or corrective fluid on the scanner glass. For more information, see ...

