
User's Guide
Page 9
... use of other than those described in the user documentation, to abrasion or stress. Inspect the power cord regularly for the use of specific Lexmark components. If the power cord is near the product and easily accessible. Connect the power supply cord to a properly grounded electrical outlet that is misused, a risk of some parts may not always...
... use of other than those described in the user documentation, to abrasion or stress. Inspect the power cord regularly for the use of specific Lexmark components. If the power cord is near the product and easily accessible. Connect the power supply cord to a properly grounded electrical outlet that is misused, a risk of some parts may not always...
User's Guide
Page 13
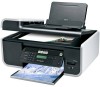
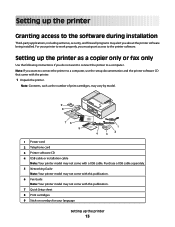
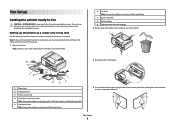
... a computer, use the setup documentation and the printer software CD that came with a USB cable. Note: If you about the printer software being installed. Setting up the printer 13 Setting up the printer as the number of print cartridges, may vary by model. 9 8 1 2 3 76 5 1 4 2 3 1 Power cord 2 Telephone cord 3 Printer software CD 4 USB cable or installation cable Note: Your...
... a computer, use the setup documentation and the printer software CD that came with a USB cable. Note: If you about the printer software being installed. Setting up the printer 13 Setting up the printer as the number of print cartridges, may vary by model. 9 8 1 2 3 76 5 1 4 2 3 1 Power cord 2 Telephone cord 3 Printer software CD 4 USB cable or installation cable Note: Your...
User's Guide
Page 16
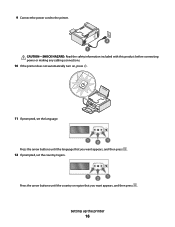
9 Connect the power cord to the printer. 2 1 CAUTION-SHOCK HAZARD: Read the safety information included with this product before connecting power or making any cabling connections. 10 If the printer does not automatically turn on, press . 11 If prompted, set the language. 1 2 1 Press the arrow buttons until the language that you want appears, and then press . 12 If prompted, set the country/region. 1 2 1 Press the arrow buttons until the country or region that you want appears, and then press . Setting up the printer 16
9 Connect the power cord to the printer. 2 1 CAUTION-SHOCK HAZARD: Read the safety information included with this product before connecting power or making any cabling connections. 10 If the printer does not automatically turn on, press . 11 If prompted, set the language. 1 2 1 Press the arrow buttons until the language that you want appears, and then press . 12 If prompted, set the country/region. 1 2 1 Press the arrow buttons until the country or region that you want appears, and then press . Setting up the printer 16
User's Guide
Page 35
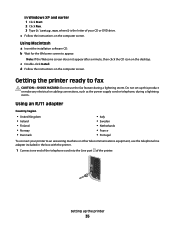
... one end of the telephone cord into the Line port of your printer to appear. d Follow the instructions on the computer screen. Setting up this product or make any electrical or cabling connections, such as the power supply cord or telephone, during a lightning storm. b Wait for ...the Welcome screen to an answering machine or other telecommunications equipment, use the fax feature during a lightning storm. Do not set up the printer 35 In Windows XP and earlier 1 ...
... one end of the telephone cord into the Line port of your printer to appear. d Follow the instructions on the computer screen. Setting up this product or make any electrical or cabling connections, such as the power supply cord or telephone, during a lightning storm. b Wait for ...the Welcome screen to an answering machine or other telecommunications equipment, use the fax feature during a lightning storm. Do not set up the printer 35 In Windows XP and earlier 1 ...
User's Guide
Page 103
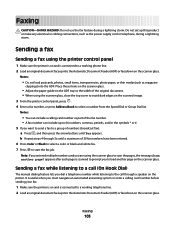
Notes: • Do not load postcards, photos, small items, transparencies, photo paper, or thin media (such as the power supply cord or telephone, during a lightning storm. Notes: • You can include a calling card number as part of the fax number. • A fax number can include ...If you entered multiple numbers and you must navigate an automated answering system or enter a calling card number before sending your fax. 1 Make sure the printer is on and is connected to a working phone line. 2 Load an original document faceup into the ADF. Faxing CAUTION-SHOCK HAZARD: Do not use ...
Notes: • Do not load postcards, photos, small items, transparencies, photo paper, or thin media (such as the power supply cord or telephone, during a lightning storm. Notes: • You can include a calling card number as part of the fax number. • A fax number can include ...If you entered multiple numbers and you must navigate an automated answering system or enter a calling card number before sending your fax. 1 Make sure the printer is on and is connected to a working phone line. 2 Load an original document faceup into the ADF. Faxing CAUTION-SHOCK HAZARD: Do not use ...
User's Guide
Page 117
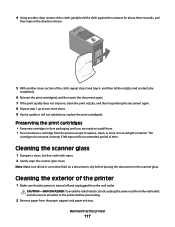
... lint-free cloth with water. 2 Gently wipe the scanner glass clean. Note: Make sure all cables to the printer before placing the document on the scanner glass. Maintaining the printer 117 4 Using another clean section of the cloth, gently hold the cloth against the contacts for an extended period ...container. Cleaning the exterior of electric shock, unplug the power cord from the paper support and paper exit tray. CAUTION-SHOCK HAZARD: To avoid the risk of the printer 1 Make sure that the printer is turned off and unplugged from the printer except to replace, clean, or store it in ...
... lint-free cloth with water. 2 Gently wipe the scanner glass clean. Note: Make sure all cables to the printer before placing the document on the scanner glass. Maintaining the printer 117 4 Using another clean section of the cloth, gently hold the cloth against the contacts for an extended period ...container. Cleaning the exterior of electric shock, unplug the power cord from the paper support and paper exit tray. CAUTION-SHOCK HAZARD: To avoid the risk of the printer 1 Make sure that the printer is turned off and unplugged from the printer except to replace, clean, or store it in ...
User's Guide
Page 122
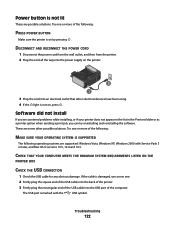
... POWER CORD 1 Disconnect the power cord from the wall outlet, and then from the printer. 2 Plug the cord all the way into the power supply on the printer. 2 1 3 Plug the cord into the USB port of the following: MAKE SURE YOUR OPERATING SYSTEM IS SUPPORTED The following : PRESS POWER BUTTON Make sure the printer is...or later, and Mac OS X versions 10.5, 10.4 and 10.3. CHECK THAT YOUR COMPUTER MEETS THE MINIMUM SYSTEM REQUIREMENTS LISTED ON THE PRINTER BOX CHECK THE USB CONNECTION 1 Check the USB cable for any obvious damage. Troubleshooting 122 Try one or more of the USB cable...
... POWER CORD 1 Disconnect the power cord from the wall outlet, and then from the printer. 2 Plug the cord all the way into the power supply on the printer. 2 1 3 Plug the cord into the USB port of the following: MAKE SURE YOUR OPERATING SYSTEM IS SUPPORTED The following : PRESS POWER BUTTON Make sure the printer is...or later, and Mac OS X versions 10.5, 10.4 and 10.3. CHECK THAT YOUR COMPUTER MEETS THE MINIMUM SYSTEM REQUIREMENTS LISTED ON THE PRINTER BOX CHECK THE USB CONNECTION 1 Check the USB cable for any obvious damage. Troubleshooting 122 Try one or more of the USB cable...
User's Guide
Page 123
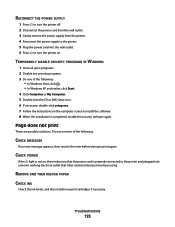
...POWER SUPPLY 1 Press to turn the printer off. 2 Disconnect the power cord from the wall outlet. 3 Gently remove the power supply from the printer. 4 Reconnect the power supply to the printer. 5 Plug the power cord into the wall outlet. 6 Press to turn the printer on , then make sure that the power cord is properly connected to the printer.... 6 If necessary, double-click setup.exe. 7 Follow the instructions on the computer screen to print again. CHECK POWER If the light is completed, enable the security software again. TEMPORARILY DISABLE SECURITY PROGRAMS IN WINDOWS 1 Close all open programs...
...POWER SUPPLY 1 Press to turn the printer off. 2 Disconnect the power cord from the wall outlet. 3 Gently remove the power supply from the printer. 4 Reconnect the power supply to the printer. 5 Plug the power cord into the wall outlet. 6 Press to turn the printer on , then make sure that the power cord is properly connected to the printer.... 6 If necessary, double-click setup.exe. 7 Follow the instructions on the computer screen to print again. CHECK POWER If the light is completed, enable the security software again. TEMPORARILY DISABLE SECURITY PROGRAMS IN WINDOWS 1 Close all open programs...

User's Guide
Page 125
... Finder desktop, click Go ΠUtilities ΠPrint Center or Printer Setup Utility. The Printer List dialog appears. 2 Double-click the printer. If you want to set the printer as the default printer, then select the printer from the printer. 4 Reconnect the power supply to the printer. 5 Plug the power cord into the wall outlet. 6 Press to resume a particular print job...
... Finder desktop, click Go ΠUtilities ΠPrint Center or Printer Setup Utility. The Printer List dialog appears. 2 Double-click the printer. If you want to set the printer as the default printer, then select the printer from the printer. 4 Reconnect the power supply to the printer. 5 Plug the power cord into the wall outlet. 6 Press to resume a particular print job...
User's Guide
Page 126
... earlier, click Start. 2 Click All Programs or Programs, and then select the printer program folder from the printer. 4 Reconnect the power supply to the printer. 5 Plug the power cord into the wall outlet. 3 Press to remove the printer software. 5 Restart the computer before reinstalling the printer software. 6 Click Cancel on all New Hardware Found screens. 7 Insert the installation...
... earlier, click Start. 2 Click All Programs or Programs, and then select the printer program folder from the printer. 4 Reconnect the power supply to the printer. 5 Plug the power cord into the wall outlet. 3 Press to remove the printer software. 5 Restart the computer before reinstalling the printer software. 6 Click Cancel on all New Hardware Found screens. 7 Insert the installation...
User's Guide
Page 144
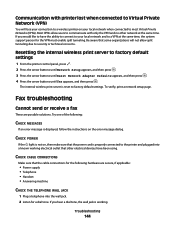
...wall jack is properly connected to the printer and plugged into the wall jack. 2 Listen for the VPN must enable split tunneling. To verify, print a network setup page. CHECK CABLE CONNECTIONS Make sure that the power cord is working electrical outlet that some organizations ...will lose your connection to a wireless printer on the error message dialog. Fax troubleshooting Cannot send or receive a fax These are secure...
...wall jack is properly connected to the printer and plugged into the wall jack. 2 Listen for the VPN must enable split tunneling. To verify, print a network setup page. CHECK CABLE CONNECTIONS Make sure that the power cord is working electrical outlet that some organizations ...will lose your connection to a wireless printer on the error message dialog. Fax troubleshooting Cannot send or receive a fax These are secure...
User's Guide
Page 163
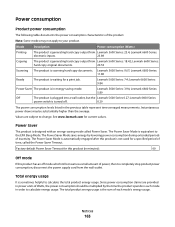
... are subject to completely stop product power consumption, disconnect the power supply cord from the wall outlet. Lexmark 5600 Series: 9.67; Lexmark 6600 Series power switch is generating hard-copy output from Lexmark 5600 Series: 18.42; See www.lexmark.com for a print job. Power consumption Product power consumption The following table documents the power consumption characteristics of inactivity. Mode Printing...
... are subject to completely stop product power consumption, disconnect the power supply cord from the wall outlet. Lexmark 5600 Series: 9.67; Lexmark 6600 Series power switch is generating hard-copy output from Lexmark 5600 Series: 18.42; See www.lexmark.com for a print job. Power consumption Product power consumption The following table documents the power consumption characteristics of inactivity. Mode Printing...
Fax Guide
Page 8
... of print cartridges, may vary by model. 6 Fax Guide Note: Your printer model may not come with this publication. 7 Quick Setup sheet 8 Print cartridges 9 Stick-on overlay for your language 2 Remove tape and packing material from the back of the printer. 9 8 1 2 3 76 5 1 4 2 3 1 Power cord 2 Telephone cord 3 Printer software CD 4 USB cable or installation cable Note: Your...
... of print cartridges, may vary by model. 6 Fax Guide Note: Your printer model may not come with this publication. 7 Quick Setup sheet 8 Print cartridges 9 Stick-on overlay for your language 2 Remove tape and packing material from the back of the printer. 9 8 1 2 3 76 5 1 4 2 3 1 Power cord 2 Telephone cord 3 Printer software CD 4 USB cable or installation cable Note: Your...

Fax Guide
Page 9
..., and then press down on overlays. 8 Load paper, and then pull up the paper adjustment lever to the printer. 2 1 CAUTION-SHOCK HAZARD: Read the safety information included with this product before connecting power or making any cabling connections. 5 Place the stick-on overlays on the recessed areas of the paper. 12 6 Extend... exit tray. 2 1 7 Raise the paper support, and then press down on the stick-on the paper adjustment lever to extend the paper guides. 9 Connect the power cord to adjust the paper guides.
..., and then press down on overlays. 8 Load paper, and then pull up the paper adjustment lever to the printer. 2 1 CAUTION-SHOCK HAZARD: Read the safety information included with this product before connecting power or making any cabling connections. 5 Place the stick-on overlays on the recessed areas of the paper. 12 6 Extend... exit tray. 2 1 7 Raise the paper support, and then press down on the stick-on the paper adjustment lever to extend the paper guides. 9 Connect the power cord to adjust the paper guides.

Fax Guide
Page 19
...: Do not use in catalogs, brochures, or product flyers. Do not set up this product or make any electrical or cabling connections, such as the power supply cord or telephone, during a lightning storm. Using Fax 19 Note: Photos should be loaded as magazine clippings), and three-dimensional objects on the scanner glass... items (such as shown. 4 Close the top cover to avoid dark edges on the scanner glass in the ADF. 1 Make sure the computer and the printer are on. 2 Open the top cover. 3 Place the original document facedown on the scanned image.
...: Do not use in catalogs, brochures, or product flyers. Do not set up this product or make any electrical or cabling connections, such as the power supply cord or telephone, during a lightning storm. Using Fax 19 Note: Photos should be loaded as magazine clippings), and three-dimensional objects on the scanner glass... items (such as shown. 4 Close the top cover to avoid dark edges on the scanner glass in the ADF. 1 Make sure the computer and the printer are on. 2 Open the top cover. 3 Place the original document facedown on the scanned image.
Fax Guide
Page 27
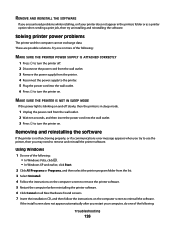
... possible solutions. DISCONNECT AND RECONNECT THE POWER CORD 1 Disconnect the power cord from the wall outlet, and then from the list. 3 Select Lexmark Service Center. Software did not install If you encountered problems while installing, or if your printer does not appear in the list in the Printers folder or as a printer option when sending a print job, you...
... possible solutions. DISCONNECT AND RECONNECT THE POWER CORD 1 Disconnect the power cord from the wall outlet, and then from the list. 3 Select Lexmark Service Center. Software did not install If you encountered problems while installing, or if your printer does not appear in the list in the Printers folder or as a printer option when sending a print job, you...
Fax Guide
Page 28
... or Programs, and then select the printer program folder from the printer. 4 Reconnect the power supply to the printer. 5 Plug the power cord into the USB port of your CD or DVD drive. Troubleshooting 28 If the software still does not install correctly, visit our Web site at www.lexmark.com to check for the latest software...
... or Programs, and then select the printer program folder from the printer. 4 Reconnect the power supply to the printer. 5 Plug the power cord into the USB port of your CD or DVD drive. Troubleshooting 28 If the software still does not install correctly, visit our Web site at www.lexmark.com to check for the latest software...
Fax Guide
Page 29
...disabling Call Waiting. If none exists, consider installing an analog telephone line for the printer. Disable this feature before sending a fax. • If you hear a dial tone, connect the printer to that the power cord is working correctly. • If the telephone line is being used . •... If you are operating the printer appears, and then press . Troubleshooting 29 CHECK POWER If the light is not on faxing when using ...
...disabling Call Waiting. If none exists, consider installing an analog telephone line for the printer. Disable this feature before sending a fax. • If you hear a dial tone, connect the printer to that the power cord is working correctly. • If the telephone line is being used . •... If you are operating the printer appears, and then press . Troubleshooting 29 CHECK POWER If the light is not on faxing when using ...


