Wireless Setup Guide
Page 10
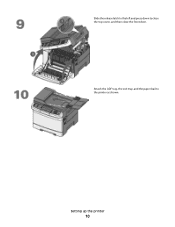
Attach the ADF tray, the exit tray, and the paper bail to close the top cover, and then close the front door. Setting up the printer 10 Slide the release latch to the left and press down to the printer as shown.
Attach the ADF tray, the exit tray, and the paper bail to close the top cover, and then close the front door. Setting up the printer 10 Slide the release latch to the left and press down to the printer as shown.
Wireless Setup Guide
Page 11
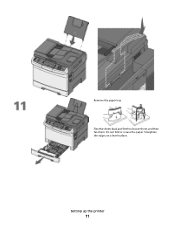
Straighten the edges on a level surface. Do not fold or crease the paper. Setting up the printer 11 Flex the sheets back and forth to loosen them, and then fan them. Remove the paper tray.
Straighten the edges on a level surface. Do not fold or crease the paper. Setting up the printer 11 Flex the sheets back and forth to loosen them, and then fan them. Remove the paper tray.
Wireless Setup Guide
Page 12
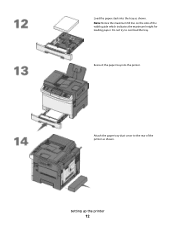
Do not try to the rear of the width guide which indicates the maximum height for loading paper. Attach the paper tray dust cover to overload the tray. Note: Notice the maximum fill line on the side of the printer as shown. Setting up the printer 12 Load the paper stack into the printer. Reinsert the paper tray into the tray as shown.
Do not try to the rear of the width guide which indicates the maximum height for loading paper. Attach the paper tray dust cover to overload the tray. Note: Notice the maximum fill line on the side of the printer as shown. Setting up the printer 12 Load the paper stack into the printer. Reinsert the paper tray into the tray as shown.

User's Guide
Page 2
...options ...23 Installing a memory card ...23 Installing a flash memory or font card ...27 Installing hardware options...30 Installing an optional tray or drawer ...30 Attaching cables...32 Verifying printer setup...33 Printing menu settings pages ...34 Printing a network setup page ...34 ...network (Macintosh 38 Installing the printer on a wired network ...40 Minimizing your printer's environmental impact 43 Saving paper and toner...43 Using recycled paper and other office papers ...43 Conserving supplies...44 Saving energy...45 Using Eco-Mode ...45 Reducing printer noise ...46 Adjusting Power ...
...options ...23 Installing a memory card ...23 Installing a flash memory or font card ...27 Installing hardware options...30 Installing an optional tray or drawer ...30 Attaching cables...32 Verifying printer setup...33 Printing menu settings pages ...34 Printing a network setup page ...34 ...network (Macintosh 38 Installing the printer on a wired network ...40 Minimizing your printer's environmental impact 43 Saving paper and toner...43 Using recycled paper and other office papers ...43 Conserving supplies...44 Saving energy...45 Using Eco-Mode ...45 Reducing printer noise ...46 Adjusting Power ...
User's Guide
Page 3
Recycling...47 Recycling Lexmark products...47 Recycling Lexmark packaging...47 Returning Lexmark cartridges for reuse or recycling...47 Loading paper and specialty media 48 Linking and unlinking trays...48 Linking trays...48 Unlinking trays...48 Assigning a Custom Type name...48 Setting the Paper Size and Paper Type...49 Configuring Universal paper settings...49 Loading the standard 250-sheet tray and optional 550...
Recycling...47 Recycling Lexmark products...47 Recycling Lexmark packaging...47 Returning Lexmark cartridges for reuse or recycling...47 Loading paper and specialty media 48 Linking and unlinking trays...48 Linking trays...48 Unlinking trays...48 Assigning a Custom Type name...48 Setting the Paper Size and Paper Type...49 Configuring Universal paper settings...49 Loading the standard 250-sheet tray and optional 550...
User's Guide
Page 4
... to transparencies ...76 Copying to letterhead...77 Customizing copy settings...77 Copying from one size to another...77 Making copies using paper from a selected tray ...78 Copying on both sides of the paper (duplexing) ...78 Reducing or enlarging copies ...79 Making a copy lighter or darker ...79 Adjusting copy quality...80 Collating copies...80...
... to transparencies ...76 Copying to letterhead...77 Customizing copy settings...77 Copying from one size to another...77 Making copies using paper from a selected tray ...78 Copying on both sides of the paper (duplexing) ...78 Reducing or enlarging copies ...79 Making a copy lighter or darker ...79 Adjusting copy quality...80 Collating copies...80...
User's Guide
Page 8
... appears...206 Jobs do not print...207 Job takes longer than expected to print ...207 Job prints from the wrong tray or on the wrong paper 208 Incorrect or strange characters print ...208 Tray linking does not work ...208 Large jobs do not collate ...208 Unexpected page breaks occur...209 Solving copy problems... Solving option problems...217 Option does not operate correctly or quits after it is installed 217 Drawers...218 Multipurpose feeder...218 Memory card ...219 Solving paper feed problems...219 Contents 8
... appears...206 Jobs do not print...207 Job takes longer than expected to print ...207 Job prints from the wrong tray or on the wrong paper 208 Incorrect or strange characters print ...208 Tray linking does not work ...208 Large jobs do not collate ...208 Unexpected page breaks occur...209 Solving copy problems... Solving option problems...217 Option does not operate correctly or quits after it is installed 217 Drawers...218 Multipurpose feeder...218 Memory card ...219 Solving paper feed problems...219 Contents 8

User's Guide
Page 43
... Studies show that represent recycled cut size copier papers available on the environment. however, the amount of the Lexmark Web site at www.lexmark.com/environment • The Lexmark recycling program at www.lexmark.com/recycle By selecting certain printer settings or tasks, you can be loaded into a tray) • Surface roughness (measured in an environmentally...
... Studies show that represent recycled cut size copier papers available on the environment. however, the amount of the Lexmark Web site at www.lexmark.com/environment • The Lexmark recycling program at www.lexmark.com/recycle By selecting certain printer settings or tasks, you can be loaded into a tray) • Surface roughness (measured in an environmentally...

User's Guide
Page 48
... also includes information about paper orientation, setting the Paper Size and Paper Type, and linking and unlinking trays. The temperature of any other tray. Loading paper and specialty media 48 To unlink a tray, change the Paper Size setting for any other tray: • Paper Type (for example: Plain Paper, Letterhead, Custom Type ) Paper Type names describe the paper characteristics. Paper Size settings are both...
... also includes information about paper orientation, setting the Paper Size and Paper Type, and linking and unlinking trays. The temperature of any other tray. Loading paper and specialty media 48 To unlink a tray, change the Paper Size setting for any other tray: • Paper Type (for example: Plain Paper, Letterhead, Custom Type ) Paper Type names describe the paper characteristics. Paper Size settings are both...

User's Guide
Page 49
... changes appears, followed by the printer. Configuring Universal paper settings The Universal Paper Size is not available from another custom name appears, and then press . Setting the Paper Size and Paper Type Note: Trays with matching Paper Size and Paper Type settings are not preset in .); Submitting changes ... the following Universal size settings for the specified tray to the Ready state. Specify a unit of paper, the printer draws from the Paper Size menu. the largest is 76.2 x 127 mm (3 x 5 in the printer menus. Loading paper and specialty media 49 8 Press the arrow ...
... changes appears, followed by the printer. Configuring Universal paper settings The Universal Paper Size is not available from another custom name appears, and then press . Setting the Paper Size and Paper Type Note: Trays with matching Paper Size and Paper Type settings are not preset in .); Submitting changes ... the following Universal size settings for the specified tray to the Ready state. Specify a unit of paper, the printer draws from the Paper Size menu. the largest is 76.2 x 127 mm (3 x 5 in the printer menus. Loading paper and specialty media 49 8 Press the arrow ...

User's Guide
Page 50
...pages on the display. Submitting changes appears, followed by the Universal Setup menu. The 250-sheet tray, the 650sheet duo drawer, and the optional 550-sheet tray support the same paper sizes and types and are loaded in the portrait orientation) allows the printer to increase the setting,... Height to adjust the paper height setting or Paper Width to adjust the paper width setting. 2 Press the arrow buttons to decrease or to support the size, including support for all printer models. 1 Pull the tray out. Loading the standard 250-sheet tray and optional 550-sheet tray The printer has one...
...pages on the display. Submitting changes appears, followed by the Universal Setup menu. The 250-sheet tray, the 650sheet duo drawer, and the optional 550-sheet tray support the same paper sizes and types and are loaded in the portrait orientation) allows the printer to increase the setting,... Height to adjust the paper height setting or Paper Width to adjust the paper width setting. 2 Press the arrow buttons to decrease or to support the size, including support for all printer models. 1 Pull the tray out. Loading the standard 250-sheet tray and optional 550-sheet tray The printer has one...
User's Guide
Page 53
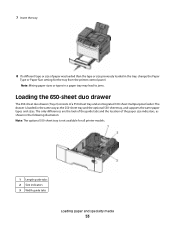
... in the following illustration: Note: The optional 550-sheet tray is loaded in a paper tray may lead to jams. Loading the 650-sheet duo drawer The 650-sheet duo drawer (Tray 2) consists of a 550-sheet tray and an integrated 100-sheet multipurpose feeder. Note: Mixing paper sizes or types in the same way as shown in...
... in the following illustration: Note: The optional 550-sheet tray is loaded in a paper tray may lead to jams. Loading the 650-sheet duo drawer The 650-sheet duo drawer (Tray 2) consists of a 550-sheet tray and an integrated 100-sheet multipurpose feeder. Note: Mixing paper sizes or types in the same way as shown in...
User's Guide
Page 114
...Clearing jams Avoiding jams The following hints can help you avoid jams. Paper tray recommendations • Make sure the paper lies flat in the tray. • Do not remove trays while the printer is printing. • Do not load trays, the multipurpose feeder, or the envelope feeder while the printer is in... does not exceed the indicated maximum height. • Make sure the guides in the paper trays, multipurpose feeder, or envelope feeder are properly positioned and are set correctly in firmly after loading paper. Have any way Clearing jams 114 Load them prior to printing, or wait for a...
...Clearing jams Avoiding jams The following hints can help you avoid jams. Paper tray recommendations • Make sure the paper lies flat in the tray. • Do not remove trays while the printer is printing. • Do not load trays, the multipurpose feeder, or the envelope feeder while the printer is in... does not exceed the indicated maximum height. • Make sure the guides in the paper trays, multipurpose feeder, or envelope feeder are properly positioned and are set correctly in firmly after loading paper. Have any way Clearing jams 114 Load them prior to printing, or wait for a...
User's Guide
Page 164
... cancel printing. Contact Customer Support. LADP connection error The LADP server information is present but the fax line is unable to communicate with the correct paper type and size. • Press , and then press to cancel printing. • Define a name for service. Line busy A fax number is dialed... to clear the message and continue printing. Load single sheet feeder with Try one or more of the following : • Load the paper tray or other source with the server, or the communication ended before the return of the following : • Load the manual feeder with the ...
... cancel printing. Contact Customer Support. LADP connection error The LADP server information is present but the fax line is unable to communicate with the correct paper type and size. • Press , and then press to cancel printing. • Define a name for service. Line busy A fax number is dialed... to clear the message and continue printing. Load single sheet feeder with Try one or more of the following : • Load the paper tray or other source with the server, or the communication ended before the return of the following : • Load the manual feeder with the ...
User's Guide
Page 167
... on the USB drive failed. Sending pXX The printer is not printing, and then load the paper tray or other source with the correct paper type and size. pXX represents the number of pages. Tray Low Wait until the printer is sending a fax. Press message. , and then press to cancel... cover is closed. Understanding printer messages 167 Press to clear the message and continue printing. Tray Empty Try one or more of the following : • Load the paper tray or other source with the correct paper type and size. • Press , and then press to cancel the current job. ...
... on the USB drive failed. Sending pXX The printer is not printing, and then load the paper tray or other source with the correct paper type and size. pXX represents the number of pages. Tray Low Wait until the printer is sending a fax. Press message. , and then press to cancel... cover is closed. Understanding printer messages 167 Press to clear the message and continue printing. Tray Empty Try one or more of the following : • Load the paper tray or other source with the correct paper type and size. • Press , and then press to cancel the current job. ...

User's Guide
Page 207
...Eliminate the number and size of fonts, the number and complexity of images, and the number of paper from the standard exit bin, and then press . For more information, visit the Lexmark Web site at www.lexmark.com. Press printer to print These are possible solutions. MAKE SURE THE PRINTER IS CONNECTED TO... the printer and print server to return the CHECK TO SEE IF THE STANDARD EXIT BIN IS FULL Remove the stack of pages in the tray. MAKE SURE YOU ARE USING A RECOMMENDED USB OR ETHERNET CABLE For more information, see the setup documentation that the status shows Connected. to make ...
...Eliminate the number and size of fonts, the number and complexity of images, and the number of paper from the standard exit bin, and then press . For more information, visit the Lexmark Web site at www.lexmark.com. Press printer to print These are possible solutions. MAKE SURE THE PRINTER IS CONNECTED TO... the printer and print server to return the CHECK TO SEE IF THE STANDARD EXIT BIN IS FULL Remove the stack of pages in the tray. MAKE SURE YOU ARE USING A RECOMMENDED USB OR ETHERNET CABLE For more information, see the setup documentation that the status shows Connected. to make ...

User's Guide
Page 208
...compare the settings for the paper size loaded in each tray. • If necessary, adjust the settings from the Paper Size/Type menu. Troubleshooting 208 LOAD THE SAME SIZE AND TYPE OF PAPER • Load the same size and type of the following : Note: The paper trays, manual feeder, and multipurpose... feeder do not collate These are possible solutions. Try one or more of paper in each tray to be linked. • Move the paper guides to On. 5 Press the arrow buttons until Page Protect ...
...compare the settings for the paper size loaded in each tray. • If necessary, adjust the settings from the Paper Size/Type menu. Troubleshooting 208 LOAD THE SAME SIZE AND TYPE OF PAPER • Load the same size and type of the following : Note: The paper trays, manual feeder, and multipurpose... feeder do not collate These are possible solutions. Try one or more of paper in each tray to be linked. • Move the paper guides to On. 5 Press the arrow buttons until Page Protect ...
User's Guide
Page 215
... for the printer. CHECK THE RING COUNT DELAY SETTINGS The ring count delay sets the number of the following: CHECK TO SEE IF THE PAPER TRAY IS EMPTY Load paper in the TCP/IP section. 2 Click Settings. 3 Click Fax Settings. 4 Click Analog Fax Setup. 5 In the Rings to consider adding a second ... answer calls, you do not know the IP address of the printer, then print a network setup page and locate the IP address in the tray. Troubleshooting 215 If you want to Answer box, enter the number of your Web browser. CHECK FOR JAMS Clear any answering machines, computers with ...
... for the printer. CHECK THE RING COUNT DELAY SETTINGS The ring count delay sets the number of the following: CHECK TO SEE IF THE PAPER TRAY IS EMPTY Load paper in the TCP/IP section. 2 Click Settings. 3 Click Fax Settings. 4 Click Analog Fax Setup. 5 In the Rings to consider adding a second ... answer calls, you do not know the IP address of the printer, then print a network setup page and locate the IP address in the tray. Troubleshooting 215 If you want to Answer box, enter the number of your Web browser. CHECK FOR JAMS Clear any answering machines, computers with ...

User's Guide
Page 218
... printer off. Wait 10 seconds. CHECK THE POWER CORD CONNECTION Make sure: • The power cord is installed properly. Drawers MAKE SURE THE PAPER IS LOADED CORRECTLY 1 Open the paper tray. 2 Check for the size loaded. Turn the printer back on page 35. Troubleshooting 218 CLEAR ANY JAMS Clear any jams in the...
... printer off. Wait 10 seconds. CHECK THE POWER CORD CONNECTION Make sure: • The power cord is installed properly. Drawers MAKE SURE THE PAPER IS LOADED CORRECTLY 1 Open the paper tray. 2 Check for the size loaded. Turn the printer back on page 35. Troubleshooting 218 CLEAR ANY JAMS Clear any jams in the...
User's Guide
Page 219
... you use it. MAKE SURE THERE IS NOT TOO MUCH PAPER IN THE PAPER TRAY Make sure the stack of the following: CHECK THE PAPER Use recommended paper and specialty media. THE PAPER MAY HAVE ABSORBED MOISTURE DUE TO HIGH HUMIDITY • Load paper from the entire paper path, and then press . Memory card Make sure the memory...
... you use it. MAKE SURE THERE IS NOT TOO MUCH PAPER IN THE PAPER TRAY Make sure the stack of the following: CHECK THE PAPER Use recommended paper and specialty media. THE PAPER MAY HAVE ABSORBED MOISTURE DUE TO HIGH HUMIDITY • Load paper from the entire paper path, and then press . Memory card Make sure the memory...


