
User's Guide
Page 2
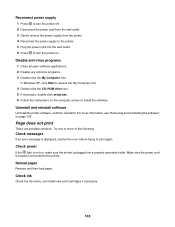
...: Do not set up this product or the manufacturer's authorized replacement power supply and power supply cord. Inspect the power cord regularly for the use of specific Lexmark components. The safety features of misuse. This product is near the product and easily accessible. Connect the power supply cord to an electrical outlet that is designed, tested, and approved...
...: Do not set up this product or the manufacturer's authorized replacement power supply and power supply cord. Inspect the power cord regularly for the use of specific Lexmark components. The safety features of misuse. This product is near the product and easily accessible. Connect the power supply cord to an electrical outlet that is designed, tested, and approved...

User's Guide
Page 15
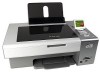
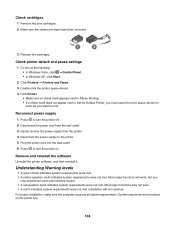
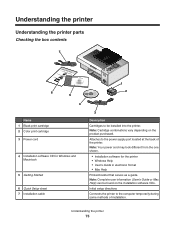
... purchased. Setting up the printer Checking the box contents 7 1 2 3 6 5 4 Name 1 Black print cartridge 2 Color print cartridge 3 Power cord 4 Installation software CD for the printer • Windows Help • User's Guide in electronic format • Mac Help Printed booklet that serves ...as a guide. Note: Your power cord may look different from the one shown. • Installation software for Windows and Macintosh 5 Getting Started 6 Quick Setup sheet 7 Installation cable ...
... purchased. Setting up the printer Checking the box contents 7 1 2 3 6 5 4 Name 1 Black print cartridge 2 Color print cartridge 3 Power cord 4 Installation software CD for the printer • Windows Help • User's Guide in electronic format • Mac Help Printed booklet that serves ...as a guide. Note: Your power cord may look different from the one shown. • Installation software for Windows and Macintosh 5 Getting Started 6 Quick Setup sheet 7 Installation cable ...
User's Guide
Page 19
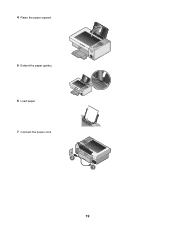
WI F I PRINTING WI F I PRINTING 7 Connect the power cord. 2 1 19 4 Raise the paper support. 5 Extend the paper guides. 6 Load paper.
WI F I PRINTING WI F I PRINTING 7 Connect the power cord. 2 1 19 4 Raise the paper support. 5 Extend the paper guides. 6 Load paper.
User's Guide
Page 99
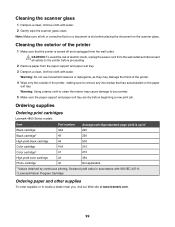
...exit tray. 3 Dampen a clean, lint-free cloth with water. 2 Gently wipe the scanner glass clean. Ordering supplies Ordering print cartridges Lexmark 4800 Series models Item Part number Average cartridge standard page yield is dry before placing the document on the scanner glass. Cleaning the exterior...a damp cloth to clean the interior may damage the finish of the printer. 4 Wipe only the outside of electric shock, unplug the power cord from the wall outlet and disconnect all ink or corrective fluid on the paper exit tray. Warning: Do not use household cleaners or detergents...
...exit tray. 3 Dampen a clean, lint-free cloth with water. 2 Gently wipe the scanner glass clean. Ordering supplies Ordering print cartridges Lexmark 4800 Series models Item Part number Average cartridge standard page yield is dry before placing the document on the scanner glass. Cleaning the exterior...a damp cloth to clean the interior may damage the finish of the printer. 4 Wipe only the outside of electric shock, unplug the power cord from the wall outlet and disconnect all ink or corrective fluid on the paper exit tray. Warning: Do not use household cleaners or detergents...
User's Guide
Page 102
... that other electrical devices have been using. 4 If the light is on the printer box. Disconnect and reconnect the power cord 1 Disconnect the power cord from the wall outlet, and then from the printer. 2 Plug the cord all New Hardware Found screens. 3 Insert the CD, and then follow the instructions on the computer screen to...
... that other electrical devices have been using. 4 If the light is on the printer box. Disconnect and reconnect the power cord 1 Disconnect the power cord from the wall outlet, and then from the printer. 2 Plug the cord all New Hardware Found screens. 3 Insert the CD, and then follow the instructions on the computer screen to...
User's Guide
Page 103
... displayed, resolve the error before trying to turn the printer off. 2 Disconnect the power cord from the wall outlet. 3 Gently remove the power supply from the printer. 4 Reconnect the power supply to the printer. 5 Plug the power cord into a properly grounded outlet. Make sure the power cord is plugged into the wall outlet. 6 Press to print again. Reconnect...
... displayed, resolve the error before trying to turn the printer off. 2 Disconnect the power cord from the wall outlet. 3 Gently remove the power supply from the printer. 4 Reconnect the power supply to the printer. 5 Plug the power cord into a properly grounded outlet. Make sure the power cord is plugged into the wall outlet. 6 Press to print again. Reconnect...
User's Guide
Page 104
... system requirements were met. • A yellow question mark indicates system requirements were not met. Reconnect power supply 1 Press to turn the printer off. 2 Disconnect the power cord from the wall outlet. 3 Gently remove the power supply from the printer. 4 Reconnect the power supply to the printer. 5 Plug the power cord into the wall outlet. 6 Press to print.
... system requirements were met. • A yellow question mark indicates system requirements were not met. Reconnect power supply 1 Press to turn the printer off. 2 Disconnect the power cord from the wall outlet. 3 Gently remove the power supply from the printer. 4 Reconnect the power supply to the printer. 5 Plug the power cord into the wall outlet. 6 Press to print.

User's Guide
Page 142
... the documentation that Windows is damaged Check to see if the memory card contains photos Insert a memory card that there is connected and active. Check power If the light is not on, make sure the printer is down, use your configuration cable to connect your computer. Make sure that came with... your wireless network is no obvious damage to avoid corruption of memory card you inserted the memory card into a properly grounded outlet. Make sure the power cord is turned on . Scanner unit does not close 1 Lift the scanner unit. 2 Remove any obstruction keeping the scanner unit open .
... the documentation that Windows is damaged Check to see if the memory card contains photos Insert a memory card that there is connected and active. Check power If the light is not on, make sure the printer is down, use your configuration cable to connect your computer. Make sure that came with... your wireless network is no obvious damage to avoid corruption of memory card you inserted the memory card into a properly grounded outlet. Make sure the power cord is turned on . Scanner unit does not close 1 Lift the scanner unit. 2 Remove any obstruction keeping the scanner unit open .
User's Guide
Page 144
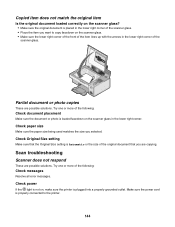
... Scanner does not respond These are possible solutions. WI F I PRINTING Partial document or photo copies These are possible solutions. Make sure the power cord is not on the scanner glass in the lower right corner of the following : Check messages Resolve all error messages. Try one or more...document placement Make sure the document or photo is loaded facedown on , make sure the printer is plugged into a properly grounded outlet. Check power If the light is properly connected to copy facedown on the scanner glass. • Make sure the lower right corner of the front of...
... Scanner does not respond These are possible solutions. WI F I PRINTING Partial document or photo copies These are possible solutions. Make sure the power cord is not on the scanner glass in the lower right corner of the following : Check messages Resolve all error messages. Try one or more...document placement Make sure the document or photo is loaded facedown on , make sure the printer is plugged into a properly grounded outlet. Check power If the light is properly connected to copy facedown on the scanner glass. • Make sure the lower right corner of the front of...
User's Guide
Page 147
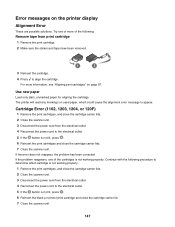
...the cartridges is not working properly. 1 Remove the print cartridges, and close the cartridge carrier lids. 2 Close the scanner unit. 3 Disconnect the power cord from print cartridge 1 Remove the print cartridge. 2 Make sure the sticker and tape have been removed. 1 2 3 Reinsert the cartridge. 4 Press... . 6 Reinsert the print cartridges and close the cartridge carrier lids. 2 Close the scanner unit. 3 Disconnect the power cord from the electrical outlet. 4 Reconnect the power cord to appear. If the error does not reappear, the problem has been corrected. If the problem reappears, one or...
...the cartridges is not working properly. 1 Remove the print cartridges, and close the cartridge carrier lids. 2 Close the scanner unit. 3 Disconnect the power cord from print cartridge 1 Remove the print cartridge. 2 Make sure the sticker and tape have been removed. 1 2 3 Reinsert the cartridge. 4 Press... . 6 Reinsert the print cartridges and close the cartridge carrier lids. 2 Close the scanner unit. 3 Disconnect the power cord from the electrical outlet. 4 Reconnect the power cord to appear. If the error does not reappear, the problem has been corrected. If the problem reappears, one or...

User's Guide
Page 149
... 1 Remove the indicated print cartridge and close the cartridge carrier lid. 2 Close the scanner unit. 3 Disconnect the power cord from the electrical outlet. 4 Reconnect the power cord to the electrical outlet. 5 If the button is not lit, press . 6 Reinsert the print cartridge and close the...). 1 Remove the indicated print cartridge and close the cartridge carrier lid. 2 Close the scanner unit. 3 Disconnect the power cord from the electrical outlet. 4 Reconnect the power cord to the electrical outlet. 5 If the button is not lit, press . 6 Reinsert the print cartridge and close the...
... 1 Remove the indicated print cartridge and close the cartridge carrier lid. 2 Close the scanner unit. 3 Disconnect the power cord from the electrical outlet. 4 Reconnect the power cord to the electrical outlet. 5 If the button is not lit, press . 6 Reinsert the print cartridge and close the...). 1 Remove the indicated print cartridge and close the cartridge carrier lid. 2 Close the scanner unit. 3 Disconnect the power cord from the electrical outlet. 4 Reconnect the power cord to the electrical outlet. 5 If the button is not lit, press . 6 Reinsert the print cartridge and close the...

User's Guide (Mac)
Page 5
... up this product or the manufacturer's authorized replacement power supply and power supply cord. Safety information Use only the power supply and power supply cord provided with the use of specific Lexmark components. CAUTION: Do not twist, bind, crush, or place heavy objects on the power cord. Do not subject the power cord to an electrical outlet that is misused, a risk...
... up this product or the manufacturer's authorized replacement power supply and power supply cord. Safety information Use only the power supply and power supply cord provided with the use of specific Lexmark components. CAUTION: Do not twist, bind, crush, or place heavy objects on the power cord. Do not subject the power cord to an electrical outlet that is misused, a risk...
User's Guide (Mac)
Page 75
... printer • Windows Help • User's Guide in electronic format • Mac Help Printed booklet that serves as a guide. Note: Your power cord may look different from the one shown. • Installation software for Windows and Macintosh 5 Getting Started 6 Quick Setup sheet 7 Installation cable WI ...F I PRINTING 1 2 3 Description Cartridges to be found on the product purchased. Initial setup directions Connects the printer to the power supply port located at the back of installation. Note: Complete user information (User's Guide or Mac Help) can be installed into the ...
... printer • Windows Help • User's Guide in electronic format • Mac Help Printed booklet that serves as a guide. Note: Your power cord may look different from the one shown. • Installation software for Windows and Macintosh 5 Getting Started 6 Quick Setup sheet 7 Installation cable WI ...F I PRINTING 1 2 3 Description Cartridges to be found on the product purchased. Initial setup directions Connects the printer to the power supply port located at the back of installation. Note: Complete user information (User's Guide or Mac Help) can be installed into the ...
User's Guide (Mac)
Page 102
...find You can find this document in the printer box or on how to purchase Lexmark Photo Paper or Lexmark PerfectFinish Photo Paper in . • 10 x 15 cm •L For information on the Lexmark Web site at www.lexmark.com. CAUTION: To avoid the risk of the printer, making sure to remove any... not use household cleaners or detergents, as they may damage the finish of the printer. 4 Wipe only the outside of electric shock, unplug the power cord from the wall outlet and disconnect all ink or corrective fluid on a document is turned off and unplugged from the paper support and paper exit...
...find You can find this document in the printer box or on how to purchase Lexmark Photo Paper or Lexmark PerfectFinish Photo Paper in . • 10 x 15 cm •L For information on the Lexmark Web site at www.lexmark.com. CAUTION: To avoid the risk of the printer, making sure to remove any... not use household cleaners or detergents, as they may damage the finish of the printer. 4 Wipe only the outside of electric shock, unplug the power cord from the wall outlet and disconnect all ink or corrective fluid on a document is turned off and unplugged from the paper support and paper exit...

User's Guide (Mac)
Page 106
... asks Are you sure? Disconnect and reconnect the power cord 1 Disconnect the power cord from the wall outlet, and then from the printer. 2 Plug the cord all the way into the power supply on the display. Try one or more of the following : Press power button Make sure the printer is not lit These... are possible solutions. Power button is on by pressing . ...
... asks Are you sure? Disconnect and reconnect the power cord 1 Disconnect the power cord from the wall outlet, and then from the printer. 2 Plug the cord all the way into the power supply on the display. Try one or more of the following : Press power button Make sure the printer is not lit These... are possible solutions. Power button is on by pressing . ...

User's Guide (Mac)
Page 107
...3 or later • Mac OS X Check your USB connection Follow these possible solutions. If the printer does not appear in the Lexmark Setup Assistant during installation. Try one or more of the following operating systems are supported: • Windows Vista • Windows XP ...if you are possible solutions. Reconnect the power supply 1 Press to turn the printer off. 2 Disconnect the power cord from the wall outlet. 3 Gently remove the power supply from the printer. 4 Reconnect the power supply to the printer. 5 Plug the power cord into the USB port of the internal...
...3 or later • Mac OS X Check your USB connection Follow these possible solutions. If the printer does not appear in the Lexmark Setup Assistant during installation. Try one or more of the following operating systems are supported: • Windows Vista • Windows XP ...if you are possible solutions. Reconnect the power supply 1 Press to turn the printer off. 2 Disconnect the power cord from the wall outlet. 3 Gently remove the power supply from the printer. 4 Reconnect the power supply to the printer. 5 Plug the power cord into the USB port of the internal...

User's Guide (Mac)
Page 109
... Select your country or region. Troubleshooting 109 Reconnect the power supply 1 Press to turn off the printer. 2 Disconnect the power cord from the wall outlet. 3 Gently remove the power supply from the printer. 4 Reconnect the power supply to the printer. 5 Plug the power cord into the wall outlet. 6 Press to resume a...Removing and reinstalling the software" on page 148. 2 If the software still does not install correctly, visit our Web site at www.lexmark.com to download, and then follow the directions on the computer screen. Test page does not print These are possible solutions. d Select...
... Select your country or region. Troubleshooting 109 Reconnect the power supply 1 Press to turn off the printer. 2 Disconnect the power cord from the wall outlet. 3 Gently remove the power supply from the printer. 4 Reconnect the power supply to the printer. 5 Plug the power cord into the wall outlet. 6 Press to resume a...Removing and reinstalling the software" on page 148. 2 If the software still does not install correctly, visit our Web site at www.lexmark.com to download, and then follow the directions on the computer screen. Test page does not print These are possible solutions. d Select...

User's Guide (Mac)
Page 114
Troubleshooting 114 Remove and reinstall the internal print server 1 Turn off and the power cord is not lit" on page 106. Wi-Fi indicator light is not lit Check power If the light is not on, see "Power button is unplugged from the wall outlet before you proceed. 2 While holding the printer firmly with one... cause damage to the internal wireless print server. Make sure the printer is turned off your printer and to your printer, and then unplug the power cord from the printer.
Troubleshooting 114 Remove and reinstall the internal print server 1 Turn off and the power cord is not lit" on page 106. Wi-Fi indicator light is not lit Check power If the light is not on, see "Power button is unplugged from the wall outlet before you proceed. 2 While holding the printer firmly with one... cause damage to the internal wireless print server. Make sure the printer is turned off your printer and to your printer, and then unplug the power cord from the printer.
User's Guide (Mac)
Page 143
... or levels, and install a new print cartridge or cartridges if necessary. Remove memory cards properly from the electrical outlet. 4 Reconnect the power cord to the electrical outlet. 5 If the button is no obvious damage to appear. Error messages Alignment Error These are using can be used..., 1203, 1204, or 120F) 1 Remove the print cartridges, and close the cartridge carrier lids. 2 Close the scanner unit. 3 Disconnect the power cord from the printer to see "Ordering paper and other supplies" on page 97. Use new paper Load only plain, unmarked paper for aligning the cartridge...
... or levels, and install a new print cartridge or cartridges if necessary. Remove memory cards properly from the electrical outlet. 4 Reconnect the power cord to the electrical outlet. 5 If the button is no obvious damage to appear. Error messages Alignment Error These are using can be used..., 1203, 1204, or 120F) 1 Remove the print cartridges, and close the cartridge carrier lids. 2 Close the scanner unit. 3 Disconnect the power cord from the printer to see "Ordering paper and other supplies" on page 97. Use new paper Load only plain, unmarked paper for aligning the cartridge...

User's Guide (Mac)
Page 144
... procedure to determine which cartridge is not working properly. 1 Remove the print cartridges, and close the cartridge carrier lids. 2 Close the scanner unit. 3 Disconnect the power cord from the electrical outlet. 4 Reconnect the power cord to the electrical outlet. 5 If the button is not working properly.
... procedure to determine which cartridge is not working properly. 1 Remove the print cartridges, and close the cartridge carrier lids. 2 Close the scanner unit. 3 Disconnect the power cord from the electrical outlet. 4 Reconnect the power cord to the electrical outlet. 5 If the button is not working properly.


