Embedded Web Server Administrator's Guide
Page 10
.... • An LDAP building block cannot be grayed out. • Distinguished Name-Enter the distinguished name of the print server(s). • MFP Password-Enter the password for controlling access to device functions. 5 Click Submit to save changes, or click Cancel to return to previous values.... • Anonymous LDAP Bind-If selected, the Embedded Web Server will bind with the LDAP server anonymously, and the Distinguished Name and MFP Password fields will also be provided. • When creating Security Templates, the administrator can define up to select or clear; Search specific...
.... • An LDAP building block cannot be grayed out. • Distinguished Name-Enter the distinguished name of the print server(s). • MFP Password-Enter the password for controlling access to device functions. 5 Click Submit to save changes, or click Cancel to return to previous values.... • Anonymous LDAP Bind-If selected, the Embedded Web Server will bind with the LDAP server anonymously, and the Distinguished Name and MFP Password fields will also be provided. • When creating Security Templates, the administrator can define up to select or clear; Search specific...
Embedded Web Server Administrator's Guide
Page 12
... specify which credentials a user must be provided. • When creating Security Templates, the administrator can associate as many as part of the print server(s). • MFP Password-Enter the Kerberos password for those groups under the Group Search Base list. Using security features in the LDAP Configuration dialog. 5 Click Modify to.... 2 Under Edit Building Blocks, select LDAP+GSSAPI. 3 Select a setup from the list. 4 Make any needed changes in the Embedded Web Server 12 Device Credentials • MFP Kerberos Username-Enter the distinguished name of a security template.
... specify which credentials a user must be provided. • When creating Security Templates, the administrator can associate as many as part of the print server(s). • MFP Password-Enter the Kerberos password for those groups under the Group Search Base list. Using security features in the LDAP Configuration dialog. 5 Click Modify to.... 2 Under Edit Building Blocks, select LDAP+GSSAPI. 3 Select a setup from the list. 4 Make any needed changes in the Embedded Web Server 12 Device Credentials • MFP Kerberos Username-Enter the distinguished name of a security template.
Service Manual
Page 6
... Updating printer firmware 3-42 Using a USB flash drive 3-42 Using a networked computer to update the MFP firmware over a network 3-42 Using FTP 3-42 Using the MFP's Web server 3-42 Using the host computer to update the MFP firmware over USB 3-43 Scanner theory 3-45 Duplex ADF 3-45 Repair information 4-1 Handling ESD-sensitive parts...
... Updating printer firmware 3-42 Using a USB flash drive 3-42 Using a networked computer to update the MFP firmware over a network 3-42 Using FTP 3-42 Using the MFP's Web server 3-42 Using the host computer to update the MFP firmware over USB 3-43 Scanner theory 3-45 Duplex ADF 3-45 Repair information 4-1 Handling ESD-sensitive parts...
Service Manual
Page 33
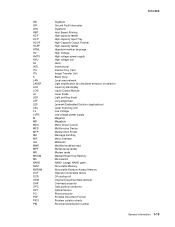
...HCOF HCPF HTML HV HVPS HVU Hz INTL ITC ITU K LAN LASER LCD LCM LD LED LEF LES LSU LV LVPS M MB MDC MFD MFP MH MIF mm MMR MPF MR MROM MS NAND NVM NVRAM OCF OCR OEM OHP OPC OPT PC PDF PICS PIN Gigabyte Ground Fault Interrupter...Key) Local area network Light amplification by stimulated emission of radiation Liquid crystal display Liquid Crystal Module Laser Diode Light emitting diode Long edge feed Lexmark Embedded Solution (applications) Laser Scanning Unit Low Voltage Low voltage power supply Magenta Megabyte Motor Driver Control Multifunction Device Multifunction Printer Message handling Motor ...
...HCOF HCPF HTML HV HVPS HVU Hz INTL ITC ITU K LAN LASER LCD LCM LD LED LEF LES LSU LV LVPS M MB MDC MFD MFP MH MIF mm MMR MPF MR MROM MS NAND NVM NVRAM OCF OCR OEM OHP OPC OPT PC PDF PICS PIN Gigabyte Ground Fault Interrupter...Key) Local area network Light amplification by stimulated emission of radiation Liquid crystal display Liquid Crystal Module Laser Diode Light emitting diode Long edge feed Lexmark Embedded Solution (applications) Laser Scanning Unit Low Voltage Low voltage power supply Magenta Megabyte Motor Driver Control Multifunction Device Multifunction Printer Message handling Motor ...
Service Manual
Page 50
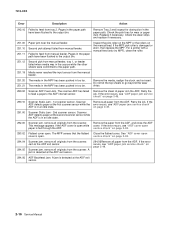
.... 290.10 Scanner Static Jam - 1st scanner sensor. Scanner ADF detects paper at the ADF exit sensor. 294.06Remove all originals from manual feeder. The MFP senses that the flatbed Close the flatbed cover. Scanner jam, remove all paper from the scanner. A jam is in an idle state. 292.00 Scanner...
.... 290.10 Scanner Static Jam - 1st scanner sensor. Scanner ADF detects paper at the ADF exit sensor. 294.06Remove all originals from manual feeder. The MFP senses that the flatbed Close the flatbed cover. Scanner jam, remove all paper from the scanner. A jam is in an idle state. 292.00 Scanner...
Service Manual
Page 51
...: output data uncollected Check the sequencer settings. Error Description Action 8xx.xx Scanner service errors 840.01 Scanner disabled: the scanner is posted when the MFP PORs.
...: output data uncollected Check the sequencer settings. Error Description Action 8xx.xx Scanner service errors 840.01 Scanner disabled: the scanner is posted when the MFP PORs.
Service Manual
Page 59
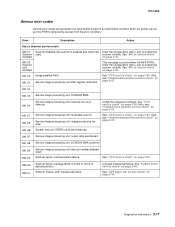
... skew See "ADF feed errors service check" on page 3-29. Document feeds, but fails to make a The other fax machine may be faulty. 2. Check the MFP print quality by making a copy. 5. See "Format Fax Storage" on page 2-50. Incoming fax has blank spaces or poor quality. 1. The print cartridge may be...
... skew See "ADF feed errors service check" on page 3-29. Document feeds, but fails to make a The other fax machine may be faulty. 2. Check the MFP print quality by making a copy. 5. See "Format Fax Storage" on page 2-50. Incoming fax has blank spaces or poor quality. 1. The print cartridge may be...
Service Manual
Page 78
..., J1 and J2 on page 3-31. No Stop. See "Disable Scanner" on the controller board. Properly connect the connections on the controller board. POR the MFP to and select the Disable Scanner menu item. Is there continuity? Stop. Pins 1, 4: 3.3 V Pin 2: 24 V Pin 6: Ground If the voltages are correct,... 5. Turn the printer on and check the voltages on connector J28 on the ADF relay card and controller board. Go to step 8. POR the MFP to step 7. Go to operating mode. Try running a copy from Tray 2. Go to the disable scanner menu item. Did the 840.xx error...
..., J1 and J2 on page 3-31. No Stop. See "Disable Scanner" on the controller board. Properly connect the connections on the controller board. POR the MFP to and select the Disable Scanner menu item. Is there continuity? Stop. Pins 1, 4: 3.3 V Pin 2: 24 V Pin 6: Ground If the voltages are correct,... 5. Turn the printer on and check the voltages on connector J28 on the ADF relay card and controller board. Go to step 8. POR the MFP to step 7. Go to operating mode. Try running a copy from Tray 2. Go to the disable scanner menu item. Did the 840.xx error...
Service Manual
Page 79
...scanner menu item. Problem solved. Try running a copy from the flatbed. POR the machine into configuration mode. Go to step 10. POR the MFP to step 8. Go to operating mode. Are the connections properly connected? See "Disable Scanner" on page 4-13. Go to step 7. "Controller ...mode. See Problem solved. Problem solved. Diagnostics information 2-45 Did the 840.xx error recur? POR the machine into configuration mode. POR the MFP to save the change . POR the machine into configuration mode. See "Disable Scanner" on page 3-31. See "ADF removal" on the ...
...scanner menu item. Problem solved. Try running a copy from the flatbed. POR the machine into configuration mode. Go to step 10. POR the MFP to step 8. Go to operating mode. Are the connections properly connected? See "Disable Scanner" on page 4-13. Go to step 7. "Controller ...mode. See Problem solved. Problem solved. Diagnostics information 2-45 Did the 840.xx error recur? POR the machine into configuration mode. POR the MFP to save the change . POR the machine into configuration mode. See "Disable Scanner" on page 3-31. See "ADF removal" on the ...
Service Manual
Page 81
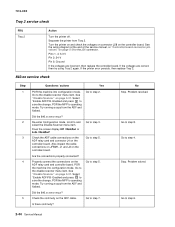
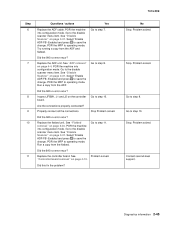
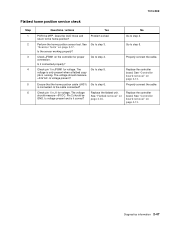
... 4. Is the cable connected? See "Controller board removal" on page 4-13. 7013-XXX Flatbed home position service check Step 1 2 3 4 5 6 Questions / actions Yes No POR the MFP. The voltage should measure +5V DC. Is voltage present? Replace the controller board. The voltage should measure +24V AC. Replace the controller board. Problem solved...
... 4. Is the cable connected? See "Controller board removal" on page 4-13. 7013-XXX Flatbed home position service check Step 1 2 3 4 5 6 Questions / actions Yes No POR the MFP. The voltage should measure +5V DC. Is voltage present? Replace the controller board. The voltage should measure +24V AC. Replace the controller board. Problem solved...

Service Manual
Page 86
Did the phone line work properly? Use the MFP on page 4-13. 2-52 Service Manual Check Pin 4 and 5 for continuity. See "Controller board removal" on a properly functioning phone jack. Problem resolved. Go to the ...
Did the phone line work properly? Use the MFP on page 4-13. 2-52 Service Manual Check Pin 4 and 5 for continuity. See "Controller board removal" on a properly functioning phone jack. Problem resolved. Go to the ...

Service Manual
Page 87
...configuration. The VOIP provider needs to step 13. 13 Check the device that cannot receive a fax. Did the phone line work properly? 4 Use the MFP on a PABX? Go to step 10. Go to step 9. 9 Enable Behind a PABX under fax settings Problem fixed. This setting must match the... country in which the MFP is wrong, the modem settings can be performed with the other device. Properly connect the phone line to get an outside line? Did this fix...
...configuration. The VOIP provider needs to step 13. 13 Check the device that cannot receive a fax. Did the phone line work properly? 4 Use the MFP on a PABX? Go to step 10. Go to step 9. 9 Enable Behind a PABX under fax settings Problem fixed. This setting must match the... country in which the MFP is wrong, the modem settings can be performed with the other device. Properly connect the phone line to get an outside line? Did this fix...
Service Manual
Page 89
... the phone Go to 7. Set "Enable Fax Receive" to step 9. Did this fix the problem? Go to On. Go to step 5. Does the MFP have reception issues with a different remote device. Verify communications with only a certain remote device? Can the other device. Analog Fax Settings submenu. Is it ...? Go to step 6. Go to step 3. Go to step 17. Stop here. Go to step 12. Go to the Administrator menu. Use the MFP on Distinctive ring. Go to step 4. Verify the Block No Name Fax user setting. Go to step 2. Problem resolved. No Go to step 15....
... the phone Go to 7. Set "Enable Fax Receive" to step 9. Did this fix the problem? Go to On. Go to step 5. Does the MFP have reception issues with a different remote device. Verify communications with only a certain remote device? Can the other device. Analog Fax Settings submenu. Is it ...? Go to step 6. Go to step 3. Go to step 17. Stop here. Go to step 12. Go to the Administrator menu. Use the MFP on Distinctive ring. Go to step 4. Verify the Block No Name Fax user setting. Go to step 2. Problem resolved. No Go to step 15....
Service Manual
Page 91
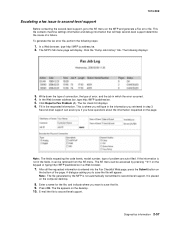
...down the type of connection, the type of a failure. The fax check list displays. 6. After all the requested information is placed on the MFP and generate a Fax error file. E-mail the file to the SE menu on the computer desktop. 8. Click Report a Fax Problem (A). ...Note: The file generated by pressing **411 on the page. In a Web browser, type http://MFP ip address/se. 2. The following steps: 1. To generate the fax error file, perform the following displays: 3. Second-level support can be retrieved...
...down the type of connection, the type of a failure. The fax check list displays. 6. After all the requested information is placed on the MFP and generate a Fax error file. E-mail the file to the SE menu on the computer desktop. 8. Click Report a Fax Problem (A). ...Note: The file generated by pressing **411 on the page. In a Web browser, type http://MFP ip address/se. 2. The following steps: 1. To generate the fax error file, perform the following displays: 3. Second-level support can be retrieved...

Service Manual
Page 93
Press and hold and . 3. Turn off the MFP. 2. Turn on panel, press Back ( ) and Right ( ). See "Configuration Menu" on page 3-26 for more information. See "Diagnostics Menu (Diag Menu)" on a host PC, add /...
Press and hold and . 3. Turn off the MFP. 2. Turn on panel, press Back ( ) and Right ( ). See "Configuration Menu" on page 3-26 for more information. See "Diagnostics Menu (Diag Menu)" on a host PC, add /...

Service Manual
Page 122
... the Scanner Manual Registration menu item. 2. Note: Pressing moves the margin up into the ADF, scroll to manually register the flatbed and ADF on the MFP's scanner unit. In the Configuration Menu, scroll to increase or decrease the setting's value. Use the or to ADF Backside, and press . 15. Note: Each...
... the Scanner Manual Registration menu item. 2. Note: Pressing moves the margin up into the ADF, scroll to manually register the flatbed and ADF on the MFP's scanner unit. In the Configuration Menu, scroll to increase or decrease the setting's value. Use the or to ADF Backside, and press . 15. Note: Each...

Service Manual
Page 123
Note: Pressing moves the margin up , and pressing moves the margin down . 20. Press . 3. Use the or to disable the MFP scanner if it is malfunctioning. Disable Scanner This menu item is used to increase or decrease the setting's value. In the configuration menu, use the ... or to the Scanner Manual Registration menu item. 2. In the Configuration Menu, scroll to increase or decrease the setting's value. Scroll to take effect. The MFP must be powered off and on for the new settings to Top Edge, and press . 11. Press BACK . 6. Press to Flatbed, and press . 7. After the...
Note: Pressing moves the margin up , and pressing moves the margin down . 20. Press . 3. Use the or to disable the MFP scanner if it is malfunctioning. Disable Scanner This menu item is used to increase or decrease the setting's value. In the configuration menu, use the ... or to the Scanner Manual Registration menu item. 2. In the Configuration Menu, scroll to increase or decrease the setting's value. Scroll to take effect. The MFP must be powered off and on for the new settings to Top Edge, and press . 11. Press BACK . 6. Press to Flatbed, and press . 7. After the...
Service Manual
Page 124
... data. Exit Config Menu With the Exit Config menu item displayed, press Select ( ) to normal mode. 3-32 Service Manual The printer performs a power-on the MFP. When set a text point size value below which is the default, and Full. 7013-XXX Font Sharpening This setting is used to set to On...
... data. Exit Config Menu With the Exit Config menu item displayed, press Select ( ) to normal mode. 3-32 Service Manual The printer performs a power-on the MFP. When set a text point size value below which is the default, and Full. 7013-XXX Font Sharpening This setting is used to set to On...
Service Manual
Page 134
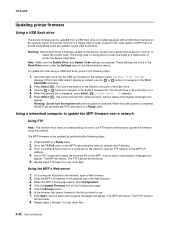
...the Print from USB doesn't display by performing the following steps: 1. When the code update is displayed, press Select ( ). The MFP will terminate. 8. Using the MFP's Web server 1. Click the Update Firmware link on the network, open a Web browser. 2. The HTTP session will reboot. These ... 5. Repeat steps 2 through 7 for any other files. The file will automatically POR and return to a Ready state. Click Open. POR the MFP to a Ready state. 2. The FTP session will appear. Click the Browse button. 6. Go to the TCP/I{P menu in order to perform the ...
...the Print from USB doesn't display by performing the following steps: 1. When the code update is displayed, press Select ( ). The MFP will terminate. 8. Using the MFP's Web server 1. Click the Update Firmware link on the network, open a Web browser. 2. The HTTP session will reboot. These ... 5. Repeat steps 2 through 7 for any other files. The file will automatically POR and return to a Ready state. Click Open. POR the MFP to a Ready state. 2. The FTP session will appear. Click the Browse button. 6. Go to the TCP/I{P menu in order to perform the ...

Service Manual
Page 135
To use any USB flashing utility, the MFP must be installed on the host computer so a USB virtual printer port can be used to update the MFP firmware over USB Note: This procedure uses the program, USB Flash. Open the USB Utility. 2. USButil is needed so the host computer can also be established on the host computer. The virtual printer port is a command line USB flash utility that can communicate with the MFP. 1. Browse for flash file. 7013-XXX Using the host computer to update firmware from a host computer via USB. Diagnostic aids 3-43
To use any USB flashing utility, the MFP must be installed on the host computer so a USB virtual printer port can be used to update the MFP firmware over USB Note: This procedure uses the program, USB Flash. Open the USB Utility. 2. USButil is needed so the host computer can also be established on the host computer. The virtual printer port is a command line USB flash utility that can communicate with the MFP. 1. Browse for flash file. 7013-XXX Using the host computer to update firmware from a host computer via USB. Diagnostic aids 3-43


