
User's Guide
Page 3
...for another language 10 Installing an additional paper tray 11 Getting the MFP ready to print and scan 12 Installing the software for USB attach 12 Installing the software for network attach (X342n only 13 Getting the MFP ready to fax 14 Connecting directly to a telephone wall jack ...22 Navigating the control panel menus 22 Printing a list of menu items 22 Printing a network setup page (X342n only 22 Changing the default mode 24 Setting the Timeout option 24 Setting the network options (X342n only 25 Using the MFP software 26 Using Print Properties 26 Using Presto! PageManager (...
...for another language 10 Installing an additional paper tray 11 Getting the MFP ready to print and scan 12 Installing the software for USB attach 12 Installing the software for network attach (X342n only 13 Getting the MFP ready to fax 14 Connecting directly to a telephone wall jack ...22 Navigating the control panel menus 22 Printing a list of menu items 22 Printing a network setup page (X342n only 22 Changing the default mode 24 Setting the Timeout option 24 Setting the network options (X342n only 25 Using the MFP software 26 Using Print Properties 26 Using Presto! PageManager (...

User's Guide
Page 5
...(USB attach only 55 Configuring additional applications for scanning 56 Scanning documents directly from an application (USB attach only 56 Scanning text for editing (OCR 57 Customizing scan settings 58 Scanning over a network 58 Understanding Scan options 59 Chapter 9: Maintaining the MFP 61 Removing... Lexmark products 70 Chapter 10: Troubleshooting 71 Setup troubleshooting ...72 Removing and reinstalling the drivers software 74 Jams and misfeeds troubleshooting 75 Clearing a paper jam 76 Print and copy troubleshooting 84 Print quality troubleshooting 85 Scan troubleshooting...
...(USB attach only 55 Configuring additional applications for scanning 56 Scanning documents directly from an application (USB attach only 56 Scanning text for editing (OCR 57 Customizing scan settings 58 Scanning over a network 58 Understanding Scan options 59 Chapter 9: Maintaining the MFP 61 Removing... Lexmark products 70 Chapter 10: Troubleshooting 71 Setup troubleshooting ...72 Removing and reinstalling the drivers software 74 Jams and misfeeds troubleshooting 75 Clearing a paper jam 76 Print and copy troubleshooting 84 Print quality troubleshooting 85 Scan troubleshooting...
User's Guide
Page 13
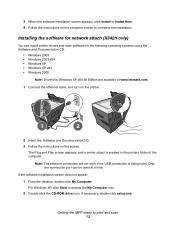
...and a printer object is being used at www.lexmark.com. 1 Connect the ethernet cable, and turn on the printer. 1 2 2 Insert the Software and Documentation CD. 3 Follow the instructions on the computer screen to complete the installation. For Windows XP, click Start to print and scan 13 Installing... and scan software for the following operating systems using the Software and Documentation CD: • Windows 2003 • Windows 2003 x64 • Windows XP • Windows XP x64 • Windows 2000 Note: Drivers for network attach (X342n only) You can be used . 3 When the software...
...and a printer object is being used at www.lexmark.com. 1 Connect the ethernet cable, and turn on the printer. 1 2 2 Insert the Software and Documentation CD. 3 Follow the instructions on the computer screen to complete the installation. For Windows XP, click Start to print and scan 13 Installing... and scan software for the following operating systems using the Software and Documentation CD: • Windows 2003 • Windows 2003 x64 • Windows XP • Windows XP x64 • Windows 2000 Note: Drivers for network attach (X342n only) You can be used . 3 When the software...
User's Guide
Page 22
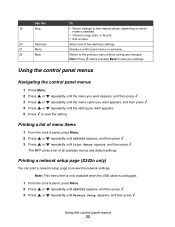
Note: This menu item is only available when the USB cable is selected. • Cancel a copy, scan, or fax job. • Exit a menu. Select one of all available menus and default settings. Using the control panel menus 22 The MFP prints a ..., and then press . 3 Press or repeatedly until Print Menus appears, and then press . Printing a network setup page (X342n only) You can print a network setup page to save the setting. Note: Press before pressing Back to review the network settings. Using the control panel menus Navigating the control panel menus 1 Press Menu. 2 Press or...
Note: This menu item is only available when the USB cable is selected. • Cancel a copy, scan, or fax job. • Exit a menu. Select one of all available menus and default settings. Using the control panel menus 22 The MFP prints a ..., and then press . 3 Press or repeatedly until Print Menus appears, and then press . Printing a network setup page (X342n only) You can print a network setup page to save the setting. Note: Press before pressing Back to review the network settings. Using the control panel menus Navigating the control panel menus 1 Press Menu. 2 Press or...
User's Guide
Page 54
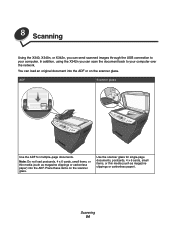
..., 4 x 6 cards, small items, or thin media (such as magazine clippings or carbonless paper). 8 Scanning Using the X340, X340n, or X342n, you can scan the document back to your computer over the network. ADF Scanner glass Use the ADF for single-page documents, postcards, 4 x 6 cards, small items, or... scanner glass. Place these items on the scanner glass. In addition, using the X342n you can load an original document into the ADF. Use the scanner glass for multiple-page documents. Scanning 54 You can send scanned images through the USB connection to your computer.
..., 4 x 6 cards, small items, or thin media (such as magazine clippings or carbonless paper). 8 Scanning Using the X340, X340n, or X342n, you can scan the document back to your computer over the network. ADF Scanner glass Use the ADF for single-page documents, postcards, 4 x 6 cards, small items, or... scanner glass. Place these items on the scanner glass. In addition, using the X342n you can load an original document into the ADF. Use the scanner glass for multiple-page documents. Scanning 54 You can send scanned images through the USB connection to your computer.

User's Guide
Page 58
.... 7 Click Submit. 8 Review the instructions on the Scan to . 3 Click Edit. 4 Adjust the scan settings. 5 Click OK. Scanning over a network Note: Only available on the X342n connected to scan your browser, and then press Enter. For more information, see Printing a network setup page (X342n only) 2 Click Scan Profile. 3 Click Create Scan Profile. 4 Select your scan settings, and then click Next. 5 Select...
.... 7 Click Submit. 8 Review the instructions on the Scan to . 3 Click Edit. 4 Adjust the scan settings. 5 Click OK. Scanning over a network Note: Only available on the X342n connected to scan your browser, and then press Enter. For more information, see Printing a network setup page (X342n only) 2 Click Scan Profile. 3 Click Create Scan Profile. 4 Select your scan settings, and then click Next. 5 Select...
Service Manual
Page 4
... service check 2-24 LVPS/HVPS service check 2-25 Main motor service check 2-25 Modem service check 2-26 Network card service check 2-26 Operator panel service check 2-27 Paperpath sensor service check 2-28 Printhead service check 2-28... Diagnostics mode 3-2 Available menu items 3-2 Serial number 3-3 USB 3-3 Printer Model 3-4 Power supply ID 3-4 Count reset 3-4 Page Count 3-4 Fax Usage 3-5 Scan Usage 3-5 Network menu 3-5 Print Debug 3-5 Force Speed 3-5 NVRAM Reset 3-6 Registration 3-6 Printer Registration 3-6 Scanner Registration 3-7 Using the test copy page rulers to...
... service check 2-24 LVPS/HVPS service check 2-25 Main motor service check 2-25 Modem service check 2-26 Network card service check 2-26 Operator panel service check 2-27 Paperpath sensor service check 2-28 Printhead service check 2-28... Diagnostics mode 3-2 Available menu items 3-2 Serial number 3-3 USB 3-3 Printer Model 3-4 Power supply ID 3-4 Count reset 3-4 Page Count 3-4 Fax Usage 3-5 Scan Usage 3-5 Network menu 3-5 Print Debug 3-5 Force Speed 3-5 NVRAM Reset 3-6 Registration 3-6 Printer Registration 3-6 Scanner Registration 3-7 Using the test copy page rulers to...

Service Manual
Page 19
The X340n and X342n are compatible with the X342n. The MFP will display Scanner locked if the CCD is available only on the X340n, and X342n. General information 1-5 Note: Network scan is locked during POST. The ScanBack utility is bundled with the Lexmark ScanBackTM utility. This lock ...must be moved to the open position in 40 seconds Maximum document width 216mm (8.5") ADF Scan speed @600x300 dpi •...
The X340n and X342n are compatible with the X342n. The MFP will display Scanner locked if the CCD is available only on the X340n, and X342n. General information 1-5 Note: Network scan is locked during POST. The ScanBack utility is bundled with the Lexmark ScanBackTM utility. This lock ...must be moved to the open position in 40 seconds Maximum document width 216mm (8.5") ADF Scan speed @600x300 dpi •...
Service Manual
Page 57
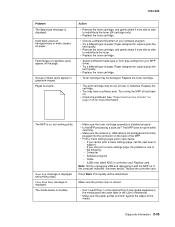
...are blank. If you cannot print a menu settings page, call the next level of black spots appear in graysacle images. Make sure the printer cover is firmly plugged into the connector on . If you can print a menu settings page, the problem is displayed and printing stops. Pages... or controller card. 7003-XXX Problem The Toner Low message is installed properly. • Is the MFP processing a scan job? The MFP does not print while scanning. • Make sure the network or USB cable is not damaged and is closed. • Don't overfill Tray 1 or the optional Tray 2 ...
...are blank. If you cannot print a menu settings page, call the next level of black spots appear in graysacle images. Make sure the printer cover is firmly plugged into the connector on . If you can print a menu settings page, the problem is displayed and printing stops. Pages... or controller card. 7003-XXX Problem The Toner Low message is installed properly. • Is the MFP processing a scan job? The MFP does not print while scanning. • Make sure the network or USB cable is not damaged and is closed. • Don't overfill Tray 1 or the optional Tray 2 ...

Service Manual
Page 59
...glass or calibration reference plate Black page Lamp too dark Scanner not properly registered Scanner not performing multipage scans 75 dpi images shift to left when scanning to "Network card service check" on page 2-20. Clean glass with isopropyl alcohol. Replace the controller card....Go to see "CCD service check" on the network. Perform scanner registration in ADF does not feed Unable to scan to "ADF service check" on page 3-8. The WIA driver cannot multipage scan by default. Download EC1 network daughtercard update. Irregular movement Problem Flatbed motor failure...
...glass or calibration reference plate Black page Lamp too dark Scanner not properly registered Scanner not performing multipage scans 75 dpi images shift to left when scanning to "Network card service check" on page 2-20. Clean glass with isopropyl alcohol. Replace the controller card....Go to see "CCD service check" on the network. Perform scanner registration in ADF does not feed Unable to scan to "ADF service check" on page 3-8. The WIA driver cannot multipage scan by default. Download EC1 network daughtercard update. Irregular movement Problem Flatbed motor failure...
Service Manual
Page 62
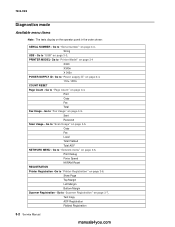
...Printer Registration -Go to "Printer Model" on page 3-6. Test Copy ADF Registration Flatbed Registration 3-2 Service Manual manuals4you.com Go to "Network menu" on page 3-3. Print Copy Fax Total Fax Usage - Copy Fax Local Total Flatbed Total ADF NETWORK MENU - Go to "USB" on page 3-5. Sent Received Scan ...Usage - Go to "Fax Usage" on page 3-4. 110v / 220v COUNT RESET Page Count - Go to "Power supply ID" on page 3-5. Go to "Scan Usage" on page 3-4. Go to "...
...Printer Registration -Go to "Printer Model" on page 3-6. Test Copy ADF Registration Flatbed Registration 3-2 Service Manual manuals4you.com Go to "Network menu" on page 3-3. Print Copy Fax Total Fax Usage - Copy Fax Local Total Flatbed Total ADF NETWORK MENU - Go to "USB" on page 3-5. Sent Received Scan ...Usage - Go to "Fax Usage" on page 3-4. 110v / 220v COUNT RESET Page Count - Go to "Power supply ID" on page 3-5. Go to "Scan Usage" on page 3-4. Go to "...

Service Manual
Page 65
... changed, the display returns to scroll though the list of available connection settings. When Scan Usage is displayed, press the key to Ready mode. The following sequence is used to Network Menu in the diagnostics menu. 7003-XXX Fax Usage Fax Usage is the second item...display returns to change the connection setting, perform the following : 1. Scan Usage Scan Usage is displayed, press the key to reset the count. 4. Force Speed The force speed menu setting can be used for the network card. Connecting... Press the Down key to advance to the next page...
... changed, the display returns to scroll though the list of available connection settings. When Scan Usage is displayed, press the key to Ready mode. The following sequence is used to Network Menu in the diagnostics menu. 7003-XXX Fax Usage Fax Usage is the second item...display returns to change the connection setting, perform the following : 1. Scan Usage Scan Usage is displayed, press the key to reset the count. 4. Force Speed The force speed menu setting can be used for the network card. Connecting... Press the Down key to advance to the next page...

Service Manual
Page 155
...sensor removal 4-15 D developer drive coupling assembly removal 4-16 diagnostics menu ATM menu 3-9 count reset 3-4 fax usage 3-5 page count 3-4 scan usage 3-5 fax settings 3-9 autoprint T30 log 3-9 detect EOLs 3-9 fax modulations 3-9 print all T30 logs 3-10 print CND logs 3-10 ...3-10 print T30 log 3-10 print user settings 3-10 station ID 3-10 homologation settings 3-11 network menu 3-5 force speed 3-5 NVRAM reset 3-6 print debug 3-5 power supply ID 3-4 printer model 3-4 registration 3-6 printer 3-6 scanner 3-7 using the test copy 3-8 scanner calibration 3-9 serial number 3-3 USB 3-3 utilities 3-...
...sensor removal 4-15 D developer drive coupling assembly removal 4-16 diagnostics menu ATM menu 3-9 count reset 3-4 fax usage 3-5 page count 3-4 scan usage 3-5 fax settings 3-9 autoprint T30 log 3-9 detect EOLs 3-9 fax modulations 3-9 print all T30 logs 3-10 print CND logs 3-10 ...3-10 print T30 log 3-10 print user settings 3-10 station ID 3-10 homologation settings 3-11 network menu 3-5 force speed 3-5 NVRAM reset 3-6 print debug 3-5 power supply ID 3-4 printer model 3-4 registration 3-6 printer 3-6 scanner 3-7 using the test copy 3-8 scanner calibration 3-9 serial number 3-3 USB 3-3 utilities 3-...

Service Manual
Page 157
... power-on self test (POST) 2-2 print media types 1-4 print quality problems solving 2-34 print speed 1-1 printer taking offline with Stop button 2-5 printhead removal 4-32 printing menus 3-1 R rear cover removal 4-5 removals autocompensator clutch...30 scanner base assembly 4-51 top 4-48 transfer roll 4-33 S safety information ii-xi scan quality service checks 2-37 scanner quality service checks 2-37 image unclear 2-37 irregular movement 2-... 2-23 cold 2-20 hot 2-24 LVPS/HVPS 2-25 main motor 2-25 modem 2-26 network card 2-26 operator panel 2-27 operator panel button 2-27 paper feed 2-29 paper jam...
... power-on self test (POST) 2-2 print media types 1-4 print quality problems solving 2-34 print speed 1-1 printer taking offline with Stop button 2-5 printhead removal 4-32 printing menus 3-1 R rear cover removal 4-5 removals autocompensator clutch...30 scanner base assembly 4-51 top 4-48 transfer roll 4-33 S safety information ii-xi scan quality service checks 2-37 scanner quality service checks 2-37 image unclear 2-37 irregular movement 2-... 2-23 cold 2-20 hot 2-24 LVPS/HVPS 2-25 main motor 2-25 modem 2-26 network card 2-26 operator panel 2-27 operator panel button 2-27 paper feed 2-29 paper jam...


