
Clearing Jams Guide
Page 1
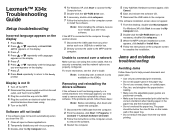
Extended light exposure can help you have loaded. Lexmark™ X342 Clearing Jams Guide Avoiding jams The following hints can cause print quality problems. 3 Remove the jammed paper by the stack line on the ... does not exceed the maximum height indicated by gently pulling it . Avoid contact with the fuser area to direct light for the size of the MFP, and open the front cover. 1 4 Reinsert the print cartridge assembly. 2 2 Pull on the labels in the sources. • Do not load wrinkled, creased, damp, or...
Extended light exposure can help you have loaded. Lexmark™ X342 Clearing Jams Guide Avoiding jams The following hints can cause print quality problems. 3 Remove the jammed paper by the stack line on the ... does not exceed the maximum height indicated by gently pulling it . Avoid contact with the fuser area to direct light for the size of the MFP, and open the front cover. 1 4 Reinsert the print cartridge assembly. 2 2 Pull on the labels in the sources. • Do not load wrinkled, creased, damp, or...
Clearing Jams Guide
Page 2
Note: To prevent document jams, use the scanner glass rather than the ADF for thick, thin, or a mixed set of the MFP. 2 Remove the jammed paper by gently pulling it straight out. 2 Remove the jammed paper by gently pulling it straight out. 2 Press Start to resume printing. 3 ...
Note: To prevent document jams, use the scanner glass rather than the ADF for thick, thin, or a mixed set of the MFP. 2 Remove the jammed paper by gently pulling it straight out. 2 Remove the jammed paper by gently pulling it straight out. 2 Press Start to resume printing. 3 ...
Troubleshooting Guide
Page 1
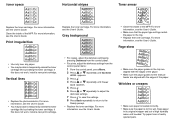
... Removing and reinstalling the drivers software If the software is only available on the X342n. Jams and misfeeds troubleshooting Avoiding Jams Follow these steps: Note: Before reinstalling, shut... Unable to connect over a network is not functioning properly or a communications error message appears, you are using . 5 Turn on the MFP. If the MFP is connected to the computer through another device...as a USB hub or switch box. 2 Directly connect the cable to the MFP and the computer. Lexmark™ X34x Troubleshooting Guide Setup troubleshooting Incorrect language appears on the display 1 ...
... Removing and reinstalling the drivers software If the software is only available on the X342n. Jams and misfeeds troubleshooting Avoiding Jams Follow these steps: Note: Before reinstalling, shut... Unable to connect over a network is not functioning properly or a communications error message appears, you are using . 5 Turn on the MFP. If the MFP is connected to the computer through another device...as a USB hub or switch box. 2 Directly connect the cable to the MFP and the computer. Lexmark™ X34x Troubleshooting Guide Setup troubleshooting Incorrect language appears on the display 1 ...

Troubleshooting Guide
Page 2
...toner cartridge is set as the default printer. 1 Click Start Settings Printers and Faxes or Printers. or Click Start Control Panel Printers and Other Hardware Printers and Faxes. 2 Double-click the Lexmark X340/X340n/ X342n icon. 3 Click Printer, and make sure the guides are ...repeatedly until scanning is complete before using the manual feeder, this is loaded correctly. • Load a smaller amount of paper into the MFP. Envelopes skew or fail to the Ready prompt. Print speed is slow. • Close all applications not in use new, dry ...
...toner cartridge is set as the default printer. 1 Click Start Settings Printers and Faxes or Printers. or Click Start Control Panel Printers and Other Hardware Printers and Faxes. 2 Double-click the Lexmark X340/X340n/ X342n icon. 3 Click Printer, and make sure the guides are ...repeatedly until scanning is complete before using the manual feeder, this is loaded correctly. • Load a smaller amount of paper into the MFP. Envelopes skew or fail to the Ready prompt. Print speed is slow. • Close all applications not in use new, dry ...
Troubleshooting Guide
Page 3
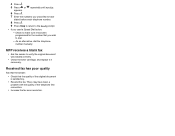
... menu: 1 From the control panel, press Menu. 2 Press or repeatedly until MACHINE SETUP appears. 3 Press . 4 Press or repeatedly until needed. Clean the inside of the MFP. Toner specs AaBbCc AaBbCc AaBbCc AaBbCc AaBbCc Replace the toner cartridge. Toner smear • Clean the inside of the...
... menu: 1 From the control panel, press Menu. 2 Press or repeatedly until MACHINE SETUP appears. 3 Press . 4 Press or repeatedly until needed. Clean the inside of the MFP. Toner specs AaBbCc AaBbCc AaBbCc AaBbCc AaBbCc Replace the toner cartridge. Toner smear • Clean the inside of the...

Troubleshooting Guide
Page 4
... does not correct the problem, replace the photoconductor. or Click Start Control Panel Printers and Other Hardware Printers and Faxes. 2 Double-click the Lexmark X340/X340n/ X342n icon. 3 Click Printer, and make sure that it is working correctly, connect it directly to Set As Default. Scans very... • Call Waiting can disrupt fax transmissions. Call your telephone company to see the User's Guide. • Make sure the MFP is set as the default printer and is loaded correctly into the ADF or on hold or paused. 1 Click Start Settings ...
... does not correct the problem, replace the photoconductor. or Click Start Control Panel Printers and Other Hardware Printers and Faxes. 2 Double-click the Lexmark X340/X340n/ X342n icon. 3 Click Printer, and make sure that it is working correctly, connect it directly to Set As Default. Scans very... • Call Waiting can disrupt fax transmissions. Call your telephone company to see the User's Guide. • Make sure the MFP is set as the default printer and is loaded correctly into the ADF or on hold or paused. 1 Click Start Settings ...
Troubleshooting Guide
Page 5
4 Press . 5 Press or appears. MFP receives a blank fax • Ask the sender to verify the original document was loaded correctly. • Check the toner cartridge, and replace it has been ...
4 Press . 5 Press or appears. MFP receives a blank fax • Ask the sender to verify the original document was loaded correctly. • Check the toner cartridge, and replace it has been ...
User's Guide
Page 3
... for another language 10 Installing an additional paper tray 11 Getting the MFP ready to print and scan 12 Installing the software for USB attach 12 Installing the software for network attach (X342n only 13 Getting the MFP ready to fax 14 Connecting directly to a telephone wall jack 14 ...Connecting to a telephone 15 Getting the MFP ready to copy 16 Chapter 3: Learning about the MFP 17 Understanding the parts of the MFP 17 Using the control panel buttons...
... for another language 10 Installing an additional paper tray 11 Getting the MFP ready to print and scan 12 Installing the software for USB attach 12 Installing the software for network attach (X342n only 13 Getting the MFP ready to fax 14 Connecting directly to a telephone wall jack 14 ...Connecting to a telephone 15 Getting the MFP ready to copy 16 Chapter 3: Learning about the MFP 17 Understanding the parts of the MFP 17 Using the control panel buttons...

User's Guide
Page 5
... 61 Installing a toner cartridge 62 Redistributing toner ...63 Replacing the photoconductor 65 Cleaning the MFP ...67 Cleaning the scanner glass 67 Cleaning the outside of the MFP 67 Cleaning the inside of the MFP 68 Ordering supplies ...70 Recycling Lexmark products 70 Chapter 10: Troubleshooting 71 Setup troubleshooting ...72 Removing and reinstalling the drivers...
... 61 Installing a toner cartridge 62 Redistributing toner ...63 Replacing the photoconductor 65 Cleaning the MFP ...67 Cleaning the scanner glass 67 Cleaning the outside of the MFP 67 Cleaning the inside of the MFP 68 Ordering supplies ...70 Recycling Lexmark products 70 Chapter 10: Troubleshooting 71 Setup troubleshooting ...72 Removing and reinstalling the drivers...
User's Guide
Page 7
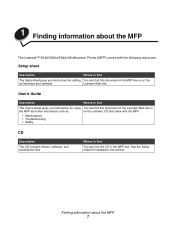
... the following resources: Setup sheet Description Where to find The User's Guide gives you instructions for installation instructions. Finding information about the MFP The Lexmark™ X340/X340n/X342n Multifunction Printer (MFP) comes with the MFP. • Maintenance • Troubleshooting • Safety CD Description The CD contains drivers, software, and publications files. 1 Finding information about the...
... the following resources: Setup sheet Description Where to find The User's Guide gives you instructions for installation instructions. Finding information about the MFP The Lexmark™ X340/X340n/X342n Multifunction Printer (MFP) comes with the MFP. • Maintenance • Troubleshooting • Safety CD Description The CD contains drivers, software, and publications files. 1 Finding information about the...

User's Guide
Page 8
To access the Readme file: 1 Click Start Æ Programs or All Programs Æ Lexmark Æ Lexmark X34x Series. 2 Select Readme. Web site Description Our Web site contains a variety of the MFP), and have it ready when you contact us so that we may serve you need. Readme file Description Where to ...find Visit our Web site at www.lexmark.com. 1 Go to the Web site. 2 Select a country or region...
To access the Readme file: 1 Click Start Æ Programs or All Programs Æ Lexmark Æ Lexmark X34x Series. 2 Select Readme. Web site Description Our Web site contains a variety of the MFP), and have it ready when you contact us so that we may serve you need. Readme file Description Where to ...find Visit our Web site at www.lexmark.com. 1 Go to the Web site. 2 Select a country or region...

User's Guide
Page 9
Clearance space Front 400 mm (16 in.) Back 175 mm (8 in.) Right 127 mm (3 in.) Left 50 mm (2 in.) Top 175 mm (7 in.) Setting up the MFP Before unpacking your MFP, select a level, stable surface on which to set it. Allow adequate space for air circulation and opening covers and trays. 2 Setting up the MFP 9
Clearance space Front 400 mm (16 in.) Back 175 mm (8 in.) Right 127 mm (3 in.) Left 50 mm (2 in.) Top 175 mm (7 in.) Setting up the MFP Before unpacking your MFP, select a level, stable surface on which to set it. Allow adequate space for air circulation and opening covers and trays. 2 Setting up the MFP 9

User's Guide
Page 10
Installing an overlay for another language These instructions apply only if you received one or more additional language overlays with the MFP. 1 Lift and remove the overlay. 2 Choose the correct overlay for another language 10 Installing an overlay for your language. 3 Align the overlay with the buttons on the MFP, and then press down until the overlay locks into place.
Installing an overlay for another language These instructions apply only if you received one or more additional language overlays with the MFP. 1 Lift and remove the overlay. 2 Choose the correct overlay for another language 10 Installing an overlay for your language. 3 Align the overlay with the buttons on the MFP, and then press down until the overlay locks into place.

User's Guide
Page 11
or Click Start Æ Control Panel Æ Printers and Other Hardware Æ Printers and Faxes. 5 Select the MFP icon. 6 Click File Æ Properties. 7 Click the Device Settings tab. 8 Select Tray2 from the Installable Options list. 9 Select 550-Sheet Tray from the wall ... remove any packing material. 2 Place the paper tray in the MFP with the positioning posts on the 550-sheet paper tray, and lower the MFP into place. 4 Click Start Æ Settings Æ Printers or Printers and Faxes. CAUTION: If you have chosen for your MFP. 3 Align the holes in the location you are installing a ...
or Click Start Æ Control Panel Æ Printers and Other Hardware Æ Printers and Faxes. 5 Select the MFP icon. 6 Click File Æ Properties. 7 Click the Device Settings tab. 8 Select Tray2 from the Installable Options list. 9 Select 550-Sheet Tray from the wall ... remove any packing material. 2 Place the paper tray in the MFP with the positioning posts on the 550-sheet paper tray, and lower the MFP into place. 4 Click Start Æ Settings Æ Printers or Printers and Faxes. CAUTION: If you have chosen for your MFP. 3 Align the holes in the location you are installing a ...
User's Guide
Page 12
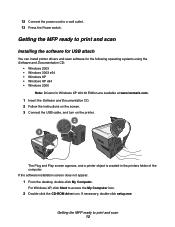
...not appear: 1 From the desktop, double-click My Computer. Getting the MFP ready to print and scan 12 Getting the MFP ready to print and scan Installing the software for USB attach You can install printer drivers and scan software for the following operating systems using the Software and ... Windows XP x64 bit Edition are available at www.lexmark.com. 1 Insert the Software and Documentation CD. 2 Follow the instructions on the screen. 3 Connect the USB cable, and turn on the printer. 2 1 The Plug and Play screen appears, and a printer object is created in the printers folder of the computer.
...not appear: 1 From the desktop, double-click My Computer. Getting the MFP ready to print and scan 12 Getting the MFP ready to print and scan Installing the software for USB attach You can install printer drivers and scan software for the following operating systems using the Software and ... Windows XP x64 bit Edition are available at www.lexmark.com. 1 Insert the Software and Documentation CD. 2 Follow the instructions on the screen. 3 Connect the USB cable, and turn on the printer. 2 1 The Plug and Play screen appears, and a printer object is created in the printers folder of the computer.
User's Guide
Page 13
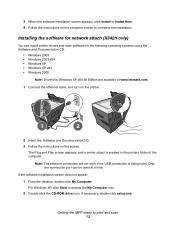
If necessary, double-click setup.exe. Getting the MFP ready to access the My Computer icon. 2 Double-click the CD-ROM drive icon. Only one connection port can install printer drivers and scan software for the following operating systems using the Software and Documentation CD: • Windows... software for network attach (X342n only) You can be used . 3 When the software installation screen appears, click Install or Install Now. 4 Follow the instructions on the screen. The Plug and Play screen appears, and a printer object is being used at www.lexmark.com. 1 Connect the ethernet...
If necessary, double-click setup.exe. Getting the MFP ready to access the My Computer icon. 2 Double-click the CD-ROM drive icon. Only one connection port can install printer drivers and scan software for the following operating systems using the Software and Documentation CD: • Windows... software for network attach (X342n only) You can be used . 3 When the software installation screen appears, click Install or Install Now. 4 Follow the instructions on the screen. The Plug and Play screen appears, and a printer object is being used at www.lexmark.com. 1 Connect the ethernet...

User's Guide
Page 14
Getting the MFP ready to fax You can connect the printer to other equipment. Note: The printer is required. You do not need to connect it to a telephone line to complete the installation. You can connect the printer to a computer, but you have a telephone cord and a telephone wall jack. 2 Connect ...one end of the telephone cord into the LINE port of the MFP. Getting the MFP ready to set up the printer. If you want a digital connection such as ISDN, DSL, or ADSL, a third-party device (such as described in the ...
Getting the MFP ready to fax You can connect the printer to other equipment. Note: The printer is required. You do not need to connect it to a telephone line to complete the installation. You can connect the printer to a computer, but you have a telephone cord and a telephone wall jack. 2 Connect ...one end of the telephone cord into the LINE port of the MFP. Getting the MFP ready to set up the printer. If you want a digital connection such as ISDN, DSL, or ADSL, a third-party device (such as described in the ...
User's Guide
Page 15
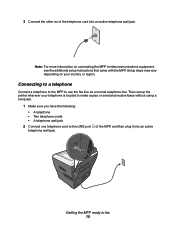
... then plug it into an active telephone wall jack. Then set up the printer wherever your country or region. Connecting to a telephone Connect a telephone to the MFP to the LINE port telephone wall jack. Note: For more information on your telephone is located to make copies or send ... jack 2 Connect one telephone cord to use the fax line as a normal telephone line. of the telephone cord into an active Getting the MFP ready to fax 15 Setup steps may vary depending on connecting the MFP to telecommunications equipment, see the additional setup instructions that came with the...
... then plug it into an active telephone wall jack. Then set up the printer wherever your country or region. Connecting to a telephone Connect a telephone to the MFP to the LINE port telephone wall jack. Note: For more information on your telephone is located to make copies or send ... jack 2 Connect one telephone cord to use the fax line as a normal telephone line. of the telephone cord into an active Getting the MFP ready to fax 15 Setup steps may vary depending on connecting the MFP to telecommunications equipment, see the additional setup instructions that came with the...

User's Guide
Page 16
Getting the MFP ready to copy The X340/X340n/X342n can be used as a stand-alone copier and does not require additional setup or connection to copy 16 Getting the MFP ready to a computer or a network. 3 Remove the protective plug from the EXT port of the MFP. Note: For more information on your country or region. Setup steps may vary depending on connecting the MFP to a telephone, and then plug it into the EXT port of the MFP. 4 Connect the other telephone cord to telecommunications equipment, see the additional setup instructions that came with the MFP.
Getting the MFP ready to copy The X340/X340n/X342n can be used as a stand-alone copier and does not require additional setup or connection to copy 16 Getting the MFP ready to a computer or a network. 3 Remove the protective plug from the EXT port of the MFP. Note: For more information on your country or region. Setup steps may vary depending on connecting the MFP to a telephone, and then plug it into the EXT port of the MFP. 4 Connect the other telephone cord to telecommunications equipment, see the additional setup instructions that came with the MFP.
User's Guide
Page 17
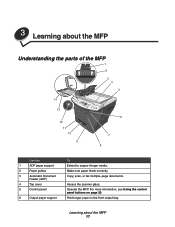
Copy, scan, or fax multiple-page documents. Operate the MFP. For more information, see Using the control panel buttons on page 20. Hold longer paper in the front output tray. Learning about the MFP Understanding the parts of the MFP 1 2 3 4 5 14 13 12 11 10 9 6 7 8 Use the 1 ADF paper support 2 Paper guides 3 Automatic Document Feeder (ADF) 4 Top cover 5 Control panel 6 Output paper support To Extend to support longer media. 3 Learning about the MFP 17 Access the scanner glass. Make sure paper feeds correctly.
Copy, scan, or fax multiple-page documents. Operate the MFP. For more information, see Using the control panel buttons on page 20. Hold longer paper in the front output tray. Learning about the MFP Understanding the parts of the MFP 1 2 3 4 5 14 13 12 11 10 9 6 7 8 Use the 1 ADF paper support 2 Paper guides 3 Automatic Document Feeder (ADF) 4 Top cover 5 Control panel 6 Output paper support To Extend to support longer media. 3 Learning about the MFP 17 Access the scanner glass. Make sure paper feeds correctly.


