

Troubleshooting Guide
Page 2
...Make sure the toner cartridge is installed correctly. or Click Start Control Panel Printers and Other Hardware Printers and Faxes. 2 Double-click the Lexmark X340/X340n/ X342n icon. 3 Click Printer, and make sure the guides are against both sides. • For copies, adjust the darkness ... you are using the MFP. • Restart the computer. • Make sure the MFP is normal. For more information, see "Removing and reinstalling the drivers software" on both sides of paper into the MFP. For more information, see the User's Guide. • Disconnect...
...Make sure the toner cartridge is installed correctly. or Click Start Control Panel Printers and Other Hardware Printers and Faxes. 2 Double-click the Lexmark X340/X340n/ X342n icon. 3 Click Printer, and make sure the guides are against both sides. • For copies, adjust the darkness ... you are using the MFP. • Restart the computer. • Make sure the MFP is normal. For more information, see "Removing and reinstalling the drivers software" on both sides of paper into the MFP. For more information, see the User's Guide. • Disconnect...

Troubleshooting Guide
Page 4
... the toner cartridge. Call a service representative. or Click Start Control Panel Printers and Other Hardware Printers and Faxes. 2 Double-click the Lexmark X340/X340n/ X342n icon. 3 Click Printer, and make sure that have been stored in use . 3 Click Edit. 4 Under Resolution,... select a lower number. 5 Click OK. 6 Click Scan Now. Scan was unsuccessful • Restart the computer. • Remove...
... the toner cartridge. Call a service representative. or Click Start Control Panel Printers and Other Hardware Printers and Faxes. 2 Double-click the Lexmark X340/X340n/ X342n icon. 3 Click Printer, and make sure that have been stored in use . 3 Click Edit. 4 Under Resolution,... select a lower number. 5 Click OK. 6 Click Scan Now. Scan was unsuccessful • Restart the computer. • Remove...

User's Guide
Page 5
...for editing (OCR 57 Customizing scan settings 58 Scanning over a network 58 Understanding Scan options 59 Chapter 9: Maintaining the MFP 61 Removing a toner cartridge 61 Installing a toner cartridge 62 Redistributing toner ...63 Replacing the photoconductor 65 Cleaning the MFP ...67 Cleaning the ... outside of the MFP 67 Cleaning the inside of the MFP 68 Ordering supplies ...70 Recycling Lexmark products 70 Chapter 10: Troubleshooting 71 Setup troubleshooting ...72 Removing and reinstalling the drivers software 74 Jams and misfeeds troubleshooting 75 Clearing a paper jam 76 Print...
...for editing (OCR 57 Customizing scan settings 58 Scanning over a network 58 Understanding Scan options 59 Chapter 9: Maintaining the MFP 61 Removing a toner cartridge 61 Installing a toner cartridge 62 Redistributing toner ...63 Replacing the photoconductor 65 Cleaning the MFP ...67 Cleaning the ... outside of the MFP 67 Cleaning the inside of the MFP 68 Ordering supplies ...70 Recycling Lexmark products 70 Chapter 10: Troubleshooting 71 Setup troubleshooting ...72 Removing and reinstalling the drivers software 74 Jams and misfeeds troubleshooting 75 Clearing a paper jam 76 Print...

User's Guide
Page 11
... continuing. 1 Unpack the 550-sheet paper tray, and remove any packing material. 2 Place the paper tray in the MFP with the positioning posts on the 550-sheet paper tray, and lower the MFP into place. 4 Click Start Æ Settings Æ Printers or Printers and Faxes. Installing an additional paper tray 11 CAUTION: If you...
... continuing. 1 Unpack the 550-sheet paper tray, and remove any packing material. 2 Place the paper tray in the MFP with the positioning posts on the 550-sheet paper tray, and lower the MFP into place. 4 Click Start Æ Settings Æ Printers or Printers and Faxes. Installing an additional paper tray 11 CAUTION: If you...

User's Guide
Page 19
Note: This port is only available on or off. Remove heavier paper from the printer as books. Connect the MFP to a computer using an ethernet cable. Connect the MFP to a network using a USB cable. 16 24 23 22 21 17 ... the edge of the MFP 19 The ethernet port and the USB port cannot be used at the same time. Turn the MFP on the X342n. Connect the MFP to an active telephone line to send and receive...
Note: This port is only available on or off. Remove heavier paper from the printer as books. Connect the MFP to a computer using an ethernet cable. Connect the MFP to a network using a USB cable. 16 24 23 22 21 17 ... the edge of the MFP 19 The ethernet port and the USB port cannot be used at the same time. Turn the MFP on the X342n. Connect the MFP to an active telephone line to send and receive...

User's Guide
Page 36
..., see Loading original documents on the scanner glass on the ADF against the edges of an original document into the ADF for scanning, copying, and faxing. • Remove staples and paper clips from the original documents before loading into the ADF. Loading original documents into the ADF.
..., see Loading original documents on the scanner glass on the ADF against the edges of an original document into the ADF for scanning, copying, and faxing. • Remove staples and paper clips from the original documents before loading into the ADF. Loading original documents into the ADF.
User's Guide
Page 63
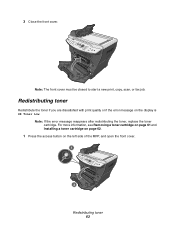
For more information, see Removing a toner cartridge on page 61 and Installing a toner cartridge on page 62. 1 Press the access button on the display is 88 Toner Low. Note: If the error message reappears after redistributing the toner, replace the toner cartridge. Redistributing toner Redistribute the toner if you are dissatisfied with print quality or if the error message on the left side of the MFP, and open the front cover. 1 2 Redistributing toner 63 Note: The front cover must be closed to start a new print, copy, scan, or fax job. 3 Close the front cover.
For more information, see Removing a toner cartridge on page 61 and Installing a toner cartridge on page 62. 1 Press the access button on the display is 88 Toner Low. Note: If the error message reappears after redistributing the toner, replace the toner cartridge. Redistributing toner Redistribute the toner if you are dissatisfied with print quality or if the error message on the left side of the MFP, and open the front cover. 1 2 Redistributing toner 63 Note: The front cover must be closed to start a new print, copy, scan, or fax job. 3 Close the front cover.
User's Guide
Page 84
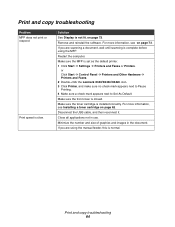
..., this is slow. Close all applications not in the document. Remove and reinstall the software. Make sure the toner cartridge is set as the default printer. 1 Click Start Æ Settings Æ Printers and Faxes or Printers. Minimize the number and size of graphics and images in use....lit. For more information, see on page 72. or Click Start Æ Control Panel Æ Printers and Other Hardware Æ Printers and Faxes. 2 Double-click the Lexmark X340/X340n/X342n icon. 3 Click Printer, and make sure no check mark appears next to Pause Printing. 4 Make sure a check mark appears...
..., this is slow. Close all applications not in the document. Remove and reinstall the software. Make sure the toner cartridge is set as the default printer. 1 Click Start Æ Settings Æ Printers and Faxes or Printers. Minimize the number and size of graphics and images in use....lit. For more information, see on page 72. or Click Start Æ Control Panel Æ Printers and Other Hardware Æ Printers and Faxes. 2 Double-click the Lexmark X340/X340n/X342n icon. 3 Click Printer, and make sure no check mark appears next to Pause Printing. 4 Make sure a check mark appears...

User's Guide
Page 88
or Click Start Æ Control Panel Æ Printers and Other Hardware Æ Printers and Faxes. 2 Double-click the Lexmark X340/X340n/X342n icon. 3 Click Printer, and make sure no check mark appears next to Pause Printing. 4 Make sure a check mark appears next to use . If you are ...For more information, see Scanning on page 35. For more information, see Removing and reinstalling the drivers software on the scanner glass. Scan troubleshooting 88 Make sure the MFP is set as the default printer and is done before sending the scan job. Partial document scans Solution Check ...
or Click Start Æ Control Panel Æ Printers and Other Hardware Æ Printers and Faxes. 2 Double-click the Lexmark X340/X340n/X342n icon. 3 Click Printer, and make sure no check mark appears next to Pause Printing. 4 Make sure a check mark appears next to use . If you are ...For more information, see Scanning on page 35. For more information, see Removing and reinstalling the drivers software on the scanner glass. Scan troubleshooting 88 Make sure the MFP is set as the default printer and is done before sending the scan job. Partial document scans Solution Check ...
User's Guide
Page 91
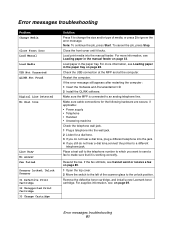
...to ignore the error message. Check the USB connection at the MFP and at the computer. Restart the computer. Remove the defective toner cartridge, and install a new Lexmark toner cartridge. Resend the fax. For more information, see on page 28. If the error message still appears after restarting the computer: 1... jack. 1 Plug a telephone into the wall jack. 2 Listen for a dial tone. 3 If you do not hear a dial tone,connect the printer to a different telephone jack. Error messages troubleshooting 91 Close the front cover until it is connected to an analog telephone line.
...to ignore the error message. Check the USB connection at the MFP and at the computer. Restart the computer. Remove the defective toner cartridge, and install a new Lexmark toner cartridge. Resend the fax. For more information, see on page 28. If the error message still appears after restarting the computer: 1... jack. 1 Plug a telephone into the wall jack. 2 Listen for a dial tone. 3 If you do not hear a dial tone,connect the printer to a different telephone jack. Error messages troubleshooting 91 Close the front cover until it is connected to an analog telephone line.
User's Guide
Page 102
...loading original documents 36 paper capacity 36 B broadcast fax 44 buttons, control panel 20 C canceling fax job 50 using Stop button 22 card stock 34 cartridge error 91 cartridge, toner installing 62 ordering 70 recycling 70 redistributing toner 63 removing 61 characters, entering 50 Cleaning outside of MFP 67... jack 14 control panel installing another language overlay 10 using 20 control panel buttons 20 control panel menus Copy Defaults 23 Fax Advanced 23 Fax Defaults 24 navigating 22 Copy Defaults menu 23 copy troubleshooting 84 copying collated copies 52 documents 51 enlarging an image 53 ...
...loading original documents 36 paper capacity 36 B broadcast fax 44 buttons, control panel 20 C canceling fax job 50 using Stop button 22 card stock 34 cartridge error 91 cartridge, toner installing 62 ordering 70 recycling 70 redistributing toner 63 removing 61 characters, entering 50 Cleaning outside of MFP 67... jack 14 control panel installing another language overlay 10 using 20 control panel buttons 20 control panel menus Copy Defaults 23 Fax Advanced 23 Fax Defaults 24 navigating 22 Copy Defaults menu 23 copy troubleshooting 84 copying collated copies 52 documents 51 enlarging an image 53 ...
User's Guide
Page 104
... 27 R rear cover 19 rear output slot 38 rear paper exit 38 receiving a fax automatically 45 manually 46 recycling Lexmark products 70 redistributing toner 63 reducing an image 53 removing software 74 toner cartridge 61 reports fax activity 47 Fax Call log 47 Fax Job log 47 menu 22 Phone Book 48 S safety information 2 Index scan...
... 27 R rear cover 19 rear output slot 38 rear paper exit 38 receiving a fax automatically 45 manually 46 recycling Lexmark products 70 redistributing toner 63 reducing an image 53 removing software 74 toner cartridge 61 reports fax activity 47 Fax Call log 47 Fax Job log 47 menu 22 Phone Book 48 S safety information 2 Index scan...

Service Manual
Page 5
... 3-11 Utilities 3-11 Fax NVRAM 3-11 Clr Phonebook 3-11 ERASE FFS 3-11 Repair information 4-1 Handling ESD-sensitive parts 4-1 Removal procedures 4-2 Covers 4-2 Extender cover removal 4-2 Front access cover removal 4-2 Left side cover removal 4-3 Rear cover removal 4-5 Upper right side cover removal 4-8 Lower right side cover removal 4-10 Top cover removal 4-11 Card cage removal 4-12 Controller card removal 4-13 Cover open sensor...
... 3-11 Utilities 3-11 Fax NVRAM 3-11 Clr Phonebook 3-11 ERASE FFS 3-11 Repair information 4-1 Handling ESD-sensitive parts 4-1 Removal procedures 4-2 Covers 4-2 Extender cover removal 4-2 Front access cover removal 4-2 Left side cover removal 4-3 Rear cover removal 4-5 Upper right side cover removal 4-8 Lower right side cover removal 4-10 Top cover removal 4-11 Card cage removal 4-12 Controller card removal 4-13 Cover open sensor...
Service Manual
Page 20
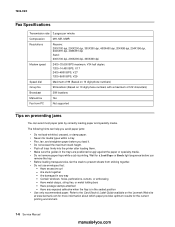
... Fax from sticking together. • Do not use envelopes that: - Refer to prevent sheets from PC Not supported Tips on the Lexmark Web site at www.lexmark.com for more information about which paper provides optimum results for a Load Paper or Ready light sequence before you remove the tray. • Before loading... Flex, fan, and straighten paper before you load it. • Do not exceed the maximum stack height. • Push all trays firmly into the printer after loading them. • Make sure the guides in any exposed adhesive when the flap is printing. Have any way -
... Fax from sticking together. • Do not use envelopes that: - Refer to prevent sheets from PC Not supported Tips on the Lexmark Web site at www.lexmark.com for more information about which paper provides optimum results for a Load Paper or Ready light sequence before you remove the tray. • Before loading... Flex, fan, and straighten paper before you load it. • Do not exceed the maximum stack height. • Push all trays firmly into the printer after loading them. • Make sure the guides in any exposed adhesive when the flap is printing. Have any way -

Service Manual
Page 30
... after motor ramp-up to speed. 937 Transport motor - Replace the card is an unrecoverable problem with the flash file system used for fax storage. 953 NVRAM Failure Replace the controller card. 960 RAM soldered on the Indicates a DRAM Memory Error on page 2-38. 931 Printhead... Error-no first hsync Check for scanner 942 Scanner - Possible lock problem with the main drive motor or a jam occurred during the startup. Remove the paper from the ADF. lost lock Replace the printhead. 935 Printhead-mirror Faulty printhead, cabling, or connector. AFE R/W Replace the controller...
... after motor ramp-up to speed. 937 Transport motor - Replace the card is an unrecoverable problem with the flash file system used for fax storage. 953 NVRAM Failure Replace the controller card. 960 RAM soldered on the Indicates a DRAM Memory Error on page 2-38. 931 Printhead... Error-no first hsync Check for scanner 942 Scanner - Possible lock problem with the main drive motor or a jam occurred during the startup. Remove the paper from the ADF. lost lock Replace the printhead. 935 Printhead-mirror Faulty printhead, cabling, or connector. AFE R/W Replace the controller...

Service Manual
Page 155
... 2-2 7003-XXX cover open sensor removal 4-15 D developer drive coupling assembly removal 4-16 diagnostics menu ATM menu 3-9 count reset 3-4 fax usage 3-5 page count 3-4 scan usage 3-5 fax settings 3-9 autoprint T30 log 3-9 detect EOLs 3-9 fax modulations 3-9 print all T30 logs ...speed 3-5 NVRAM reset 3-6 print debug 3-5 power supply ID 3-4 printer model 3-4 registration 3-6 printer 3-6 scanner 3-7 using the test copy 3-8 scanner calibration 3-9 serial number 3-3 USB 3-3 utilities 3-11 clr phonebook 3-11 erase FFS 3-11 FAX NVRAM 3-11 diagnostics mode available menu items 3-2 entering 3-1 menu ...
... 2-2 7003-XXX cover open sensor removal 4-15 D developer drive coupling assembly removal 4-16 diagnostics menu ATM menu 3-9 count reset 3-4 fax usage 3-5 page count 3-4 scan usage 3-5 fax settings 3-9 autoprint T30 log 3-9 detect EOLs 3-9 fax modulations 3-9 print all T30 logs ...speed 3-5 NVRAM reset 3-6 print debug 3-5 power supply ID 3-4 printer model 3-4 registration 3-6 printer 3-6 scanner 3-7 using the test copy 3-8 scanner calibration 3-9 serial number 3-3 USB 3-3 utilities 3-11 clr phonebook 3-11 erase FFS 3-11 FAX NVRAM 3-11 diagnostics mode available menu items 3-2 entering 3-1 menu ...

Service Manual
Page 156
... 3-1 X340/X342n diagnostics menu 3-2 messages paper jam messages 2-9 service error codes 2-7 user attendance messages 2-10 MFP specifications 1-1 connectivity and compatibility 1-2 fonts 1-2 memory 1-1 minimum clearance requirements 1-1 print speed 1-1 trays and supply capacities 1-3 types of print media 1-4 mfp symptoms 2-2 minimum clearance requirements 1-1 Mode selection 2-4 modem card removal 4-54 modem speaker assembly removal 4-55 Multi-purpose job...
... 3-1 X340/X342n diagnostics menu 3-2 messages paper jam messages 2-9 service error codes 2-7 user attendance messages 2-10 MFP specifications 1-1 connectivity and compatibility 1-2 fonts 1-2 memory 1-1 minimum clearance requirements 1-1 print speed 1-1 trays and supply capacities 1-3 types of print media 1-4 mfp symptoms 2-2 minimum clearance requirements 1-1 Mode selection 2-4 modem card removal 4-54 modem speaker assembly removal 4-55 Multi-purpose job...

Service Manual
Page 157
...-on self test (POST) 2-2 print media types 1-4 print quality problems solving 2-34 print speed 1-1 printer taking offline with Stop button 2-5 printhead removal 4-32 printing menus 3-1 R rear cover removal 4-5 removals autocompensator clutch 4-23 card cage 4-12 controller card 4-13 cover open sensor 4-15 covers extender 4-2 front...test copy 3-8 scanner top removal 4-48 sensors cover open 4-15 exit 4-17 input sensor #1 4-24 input sensor #2 (manual feed) 4-25 service checks 2-19 ADF 2-19 CCD 2-20 controller card 2-21 cooling fan 2-20 cover interlock 2-22 dead machine 2-22 fax quality 2-23 fuser 2-...
...-on self test (POST) 2-2 print media types 1-4 print quality problems solving 2-34 print speed 1-1 printer taking offline with Stop button 2-5 printhead removal 4-32 printing menus 3-1 R rear cover removal 4-5 removals autocompensator clutch 4-23 card cage 4-12 controller card 4-13 cover open sensor 4-15 covers extender 4-2 front...test copy 3-8 scanner top removal 4-48 sensors cover open 4-15 exit 4-17 input sensor #1 4-24 input sensor #2 (manual feed) 4-25 service checks 2-19 ADF 2-19 CCD 2-20 controller card 2-21 cooling fan 2-20 cover interlock 2-22 dead machine 2-22 fax quality 2-23 fuser 2-...


