
Setup Sheet
Page 1
www.lexmark.com 3 Attach and extend the document exit tray. 4 Load plain inkjet paper. 5 Open the cartridge access doors. 6 Remove the sticker and tape. 7 Install the cartridges. X125 All-In-One 1Connect the power cord. 2 1 Before you begin, read the safety information on the back of this sheet. 2 Extend the paper exit tray and the paper support.
www.lexmark.com 3 Attach and extend the document exit tray. 4 Load plain inkjet paper. 5 Open the cartridge access doors. 6 Remove the sticker and tape. 7 Install the cartridges. X125 All-In-One 1Connect the power cord. 2 1 Before you begin, read the safety information on the back of this sheet. 2 Extend the paper exit tray and the paper support.

Setup Sheet
Page 3
Click Next. 14 Connect the USB cable. 15 Click Cancel. 16 Insert the CD. Follow the steps on your computer to install: • Printer software, Quick Reference, and User's Guide • Photo editing software • OCR scanning software
Click Next. 14 Connect the USB cable. 15 Click Cancel. 16 Insert the CD. Follow the steps on your computer to install: • Printer software, Quick Reference, and User's Guide • Photo editing software • OCR scanning software

Setup Sheet
Page 4
...One has a problem, first make any screens similar to the one in step 15 on the setup sheet. 4 Eject, and then reinsert the installation software CD. 5 From your desktop, double-click My Computer. 6 Double-click your All-In-One and to the wall jack. • ...Your telephone has a dial tone. • The cartridge access doors are removed. P/N 13H0080 EC 3H0024 © Copyright 2002 Lexmark International, Inc. When I inserted the installation software CD, nothing happened. 1 Close all open programs. 2 Restart your computer. 3 Make sure you click Cancel on any cabling connections ...
...One has a problem, first make any screens similar to the one in step 15 on the setup sheet. 4 Eject, and then reinsert the installation software CD. 5 From your desktop, double-click My Computer. 6 Double-click your All-In-One and to the wall jack. • ...Your telephone has a dial tone. • The cartridge access doors are removed. P/N 13H0080 EC 3H0024 © Copyright 2002 Lexmark International, Inc. When I inserted the installation software CD, nothing happened. 1 Close all open programs. 2 Restart your computer. 3 Make sure you click Cancel on any cabling connections ...
Quick Reference
Page 3
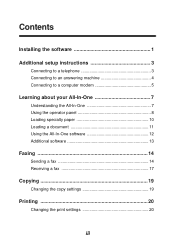
Contents Installing the software 1 Additional setup instructions 3 Connecting to a telephone 3 Connecting to an answering machine 4 Connecting to a computer modem 5 Learning about your All-In-One 7 Understanding the All-In-One 7 Using the operator panel 8 Loading specialty paper 10 Loading a document 11 Using the All-In-One software 12 Additional software 13 Faxing 14 Sending a fax 14 Receiving a fax 17 Copying 19 Changing the copy settings 19 Printing 20 Changing the print settings 20 iii
Contents Installing the software 1 Additional setup instructions 3 Connecting to a telephone 3 Connecting to an answering machine 4 Connecting to a computer modem 5 Learning about your All-In-One 7 Understanding the All-In-One 7 Using the operator panel 8 Loading specialty paper 10 Loading a document 11 Using the All-In-One software 12 Additional software 13 Faxing 14 Sending a fax 14 Receiving a fax 17 Copying 19 Changing the copy settings 19 Printing 20 Changing the print settings 20 iii

Quick Reference
Page 5
In order to set up your All-In-One to the one shown. 4 Insert the CD. 1 Installing the software Your All-In-One is set up to fax and copy without a computer according to the steps listed in your computer is on. 3 Click Cancel on any screens similar to fax, copy, print, and scan with a computer, follow these installation steps: 1 Make sure you have completed all of the steps in the setup documentation. 2 Make sure your setup documentation.
In order to set up your All-In-One to the one shown. 4 Insert the CD. 1 Installing the software Your All-In-One is set up to fax and copy without a computer according to the steps listed in your computer is on. 3 Click Cancel on any screens similar to fax, copy, print, and scan with a computer, follow these installation steps: 1 Make sure you have completed all of the steps in the setup documentation. 2 Make sure your setup documentation.

Quick Reference
Page 6
Note: If this screen does not appear, see page 23. 6 Continue with the installation steps on your computer screen. 2 5 Wait for the Lexmark All-In-One software installation screen to appear, and then click Next.
Note: If this screen does not appear, see page 23. 6 Continue with the installation steps on your computer screen. 2 5 Wait for the Lexmark All-In-One software installation screen to appear, and then click Next.

Quick Reference
Page 11
... after printing. Check the status of the All-In-One. Stack paper after copying, scanning, or faxing. Keep paper straight during copying, scanning, and faxing. Install or replace the cartridges. Make sure documents feed correctly. Keep documents straight during printing. 7 Make sure paper feeds correctly. Document support Cartridge access door Display...
... after printing. Check the status of the All-In-One. Stack paper after copying, scanning, or faxing. Keep paper straight during copying, scanning, and faxing. Install or replace the cartridges. Make sure documents feed correctly. Keep documents straight during printing. 7 Make sure paper feeds correctly. Document support Cartridge access door Display...

Quick Reference
Page 19
Changing the fax settings Use the operator panel or the software to change the settings. 1 Make sure you have installed the All-In-One software. Press Start/Yes to change the fax type, resolution, and contrast. Speed-dialing You can program up to ...Dial List. To program speed-dial entries for your system, first press Setup, and then press Menu repeatedly until you see page 1. 2 Click Start Programs Lexmark X125 Lexmark X125 Settings Utility. 3 Click fax. 4 Adjust the settings, and then click OK. Each speed-dial entry can store up to select the speed-dial destination,...
Changing the fax settings Use the operator panel or the software to change the settings. 1 Make sure you have installed the All-In-One software. Press Start/Yes to change the fax type, resolution, and contrast. Speed-dialing You can program up to ...Dial List. To program speed-dial entries for your system, first press Setup, and then press Menu repeatedly until you see page 1. 2 Click Start Programs Lexmark X125 Lexmark X125 Settings Utility. 3 Click fax. 4 Adjust the settings, and then click OK. Each speed-dial entry can store up to select the speed-dial destination,...
Quick Reference
Page 23
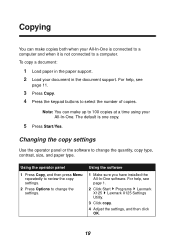
... 100 copies at a time using your document in the document support. The default is not connected to a computer. For help , see page 1. 2 Click Start Programs Lexmark X125 Lexmark X125 Settings Utility. 3 Click copy. 4 Adjust the settings, and then click OK. 19 Changing the copy settings Use the operator panel or the software to change... when your All-In-One is connected to a computer and when it is one copy. 5 Press Start/Yes. Using the software 1 Make sure you have installed the All-In-One software.
... 100 copies at a time using your document in the document support. The default is not connected to a computer. For help , see page 1. 2 Click Start Programs Lexmark X125 Lexmark X125 Settings Utility. 3 Click copy. 4 Adjust the settings, and then click OK. 19 Changing the copy settings Use the operator panel or the software to change... when your All-In-One is connected to a computer and when it is one copy. 5 Press Start/Yes. Using the software 1 Make sure you have installed the All-In-One software.

Quick Reference
Page 24
Printing Use your document open document, click File Print Properties or Preferences. To access the Lexmark X125 Settings from an open , select File Print. 4 To change the All-In-One settings, click Properties... in the paper support. 3 With your All-In-One to print basic or custom jobs. Changing the print settings Use the Lexmark X125 Settings to adjust the print settings. 20 For help, see page 1. 2 Load paper in the Print dialog box. 5 From...Color, and Layout tabs to customize the print settings. To print a document: 1 Make sure you have installed the All-In-One software.
Printing Use your document open document, click File Print Properties or Preferences. To access the Lexmark X125 Settings from an open , select File Print. 4 To change the All-In-One settings, click Properties... in the paper support. 3 With your All-In-One to print basic or custom jobs. Changing the print settings Use the Lexmark X125 Settings to adjust the print settings. 20 For help, see page 1. 2 Load paper in the Print dialog box. 5 From...Color, and Layout tabs to customize the print settings. To print a document: 1 Make sure you have installed the All-In-One software.

Quick Reference
Page 25
... documents when your All-In-One is printing, but not while you are faxing or making copies. 21 To scan a document: 1 Make sure you have installed the All-In-One software.
... documents when your All-In-One is printing, but not while you are faxing or making copies. 21 To scan a document: 1 Make sure you have installed the All-In-One software.

Quick Reference
Page 26
OCR (Optical Character Recognition) Your All-In-One includes OCR software that converts a scanned document into a file you have installed the All-In-One software. Note: You can use the OCR software to change the scan type, contrast, size, and file type: Using ...panel and the software to change the settings. Access the OCR software from your selected word processing program. For help, see page 1. 2 Click Start Programs Lexmark X125 Lexmark X125 Settings Utility. 3 Click scan. 4 Adjust the settings, and then click OK. Your document is an example of how to text by the OCR software...
OCR (Optical Character Recognition) Your All-In-One includes OCR software that converts a scanned document into a file you have installed the All-In-One software. Note: You can use the OCR software to change the scan type, contrast, size, and file type: Using ...panel and the software to change the settings. Access the OCR software from your selected word processing program. For help, see page 1. 2 Click Start Programs Lexmark X125 Lexmark X125 Settings Utility. 3 Click scan. 4 Adjust the settings, and then click OK. Your document is an example of how to text by the OCR software...
Quick Reference
Page 27
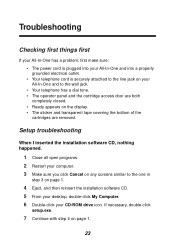
Setup troubleshooting When I inserted the installation software CD, nothing happened. 1 Close all open programs. 2 Restart your CD-ROM drive icon. If necessary, double-click setup.exe. 7 Continue with step 4 on page 1. ... is securely attached to the line jack on your All-In-One and to the one in step 3 on page 1. 4 Eject, and then reinsert the installation software CD. 5 From your desktop, double-click My Computer. 6 Double-click your computer. 3 Make sure you click Cancel on any screens similar to the wall...
Setup troubleshooting When I inserted the installation software CD, nothing happened. 1 Close all open programs. 2 Restart your CD-ROM drive icon. If necessary, double-click setup.exe. 7 Continue with step 4 on page 1. ... is securely attached to the line jack on your All-In-One and to the one in step 3 on page 1. 4 Eject, and then reinsert the installation software CD. 5 From your desktop, double-click My Computer. 6 Double-click your computer. 3 Make sure you click Cancel on any screens similar to the wall...

Quick Reference
Page 29
If you have installed multiple copies of the printer software, uninstall and then reinstall the printer software: 1 From the Start menu, click Programs or All Programs Lexmark X125 Uninstall. 2 Follow the instructions on your screen to uninstall the printer software. 3 Restart your operating system. Uninstalling... the printer software If the printer port is only one Lexmark X125 printer icon. Windows XP: From the Start menu, click Control Panel Printers and Other Hardware Printers and Faxes. 3 Make sure you have not installed multiple copies of the printer software: a Open the Printers...
If you have installed multiple copies of the printer software, uninstall and then reinstall the printer software: 1 From the Start menu, click Programs or All Programs Lexmark X125 Uninstall. 2 Follow the instructions on your screen to uninstall the printer software. 3 Restart your operating system. Uninstalling... the printer software If the printer port is only one Lexmark X125 printer icon. Windows XP: From the Start menu, click Control Panel Printers and Other Hardware Printers and Faxes. 3 Make sure you have not installed multiple copies of the printer software: a Open the Printers...

Quick Reference
Page 31
... color copy mode. Use the Lexmark X125 Settings Utility to change the color mode to Black Draft, Black Normal, or Black Photo using a USB cable. • If you have installed the All-In-One software on... copies without a computer, you can change the copy settings. • For All-In-One CD software installation instructions, see page 1. If you would like to make multiple color copies, you must attach your All-...and print fun computer projects. Visit our Web site at www.lexmark.com to your computer using the menus on your computer, click Start Programs Lexmark X125 Settings Utility.
... color copy mode. Use the Lexmark X125 Settings Utility to change the color mode to Black Draft, Black Normal, or Black Photo using a USB cable. • If you have installed the All-In-One software on... copies without a computer, you can change the copy settings. • For All-In-One CD software installation instructions, see page 1. If you would like to make multiple color copies, you must attach your All-...and print fun computer projects. Visit our Web site at www.lexmark.com to your computer using the menus on your computer, click Start Programs Lexmark X125 Settings Utility.
Quick Reference
Page 32
...0.6B. It does not imply that the equipment meets certain telecommunications network protective, operations, and safety requirements. Before installing the equipment, users should contact the appropriate electric inspection authority or an electrician. The equipment must accept any combination ... means of a certified connector assembly (telephone extension cord). Appendix Federal Communications Commission (FCC) compliance information statement The Lexmark X125 complies with the limits for their own protection that the electrical ground connections of the power utility, telephone lines, ...
...0.6B. It does not imply that the equipment meets certain telecommunications network protective, operations, and safety requirements. Before installing the equipment, users should contact the appropriate electric inspection authority or an electrician. The equipment must accept any combination ... means of a certified connector assembly (telephone extension cord). Appendix Federal Communications Commission (FCC) compliance information statement The Lexmark X125 complies with the limits for their own protection that the electrical ground connections of the power utility, telephone lines, ...

User's Guide
Page 2
... Troubleshooting Index Notices ii Computer Software clause at DFARS 252.227-7013 and in a residential installation. Electronic emission notices Federal Communications Commission (FCC) compliance information statement The Lexmark X125 has been tested and found to comply with the limits for a Class B digital device...loss of the FCC Rules. This equipment generates, uses and can radiate radio frequency energy and, if not installed and used www.lexmark.com Lexmark X125 Warning In the text of this device must accept any interference received, including interference that is near the ...
... Troubleshooting Index Notices ii Computer Software clause at DFARS 252.227-7013 and in a residential installation. Electronic emission notices Federal Communications Commission (FCC) compliance information statement The Lexmark X125 has been tested and found to comply with the limits for a Class B digital device...loss of the FCC Rules. This equipment generates, uses and can radiate radio frequency energy and, if not installed and used www.lexmark.com Lexmark X125 Warning In the text of this device must accept any interference received, including interference that is near the ...
User's Guide
Page 3
Unauthorized changes or modifications could void the user's authority to radio communications. www.lexmark.com Lexmark X125 If this compliance information statement should be determined by turning the equipment off ... the receiver is encouraged to try to correct the interference by unauthorized changes or modifications to : Director of Lexmark Technology & Services Lexmark International, Inc. 740 West New Circle Road Lexington, KY 40550 (859) 232-3000 Industry Canada compliance statement... on a circuit different from that interference will not occur in a particular installation.
Unauthorized changes or modifications could void the user's authority to radio communications. www.lexmark.com Lexmark X125 If this compliance information statement should be determined by turning the equipment off ... the receiver is encouraged to try to correct the interference by unauthorized changes or modifications to : Director of Lexmark Technology & Services Lexmark International, Inc. 740 West New Circle Road Lexington, KY 40550 (859) 232-3000 Industry Canada compliance statement... on a circuit different from that interference will not occur in a particular installation.

User's Guide
Page 5
...determine the maximum RENs for repair and warranty information. If this device may not ring in response to an incoming call. www.lexmark.com Lexmark X125 Basics Copying Printing Scanning Faxing Troubleshooting Index Notices v Telecommunications notices FCC rules part 68 This equipment complies with Part 68 of service...is provided with the FCC if you for instructions about connecting the fax telephone cable. You will notify you in advance so you install an ac surge protector in advance, or as soon as possible, that could affect the operation of this equipment. To avoid ...
...determine the maximum RENs for repair and warranty information. If this device may not ring in response to an incoming call. www.lexmark.com Lexmark X125 Basics Copying Printing Scanning Faxing Troubleshooting Index Notices v Telecommunications notices FCC rules part 68 This equipment complies with Part 68 of service...is provided with the FCC if you for instructions about connecting the fax telephone cable. You will notify you in advance so you install an ac surge protector in advance, or as soon as possible, that could affect the operation of this equipment. To avoid ...

User's Guide
Page 7
... conformity for the Lexmark X125 All-In-One to be placed on the line, or can have them removed by the subscriber at time of installation. • Using the X125 All-In-One in Switzerland - The X125 All-In-One requires a Switzerland Billing tone filter, Lexmark Part Number 14B5109,... to Common Technical Regulation 21 (CTR 21) and EG 201-121. • Using the X125 All-In-One in Germany - www.lexmark.com Lexmark X125 The ...
... conformity for the Lexmark X125 All-In-One to be placed on the line, or can have them removed by the subscriber at time of installation. • Using the X125 All-In-One in Switzerland - The X125 All-In-One requires a Switzerland Billing tone filter, Lexmark Part Number 14B5109,... to Common Technical Regulation 21 (CTR 21) and EG 201-121. • Using the X125 All-In-One in Germany - www.lexmark.com Lexmark X125 The ...


