

User's Guide
Page 1
X1100 Series All-In-One User's Guide • Learning about the All-In-One • Understanding the software • Using the All-In-One • Maintenance • Troubleshooting www.lexmark.com
X1100 Series All-In-One User's Guide • Learning about the All-In-One • Understanding the software • Using the All-In-One • Maintenance • Troubleshooting www.lexmark.com

User's Guide
Page 2
... product, program, or service that does not infringe any existing intellectual property right may be made to the information herein; Lexmark and Lexmark with other countries. This publication could include technical inaccuracies or typographical errors. Improvements or changes in the user documentation, to ... states do not imply that the manufacturer intends to make any accompanying documentation provided under this agreement are commercial computer software and documentation developed exclusively at any time. Edition: May 2003 The following paragraph does not apply to any country ...
... product, program, or service that does not infringe any existing intellectual property right may be made to the information herein; Lexmark and Lexmark with other countries. This publication could include technical inaccuracies or typographical errors. Improvements or changes in the user documentation, to ... states do not imply that the manufacturer intends to make any accompanying documentation provided under this agreement are commercial computer software and documentation developed exclusively at any time. Edition: May 2003 The following paragraph does not apply to any country ...
User's Guide
Page 3
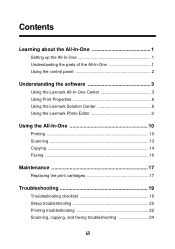
Contents Learning about the All-In-One 1 Setting up the All-In-One 1 Understanding the parts of the All-In-One 1 Using the control panel 2 Understanding the software 3 Using the Lexmark All-In-One Center 3 Using Print Properties 6 Using the Lexmark Solution Center 8 Using the Lexmark Photo Editor 9 Using the All-In-One 10 Printing 10 Scanning 13 Copying 14 Faxing 16 Maintenance 17 Replacing the print cartridges 17 Troubleshooting 19 Troubleshooting checklist 19 Setup troubleshooting 20 Printing troubleshooting 22 Scanning, copying, and faxing troubleshooting 24 iii
Contents Learning about the All-In-One 1 Setting up the All-In-One 1 Understanding the parts of the All-In-One 1 Using the control panel 2 Understanding the software 3 Using the Lexmark All-In-One Center 3 Using Print Properties 6 Using the Lexmark Solution Center 8 Using the Lexmark Photo Editor 9 Using the All-In-One 10 Printing 10 Scanning 13 Copying 14 Faxing 16 Maintenance 17 Replacing the print cartridges 17 Troubleshooting 19 Troubleshooting checklist 19 Setup troubleshooting 20 Printing troubleshooting 22 Scanning, copying, and faxing troubleshooting 24 iii

User's Guide
Page 4
iv This guide tells you for purchasing a Lexmark X1100 Series All-In-One! Congratulations on the market today. The Lexmark™ X1100 Series All-In-One combines the functionality of an inkjet printer, a scanner, a copier, and a fax machine all into a single, multifunction device, making it one of the most exciting products on your purchase. Removing and reinstalling the software 26 Other help sources 26 Thank you how to perform printing, copying, scanning, and faxing tasks. Also included are sections describing the All-In-One software and troubleshooting information.
iv This guide tells you for purchasing a Lexmark X1100 Series All-In-One! Congratulations on the market today. The Lexmark™ X1100 Series All-In-One combines the functionality of an inkjet printer, a scanner, a copier, and a fax machine all into a single, multifunction device, making it one of the most exciting products on your purchase. Removing and reinstalling the software 26 Other help sources 26 Thank you how to perform printing, copying, scanning, and faxing tasks. Also included are sections describing the All-In-One software and troubleshooting information.
User's Guide
Page 5
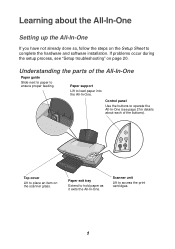
...-One Paper guide Slide next to paper to load paper into the All-In-One. Control panel Use the buttons to complete the hardware and software installation. If problems occur during the setup process, see page 2 for details about the All-In-One Setting up the All-In-One If you...
...-One Paper guide Slide next to paper to load paper into the All-In-One. Control panel Use the buttons to complete the hardware and software installation. If problems occur during the setup process, see page 2 for details about the All-In-One Setting up the All-In-One If you...
User's Guide
Page 7
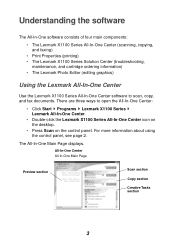
... (scanning, copying, and faxing) • Print Properties (printing) • The Lexmark X1100 Series Solution Center (troubleshooting, maintenance, and cartridge ordering information) • The Lexmark Photo Editor (editing graphics) Using the Lexmark All-In-One Center Use the Lexmark X1100 Series All-In-One Center software to open the All-In-One Center: • Click Start...
... (scanning, copying, and faxing) • Print Properties (printing) • The Lexmark X1100 Series Solution Center (troubleshooting, maintenance, and cartridge ordering information) • The Lexmark Photo Editor (editing graphics) Using the Lexmark All-In-One Center Use the Lexmark X1100 Series All-In-One Center software to open the All-In-One Center: • Click Start...

User's Guide
Page 9
... page, click the Help button located in the upper right corner of the screen. Print a Copy... Note: For more information about the Lexmark Solution Center, see page 4. From this page, click the Help button located in the upper right corner of your copies. • Select...8226; More printing ideas and how to's • Contact information • Advanced (skin, voice, and communication options) • View the software version and copyright information For more information about this section: Open with direct links to perform tasks with images that are saved on the computer...
... page, click the Help button located in the upper right corner of the screen. Print a Copy... Note: For more information about the Lexmark Solution Center, see page 4. From this page, click the Help button located in the upper right corner of your copies. • Select...8226; More printing ideas and how to's • Contact information • Advanced (skin, voice, and communication options) • View the software version and copyright information For more information about this section: Open with direct links to perform tasks with images that are saved on the computer...
User's Guide
Page 10
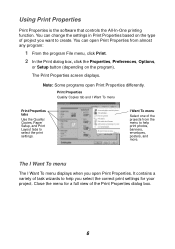
... menu for your project. Note: Some programs open Print Properties from the menu to select the print settings. Using Print Properties Print Properties is the software that controls the All-In-One printing function. You can change the settings in Print Properties based on the program). The Print Properties screen displays...
... menu for your project. Note: Some programs open Print Properties from the menu to select the print settings. Using Print Properties Print Properties is the software that controls the All-In-One printing function. You can change the settings in Print Properties based on the program). The Print Properties screen displays...
User's Guide
Page 11
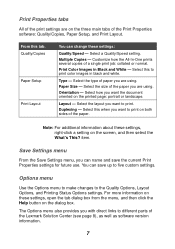
.... Select this when you want to five custom settings. Select the type of the Print Properties software: Quality/Copies, Paper Setup, and Print Layout. Select the size of the Lexmark Solution Center (see page 8), as well as software version information. 7 Select how you can change these settings, right-click a setting on the dialog...
.... Select this when you want to five custom settings. Select the type of the Print Properties software: Quality/Copies, Paper Setup, and Print Layout. Select the size of the Lexmark Solution Center (see page 8), as well as software version information. 7 Select how you can change these settings, right-click a setting on the dialog...

User's Guide
Page 13
Using the Lexmark Photo Editor Use the Lexmark Photo Editor software to edit your pointer over the tool for a description. Move your graphic. The Lexmark Photo Editor displays. To open the Lexmark Photo Editor, click Start Programs Lexmark X1100 Series Lexmark Photo Editor. Use the touch-up tools 9 From this tab: Contact Information Advanced You can: • Learn...
Using the Lexmark Photo Editor Use the Lexmark Photo Editor software to edit your pointer over the tool for a description. Move your graphic. The Lexmark Photo Editor displays. To open the Lexmark Photo Editor, click Start Programs Lexmark X1100 Series Lexmark Photo Editor. Use the touch-up tools 9 From this tab: Contact Information Advanced You can: • Learn...
User's Guide
Page 18
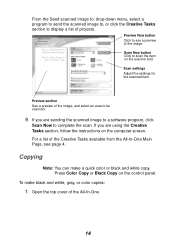
... All-In-One Main Page, see a preview of the image, and select an area to be scanned. 9 If you are sending the scanned image to a software program, click Scan Now to complete the scan. To make a quick color or black and white copy. If you are using the Creative Tasks section...
... All-In-One Main Page, see a preview of the image, and select an area to be scanned. 9 If you are sending the scanned image to a software program, click Scan Now to complete the scan. To make a quick color or black and white copy. If you are using the Creative Tasks section...
User's Guide
Page 23
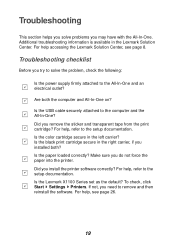
... is available in the left carrier? Is the USB cable securely attached to the setup documentation. Is the color cartridge secure in the Lexmark Solution Center. Is the Lexmark X1100 Series set as the default? Is the paper loaded correctly? Is the black print cartridge secure in the right carrier, if you...One. For help , see page 8. If not, you do not force the paper into the printer. For help , refer to remove and then reinstall the software. Make sure you need to the setup documentation. For help , refer to the computer and the All-In-One? Did you install the printer...
... is available in the left carrier? Is the USB cable securely attached to the setup documentation. Is the color cartridge secure in the Lexmark Solution Center. Is the Lexmark X1100 Series set as the default? Is the paper loaded correctly? Is the black print cartridge secure in the right carrier, if you...One. For help , see page 8. If not, you do not force the paper into the printer. For help , refer to remove and then reinstall the software. Make sure you need to the setup documentation. For help , refer to the computer and the All-In-One? Did you install the printer...
User's Guide
Page 24
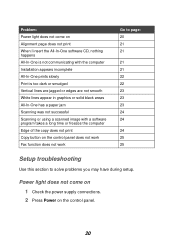
Power light does not come on Alignment page does not print When I insert the All-In-One software CD, nothing happens All-In-One is not communicating with the computer Installation appears incomplete All-In-One prints slowly Print is too dark or ... White lines appear in graphics or solid black areas All-In-One has a paper jam Scanning was not successful Scanning or using a scanned image with a software program takes a long time or freezes the computer Edge of the copy does not print Copy button on the control panel. 20 Problem: Power light...
Power light does not come on Alignment page does not print When I insert the All-In-One software CD, nothing happens All-In-One is not communicating with the computer Installation appears incomplete All-In-One prints slowly Print is too dark or ... White lines appear in graphics or solid black areas All-In-One has a paper jam Scanning was not successful Scanning or using a scanned image with a software program takes a long time or freezes the computer Edge of the copy does not print Copy button on the control panel. 20 Problem: Power light...
User's Guide
Page 25
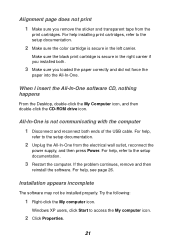
...from the print cartridges. All-In-One is secure in the left carrier. If the problem continues, remove and then reinstall the software. Installation appears incomplete The software may not be installed properly. For help installing print cartridges, refer to the setup documentation. 3 Restart the computer. For help...and transparent tape from the electrical wall outlet, reconnect the power supply, and then press Power. When I insert the All-In-One software CD, nothing happens From the Desktop, double-click the My Computer icon, and then double-click the CD-ROM drive icon. Alignment ...
...from the print cartridges. All-In-One is secure in the left carrier. If the problem continues, remove and then reinstall the software. Installation appears incomplete The software may not be installed properly. For help installing print cartridges, refer to the setup documentation. 3 Restart the computer. For help...and transparent tape from the electrical wall outlet, reconnect the power supply, and then press Power. When I insert the All-In-One software CD, nothing happens From the Desktop, double-click the My Computer icon, and then double-click the CD-ROM drive icon. Alignment ...
User's Guide
Page 26
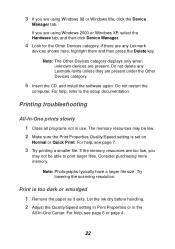
... paper as it exits. If the memory resources are present. If there are present under the Other Devices category. 5 Insert the CD, and install the software again. For help , see page 6 or page 4. 22 Let the ink dry before handling. 2 Adjust the Quality/Speed setting in Print Properties or in... use. For help , refer to print larger files. Do not restart the computer. Do not delete any Lexmark items unless they are any Lexmark devices shown here, highlight them and then press the Delete key. Print is set on Normal or Quick Print. For help, see ...
... paper as it exits. If the memory resources are present. If there are present under the Other Devices category. 5 Insert the CD, and install the software again. For help , see page 6 or page 4. 22 Let the ink dry before handling. 2 Adjust the Quality/Speed setting in Print Properties or in... use. For help , refer to print larger files. Do not restart the computer. Do not delete any Lexmark items unless they are any Lexmark devices shown here, highlight them and then press the Delete key. Print is set on Normal or Quick Print. For help, see ...
User's Guide
Page 28
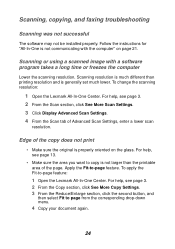
...Fit to copy is not larger than printing resolution and is properly oriented on page 21. Apply the Fit-to -page feature: 1 Open the Lexmark All-In-One Center. To apply the Fit-to -page feature. Scanning resolution is much different than the printable area of the copy does ... to page from the corresponding drop-down menu. 4 Copy your document again. 24 Scanning, copying, and faxing troubleshooting Scanning was not successful The software may not be installed properly. Scanning or using a scanned image with the computer" on the glass. To change the scanning resolution: 1 Open the...
...Fit to copy is not larger than printing resolution and is properly oriented on page 21. Apply the Fit-to -page feature: 1 Open the Lexmark All-In-One Center. To apply the Fit-to -page feature. Scanning resolution is much different than the printable area of the copy does ... to page from the corresponding drop-down menu. 4 Copy your document again. 24 Scanning, copying, and faxing troubleshooting Scanning was not successful The software may not be installed properly. Scanning or using a scanned image with the computer" on the glass. To change the scanning resolution: 1 Open the...

User's Guide
Page 29
Fax function does not work . For help, refer to function. • The memory may be full. The software must be installed for faxing to the setup documentation. The computer must be on in memory have been sent, and then send the current fax ... is connected to a phone line. A phone connection is on. Copy button on the control panel does not work . • Make sure you properly installed the software.
Fax function does not work . For help, refer to function. • The memory may be full. The software must be installed for faxing to the setup documentation. The computer must be on in memory have been sent, and then send the current fax ... is connected to a phone line. A phone connection is on. Copy button on the control panel does not work . • Make sure you properly installed the software.
User's Guide
Page 30
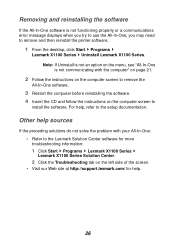
... properly or a communications error message displays when you try to use the All-In-One, you may need to the Lexmark Solution Center software for more troubleshooting information: 1 Click Start Programs Lexmark X1100 Series Lexmark X1100 Series Solution Center. 2 Click the Troubleshooting tab on the left side of the screen. • Visit our Web...
... properly or a communications error message displays when you try to use the All-In-One, you may need to the Lexmark Solution Center software for more troubleshooting information: 1 Click Start Programs Lexmark X1100 Series Lexmark X1100 Series Solution Center. 2 Click the Troubleshooting tab on the left side of the screen. • Visit our Web...
User's Guide
Page 33
... 7 E edition information ii electrical emission statement 27 emission statement 27 envelopes printing 6 F faxing 16 FCC statement 27 G glossy paper 10 H hardware setup software setup 1 How To tab 8 I I Want To change quality settings 6 change speed settings 6 print a banner 6 print a photo 6 print a ... ink cartridges viewing ink levels of 8 ink levels viewing 8 inkjet paper 10 iron-on transfers 10 printing 6 L labels 10 Lexmark All-In-One Center 3 opening 3 using 3 Lexmark Solution Center 8 Advanced tab 9 Contact Information tab 9 How To tab 8 Maintenance tab 8 opening 8 Printer Status tab 8 ...
... 7 E edition information ii electrical emission statement 27 emission statement 27 envelopes printing 6 F faxing 16 FCC statement 27 G glossy paper 10 H hardware setup software setup 1 How To tab 8 I I Want To change quality settings 6 change speed settings 6 print a banner 6 print a photo 6 print a ... ink cartridges viewing ink levels of 8 ink levels viewing 8 inkjet paper 10 iron-on transfers 10 printing 6 L labels 10 Lexmark All-In-One Center 3 opening 3 using 3 Lexmark Solution Center 8 Advanced tab 9 Contact Information tab 9 How To tab 8 Maintenance tab 8 opening 8 Printer Status tab 8 ...
User's Guide
Page 34
...tabs 7 printing 10 banners 6 envelopes 6 photos 6 posters 6 Printing Status window changing appearance of 9 Q Quality/Copies tab 7 R reinstalling software 26 removing software 26 S safety information ii Save Settings menu 7 saved images viewing 5 Scan button 2 scan settings 4 scanner unit 1 scanning 13 placing an... a Copy...section 5 voice notification turning on the glass 13 settings, saving for future use 7 setup 1 setup troubleshooting 20 software reinstalling 26 removing 26 sound, see voice notification Status tab 8 T top cover 1 transparencies 10 troubleshooting copying problems 24 faxing...
...tabs 7 printing 10 banners 6 envelopes 6 photos 6 posters 6 Printing Status window changing appearance of 9 Q Quality/Copies tab 7 R reinstalling software 26 removing software 26 S safety information ii Save Settings menu 7 saved images viewing 5 Scan button 2 scan settings 4 scanner unit 1 scanning 13 placing an... a Copy...section 5 voice notification turning on the glass 13 settings, saving for future use 7 setup 1 setup troubleshooting 20 software reinstalling 26 removing 26 sound, see voice notification Status tab 8 T top cover 1 transparencies 10 troubleshooting copying problems 24 faxing...


