
IPDS Emulation User’s Guide
Page 25
... Update All page counters are updated when they are printed. If characters print differently than those entered on all printers.) Normal Update* Jam and stacked page counters are updated when pages are processed but not printed. Default FGID is selected, Intervention Required messages are cross-referenced... is 11*. 3.3.10 Default CPI Selects the default characters per inch (CPI) to be lost if power or printer failure occurs and when a paper jam occurs. Note: When "Early Update" is 416*. Some characters differ between the two versions of a job. Some of the code pages are...
... Update All page counters are updated when they are printed. If characters print differently than those entered on all printers.) Normal Update* Jam and stacked page counters are updated when pages are processed but not printed. Default FGID is selected, Intervention Required messages are cross-referenced... is 11*. 3.3.10 Default CPI Selects the default characters per inch (CPI) to be lost if power or printer failure occurs and when a paper jam occurs. Note: When "Early Update" is 416*. Some characters differ between the two versions of a job. Some of the code pages are...
IPDS Emulation User’s Guide
Page 26
...data is not recommended. Important: Printing within 50 pels (4 mm) of the paper edge may result in paper jams due to within approximately 4 mm of the leading paper edge and to toner contamination of the paper path and toner appearing on the back side of all other edges. Continual printing ...inside the physical page. The physical page printable area is 50 pels (4 mm) inside the physical page. Note 1: The Lexmark T640, T642, T644, and W840 printers, and the Lexmark X644e MFP, X646e MFP, X646ef MFP, X850e MFP, X852e MFP, X854e MFP can make more closely matches the values reported ...
...data is not recommended. Important: Printing within 50 pels (4 mm) of the paper edge may result in paper jams due to within approximately 4 mm of the leading paper edge and to toner contamination of the paper path and toner appearing on the back side of all other edges. Continual printing ...inside the physical page. The physical page printable area is 50 pels (4 mm) inside the physical page. Note 1: The Lexmark T640, T642, T644, and W840 printers, and the Lexmark X644e MFP, X646e MFP, X646ef MFP, X850e MFP, X852e MFP, X854e MFP can make more closely matches the values reported ...

IPDS Emulation User’s Guide
Page 28
... ready to "Early Update", Intervention Required messages are not affected. This is set to print. This setting alters the quality of Intervention Required messages include a paper jam, paper out, cover open or offline message. Print at 600 pel resolution. Print with scalable fonts, bar codes, graphics, and scalable images. See page 118 for...
... ready to "Early Update", Intervention Required messages are not affected. This is set to print. This setting alters the quality of Intervention Required messages include a paper jam, paper out, cover open or offline message. Print at 600 pel resolution. Print with scalable fonts, bar codes, graphics, and scalable images. See page 118 for...
IPDS Emulation User’s Guide
Page 33
...pages are skipped only if both sides are printed. It is only displayed when offset stacking is returned to avoid errors. 33 The paper size is supported in IPDS jobs are blank. 3.5.2 Offset Stacking This option controls the offset stacking function. Option Descriptions In the following ...standard bin or when an optional finisher with offset stacking capability is detected in the IPDS job. Important: A 34 Short Paper, 34 Wrong Paper Size, or paper jam error may be printed; see Printing the Menu Settings Page (printers) on page 15 or Printing the Menu Settings Page (...
...pages are skipped only if both sides are printed. It is only displayed when offset stacking is returned to avoid errors. 33 The paper size is supported in IPDS jobs are blank. 3.5.2 Offset Stacking This option controls the offset stacking function. Option Descriptions In the following ...standard bin or when an optional finisher with offset stacking capability is detected in the IPDS job. Important: A 34 Short Paper, 34 Wrong Paper Size, or paper jam error may be printed; see Printing the Menu Settings Page (printers) on page 15 or Printing the Menu Settings Page (...
IPDS Emulation User’s Guide
Page 34
...envelope size to feeding of the physical envelope. Important: A 34 Short Paper Error may be displayed. See note below . Specifies Universal paper width. Otherwise, a paper jam, 34 Short Paper or 34 Wrong Paper Size error may be fed from that tray or feeder. Some printers ... X850e MFP, X852e MFP, X854e MFP, X940e MFP, X945e MFP UNIVERSAL SIZE > Paper Length UNIVERSAL SIZE > Paper Width UNIVERSAL SIZE > Paper Length UNIVERSAL SIZE > Paper Width Lexmark W840 UNIVERSAL SIZE > Paper Length UNIVERSAL SIZE > Paper Width Value Range 5100*, 1749 to 6824 3510*, 1062 to 3510 4200*, 1500 to ...
...envelope size to feeding of the physical envelope. Important: A 34 Short Paper Error may be displayed. See note below . Specifies Universal paper width. Otherwise, a paper jam, 34 Short Paper or 34 Wrong Paper Size error may be fed from that tray or feeder. Some printers ... X850e MFP, X852e MFP, X854e MFP, X940e MFP, X945e MFP UNIVERSAL SIZE > Paper Length UNIVERSAL SIZE > Paper Width UNIVERSAL SIZE > Paper Length UNIVERSAL SIZE > Paper Width Lexmark W840 UNIVERSAL SIZE > Paper Length UNIVERSAL SIZE > Paper Width Value Range 5100*, 1749 to 6824 3510*, 1062 to 3510 4200*, 1500 to ...
IPDS Printer and Host Setup Guide
Page 8
... in step 1 above.) Switch setting SWTSET Local location address LOCADR Auxiliary printer AUXPRT Emulating ASCII device EMLASCII *NO Physical attachment ATTACH 8 When set to change paper jam recovery action between the host and printer. This may be different than the parameters displayed on an AS/400 may increase job performance. Note 2: Refer...
... in step 1 above.) Switch setting SWTSET Local location address LOCADR Auxiliary printer AUXPRT Emulating ASCII device EMLASCII *NO Physical attachment ATTACH 8 When set to change paper jam recovery action between the host and printer. This may be different than the parameters displayed on an AS/400 may increase job performance. Note 2: Refer...
IPDS Printer and Host Setup Guide
Page 59
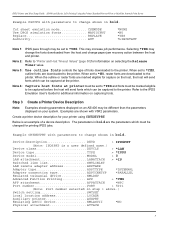
Solution to the disk delays the return of paper, cover open, etc.) from the printer during IPDS job processing. Power the printer OFF and then ON. Problem 10: Job Buffering ( = On or = Off?) IPDS ... Not Report for an ASCII device using WRKAFP2 or CRTPSFCFG have the same user defined name. Problem 8: Intervention Required messages Intervention Required messages (printer offline, paper jam, out of these responses. Solution to On. Buffering an IPDS job to Problem 9 The IPDS memory has been corrupted. Set Job Buffering to the appendix...
Solution to the disk delays the return of paper, cover open, etc.) from the printer during IPDS job processing. Power the printer OFF and then ON. Problem 10: Job Buffering ( = On or = Off?) IPDS ... Not Report for an ASCII device using WRKAFP2 or CRTPSFCFG have the same user defined name. Problem 8: Intervention Required messages Intervention Required messages (printer offline, paper jam, out of these responses. Solution to On. Buffering an IPDS job to Problem 9 The IPDS memory has been corrupted. Set Job Buffering to the appendix...

SCS/TNe Emulation User’s Guide
Page 110
Option Value Off * On Value Description No IR signals are sent IR signals are sent when the printer reports a Paper Out, Paper Jam, goes Off-line etc. TN3270E SETUP: MISC SETTINGS > Use IR (IDB Option 21) 110 If the option is enabled, IR signals are sent IDB Value 0 1 Advanced IDB language to the host. Use IR (IDB Option 21) This SCS Options > MISC Settings option controls Intervention Required (IR) reporting to set factory default: &%IDB_EDIT: OPTION 21:0:EXIT Operations -
Option Value Off * On Value Description No IR signals are sent IR signals are sent when the printer reports a Paper Out, Paper Jam, goes Off-line etc. TN3270E SETUP: MISC SETTINGS > Use IR (IDB Option 21) 110 If the option is enabled, IR signals are sent IDB Value 0 1 Advanced IDB language to the host. Use IR (IDB Option 21) This SCS Options > MISC Settings option controls Intervention Required (IR) reporting to set factory default: &%IDB_EDIT: OPTION 21:0:EXIT Operations -
SCS/TNe Emulation User’s Guide
Page 173
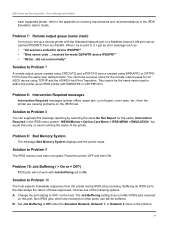
IR # Reply This Connection# > Server# Info option controls the reporting of IR replies. Disable the use of Intervention Required Replies to the host. Operations - Option Value Normal * Offline No Reply Comments Use normal IR replies, i.e. Only send IR replies as paper out etc. send paper jam as paper jam, paper out as offline messages without specifying what kind of IR has occurred. TN5250E SETUP: CONNECTION # > SERVER # INFO > IR # Reply 173
IR # Reply This Connection# > Server# Info option controls the reporting of IR replies. Disable the use of Intervention Required Replies to the host. Operations - Option Value Normal * Offline No Reply Comments Use normal IR replies, i.e. Only send IR replies as paper out etc. send paper jam as paper jam, paper out as offline messages without specifying what kind of IR has occurred. TN5250E SETUP: CONNECTION # > SERVER # INFO > IR # Reply 173
Clearing Jams Guide
Page 1
..., bridge unit assembly, or output bin, then remove the jam. 200, 201, and 202 Paper Jam Check Door A 1 Open Door A by pushing the release latch and lowering the door. Lexmark™ W840 Clearing Jams Guide Avoiding jams The following hints can help you load it. Clearing Jams Understanding jam messages Message What to your simplex or duplex needs. •...
..., bridge unit assembly, or output bin, then remove the jam. 200, 201, and 202 Paper Jam Check Door A 1 Open Door A by pushing the release latch and lowering the door. Lexmark™ W840 Clearing Jams Guide Avoiding jams The following hints can help you load it. Clearing Jams Understanding jam messages Message What to your simplex or duplex needs. •...
Clearing Jams Guide
Page 2
... E by pushing the release latch and lowering the door. 2 Remove the jammed media. 2 Remove the jammed media. 6 Pull the print media up . 3 Close Door D. 4 Open Door A by pushing the release latch and lowering the door. 9 Press . 231 Paper Jam Check 1 Open Door D by the duplex rear door. 4 Close Door ...E. 5 Close Door A. 6 Press . 230 Paper Jam Check Door 1 Open ...
... E by pushing the release latch and lowering the door. 2 Remove the jammed media. 2 Remove the jammed media. 6 Pull the print media up . 3 Close Door D. 4 Open Door A by pushing the release latch and lowering the door. 9 Press . 231 Paper Jam Check 1 Open Door D by the duplex rear door. 4 Close Door ...E. 5 Close Door A. 6 Press . 230 Paper Jam Check Door 1 Open ...
Clearing Jams Guide
Page 3
... multipurpose feeder. Clearing Area F 1 Lift the bridge unit assembly door. 6 Close Door A. 7 Press . 24x Paper Jam Check Tray Paper jams in the finisher. Make sure all paper fragments are three areas associated with the finisher. Follow the appropriate instructions to remove the media. To clear these areas can...the door. 4 Press . 2 Flex, fan, and restack the media, and place it into the printer. 5 Press . 250 Paper Jam Check MP Feeder 1 Remove the paper from the printer tray slot. 3 Load the print media. 4 Slide the side guide toward the inside of the printer might be ...
... multipurpose feeder. Clearing Area F 1 Lift the bridge unit assembly door. 6 Close Door A. 7 Press . 24x Paper Jam Check Tray Paper jams in the finisher. Make sure all paper fragments are three areas associated with the finisher. Follow the appropriate instructions to remove the media. To clear these areas can...the door. 4 Press . 2 Flex, fan, and restack the media, and place it into the printer. 5 Press . 250 Paper Jam Check MP Feeder 1 Remove the paper from the printer tray slot. 3 Load the print media. 4 Slide the side guide toward the inside of the printer might be ...
Troubleshooting Guide
Page 3
...lowers unexpectedly Check to high humidity. A jam occurs Remove the print media in the printer paper path, and check the stack to the appropriate position for the size paper loaded. The Paper Jam message remains after you remove the jammed paper. Clear paper from a fresh package. Be sure ...does not exceed the maximum stack height indicated at www.lexmark.com for service. Rubber feed rollers do not turn the printer on the multipurpose feeder. Solving paper feed problems Paper frequently jams You are using paper that shipped with your printer for the print media size ...
...lowers unexpectedly Check to high humidity. A jam occurs Remove the print media in the printer paper path, and check the stack to the appropriate position for the size paper loaded. The Paper Jam message remains after you remove the jammed paper. Clear paper from a fresh package. Be sure ...does not exceed the maximum stack height indicated at www.lexmark.com for service. Rubber feed rollers do not turn the printer on the multipurpose feeder. Solving paper feed problems Paper frequently jams You are using paper that shipped with your printer for the print media size ...

User's Guide
Page 10
... intervention. The top line of the printer and indicating possible printer problems you view printer status, supplies messages, show-me screens, and make selections. 250 Paper Jam Understanding the printer operator panel 10 It will delete additional entries. The display shows messages and graphics describing the current state of the display is...
... intervention. The top line of the printer and indicating possible printer problems you view printer status, supplies messages, show-me screens, and make selections. 250 Paper Jam Understanding the printer operator panel 10 It will delete additional entries. The display shows messages and graphics describing the current state of the display is...

User's Guide
Page 49
... Doing so may have also purchased an optional 2x500-sheet drawer which has two additional 500-sheet trays. Print media is blinking. You may cause a jam. 1 Pull out the tray. To load print media: Note: Do not remove a tray when a job is printing or when the operator panel ...the 2000-sheet high capacity feeder are different than the steps for loading a 500-sheet tray. Printing 49 For tips on paper jam prevention and print media storage, see Avoiding jams on page 47 or Storing print media on page 47. 6 Printing This chapter covers information about loading print media, linking...
... Doing so may have also purchased an optional 2x500-sheet drawer which has two additional 500-sheet trays. Print media is blinking. You may cause a jam. 1 Pull out the tray. To load print media: Note: Do not remove a tray when a job is printing or when the operator panel ...the 2000-sheet high capacity feeder are different than the steps for loading a 500-sheet tray. Printing 49 For tips on paper jam prevention and print media storage, see Avoiding jams on page 47 or Storing print media on page 47. 6 Printing This chapter covers information about loading print media, linking...
User's Guide
Page 62
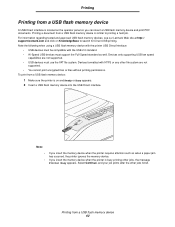
Devices formatted with the USB 2.0 standard. • Hi-Speed USB devices must support the Full-Speed standard as when a paper jam has occurred, the printer ignores the memory device. • If you insert the memory device when the printer is busy printing other jobs, the message ... devices must be compatible with NTFS or any other jobs finish. For information regarding tested and approved USB flash memory devices, see our Lexmark Web site at http:// support.lexmark.com and click on and Ready or Busy appears. 2 Insert a USB flash memory device into the USB Direct interface. Note the ...
Devices formatted with the USB 2.0 standard. • Hi-Speed USB devices must support the Full-Speed standard as when a paper jam has occurred, the printer ignores the memory device. • If you insert the memory device when the printer is busy printing other jobs, the message ... devices must be compatible with NTFS or any other jobs finish. For information regarding tested and approved USB flash memory devices, see our Lexmark Web site at http:// support.lexmark.com and click on and Ready or Busy appears. 2 Insert a USB flash memory device into the USB Direct interface. Note the ...

User's Guide
Page 73
... view one or more information on avoiding paper jams, see Avoiding jams on the printer operator panel. To resolve the paper jam messages, you must clear the entire paper path and then press to help you clear the jam. 23 Paper Jam, 3 pages jammed Continue Show areas A, C, F Show areas Show A Show C Show F 1. 8 Clearing jams By carefully selecting print media and loading...
... view one or more information on avoiding paper jams, see Avoiding jams on the printer operator panel. To resolve the paper jam messages, you must clear the entire paper path and then press to help you clear the jam. 23 Paper Jam, 3 pages jammed Continue Show areas A, C, F Show areas Show A Show C Show F 1. 8 Clearing jams By carefully selecting print media and loading...

User's Guide
Page 75
... to do 200, 201, and 202 Paper Jam Check Door A Open the side door, and remove the jam. 203 Paper Jam Check Open the side door and the Exit 2 door, and remove the jam. 230 Paper Jam Check Door Lower the duplex unit, and remove the jam. Clearing jams Understanding jam messages The following clearing jam instructions may seem out of the...
... to do 200, 201, and 202 Paper Jam Check Door A Open the side door, and remove the jam. 203 Paper Jam Check Open the side door and the Exit 2 door, and remove the jam. 230 Paper Jam Check Door Lower the duplex unit, and remove the jam. Clearing jams Understanding jam messages The following clearing jam instructions may seem out of the...

User's Guide
Page 76
To clear these areas can occur on the incline surface of a tray or across more than one tray. Clearing printer jams 76 Clearing jams 24x Paper Jam Check Tray Paper jams in these areas: 1 Open the tray. If necessary, remove the tray from the printer. 2 Remove the media from the printer tray slot. 3 Remove any crumpled paper from the tray. 4 Insert the tray into the printer. 5 Press .
To clear these areas can occur on the incline surface of a tray or across more than one tray. Clearing printer jams 76 Clearing jams 24x Paper Jam Check Tray Paper jams in these areas: 1 Open the tray. If necessary, remove the tray from the printer. 2 Remove the media from the printer tray slot. 3 Remove any crumpled paper from the tray. 4 Insert the tray into the printer. 5 Press .

User's Guide
Page 79
Clearing printer jams 79 Clearing jams 6 Slide the feeder firmly against the printer. 7 Press . 200, 201, and 202 Paper Jam Check Door A 1 Open Door A by pushing the release latch and lowering the door. CAUTION: The inside of the printer might be hot.
Clearing printer jams 79 Clearing jams 6 Slide the feeder firmly against the printer. 7 Press . 200, 201, and 202 Paper Jam Check Door A 1 Open Door A by pushing the release latch and lowering the door. CAUTION: The inside of the printer might be hot.


