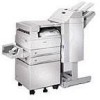
Setup Guide
Page 3
Table of contents Preface vii About your printer vii About this book ix Other sources of information x Step 1: Select a location for your printer 1 Allowing enough space 1 Considering environmental issues 4 Moving the printer 4 Step 2: Unpack the printer 5 Step 3: Install the multipurpose feeder 6 Step 4: Set up the optional high capacity feeder 9 Attaching a high capacity feeder or base cabinet 11 Step 5: Set up printer supplies 17 Installing the print cartridge 17 Preparing the fuser 20 Applying the operator panel overlay (non-English only) . . . . .22 iii
Table of contents Preface vii About your printer vii About this book ix Other sources of information x Step 1: Select a location for your printer 1 Allowing enough space 1 Considering environmental issues 4 Moving the printer 4 Step 2: Unpack the printer 5 Step 3: Install the multipurpose feeder 6 Step 4: Set up the optional high capacity feeder 9 Attaching a high capacity feeder or base cabinet 11 Step 5: Set up printer supplies 17 Installing the print cartridge 17 Preparing the fuser 20 Applying the operator panel overlay (non-English only) . . . . .22 iii
Setup Guide
Page 32
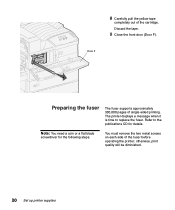
You must remove the two metal screws on each side of the cartridge. Note: You need a coin or a flat blade screwdriver for details. Refer to replace the fuser. The printer displays a message when it is time to the publications CD for the following steps. otherwise, print quality will be diminished. 20 Set up printer supplies 8 Carefully pull the yellow tape completely out of the fuser before operating the printer; Discard the tape. 9 Close the front door (Door F). Door F Preparing the fuser The fuser supports approximately 300,000 pages of single-sided printing.
You must remove the two metal screws on each side of the cartridge. Note: You need a coin or a flat blade screwdriver for details. Refer to replace the fuser. The printer displays a message when it is time to the publications CD for the following steps. otherwise, print quality will be diminished. 20 Set up printer supplies 8 Carefully pull the yellow tape completely out of the fuser before operating the printer; Discard the tape. 9 Close the front door (Door F). Door F Preparing the fuser The fuser supports approximately 300,000 pages of single-sided printing.

Setup Guide
Page 33
Door A Set up printer supplies 21 1 Remove the two labels covering the screws on each side of the fuser. 2 Turn each screw one third turn counterclockwise. 3 Pull both screws straight out and then discard them. 4 Close the side door (Door A).
Door A Set up printer supplies 21 1 Remove the two labels covering the screws on each side of the fuser. 2 Turn each screw one third turn counterclockwise. 3 Pull both screws straight out and then discard them. 4 Close the side door (Door A).
Setup Guide
Page 120
flash memory installing 25 furniture 9 fuser 20 H hard disk with adapter card 30 high capacity feeder installing 9 loading 80 I icons envelope feeder 87 multipurpose feeder 85 paper trays...printer drivers 99 printer memory 25 Tri-Port Adapter 30 USB/Parallel Interface Card 30 108 Index internal network adapter (INA) See print server internal print server See print server IP address setting 97 IP settings verifying 98 L labels 73 leveling feet 37 Lexmark W820 Publications CD x Lexmark... trays 1, 2, 3 76 trays 4 and 5 81 media setting the Paper Type 94 memory cards flash 25 installing 25 printer 25
flash memory installing 25 furniture 9 fuser 20 H hard disk with adapter card 30 high capacity feeder installing 9 loading 80 I icons envelope feeder 87 multipurpose feeder 85 paper trays...printer drivers 99 printer memory 25 Tri-Port Adapter 30 USB/Parallel Interface Card 30 108 Index internal network adapter (INA) See print server internal print server See print server IP address setting 97 IP settings verifying 98 L labels 73 leveling feet 37 Lexmark W820 Publications CD x Lexmark... trays 1, 2, 3 76 trays 4 and 5 81 media setting the Paper Type 94 memory cards flash 25 installing 25 printer 25
User's Guide
Page 5
...102 Chapter 27: Replacing the print cartridge 103 Removing the old print cartridge 103 Installing the new print cartridge 105 Chapter 28: Cleaning the printer 109 Chapter 29: Replacing a staple cartridge 110 Chapter 30: Emptying the hole punch box 113 Chapter 31: Replacing the items in the ...maintenance kit 115 Chapter 32: Replacing the fuser 116 Removing the old fuser 116 Installing a new fuser 119 Chapter 33: Replacing the transfer roller 122 Removing the old transfer roller 122 Installing the new transfer roller 124...
...102 Chapter 27: Replacing the print cartridge 103 Removing the old print cartridge 103 Installing the new print cartridge 105 Chapter 28: Cleaning the printer 109 Chapter 29: Replacing a staple cartridge 110 Chapter 30: Emptying the hole punch box 113 Chapter 31: Replacing the items in the ...maintenance kit 115 Chapter 32: Replacing the fuser 116 Removing the old fuser 116 Installing a new fuser 119 Chapter 33: Replacing the transfer roller 122 Removing the old transfer roller 122 Installing the new transfer roller 124...
User's Guide
Page 49
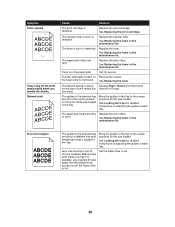
... cartridge. Replace the transfer roller. You are using print media that does not meet the printer specifications. See Replacing the items in more than one printer. from the printer driver before sending the job to print. The print cartridge is worn or defective. Load ...Darkness setting too dark. See Replacing the items in the paper tray. Replace the fuser. See Replacing the items in the maintenance kit. For information on Lexmark's Web site at www.lexmark.com for detailed specifications. Refer to high humidity. See Replacing the print cartridge. Print...
... cartridge. Replace the transfer roller. You are using print media that does not meet the printer specifications. See Replacing the items in more than one printer. from the printer driver before sending the job to print. The print cartridge is worn or defective. Load ...Darkness setting too dark. See Replacing the items in the paper tray. Replace the fuser. See Replacing the items in the maintenance kit. For information on Lexmark's Web site at www.lexmark.com for detailed specifications. Refer to high humidity. See Replacing the print cartridge. Print...
User's Guide
Page 50
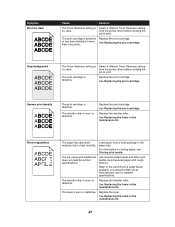
Streaked horizontal lines The print cartridge, transfer roller, or fuser may be defective, empty, or worn. See Replacing the print cartridge. Replace the fuser. Replace the printer cartridge, the transfer roller, or fuser as needed. Solution Replace the print cartridge. See Replacing the items in the maintenance kit. See Replacing the print cartridge, Replacing the transfer roller, and Replacing the fuser for more information. 48 Symptom White or black line Cause The print cartridge or fuser is defective.
Streaked horizontal lines The print cartridge, transfer roller, or fuser may be defective, empty, or worn. See Replacing the print cartridge. Replace the fuser. Replace the printer cartridge, the transfer roller, or fuser as needed. Solution Replace the print cartridge. See Replacing the items in the maintenance kit. See Replacing the print cartridge, Replacing the transfer roller, and Replacing the fuser for more information. 48 Symptom White or black line Cause The print cartridge or fuser is defective.
User's Guide
Page 52
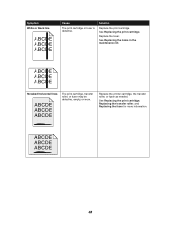
Skewed print Cause Solution The print cartridge is worn or defective. The transfer roller is defective. The fuser is in a tray. the fuser were not removed. The guides in the selected tray are not in the correct position for the print media size loaded in each tray. See ... off the print media easily when you Smooth or Rough. See Replacing the items in the tray to A4. Replace the fuser. The paper pick rollers are using. See Replacing the fuser. are dirty. The paper pick rollers are set for a different size print media than what is set the Paper Size...
Skewed print Cause Solution The print cartridge is worn or defective. The transfer roller is defective. The fuser is in a tray. the fuser were not removed. The guides in the selected tray are not in the correct position for the print media size loaded in each tray. See ... off the print media easily when you Smooth or Rough. See Replacing the items in the tray to A4. Replace the fuser. The paper pick rollers are using. See Replacing the fuser. are dirty. The paper pick rollers are set for a different size print media than what is set the Paper Size...
User's Guide
Page 70
... Open Tray 5 Area where jam occurs Rollers under the print cartridge See: Tray 1 and the print cartridge area Fuser area Duplex unit area or the fuser area Fuser area step 5 on page 72 Fuser area Fuser area Duplex unit Clearing jams from the optional duplex unit Around tray 1 In or behind tray 1 Around tray 2 In...
... Open Tray 5 Area where jam occurs Rollers under the print cartridge See: Tray 1 and the print cartridge area Fuser area Duplex unit area or the fuser area Fuser area step 5 on page 72 Fuser area Fuser area Duplex unit Clearing jams from the optional duplex unit Around tray 1 In or behind tray 1 Around tray 2 In...

User's Guide
Page 84
If print media is visible: - Allow time for it to cool before continuing. 4 Remove the paper based on handle to open position. 3 Pull up on the latch to release the duplex unit door (Door E). 2 Gently lower the door to the open the printer side door (Door A). CAUTION: The fuser may be hot. Fuser area 1 Push up on what part of the paper is jammed in the rollers, pull the sheet straight out. 82 6 Close the duplex unit door (Door E).
If print media is visible: - Allow time for it to cool before continuing. 4 Remove the paper based on handle to open position. 3 Pull up on the latch to release the duplex unit door (Door E). 2 Gently lower the door to the open the printer side door (Door A). CAUTION: The fuser may be hot. Fuser area 1 Push up on what part of the paper is jammed in the rollers, pull the sheet straight out. 82 6 Close the duplex unit door (Door E).

User's Guide
Page 85
a Push the green lever toward the back of the printer to loosen it, and then pull it out in one of the sheet is visible, as follows. - Repeat this two or three times. If print media is forced out from under the fuser, but only a small portion of two methods, so remove the... it straight out. 83 It forces it up again. b Drop the lever down and pull it easier. The jammed print media is caught under the fuser so you can grasp it up . Complete the following illustration, do not pull the sheet out. Print media exits to remove the sheet. -
a Push the green lever toward the back of the printer to loosen it, and then pull it out in one of the sheet is visible, as follows. - Repeat this two or three times. If print media is forced out from under the fuser, but only a small portion of two methods, so remove the... it straight out. 83 It forces it up again. b Drop the lever down and pull it easier. The jammed print media is caught under the fuser so you can grasp it up . Complete the following illustration, do not pull the sheet out. Print media exits to remove the sheet. -

User's Guide
Page 86
Clearing jams from the optional duplex unit Note: If an optional envelope feeder is installed on both sides and gently pull it so you can open position. 3 Remove the jammed sheet based on its location. 84 - If the print media exits to the open the duplex unit door. For instructions, see Removing the optional envelope feeder. 1 Push up on the latch to release the duplex unit door (Door E). 2 Gently lower the door to the top of the fuser, grasp the sheet on the printer, you must remove it out. 5 Close the printer side door (Door A). 6 Close the duplex unit door (Door E).
Clearing jams from the optional duplex unit Note: If an optional envelope feeder is installed on both sides and gently pull it so you can open position. 3 Remove the jammed sheet based on its location. 84 - If the print media exits to the open the duplex unit door. For instructions, see Removing the optional envelope feeder. 1 Push up on the latch to release the duplex unit door (Door E). 2 Gently lower the door to the top of the fuser, grasp the sheet on the printer, you must remove it out. 5 Close the printer side door (Door A). 6 Close the duplex unit door (Door E).

User's Guide
Page 90
b Pull the print media straight out of the jammed print media is visible and the rest is jammed between the fuser area and a mailbox bin, pull the sheet straight up. - If the print media is caught in the fuser area, see Fuser area for instructions on clearing the jam. 88 If only a small portion of the bin. -
b Pull the print media straight out of the jammed print media is visible and the rest is jammed between the fuser area and a mailbox bin, pull the sheet straight up. - If the print media is caught in the fuser area, see Fuser area for instructions on clearing the jam. 88 If only a small portion of the bin. -
User's Guide
Page 104
... Note: In the U.S. You can only staple 40 more information.) Ordering a print cartridge When the 88 Toner Low message appears, you bought your printer. Order part number 12B0090. or Canada, call 1-800-438-2468 for more times. For 220 V, order a high-voltage maintenance kit. (See... Replacing the items in the maintenance kit for information about Lexmark Authorized Supplies Dealers in the maintenance kit: fuser, transfer roller, and pick rollers. Its average yield is on hand before the Staples Low message appears because once it...
... Note: In the U.S. You can only staple 40 more information.) Ordering a print cartridge When the 88 Toner Low message appears, you bought your printer. Order part number 12B0090. or Canada, call 1-800-438-2468 for more times. For 220 V, order a high-voltage maintenance kit. (See... Replacing the items in the maintenance kit for information about Lexmark Authorized Supplies Dealers in the maintenance kit: fuser, transfer roller, and pick rollers. Its average yield is on hand before the Staples Low message appears because once it...
User's Guide
Page 117
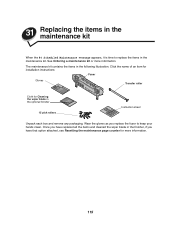
..., it is time to keep your hands clean. See Ordering a maintenance kit or more information. 115 Click the name of an item for installation instructions: Fuser Gloves Transfer roller Cloth for more information. Wear the gloves as you have replaced all the items and cleaned the wiper blade in the optional... packaging. Once you have that option attached, see Resetting the maintenance page counter for Cleaning the wiper blade in the finisher, if you replace the fuser to replace the items in the following illustration.
..., it is time to keep your hands clean. See Ordering a maintenance kit or more information. 115 Click the name of an item for installation instructions: Fuser Gloves Transfer roller Cloth for more information. Wear the gloves as you have replaced all the items and cleaned the wiper blade in the optional... packaging. Once you have that option attached, see Resetting the maintenance page counter for Cleaning the wiper blade in the finisher, if you replace the fuser to replace the items in the following illustration.
User's Guide
Page 118
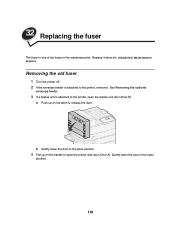
32 Replacing the fuser The fuser is attached to the printer, open the duplex unit door (Door E). a Push up on the latch to open position. 116 b Gently lower the door to the open position. 4 Pull up on the handle to release the door. See Removing the optional envelope feeder. 3 If a duplex unit is one of the items in the maintenance kit. Replace it . Gently lower the door to the printer, remove it when 80 Scheduled Maintenance appears. Removing the old fuser 1 Turn the printer off. 2 If the envelope feeder is attached to the open the printer side door (Door A).
32 Replacing the fuser The fuser is attached to the printer, open the duplex unit door (Door E). a Push up on the latch to open position. 116 b Gently lower the door to the open position. 4 Pull up on the handle to release the door. See Removing the optional envelope feeder. 3 If a duplex unit is one of the items in the maintenance kit. Replace it . Gently lower the door to the printer, remove it when 80 Scheduled Maintenance appears. Removing the old fuser 1 Turn the printer off. 2 If the envelope feeder is attached to the open the printer side door (Door A).

User's Guide
Page 119
Allow time for it . 6 Loosen the two green thumbscrews. Use the handles on each side, pull open the printer front door (Door F). 5 Using the handholds located on the fuser to remove it to cool before continuing. Handhold Door F CAUTION: The fuser may be hot. They do not come completely out. 117
Allow time for it . 6 Loosen the two green thumbscrews. Use the handles on each side, pull open the printer front door (Door F). 5 Using the handholds located on the fuser to remove it to cool before continuing. Handhold Door F CAUTION: The fuser may be hot. They do not come completely out. 117

User's Guide
Page 121
Installing a new fuser 1 Remove the packaging from the new fuser. 2 Pull the labels off of each side of the old fuser. 9 Grasp both handles and firmly pull the fuser out. 10 Dispose of the fuser. 3 Use a flat blade screwdriver or a coin to turn each screw until they are loose. 119
Installing a new fuser 1 Remove the packaging from the new fuser. 2 Pull the labels off of each side of the old fuser. 9 Grasp both handles and firmly pull the fuser out. 10 Dispose of the fuser. 3 Use a flat blade screwdriver or a coin to turn each screw until they are loose. 119

User's Guide
Page 122
4 Pull the screws straight out, and then discard them. 5 Grasp the right handle through its ring and pull it to their original positions. 120 It slides up and locks into the open position. 6 Grasp the left handle through its ring and rotate it out toward you. It does not lock into place. Note: Push firmly on each side of the fuser near the handles until it into position. 7 Align the fuser with the opening in the printer, and then slide it is in place. 8 Push both handles back to the front.
4 Pull the screws straight out, and then discard them. 5 Grasp the right handle through its ring and pull it to their original positions. 120 It slides up and locks into the open position. 6 Grasp the left handle through its ring and rotate it out toward you. It does not lock into place. Note: Push firmly on each side of the fuser near the handles until it into position. 7 Align the fuser with the opening in the printer, and then slide it is in place. 8 Push both handles back to the front.
User's Guide
Page 127
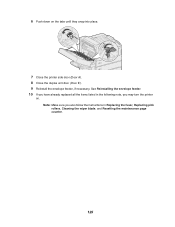
Note: Make sure you may turn the printer on the tabs until they snap into place. 7 Close the printer side door (Door A). 8 Close the duplex unit door (Door E). 9 Reinstall the envelope feeder, if necessary. 6 Push down on . See Reinstalling the envelope feeder. 10 If you have already replaced all the items listed in the following note, you also follow the instructions in Replacing the fuser, Replacing pick rollers, Cleaning the wiper blade, and Resetting the maintenance page counter. 125
Note: Make sure you may turn the printer on the tabs until they snap into place. 7 Close the printer side door (Door A). 8 Close the duplex unit door (Door E). 9 Reinstall the envelope feeder, if necessary. 6 Push down on . See Reinstalling the envelope feeder. 10 If you have already replaced all the items listed in the following note, you also follow the instructions in Replacing the fuser, Replacing pick rollers, Cleaning the wiper blade, and Resetting the maintenance page counter. 125


