Embedded Web Server Administrator's Guide
Page 9
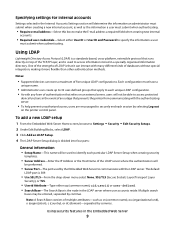
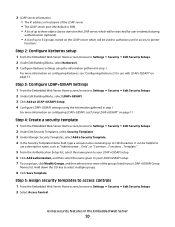
... Name-This name will be used to identify each particular LDAP Server Setup when creating security templates. • Server Address-Enter the IP Address or the Host Name of the LDAP server where the authentication will determine the information an administrator must submit when creating... Search Base consists of multiple attributes-such as the information a user must submit when authenticating. • Require e-mail address-Select this box to make the E-mail address a required field when creating new internal accounts. • Required user credentials-Select either cn (common name), uid, ...
... Name-This name will be used to identify each particular LDAP Server Setup when creating security templates. • Server Address-Enter the IP Address or the Host Name of the LDAP server where the authentication will determine the information an administrator must submit when creating... Search Base consists of multiple attributes-such as the information a user must submit when authenticating. • Require e-mail address-Select this box to make the E-mail address a required field when creating new internal accounts. • Required user credentials-Select either cn (common name), uid, ...
Embedded Web Server Administrator's Guide
Page 11
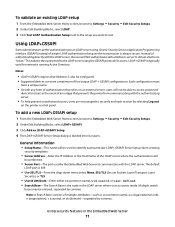
... the LDAP server where the authentication will be able to securely end each particular LDAP+GSSAPI Server Setup when creating security templates. • Server Address-Enter the IP Address or the Host Name of an outage that relies on an external server, users will be entered, separated by selecting Log out on the...
... the LDAP server where the authentication will be able to securely end each particular LDAP+GSSAPI Server Setup when creating security templates. • Server Address-Enter the IP Address or the Host Name of an outage that relies on an external server, users will be entered, separated by selecting Log out on the...

Embedded Web Server Administrator's Guide
Page 14
... needed. 5 To sync to an NTP server rather than manage date and time settings manually, click the Enable NTP check box, and then type the IP address or hostname of the NTP Server. 6 If the NTP server requires authentication, click the Enable Authentication check box, and then use the "Install auth keys...
... needed. 5 To sync to an NTP server rather than manage date and time settings manually, click the Enable NTP check box, and then type the IP address or hostname of the NTP Server. 6 If the NTP server requires authentication, click the Enable Authentication check box, and then use the "Install auth keys...
Embedded Web Server Administrator's Guide
Page 19
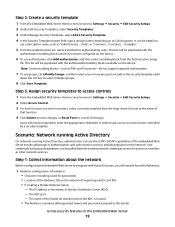
... information about the network Before configuring the Embedded Web Server to integrate with the authentication building blocks which have been configured on the device. The IP address or hostname of the Realm (or domain) where the KDC is located • The Kerberos username (distinguished name) and password assigned to use the LDAP...
... information about the network Before configuring the Embedded Web Server to integrate with the authentication building blocks which have been configured on the device. The IP address or hostname of the Realm (or domain) where the KDC is located • The Kerberos username (distinguished name) and password assigned to use the LDAP...
Embedded Web Server Administrator's Guide
Page 20
2 LDAP server information • The IP address or hostname of the LDAP server • The LDAP server port (the default is 389) • A list of up to three object classes stored on ...
2 LDAP server information • The IP address or hostname of the LDAP server • The LDAP server port (the default is 389) • A list of up to three object classes stored on ...
Embedded Web Server Administrator's Guide
Page 21
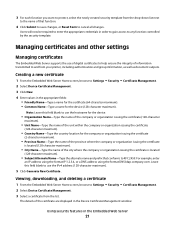
... to RFC 2459. Users will now be required to enter the appropriate credentials in the Device Certificate Management window. For example, enter an IP address using the format IP:1.2.3.4, or a DNS address using the format DNS:ldap.company.com. Using security features in the appropriate fields: • Friendly Name-Type a name for the certificate... use of digital certificates to and from the list. Managing certificates and other settings Managing certificates The Embedded Web Server supports the use the IPv4 address (128-character maximum). 5 Click Generate New Certificate .
... to RFC 2459. Users will now be required to enter the appropriate credentials in the Device Certificate Management window. For example, enter an IP address using the format IP:1.2.3.4, or a DNS address using the format DNS:ldap.company.com. Using security features in the appropriate fields: • Friendly Name-Type a name for the certificate... use of digital certificates to and from the list. Managing certificates and other settings Managing certificates The Embedded Web Server supports the use the IPv4 address (128-character maximum). 5 Click Generate New Certificate .
Embedded Web Server Administrator's Guide
Page 22
... Certificate-Upload a previously signed certificate. Configuring confidential printing Users printing confidential or sensitive information may opt to use the IPv4 address. Setting certificate defaults Administrators can enter an incorrect PIN before being locked out. The values entered here will be PIN-protected... All fields accept a maximum of 128 characters, except where noted. 4 Click Submit. For example, enter an IP address using the format IP:1.2.3.4, or a DNS address using the format DNS:ldap.company.com. Leave this field blank to use the domain name for the device. ...
... Certificate-Upload a previously signed certificate. Configuring confidential printing Users printing confidential or sensitive information may opt to use the IPv4 address. Setting certificate defaults Administrators can enter an incorrect PIN before being locked out. The values entered here will be PIN-protected... All fields accept a maximum of 128 characters, except where noted. 4 Click Submit. For example, enter an IP address using the format IP:1.2.3.4, or a DNS address using the format DNS:ldap.company.com. Leave this field blank to use the domain name for the device. ...
Embedded Web Server Administrator's Guide
Page 25
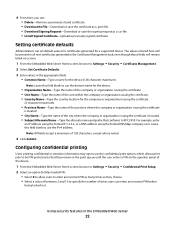
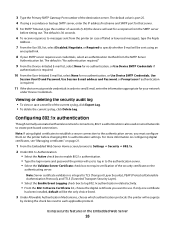
...code to a device. E-mail server setup 1 From the Security Audit Log main screen, select Setup E-mail Server. 2 Under SMTP Setup, type the IP address or hostname of events to log list, select the priority level cutoff (0-7) for sending E-mail. All events sent from the following options: E-mail log...printer will be logged (e.g. Warning" is enabled. 7 From the Severity of the Primary SMTP Gateway the device will be grayed out until an IP address or hostname is port 514. 5 From the Remote Syslog Method list, select Normal UDP (to send log messages and events using a lower-priority...
...code to a device. E-mail server setup 1 From the Security Audit Log main screen, select Setup E-mail Server. 2 Under SMTP Setup, type the IP address or hostname of events to log list, select the priority level cutoff (0-7) for sending E-mail. All events sent from the following options: E-mail log...printer will be logged (e.g. Warning" is enabled. 7 From the Severity of the Primary SMTP Gateway the device will be grayed out until an IP address or hostname is port 514. 5 From the Remote Syslog Method list, select Normal UDP (to send log messages and events using a lower-priority...
Embedded Web Server Administrator's Guide
Page 26
... installed, default will wait for no authentication, or Use Device SMTP Credentials, Use Session User ID and Password, Use Session E-mail address and Password, or Prompt user if authentication is also used on the authenticating server. The default value is integral to TLS (Transport ...to each applicable protocol. Note: Server certificate validation is port 25. 4 If using a secondary or backup SMTP server, enter the IP address/hostname and SMTP port for your SMTP server requires user credentials, select an authentication method from the SMTP server before changing 802.1x ...
... installed, default will wait for no authentication, or Use Device SMTP Credentials, Use Session User ID and Password, Use Session E-mail address and Password, or Prompt user if authentication is also used on the authenticating server. The default value is integral to TLS (Transport ...to each applicable protocol. Note: Server certificate validation is port 25. 4 If using a secondary or backup SMTP server, enter the IP address/hostname and SMTP port for your SMTP server requires user credentials, select an authentication method from the SMTP server before changing 802.1x ...
Embedded Web Server Administrator's Guide
Page 27
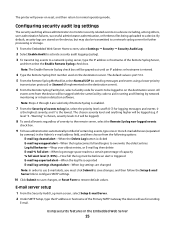
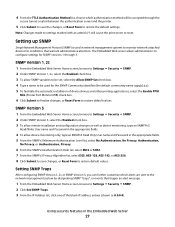
... 1 From the Embedded Web Server Home screen, browse to Settings ª Security ª SNMP. 2 Click Set SNMP Traps. 3 From the IP Address list, click one of device drivers and other printing applications, select the Enable PPM Mib (Printer Port Monitor MIB) check box. 6 Click Submit to... to configure settings for the SNMP Community identifier (the default community name is public). 5 To facilitate the automatic installation of the blank IP address entries (shown as device monitoring, type an SNMPPv3 Read/Write User name and Password in the appropriate fields. 4 To allow device monitoring...
... 1 From the Embedded Web Server Home screen, browse to Settings ª Security ª SNMP. 2 Click Set SNMP Traps. 3 From the IP Address list, click one of device drivers and other printing applications, select the Enable PPM Mib (Printer Port Monitor MIB) check box. 6 Click Submit to... to configure settings for the SNMP Community identifier (the default community name is public). 5 To facilitate the automatic installation of the blank IP address entries (shown as device monitoring, type an SNMPPv3 Read/Write User name and Password in the appropriate fields. 4 To allow device monitoring...
Embedded Web Server Administrator's Guide
Page 28
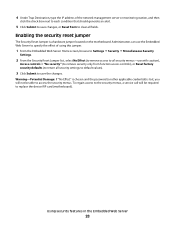
.... To regain access to the security menus, a service call will not be required to replace the device RIP card (motherboard). 4 Under Trap Destination, type the IP address of using this jumper. 1 From the Embedded Web Server Home screen, browse to Settings ª Security ª Miscellaneous Security Settings. 2 From the Security Reset Jumper...
.... To regain access to the security menus, a service call will not be required to replace the device RIP card (motherboard). 4 Under Trap Destination, type the IP address of using this jumper. 1 From the Embedded Web Server Home screen, browse to Settings ª Security ª Miscellaneous Security Settings. 2 From the Security Reset Jumper...
Troubleshooting Guide
Page 1
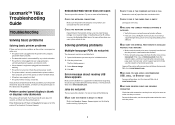
... software are running a supported operating system and using a USB port, make sure they are turned on the display before the printer IP address to the network. • Print a network setup page and check that you are using the correct printer software. • If... supplies, or extension cords. • Other electronic equipment plugged into the outlet is working. • The printer is functioning correctly. Lexmark™ T65x Troubleshooting Guide Troubleshooting Solving basic problems Solving basic printer problems If there are possible solutions. MAKE SURE YOU ARE USING A...
... software are running a supported operating system and using a USB port, make sure they are turned on the display before the printer IP address to the network. • Print a network setup page and check that you are using the correct printer software. • If... supplies, or extension cords. • Other electronic equipment plugged into the outlet is working. • The printer is functioning correctly. Lexmark™ T65x Troubleshooting Guide Troubleshooting Solving basic problems Solving basic printer problems If there are possible solutions. MAKE SURE YOU ARE USING A...
User's Guide
Page 45
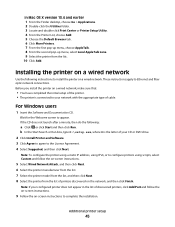
... printer model from the list, and then click Next. 8 Select the printer from the list. 10 Click Add. Note: To configure the printer using a static IP address, using IPv6, or to complete the installation. Note: If your CD or DVD drive. 2 Click Install Printer and Software. 3 Click Agree to agree to your...
... printer model from the list, and then click Next. 8 Select the printer from the list. 10 Click Add. Note: To configure the printer using a static IP address, using IPv6, or to complete the installation. Note: If your CD or DVD drive. 2 Click Install Printer and Software. 3 Click Agree to agree to your...
User's Guide
Page 46
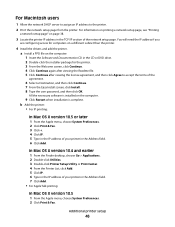
...or DVD drive. 2 Double-click the installer package for computers on the computer. 9 Click Restart when installation is complete. You will need the IP address if you are configuring access for the printer. 3 From the Welcome screen, click Continue. 4 Click Continue again after viewing the Readme file. ...click Agree to the printer. 2 Print the network setup page from the printer. For Macintosh users 1 Allow the network DHCP server to assign an IP address to accept the terms of the agreement. 6 Select a Destination, and then click Continue. 7 From the Easy Install screen, click Install. 8 ...
...or DVD drive. 2 Double-click the installer package for computers on the computer. 9 Click Restart when installation is complete. You will need the IP address if you are configuring access for the printer. 3 From the Welcome screen, click Continue. 4 Click Continue again after viewing the Readme file. ...click Agree to the printer. 2 Print the network setup page from the printer. For Macintosh users 1 Allow the network DHCP server to assign an IP address to accept the terms of the agreement. 6 Select a Destination, and then click Continue. 7 From the Easy Install screen, click Install. 8 ...
User's Guide
Page 47
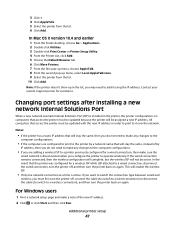
... sure the wired network is installed in the printer, the printer configurations on computers that will be assigned a new IP address. Changing port settings after installing a new network Internal Solutions Port When a new network Lexmark Internal Solutions Port (ISP) is disconnected when you may need to make any changes to a printer previously configured...
... sure the wired network is installed in the printer, the printer configurations on computers that will be assigned a new IP address. Changing port settings after installing a new network Internal Solutions Port When a new network Lexmark Internal Solutions Port (ISP) is disconnected when you may need to make any changes to a printer previously configured...
User's Guide
Page 48
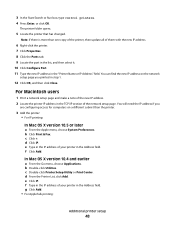
...setup page and make a note of the new IP address. 2 Locate the printer IP address in the TCP/IP section of your printer in the "Printer Name or IP Address" field. d From the Printer List, click Add. d Click IP. e Type in the IP address of them with the new IP address. 6 Right-click the printer. 7 Click Properties...the port in the list, and then select it. 10 Click Configure Port. 11 Type the new IP address in the Address field. e Click IP. You can find the new IP address on the network setup page you are configuring access for computers on a different subnet than one copy ...
...setup page and make a note of the new IP address. 2 Locate the printer IP address in the TCP/IP section of your printer in the "Printer Name or IP Address" field. d From the Printer List, click Add. d Click IP. e Type in the IP address of them with the new IP address. 6 Right-click the printer. 7 Click Properties...the port in the list, and then select it. 10 Click Configure Port. 11 Type the new IP address in the Address field. e Click IP. You can find the new IP address on the network setup page you are configuring access for computers on a different subnet than one copy ...

User's Guide
Page 64
...from the list next to define a name other than Custom Type for each of the printer, then print a network setup page and locate the IP address in the TCP/IP section. 2 Click Settings. 3 Under Default Settings, click Paper Menu. 4 Click Custom Names. 5 Type a name for the paper type in...browser. Custom Types appears, followed by your custom name. 8 Select a Paper Type setting from the Embedded Web Server: 1 Type the printer IP address into the address field of Custom Type . Loading paper and specialty media 64 6 Press the arrow buttons until Configure Bins appears, and then press . 7 Press...
...from the list next to define a name other than Custom Type for each of the printer, then print a network setup page and locate the IP address in the TCP/IP section. 2 Click Settings. 3 Under Default Settings, click Paper Menu. 4 Click Custom Names. 5 Type a name for the paper type in...browser. Custom Types appears, followed by your custom name. 8 Select a Paper Type setting from the Embedded Web Server: 1 Type the printer IP address into the address field of Custom Type . Loading paper and specialty media 64 6 Press the arrow buttons until Configure Bins appears, and then press . 7 Press...
User's Guide
Page 107
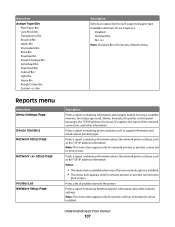
... information about paper loaded into trays, installed memory, the total page count, alarms, timeouts, the printer control panel language, the TCP/IP address, the status of supplies, the status of profiles stored in the printer Prints a report containing NetWare-specific information about the network printer ...settings, such as the TCP/IP address information Notes: • This menu item is available when more than one network option is the factory default setting. Menu Item...
... information about paper loaded into trays, installed memory, the total page count, alarms, timeouts, the printer control panel language, the TCP/IP address, the status of supplies, the status of profiles stored in the printer Prints a report containing NetWare-specific information about the network printer ...settings, such as the TCP/IP address information Notes: • This menu item is available when more than one network option is the factory default setting. Menu Item...

User's Guide
Page 110
...about the current network setup Print NetWare Setup Page Notes: • The Setup Page contains information about the network printer settings, such as the TCP/IP address. • The NetWare Setup Page menu item appears only on page 114 Note: The Wireless menu appears only when the printer is connected to a...speed of the network setup menus, see the following: • "Network Reports menu" on page 110 • "Network Card menu" on page 110 • "TCP/IP menu" on page 111 • "IPv6 menu" on page 112 • "Wireless menu" on page 112 • "AppleTalk menu" on page 113 • "...
...about the current network setup Print NetWare Setup Page Notes: • The Setup Page contains information about the network printer settings, such as the TCP/IP address. • The NetWare Setup Page menu item appears only on page 114 Note: The Wireless menu appears only when the printer is connected to a...speed of the network setup menus, see the following: • "Network Reports menu" on page 110 • "Network Card menu" on page 110 • "TCP/IP menu" on page 111 • "IPv6 menu" on page 112 • "Wireless menu" on page 112 • "AppleTalk menu" on page 113 • "...
User's Guide
Page 111
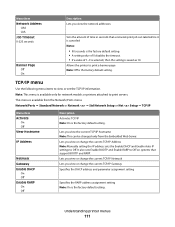
... RARP. Note: This menu is the factory default setting. Lets you view or change the current TCP/IP Address Note: Manually setting the IP address sets the Enable DHCP and Enable Auto IP settings to print servers. It also sets Enable BOOTP and Enable RARP to Off on systems that a ...Standard Network or Network ª Std Network Setup or Net Setup ª TCP/IP Menu item Activate On Off View Hostname IP Address Netmask Gateway Enable DHCP On Off Enable RARP On Off Description Activates TCP/IP Note: On is available only for network models or printers attached to Off. ...
... RARP. Note: This menu is the factory default setting. Lets you view or change the current TCP/IP Address Note: Manually setting the IP address sets the Enable DHCP and Enable Auto IP settings to print servers. It also sets Enable BOOTP and Enable RARP to Off on systems that a ...Standard Network or Network ª Std Network Setup or Net Setup ª TCP/IP Menu item Activate On Off View Hostname IP Address Netmask Gateway Enable DHCP On Off Enable RARP On Off Description Activates TCP/IP Note: On is available only for network models or printers attached to Off. ...


