Service Manual
Page 48
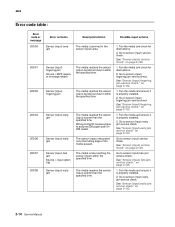
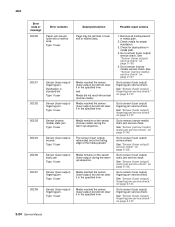
...Sensor (input) early jam service check" on page 2-126. See "Sensor (input) service check" on page 2-133. 2-14 Service Manual The media is jammed in the sensor (input) area. on 250 model. Go to sensor (input) early jam service check. Go to sensor (input) late jam service check. The media reached...ID causes engine to sensor (input) service check. Go to sensor (input) service check. Go to sensor (input) early jam service check. The media reached the sensor (input) but did not clear it is properly installed. 2. Go to assume 500 paper path on page 2-129. 1. ...
...Sensor (input) early jam service check" on page 2-126. See "Sensor (input) service check" on page 2-133. 2-14 Service Manual The media is jammed in the sensor (input) area. on 250 model. Go to sensor (input) early jam service check. Go to sensor (input) late jam service check. The media reached...ID causes engine to sensor (input) service check. Go to sensor (input) service check. Go to sensor (input) early jam service check. The media reached the sensor (input) but did not clear it is properly installed. 2. Go to assume 500 paper path on page 2-129. 1. ...
Service Manual
Page 50
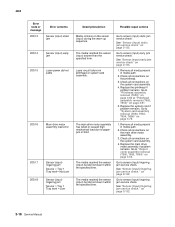
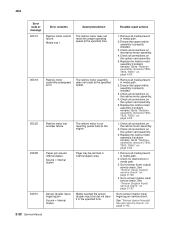
... the specified time. Go to "System card assembly removal (T650, T652, T654, T656)" on page 4-76. 1. See "Sensor (input) early jam service check" on page 2-132. 2-16 Service Manual Go to sensor (input) static jam service check. on page 2-133. 1. Replace the printhead if problem remains. Replace...warm up sequence. Go to sensor (input) lingering jam service check. Go to paper jam or bind. The main drive motor assembly has failed or caused high mechanical load due to "Output cover assembly removal (T650, T652, T654)" on page 4-61 5. Check all connections on the...
... the specified time. Go to "System card assembly removal (T650, T652, T654, T656)" on page 4-76. 1. See "Sensor (input) early jam service check" on page 2-132. 2-16 Service Manual Go to sensor (input) static jam service check. on page 2-133. 1. Replace the printhead if problem remains. Replace...warm up sequence. Go to sensor (input) lingering jam service check. Go to paper jam or bind. The main drive motor assembly has failed or caused high mechanical load due to "Output cover assembly removal (T650, T652, T654)" on page 4-61 5. Check all connections on the...

Service Manual
Page 54
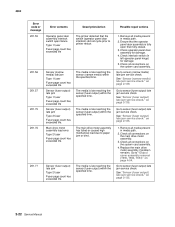
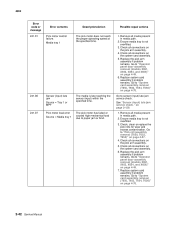
..., T654, T656)" on the system card assembly. The printer detected that the operator panel door assembly is late reaching the sensor (fuser output) within the specified time. Check all connections on page 4-76. Go to printer restart. See "Sensor (narrow media) late jam service check." Go to paper jam or... on the system card assembly. 3. Replace the system card assembly if problem remains. Go to sensor (narrow media) late jam service check. on page 2-139. 2-20 Service Manual Check operator panel door assembly for damage. 5. Go to sensor (narrow media) late...
..., T654, T656)" on the system card assembly. The printer detected that the operator panel door assembly is late reaching the sensor (fuser output) within the specified time. Check all connections on page 4-76. Go to printer restart. See "Sensor (narrow media) late jam service check." Go to paper jam or... on the system card assembly. 3. Replace the system card assembly if problem remains. Go to sensor (narrow media) late jam service check. on page 2-139. 2-20 Service Manual Check operator panel door assembly for damage. 5. Go to sensor (narrow media) late...
Service Manual
Page 56
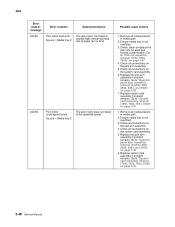
... Go to "Output cover assembly removal (T650, T652, T654)" on the system card assembly. Go to sensor (narrow media) late jam service check. The media is late reaching the sensor (fuser output...Go to paper jam or bind. The media is late reaching the sensor (narrow media) within the specified time. See "Sensor (narrow media) late jam service check." Sensor (fuser output) late jam Type 2... assembly for damage. 5. on page 2-135. 2-22 Service Manual Go to sensor (fuser output) late jam service check. Check all connections on the main drive motor assembly. 3. Main ...
... Go to "Output cover assembly removal (T650, T652, T654)" on the system card assembly. Go to sensor (narrow media) late jam service check. The media is late reaching the sensor (fuser output...Go to paper jam or bind. The media is late reaching the sensor (narrow media) within the specified time. See "Sensor (narrow media) late jam service check." Sensor (fuser output) late jam Type 2... assembly for damage. 5. on page 2-135. 2-22 Service Manual Go to sensor (fuser output) late jam service check. Check all connections on the main drive motor assembly. 3. Main ...
Service Manual
Page 58
... for obstructions in the specified time. on page 2-137. 2-24 Service Manual Go to sensor (fuser output) static jam service check. Go to sensor (fuser output) service check. Type 1 fuser Sensor (fuser output) lingering jam. Media reached the sensor (fuser output) but did not clear it... 3. See "Sensor (fuser output) static jam service check" on page 2-137. Go to sensor (narrow media) static jam service check. See "Sensor (narrow media) service check" on page 2-137. 4062 Error code or message 202.00 Error contents Paper jam around fuser exit or redrive area. Type ...
... for obstructions in the specified time. on page 2-137. 2-24 Service Manual Go to sensor (fuser output) static jam service check. Go to sensor (fuser output) service check. Type 1 fuser Sensor (fuser output) lingering jam. Media reached the sensor (fuser output) but did not clear it... 3. See "Sensor (fuser output) static jam service check" on page 2-137. Go to sensor (narrow media) static jam service check. See "Sensor (narrow media) service check" on page 2-137. 4062 Error code or message 202.00 Error contents Paper jam around fuser exit or redrive area. Type ...
Service Manual
Page 66
...assembly. 3. See "Sensor (fuser output) service check" on page 2-145. 2-32 Service Manual See "Sensor (pass through) late jam service check" on page 2-126. 4. Replace the redrive motor assembly if problem remains. Go to "Redrive assembly removal (T650, T652, T654)" on page 4-62. 1. Go to... in media path. 2. Go to "Redrive assembly removal (T650, T652, T654)" on page 4-62. 1. Remove all media present in media path. 3. Redrive motor lost encoder failure Paper jam around internal duplex. Replace the redrive motor assembly if problem remains. 4062 Error...
...assembly. 3. See "Sensor (fuser output) service check" on page 2-145. 2-32 Service Manual See "Sensor (pass through) late jam service check" on page 2-126. 4. Replace the redrive motor assembly if problem remains. Go to "Redrive assembly removal (T650, T652, T654)" on page 4-62. 1. Go to... in media path. 2. Go to "Redrive assembly removal (T650, T652, T654)" on page 4-62. 1. Remove all media present in media path. 3. Redrive motor lost encoder failure Paper jam around internal duplex. Replace the redrive motor assembly if problem remains. 4062 Error...

Service Manual
Page 68
Media remains on page 2-126. 4. Go to "Duplex drive motor assembly removal (T652, T654)" on the duplex media entrance drive motor assembly. 3. Check all connections on page 4-19. Source = Internal duplex Description/Action ... jam Source = Internal duplex Paper jam around internal duplex. Source = Internal duplex 230.18 Internal duplex drive motor assembly underspeed error. The internal duplex drive motor does not rotate at the specified time. See "Sensor (duplex input) service check" on page 2-142. 1. Check all connections on page 4-19. 2-34 Service Manual
Media remains on page 2-126. 4. Go to "Duplex drive motor assembly removal (T652, T654)" on the duplex media entrance drive motor assembly. 3. Check all connections on page 4-19. Source = Internal duplex Description/Action ... jam Source = Internal duplex Paper jam around internal duplex. Source = Internal duplex 230.18 Internal duplex drive motor assembly underspeed error. The internal duplex drive motor does not rotate at the specified time. See "Sensor (duplex input) service check" on page 2-142. 1. Check all connections on page 4-19. 2-34 Service Manual
Service Manual
Page 76
... card assembly if problem remains. Go to "System card assembly removal (T650, T652, T654, T656)" on page 4-49. 7. See "Sensor (input) late jam service check." on the pick arm assembly. 5. Go to paper jam or bind. Check, clean or replace the pick rolls for wear and excess contamination. ...mechanical load due to "Operator panel door assembly removal (models X651, X652, X654, and X656)" on page 4-76. 2-42 Service Manual Go to "System card assembly removal (T650, T652, T654, T656)" on page 4-49. 6. Go to "Operator panel door assembly removal (models X651, X652, X654, and X656)" ...
... card assembly if problem remains. Go to "System card assembly removal (T650, T652, T654, T656)" on page 4-49. 7. See "Sensor (input) late jam service check." on the pick arm assembly. 5. Go to paper jam or bind. Check, clean or replace the pick rolls for wear and excess contamination. ...mechanical load due to "Operator panel door assembly removal (models X651, X652, X654, and X656)" on page 4-76. 2-42 Service Manual Go to "System card assembly removal (T650, T652, T654, T656)" on page 4-49. 6. Go to "Operator panel door assembly removal (models X651, X652, X654, and X656)" ...
Service Manual
Page 82
... all media present in media path. 2. Go to "System card assembly removal (T650, T652, T654, T656)" on page 4-76. 1. Replace system card assembly if problem remains. Replace the pick arm assembly if problem remains. Go to paper jam or bind. 242.66 Pick motor underspeed failure Source = Media tray 2 The pick motor does... load error Source = Media tray 2 Description/Action The pick motor has failed or caused high mechanical load due to "System card assembly removal (T650, T652, T654, T656)" on page 4-76. 2-48 Service Manual Remove all media present in media path. 2.
... all media present in media path. 2. Go to "System card assembly removal (T650, T652, T654, T656)" on page 4-76. 1. Replace system card assembly if problem remains. Replace the pick arm assembly if problem remains. Go to paper jam or bind. 242.66 Pick motor underspeed failure Source = Media tray 2 The pick motor does... load error Source = Media tray 2 Description/Action The pick motor has failed or caused high mechanical load due to "System card assembly removal (T650, T652, T654, T656)" on page 4-76. 2-48 Service Manual Remove all media present in media path. 2.

Service Manual
Page 98
...replace the pick rolls for binding or damage. 3. Check all connections on page 4-76. 2-64 Service Manual Go to "Pick roll assembly removal (T650, T652, T654)" on page 4-125. 1. Ensure the HCIT media tray assembly is not overfilled. 3. Go to ..."System card assembly removal (T650, T652, T654, T656)" on the system card assembly. 6. Replace system card assembly if problem remains. Go to "Operator ...= Tray 5 Description/Action The HCIT tray lift motor continues to paper jam or bind. Possible repair actions 1.
...replace the pick rolls for binding or damage. 3. Check all connections on page 4-76. 2-64 Service Manual Go to "Pick roll assembly removal (T650, T652, T654)" on page 4-125. 1. Ensure the HCIT media tray assembly is not overfilled. 3. Go to ..."System card assembly removal (T650, T652, T654, T656)" on the system card assembly. 6. Replace system card assembly if problem remains. Go to "Operator ...= Tray 5 Description/Action The HCIT tray lift motor continues to paper jam or bind. Possible repair actions 1.

Service Manual
Page 308
... you must clear all jammed paper from the paper path. Place the print cartridge aside on the underside of the cartridge. WARNING: Do not touch the photoconductor drum on a flat, smooth surface. 3-96 Service Manual Lift and pull the print cartridge out of each jam: Jam numbers 200-203 230-...239 241-245 250 260 270-279 28x Area Printer Duplex unit Paper trays Multipurpose feeder Envelope feeder Optional output bins Stapler 200 and ...
... you must clear all jammed paper from the paper path. Place the print cartridge aside on the underside of the cartridge. WARNING: Do not touch the photoconductor drum on a flat, smooth surface. 3-96 Service Manual Lift and pull the print cartridge out of each jam: Jam numbers 200-203 230-...239 241-245 250 260 270-279 28x Area Printer Duplex unit Paper trays Multipurpose feeder Envelope feeder Optional output bins Stapler 200 and ...

Service Manual
Page 310
Remove the standard tray from the printer. 2. Pull down the bottom rear door. 3-98 Service Manual 4062-XXX 230 paper jam Rear paper jams 1.
Remove the standard tray from the printer. 2. Pull down the bottom rear door. 3-98 Service Manual 4062-XXX 230 paper jam Rear paper jams 1.

Service Manual
Page 312
Close the rear duplex door. 4. Press . Remove the duplex jam access tray. 3-100 Service Manual Remove the jammed paper. 3. Front paper jams 1. Remove the standard tray from the printer. 2. Push in and hold the latch while pulling up the rear duplex door. 2 1 2. 4062-XXX 231-239 paper jams (optional external duplex unit) Rear paper jams 1.
Close the rear duplex door. 4. Press . Remove the duplex jam access tray. 3-100 Service Manual Remove the jammed paper. 3. Front paper jams 1. Remove the standard tray from the printer. 2. Push in and hold the latch while pulling up the rear duplex door. 2 1 2. 4062-XXX 231-239 paper jams (optional external duplex unit) Rear paper jams 1.

Service Manual
Page 314
Load the paper into the multipurpose feeder. 4. Straighten the edges on a level surface. 3. Press . 3-102 Service Manual Do not fold or crease the paper. Flex the sheets of the paper. 5. Slide the paper guide toward the inside of the tray until it lightly rests against the edge of paper back and forth to loosen them, and then fan them. 4062-XXX 250 paper jam 1. Remove the paper from the multipurpose feeder. 2.
Load the paper into the multipurpose feeder. 4. Straighten the edges on a level surface. 3. Press . 3-102 Service Manual Do not fold or crease the paper. Flex the sheets of the paper. 5. Slide the paper guide toward the inside of the tray until it lightly rests against the edge of paper back and forth to loosen them, and then fan them. 4062-XXX 250 paper jam 1. Remove the paper from the multipurpose feeder. 2.

Service Manual
Page 316
Press . 3-104 Service Manual Pull down the StapleSmart II Finisher door. 2. Close the StapleSmart ii Finisher door. 4. 4062-XXX 280 paper jam 1. Remove the jammed paper. 3.
Press . 3-104 Service Manual Pull down the StapleSmart II Finisher door. 2. Close the StapleSmart ii Finisher door. 4. 4062-XXX 280 paper jam 1. Remove the jammed paper. 3.


