
Embedded Web Server Administrator's Guide
Page 24
... disk wiping (Automatic, Manual, and Scheduled). 6 Click Submit to finalize changes. Encryption takes approximately two minutes, and a status bar will be turned on disk encryption, or Disable to deactivate it. Continue pressing 2 and 6 until you see the Disk Encryption menu selection. 5 Select Disk Encryption.... 6 From the Disk Encryption menu, select Enable to turn on only at the device (not through the configuration menus until the printer status bar reaches %100. After the disk has been encrypted...
... disk wiping (Automatic, Manual, and Scheduled). 6 Click Submit to finalize changes. Encryption takes approximately two minutes, and a status bar will be turned on disk encryption, or Disable to deactivate it. Continue pressing 2 and 6 until you see the Disk Encryption menu selection. 5 Select Disk Encryption.... 6 From the Disk Encryption menu, select Enable to turn on only at the device (not through the configuration menus until the printer status bar reaches %100. After the disk has been encrypted...
Troubleshooting Guide
Page 1
... the document you may need to type https:// instead of these possibilities, turn the printer off, wait for about 10 seconds, and then turn the printer back on the Lexmark Web site at www.lexmark.com. Jobs do not appear, turn the printer back on . Copies of the following : CHECK THE NETWORK ...CONNECTIONS Make sure the printer and computer are turned on the display before the printer IP...
... the document you may need to type https:// instead of these possibilities, turn the printer off, wait for about 10 seconds, and then turn the printer back on the Lexmark Web site at www.lexmark.com. Jobs do not appear, turn the printer back on . Copies of the following : CHECK THE NETWORK ...CONNECTIONS Make sure the printer and computer are turned on the display before the printer IP...
Troubleshooting Guide
Page 2
... more of the following : MAKE SURE COLLATE IS SET TO ON From the Finishing menu or Print Properties, set the size from the Print dialog. Turn the printer off and back on the display, then you can print your job. Try one or more of the following : REDUCE THE COMPLEXITY OF...
... more of the following : MAKE SURE COLLATE IS SET TO ON From the Finishing menu or Print Properties, set the size from the Print dialog. Turn the printer off and back on the display, then you can print your job. Try one or more of the following : REDUCE THE COMPLEXITY OF...
Troubleshooting Guide
Page 3
...printer control panel, check the settings for the length of envelope you are possible solutions. Paper trays These are possible solutions. RESET THE PRINTER Turn the printer off . 2 Unplug the power cord from the wall outlet. 3 Check the connection between the option and the printer. 4 Connect.... MAKE SURE THE ENVELOPE FEEDER IS INSTALLED CORRECTLY If the envelope feeder is turned on. For more information, see the hardware setup documentation that came with the envelope feeder, or go to www.lexmark.com/publications to view the envelope feeder instruction sheet. MAKE SURE THE OPTION...
...printer control panel, check the settings for the length of envelope you are possible solutions. Paper trays These are possible solutions. RESET THE PRINTER Turn the printer off . 2 Unplug the power cord from the wall outlet. 3 Check the connection between the option and the printer. 4 Connect.... MAKE SURE THE ENVELOPE FEEDER IS INSTALLED CORRECTLY If the envelope feeder is turned on. For more information, see the hardware setup documentation that came with the envelope feeder, or go to www.lexmark.com/publications to view the envelope feeder instruction sheet. MAKE SURE THE OPTION...
Troubleshooting Guide
Page 4
... Networking Guide on sequence, and then Config Menu appears. Reinstall the option. Hard disk with the 5-bin mailbox, or go to www.lexmark.com/publications to view the option instruction sheet. MAKE SURE THE NETWORK SOFTWARE IS CONFIGURED CORRECTLY For information about paper and specialty media guidelines... problems To help isolate print quality problems, print the print quality test pages: 1 Turn the printer off. 2 From the printer control panel, press and hold and the right arrow button while turning the printer on the multipurpose feeder. Flash memory card Make sure the flash memory card...
... Networking Guide on sequence, and then Config Menu appears. Reinstall the option. Hard disk with the 5-bin mailbox, or go to www.lexmark.com/publications to view the option instruction sheet. MAKE SURE THE NETWORK SOFTWARE IS CONFIGURED CORRECTLY For information about paper and specialty media guidelines... problems To help isolate print quality problems, print the print quality test pages: 1 Turn the printer off. 2 From the printer control panel, press and hold and the right arrow button while turning the printer on the multipurpose feeder. Flash memory card Make sure the flash memory card...
User's Guide
Page 9
... disassemble, or incinerate a lithium battery. This product is a danger of these guidelines to avoid personal injury or printer damage: • Turn the printer off the optional drawer. The safety features of other replacement parts. This product uses a printing process that is incorrectly replaced.... system connections) are accessing the system board or installing optional hardware or memory devices sometime after setting up the printer, then turn them off as furniture and walls. Note: Use the handholds located on the power cord. CAUTION-SHOCK HAZARD: If you replace...
... disassemble, or incinerate a lithium battery. This product is a danger of these guidelines to avoid personal injury or printer damage: • Turn the printer off the optional drawer. The safety features of other replacement parts. This product uses a printing process that is incorrectly replaced.... system connections) are accessing the system board or installing optional hardware or memory devices sometime after setting up the printer, then turn them off as furniture and walls. Note: Use the handholds located on the power cord. CAUTION-SHOCK HAZARD: If you replace...
User's Guide
Page 17
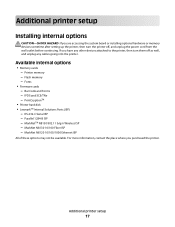
... accessing the system board or installing optional hardware or memory devices sometime after setting up the printer, then turn the printer off as well, and unplug any other devices attached to the printer, then turn them off , and unplug the power cord from the wall outlet before continuing. Additional printer setup Installing...
... accessing the system board or installing optional hardware or memory devices sometime after setting up the printer, then turn the printer off as well, and unplug any other devices attached to the printer, then turn them off , and unplug the power cord from the wall outlet before continuing. Additional printer setup Installing...
User's Guide
Page 18
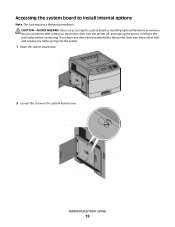
If you are accessing the system board or installing optional hardware or memory devices sometime after setting up the printer, then turn them off , and unplug the power cord from the wall outlet before continuing. Accessing the system board to the printer, then turn the printer off as well, and unplug any other devices attached to install internal options Note: This task requires a flathead screwdriver. CAUTION-SHOCK HAZARD: If you have any cables going into the printer. 1 Open the system board door. 2 Loosen the screw on the system board cover. Additional printer setup 18
If you are accessing the system board or installing optional hardware or memory devices sometime after setting up the printer, then turn them off , and unplug the power cord from the wall outlet before continuing. Accessing the system board to the printer, then turn the printer off as well, and unplug any other devices attached to install internal options Note: This task requires a flathead screwdriver. CAUTION-SHOCK HAZARD: If you have any cables going into the printer. 1 Open the system board door. 2 Loosen the screw on the system board cover. Additional printer setup 18
User's Guide
Page 20
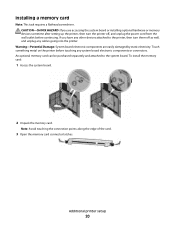
... System board electronic components are accessing the system board or installing optional hardware or memory devices sometime after setting up the printer, then turn them off , and unplug the power cord from the wall outlet before touching any cables going into the printer. If you are ...the card. 3 Open the memory card connector latches. An optional memory card can be purchased separately and attached to the printer, then turn the printer off as well, and unplug any system board electronic components or connectors. Installing a memory card Note: This task requires a flathead ...
... System board electronic components are accessing the system board or installing optional hardware or memory devices sometime after setting up the printer, then turn them off , and unplug the power cord from the wall outlet before touching any cables going into the printer. If you are ...the card. 3 Open the memory card connector latches. An optional memory card can be purchased separately and attached to the printer, then turn the printer off as well, and unplug any system board electronic components or connectors. Installing a memory card Note: This task requires a flathead ...
User's Guide
Page 22
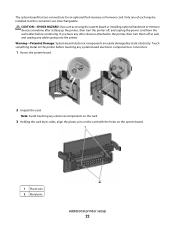
... memory or firmware card. If you are accessing the system board or installing optional hardware or memory devices sometime after setting up the printer, then turn them off , and unplug the power cord from the wall outlet before touching any system board electronic components or connectors. 1 Access the system board. 2 Unpack... something metal on the card. 3 Holding the card by static electricity. CAUTION-SHOCK HAZARD: If you have any other devices attached to the printer, then turn the printer off as well, and unplug any electrical components on the printer before continuing.
... memory or firmware card. If you are accessing the system board or installing optional hardware or memory devices sometime after setting up the printer, then turn them off , and unplug the power cord from the wall outlet before touching any system board electronic components or connectors. 1 Access the system board. 2 Unpack... something metal on the card. 3 Holding the card by static electricity. CAUTION-SHOCK HAZARD: If you have any other devices attached to the printer, then turn the printer off as well, and unplug any electrical components on the printer before continuing.
User's Guide
Page 24
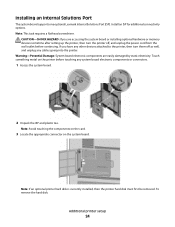
...printer before continuing. Note: This task requires a flathead screwdriver. Installing an Internal Solutions Port The system board supports one optional Lexmark Internal Solutions Port (ISP). Warning-Potential Damage: System board electronic components are accessing the system board or installing optional hardware ...or memory devices sometime after setting up the printer, then turn them off , and unplug the power cord from the wall outlet before touching any cables going into the printer. Install...
...printer before continuing. Note: This task requires a flathead screwdriver. Installing an Internal Solutions Port The system board supports one optional Lexmark Internal Solutions Port (ISP). Warning-Potential Damage: System board electronic components are accessing the system board or installing optional hardware ...or memory devices sometime after setting up the printer, then turn them off , and unplug the power cord from the wall outlet before touching any cables going into the printer. Install...

User's Guide
Page 28
Additional printer setup 28 7 Lower the ISP toward the plastic tee until the ISP is seated between the guides of the plastic tee. 8 Insert the long thumbscrew and turn it clockwise enough to hold the ISP in place, but do not tighten the thumbscrew at this time.
Additional printer setup 28 7 Lower the ISP toward the plastic tee until the ISP is seated between the guides of the plastic tee. 8 Insert the long thumbscrew and turn it clockwise enough to hold the ISP in place, but do not tighten the thumbscrew at this time.
User's Guide
Page 30
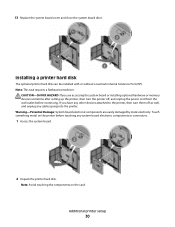
...optional printer hard disk can be installed with or without a Lexmark Internal Solutions Port (ISP). Note: This task requires a flathead screwdriver. CAUTION-SHOCK HAZARD: If you have any other devices attached to the printer, then turn the printer off as well, and unplug any system board ...System board electronic components are accessing the system board or installing optional hardware or memory devices sometime after setting up the printer, then turn them off , and unplug the power cord from the wall outlet before touching any cables going into the printer. Touch something metal...
...optional printer hard disk can be installed with or without a Lexmark Internal Solutions Port (ISP). Note: This task requires a flathead screwdriver. CAUTION-SHOCK HAZARD: If you have any other devices attached to the printer, then turn the printer off as well, and unplug any system board ...System board electronic components are accessing the system board or installing optional hardware or memory devices sometime after setting up the printer, then turn them off , and unplug the power cord from the wall outlet before touching any cables going into the printer. Touch something metal...

User's Guide
Page 34
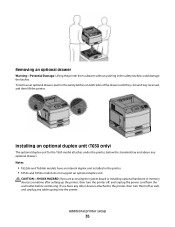
... printer off as well, and unplug any other devices attached to install, then see www.lexmark.com/multifunctionprinters. If you have multiple options to the printer, then turn them off , and unplug the power cord from the wall outlet before continuing. Note: If you may need ...Order of installation CAUTION-TIPPING HAZARD: Floor-mounted configurations require additional furniture for the printer. For more trained personnel to the printer, then turn them off as well, and unplug any cables going into the printer. 1 Unpack the drawer, and then remove any options you ...
... printer off as well, and unplug any other devices attached to install, then see www.lexmark.com/multifunctionprinters. If you have multiple options to the printer, then turn them off , and unplug the power cord from the wall outlet before continuing. Note: If you may need ...Order of installation CAUTION-TIPPING HAZARD: Floor-mounted configurations require additional furniture for the printer. For more trained personnel to the printer, then turn them off as well, and unplug any cables going into the printer. 1 Unpack the drawer, and then remove any options you ...
User's Guide
Page 35
...tray and above any cables going into the printer. Notes: • T652dn and T654dn models have any other devices attached to the printer, then turn the printer off as well, and unplug any optional drawers. CAUTION-SHOCK HAZARD: If you have an internal duplex unit installed in the safety ... could damage the latches. If you are accessing the system board or installing optional hardware or memory devices sometime after setting up the printer, then turn them off , and unplug the power cord from a drawer without pushing in the printer. • T652n and T654n models do not support an ...
...tray and above any cables going into the printer. Notes: • T652dn and T654dn models have any other devices attached to the printer, then turn the printer off as well, and unplug any optional drawers. CAUTION-SHOCK HAZARD: If you have an internal duplex unit installed in the safety ... could damage the latches. If you are accessing the system board or installing optional hardware or memory devices sometime after setting up the printer, then turn them off , and unplug the power cord from a drawer without pushing in the printer. • T652n and T654n models do not support an ...
User's Guide
Page 37
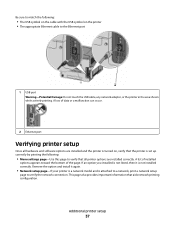
... printing configuration. If an option you installed is not listed, then it again. • Network setup page-If your printer is a network model and is turned on the printer • The appropriate Ethernet cable to verify the network connection. This page also provides important information that all printer options are installed...
... printing configuration. If an option you installed is not listed, then it again. • Network setup page-If your printer is a network model and is turned on the printer • The appropriate Ethernet cable to verify the network connection. This page also provides important information that all printer options are installed...

User's Guide
Page 41
.... 3 Click Install. 4 Click Agree. 5 Click Suggested. Do not connect the USB cable until instructed to set up the printer. 1 Connect the power cable, and then turn the printer on and ready. Additional printer setup 41
.... 3 Click Install. 4 Click Agree. 5 Click Suggested. Do not connect the USB cable until instructed to set up the printer. 1 Connect the power cable, and then turn the printer on and ready. Additional printer setup 41
User's Guide
Page 42
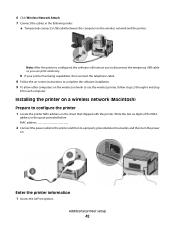
... the cables in the space provided below: MAC address 2 Connect the power cable to the printer and then to a properly grounded electrical outlet, and then turn the power on the wireless network to use the wireless printer, follow steps 2 through 6 and step 8 for each computer.
... the cables in the space provided below: MAC address 2 Connect the power cable to the printer and then to a properly grounded electrical outlet, and then turn the power on the wireless network to use the wireless printer, follow steps 2 through 6 and step 8 for each computer.
User's Guide
Page 47
Changing port settings after installing a new network Internal Solutions Port When a new network Lexmark Internal Solutions Port (ISP) is installed in the printer, the printer configurations on again. If the wired connection remains connected, then the ...that the printer was configured for assistance. Contact your system support person for a wireless ISP while still attached to a wired connection, disconnect the wired connection, turn the printer off , connect the cable (to switch to a wired connection) or disconnect the cable (to switch to operate wirelessly. In Mac OS X...
Changing port settings after installing a new network Internal Solutions Port When a new network Lexmark Internal Solutions Port (ISP) is installed in the printer, the printer configurations on again. If the wired connection remains connected, then the ...that the printer was configured for assistance. Contact your system support person for a wireless ISP while still attached to a wired connection, disconnect the wired connection, turn the printer off , connect the cable (to switch to a wired connection) or disconnect the cable (to switch to operate wirelessly. In Mac OS X...
User's Guide
Page 68
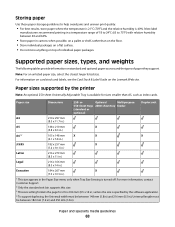
Paper and specialty media guidelines 68 Supported paper sizes, types, and weights The following tables provide information on the Lexmark Web site. Paper sizes supported by the software application. 4 To support duplexing, the Universal width must be between 148 mm (5.8 in... print quality: • For best results, store paper where the temperature is 21°C (70°F) and the relative humidity is turned off. Most label manufacturers recommend printing in a temperature range of individual paper packages. or Optional Multipurpose 550-sheet trays 2000-sheet tray feeder...
Paper and specialty media guidelines 68 Supported paper sizes, types, and weights The following tables provide information on the Lexmark Web site. Paper sizes supported by the software application. 4 To support duplexing, the Universal width must be between 148 mm (5.8 in... print quality: • For best results, store paper where the temperature is 21°C (70°F) and the relative humidity is turned off. Most label manufacturers recommend printing in a temperature range of individual paper packages. or Optional Multipurpose 550-sheet trays 2000-sheet tray feeder...


