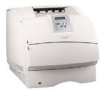
User's Reference
Page 4
... print cartridge 86 Removing the used print cartridge 86 Cleaning the printer 87 Installing the new print cartridge 88 Replacing the charge roll 90 Replacing the transfer roller 94 Replacing the pick rollers 98 Replacing the label fuser cleaner 101 Replacing the staple cartridge 104 Removing a used staple cartridge 105 Installing a new staple cartridge 106 Resetting...
... print cartridge 86 Removing the used print cartridge 86 Cleaning the printer 87 Installing the new print cartridge 88 Replacing the charge roll 90 Replacing the transfer roller 94 Replacing the pick rollers 98 Replacing the label fuser cleaner 101 Replacing the staple cartridge 104 Removing a used staple cartridge 105 Installing a new staple cartridge 106 Resetting...

User's Reference
Page 12
...other than those specified herein may cause the media to release emissions. CAUTION: Use of controls or adjustments or performance of procedures other replacement parts. • Your product uses a laser. CAUTION: Do not set up this symbol , it MUST be obvious. Operation ...software. Electronic emission notices Without a network card installed Federal Communications Commission (FCC) compliance information statement The Lexmark T family base printers, Types 4060-000 and 4060-200, and network printers, Types 4060-010 and 4060-210, have been tested and found to comply with the limits for ...
...other than those specified herein may cause the media to release emissions. CAUTION: Use of controls or adjustments or performance of procedures other replacement parts. • Your product uses a laser. CAUTION: Do not set up this symbol , it MUST be obvious. Operation ...software. Electronic emission notices Without a network card installed Federal Communications Commission (FCC) compliance information statement The Lexmark T family base printers, Types 4060-000 and 4060-200, and network printers, Types 4060-010 and 4060-210, have been tested and found to comply with the limits for ...
User's Reference
Page 17
...published specifications • Is in need of original purchase and this product if it was designed. The replacement item assumes the remaining warranty period of the Remarketer or Lexmark. Also, such product must be required to that feature or option is available to present the feature ...that came with the product. To obtain warranty service you transfer this statement is used parts, which it was originally purchased for your printer. and Canada, refer to present proof of this product to another user, warranty service under the terms of original purchase. For ...
...published specifications • Is in need of original purchase and this product if it was designed. The replacement item assumes the remaining warranty period of the Remarketer or Lexmark. Also, such product must be required to that feature or option is available to present the feature ...that came with the product. To obtain warranty service you transfer this statement is used parts, which it was originally purchased for your printer. and Canada, refer to present proof of this product to another user, warranty service under the terms of original purchase. For ...

User's Reference
Page 28
SAVED appears briefly on the display, and then is replaced by Performing Self Test. Tray 1 Sensing appears on the second line. 6 Press and release Menu until you see Size Sensing, and then press Select. Activating ... the selected input option and the second line shows the current setting. 5 Press Menu to change the setting to Off, and then press Select. The printer returns to select the input option that will hold the folio or statement size paper, and then press Select. The first line of the display...
SAVED appears briefly on the display, and then is replaced by Performing Self Test. Tray 1 Sensing appears on the second line. 6 Press and release Menu until you see Size Sensing, and then press Select. Activating ... the selected input option and the second line shows the current setting. 5 Press Menu to change the setting to Off, and then press Select. The printer returns to select the input option that will hold the folio or statement size paper, and then press Select. The first line of the display...
User's Reference
Page 81
... about one item at www.lexmark.com or contact the place where you bought your printer Periodically, you see Utilities Menu, and then press Select. However, the printer can print the menu settings page from the Utilities Menu. (Press Menu until you need replacing. Determining the status of supplies The printer uses the second line...
... about one item at www.lexmark.com or contact the place where you bought your printer Periodically, you see Utilities Menu, and then press Select. However, the printer can print the menu settings page from the Utilities Menu. (Press Menu until you need replacing. Determining the status of supplies The printer uses the second line...
User's Reference
Page 83
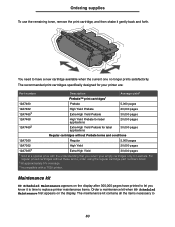
...000 pages 30,000 pages 12A7468 12A74693 High Yield Prebate for label applications Extra High Yield Prebate for your empty cartridges only to Lexmark. For regular priced cartridges without Prebate terms and conditions 12A7360 Regular 5,000 pages 12A7362 12A73653 High Yield Extra High Yield 20,...display. You need to 83 Ordering supplies To use the remaining toner, remove the print cartridge, and then shake it is time to replace printer maintenance items. Order a maintenance kit when 80 Scheduled Maintenance first appears on the display after 300,000 pages have a new cartridge ...
...000 pages 30,000 pages 12A7468 12A74693 High Yield Prebate for label applications Extra High Yield Prebate for your empty cartridges only to Lexmark. For regular priced cartridges without Prebate terms and conditions 12A7360 Regular 5,000 pages 12A7362 12A73653 High Yield Extra High Yield 20,...display. You need to 83 Ordering supplies To use the remaining toner, remove the print cartridge, and then shake it is time to replace printer maintenance items. Order a maintenance kit when 80 Scheduled Maintenance first appears on the display after 300,000 pages have a new cartridge ...
User's Reference
Page 84
... : T630 and T630n* T632 and T632n* * n denotes the network version. Part numbers 56P1409 (110 V) 56P1410 (220 V) 56P1409 (110 V) 56P1410 (220 V) For finisher maintenance information, refer to the StapleSmart™ Reference that came with your specific printer. Ordering a charge roll We recommend... ordering a new charge roll when toner fog or background shading appears on printed pages. Order Lexmark part number 99A1017. Ordering supplies replace the pick rollers, the charge roll, and...
... : T630 and T630n* T632 and T632n* * n denotes the network version. Part numbers 56P1409 (110 V) 56P1410 (220 V) 56P1409 (110 V) 56P1410 (220 V) For finisher maintenance information, refer to the StapleSmart™ Reference that came with your specific printer. Ordering a charge roll We recommend... ordering a new charge roll when toner fog or background shading appears on printed pages. Order Lexmark part number 99A1017. Ordering supplies replace the pick rollers, the charge roll, and...
User's Reference
Page 86
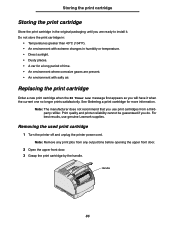
...; An environment with salty air. Removing the used print cartridge 1 Turn the printer off and unplug the printer power cord. Replacing the print cartridge Order a new print cartridge when the 88 Toner Low message first appears so you use genuine Lexmark supplies. Note: Remove any output bins before opening the upper front door. 2 Open...
...; An environment with salty air. Removing the used print cartridge 1 Turn the printer off and unplug the printer power cord. Replacing the print cartridge Order a new print cartridge when the 88 Toner Low message first appears so you use genuine Lexmark supplies. Note: Remove any output bins before opening the upper front door. 2 Open...
User's Reference
Page 87
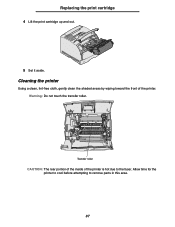
Transfer roller CAUTION: The rear portion of the inside of the printer. Cleaning the printer Using a clean, lint-free cloth, gently clean the shaded areas by wiping toward the front of the printer is hot due to remove parts in this area. 87 Replacing the print cartridge 4 Lift the print cartridge up and out. 5 Set it aside. Allow time for the printer to cool before attempting to the fuser. Warning: Do not touch the transfer roller.
Transfer roller CAUTION: The rear portion of the inside of the printer. Cleaning the printer Using a clean, lint-free cloth, gently clean the shaded areas by wiping toward the front of the printer is hot due to remove parts in this area. 87 Replacing the print cartridge 4 Lift the print cartridge up and out. 5 Set it aside. Allow time for the printer to cool before attempting to the fuser. Warning: Do not touch the transfer roller.
User's Reference
Page 88
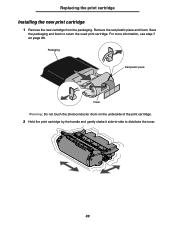
For more information, see step 7 on the underside of the print cartridge. 2 Hold the print cartridge by the handle and gently shake it side-to-side to return the used print cartridge. Packaging Red plastic piece Foam Warning: Do not touch the photoconductor drum on page 89. Save the packaging and foam to distribute the toner. 88 Replacing the print cartridge Installing the new print cartridge 1 Remove the new cartridge from the packaging. Remove the red plastic piece and foam.
For more information, see step 7 on the underside of the print cartridge. 2 Hold the print cartridge by the handle and gently shake it side-to-side to return the used print cartridge. Packaging Red plastic piece Foam Warning: Do not touch the photoconductor drum on page 89. Save the packaging and foam to distribute the toner. 88 Replacing the print cartridge Installing the new print cartridge 1 Remove the new cartridge from the packaging. Remove the red plastic piece and foam.

User's Reference
Page 89
Slot Tab 4 Slide the print cartridge into the printer until it into place. 5 Close the upper front door. 6 Turn the printer on. 7 Follow the instructions on each side of the print cartridge cradle. For best results, use Lexmark supplies with the slots on the new print cartridge box... a used print cartridge. Align the tabs on each side of the print cartridge with the printer. Note: The print cartridge warranty is voided by the handle and insert it snaps into the printer. Replacing the print cartridge 3 Hold the print cartridge by unauthorized refilling. 89 When you .
Slot Tab 4 Slide the print cartridge into the printer until it into place. 5 Close the upper front door. 6 Turn the printer on. 7 Follow the instructions on each side of the print cartridge cradle. For best results, use Lexmark supplies with the slots on the new print cartridge box... a used print cartridge. Align the tabs on each side of the print cartridge with the printer. Note: The print cartridge warranty is voided by the handle and insert it snaps into the printer. Replacing the print cartridge 3 Hold the print cartridge by unauthorized refilling. 89 When you .
User's Reference
Page 90
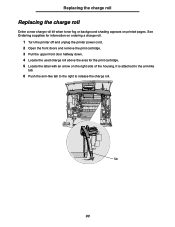
See Ordering supplies for information on ordering a charge roll. 1 Turn the printer off and unplug the printer power cord. 2 Open the front doors and remove the print cartridge. 3 Pull the upper front door halfway down. 4 Locate the used charge roll above the ... printed pages. It is attached to the arm-like tab. 6 Push the arm-like tab to the right to release the charge roll. Tab 90 Replacing the charge roll Replacing the charge roll Order a new charge roll kit when toner fog or background shading appears on the right side of the housing.
See Ordering supplies for information on ordering a charge roll. 1 Turn the printer off and unplug the printer power cord. 2 Open the front doors and remove the print cartridge. 3 Pull the upper front door halfway down. 4 Locate the used charge roll above the ... printed pages. It is attached to the arm-like tab. 6 Push the arm-like tab to the right to release the charge roll. Tab 90 Replacing the charge roll Replacing the charge roll Order a new charge roll kit when toner fog or background shading appears on the right side of the housing.

User's Reference
Page 91
Replacing the charge roll 7 Pull down on each end to loosen the left side. 9 Pull the charge roll straight out of the charge roll when installing the unit. Metal tab Cylinder part 10 Remove any packaging from the new charge roll. You may touch the metal tabs on the charge roll until it aside. Warning: Do not touch the cylinder part of the printer and set it is loose. 8 Pull the charge roll to the right to help you in the installation. Touching the cylinder part will contaminate the charge roll and affect printing. 91
Replacing the charge roll 7 Pull down on each end to loosen the left side. 9 Pull the charge roll straight out of the charge roll when installing the unit. Metal tab Cylinder part 10 Remove any packaging from the new charge roll. You may touch the metal tabs on the charge roll until it aside. Warning: Do not touch the cylinder part of the printer and set it is loose. 8 Pull the charge roll to the right to help you in the installation. Touching the cylinder part will contaminate the charge roll and affect printing. 91

User's Reference
Page 92
Replacing the charge roll 11 Align the metal tab on left side of the new charge roll with its hole and insert it. 92
Replacing the charge roll 11 Align the metal tab on left side of the new charge roll with its hole and insert it. 92
User's Reference
Page 93
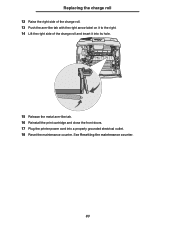
See Resetting the maintenance counter. 93 Replacing the charge roll 12 Raise the right side of the charge roll. 13 Push the arm-like tab with the right arrow label on it to the right. 14 Lift the right side of the charge roll and insert it into its hole. 15 Release the metal arm-like tab. 16 Reinstall the print cartridge and close the front doors. 17 Plug the printer power cord into a properly grounded electrical outlet. 18 Reset the maintenance counter.
See Resetting the maintenance counter. 93 Replacing the charge roll 12 Raise the right side of the charge roll. 13 Push the arm-like tab with the right arrow label on it to the right. 14 Lift the right side of the charge roll and insert it into its hole. 15 Release the metal arm-like tab. 16 Reinstall the print cartridge and close the front doors. 17 Plug the printer power cord into a properly grounded electrical outlet. 18 Reset the maintenance counter.

User's Reference
Page 94
...installation information. 1 Turn the printer off and unplug the printer power cord. 2 Open the front doors and remove the print cartridge. 3 Locate the used transfer roller on the lower floor of the print cartridge housing. 4 Pry the left side of small tool.) 94 Replacing the transfer roller Replacing the transfer roller Order a ... on ordering a transfer roller. Complete the following steps to loosen it. (Use any kind of the transfer roller up from its slot to replace the transfer roller. Refer to the documentation that comes with the transfer roller for information on printed pages.
...installation information. 1 Turn the printer off and unplug the printer power cord. 2 Open the front doors and remove the print cartridge. 3 Locate the used transfer roller on the lower floor of the print cartridge housing. 4 Pry the left side of small tool.) 94 Replacing the transfer roller Replacing the transfer roller Order a ... on ordering a transfer roller. Complete the following steps to loosen it. (Use any kind of the transfer roller up from its slot to replace the transfer roller. Refer to the documentation that comes with the transfer roller for information on printed pages.

User's Reference
Page 95
Set it straight out of the printer. Replacing the transfer roller 5 Pull the transfer roller to the left to loosen the right side and then pull it aside. 6 Remove any packaging from the new transfer roller. 95
Set it straight out of the printer. Replacing the transfer roller 5 Pull the transfer roller to the left to loosen the right side and then pull it aside. 6 Remove any packaging from the new transfer roller. 95

User's Reference
Page 96
Replacing the transfer roller 7 Grasp the transfer roller on the left side as shown. 8 Locate the small hole and insert the metal tab on the right side of the transfer roller into the hole. 96
Replacing the transfer roller 7 Grasp the transfer roller on the left side as shown. 8 Locate the small hole and insert the metal tab on the right side of the transfer roller into the hole. 96

User's Reference
Page 97
See Resetting the maintenance counter. 97 Replacing the transfer roller 9 Lower the transfer roller gently until the left metal tab fits into a properly grounded electrical outlet. 12 Reset the maintenance counter. You may have to push it down for a secure fit. 10 Reinstall the print cartridge and close the front doors. 11 Plug the printer power cord into the slot.
See Resetting the maintenance counter. 97 Replacing the transfer roller 9 Lower the transfer roller gently until the left metal tab fits into a properly grounded electrical outlet. 12 Reset the maintenance counter. You may have to push it down for a secure fit. 10 Reinstall the print cartridge and close the front doors. 11 Plug the printer power cord into the slot.

User's Reference
Page 98
Tab 4 Repeat step 3 on the end of the tab and pull the pick roller off the arm. Replacing the pick rollers Replacing the pick rollers 1 Remove the standard tray. 2 Look underneath the printer for the pick roller arm and pull it down. 3 Press on the other side to remove the other pick roller. 98
Tab 4 Repeat step 3 on the end of the tab and pull the pick roller off the arm. Replacing the pick rollers Replacing the pick rollers 1 Remove the standard tray. 2 Look underneath the printer for the pick roller arm and pull it down. 3 Press on the other side to remove the other pick roller. 98


