Setup Guide (1.4 MB)
Page 5
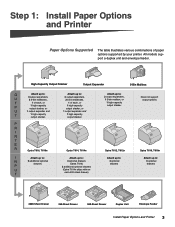
... (Optra T614) 3 additional optional drawers (Optra T614n ships with an extra 500-sheet drawer) Attach up to : 2 output expanders, 1 5-bin mailbox, or 1 high-capacity output stacker. Optra T612, T612n Attach up to: 3 optional drawers Does not support output options Optra T610... Stacker Output Expander 5-Bin Mailbox O Attach up to : 3 output expanders, U 2 5-bin mailboxes, T 1 of paper options supported by your printer. P R I N T E R Optra T616, T616n I Attach up to: N 3 additional optional drawers P U T Attach up to : 3 output expanders, 2 5-bin mailboxes, 1...
... (Optra T614) 3 additional optional drawers (Optra T614n ships with an extra 500-sheet drawer) Attach up to : 2 output expanders, 1 5-bin mailbox, or 1 high-capacity output stacker. Optra T612, T612n Attach up to: 3 optional drawers Does not support output options Optra T610... Stacker Output Expander 5-Bin Mailbox O Attach up to : 3 output expanders, U 2 5-bin mailboxes, T 1 of paper options supported by your printer. P R I N T E R Optra T616, T616n I Attach up to: N 3 additional optional drawers P U T Attach up to : 3 output expanders, 2 5-bin mailboxes, 1...
Setup Guide (1.4 MB)
Page 8
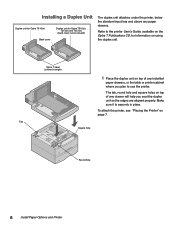
... holes on top of any installed paper drawers, or the table or printer cabinet where you plan to the printer User's Guide, available on the Optra T Publications CD, for Optra T616(n), T614(n) and T612(n) (back cover curves inward) The duplex unit attaches under the printer, below the standard input tray and above any drawer will help...
... holes on top of any installed paper drawers, or the table or printer cabinet where you plan to the printer User's Guide, available on the Optra T Publications CD, for Optra T616(n), T614(n) and T612(n) (back cover curves inward) The duplex unit attaches under the printer, below the standard input tray and above any drawer will help...

Setup Guide (1.4 MB)
Page 16
...Push the release latch and open the lower front door of the printer and Slots gently push the envelope feeder into the opening until it snaps into place. Optra T label (colored triangle) Installing the Envelope Feeder Optra T label (colored triangle) The envelope feeder attaches to the User... feeder connector door. 3 Align the tabs on the envelope feeder with installation instructions. Installing a High-Capacity Output Stacker Optra T printer models T616(n), T614(n) and T612(n) support one high-capacity output stacker. It can be removed when you are not using it is packaged...
...Push the release latch and open the lower front door of the printer and Slots gently push the envelope feeder into the opening until it snaps into place. Optra T label (colored triangle) Installing the Envelope Feeder Optra T label (colored triangle) The envelope feeder attaches to the User... feeder connector door. 3 Align the tabs on the envelope feeder with installation instructions. Installing a High-Capacity Output Stacker Optra T printer models T616(n), T614(n) and T612(n) support one high-capacity output stacker. It can be removed when you are not using it is packaged...

Setup Guide (1.4 MB)
Page 18
... shield by static electricity. Electronic components can be damaged by the tabs and lift it snaps into the three keyholes on the printer before you touch the memory option. Save the packaging materials. 3 Open both latches completely. Avoid touching the connection points along ..."Reattach Shield and Close Doors" beginning on page 15. Tab Installing Printer Memory or Flash Memory Memory connector 1 Memory connector 2 Memory connector 3 T616(n) and T614(n) models only 1 Follow the steps under "Accessing the Printer System Board" beginning on page 18 to slide the shield up until...
... shield by static electricity. Electronic components can be damaged by the tabs and lift it snaps into the three keyholes on the printer before you touch the memory option. Save the packaging materials. 3 Open both latches completely. Avoid touching the connection points along ..."Reattach Shield and Close Doors" beginning on page 15. Tab Installing Printer Memory or Flash Memory Memory connector 1 Memory connector 2 Memory connector 3 T616(n) and T614(n) models only 1 Follow the steps under "Accessing the Printer System Board" beginning on page 18 to slide the shield up until...
Setup Guide (1.4 MB)
Page 25
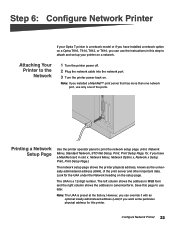
... 12-digit number. The UAA is preset at the factory. Save this printer. Look for this page to attach and set up your Optra T printer is a network model or if you have installed a network option on a Optra T616, T614, T612, or T610, you have a MarkNet card in canonical form. ...Attaching Your Printer to print the network setup page. (Hint: Network Menu, Standard Network...
... 12-digit number. The UAA is preset at the factory. Save this printer. Look for this page to attach and set up your Optra T printer is a network model or if you have installed a network option on a Optra T616, T614, T612, or T610, you have a MarkNet card in canonical form. ...Attaching Your Printer to print the network setup page. (Hint: Network Menu, Standard Network...

Setup Guide (1.4 MB)
Page 33
... that prevent its warranty period. Also, such product must be provided: • for the Optra T616n, Optra T616, Optra T614n or Optra T614, at your product to the Remarketer or Lexmark, or ship it was originally purchased for your use, and not for resale, from defects ... the item replaced becomes the property of the original product. Optra T Laser Printers This Statement of original purchase and this product does not function as shown on the World Wide Web at a Remarketer or a Lexmark designated location. You should transfer proof of Limited Warranty applies ...
... that prevent its warranty period. Also, such product must be provided: • for the Optra T616n, Optra T616, Optra T614n or Optra T614, at your product to the Remarketer or Lexmark, or ship it was originally purchased for your use, and not for resale, from defects ... the item replaced becomes the property of the original product. Optra T Laser Printers This Statement of original purchase and this product does not function as shown on the World Wide Web at a Remarketer or a Lexmark designated location. You should transfer proof of Limited Warranty applies ...
