Quick Reference Guide (410 KB)
Page 1
... it . Printing a menu settings page To print a menu settings page, press Continue while only the Ready/Data light is ready to view the printer driver settings. 8 Select MP Feeder from the Form Source list box. 9 Select your print media type (envelopes, transparencies, and so on the ... them, and then fan them. Push the print media forward without forcing it . © Copyright 2002 Lexmark International, Inc. Refer to load a single sheet of the stack on • The printer is canceled. All the lights come on the Publications CD. All rights reserved. Metal stop , print side...
... it . Printing a menu settings page To print a menu settings page, press Continue while only the Ready/Data light is ready to view the printer driver settings. 8 Select MP Feeder from the Form Source list box. 9 Select your print media type (envelopes, transparencies, and so on the ... them, and then fan them. Push the print media forward without forcing it . © Copyright 2002 Lexmark International, Inc. Refer to load a single sheet of the stack on • The printer is canceled. All the lights come on the Publications CD. All rights reserved. Metal stop , print side...
Quick Reference Guide (410 KB)
Page 2
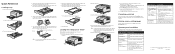
...! Do not touch the photoconductor drum on the bottom of jam: 1 Completely remove tray 1. 2 Press down the green lever on the right under the printer. 3 Reinstall the tray. Reposition the print media under the metal stop , completely remove the tray. Jams in this type of the print cartridge. 3 Remove...cartridge. 5 Close the upper front door. Jams in the multipurpose feeder is in the fuser 1 Open the upper front door using and maintaining your printer. • Contact your administrator or Help desk if you see any jams. 4 Grasp the tab on the rear door and pull the door open...
...! Do not touch the photoconductor drum on the bottom of jam: 1 Completely remove tray 1. 2 Press down the green lever on the right under the printer. 3 Reinstall the tray. Reposition the print media under the metal stop , completely remove the tray. Jams in this type of the print cartridge. 3 Remove...cartridge. 5 Close the upper front door. Jams in the multipurpose feeder is in the fuser 1 Open the upper front door using and maintaining your printer. • Contact your administrator or Help desk if you see any jams. 4 Grasp the tab on the rear door and pull the door open...

Setup Guide (881 KB)
Page 2
... In the United Kingdom and Eire, call 0628-481500. References in this device must accept any time. Lexmark and Lexmark with diamond design are the user's responsibility. This means the printer recognizes PostScript 3 commands used in various application programs, and that product, program, or service may be...8226; This product is not intended to state or imply that only that the printer emulates the functions corresponding to the commands. These appear in the left column for the use of Lab Operations Lexmark International, Inc. 740 West New Circle Road Lexington, KY 40550 (859) ...
... In the United Kingdom and Eire, call 0628-481500. References in this device must accept any time. Lexmark and Lexmark with diamond design are the user's responsibility. This means the printer recognizes PostScript 3 commands used in various application programs, and that product, program, or service may be...8226; This product is not intended to state or imply that only that the printer emulates the functions corresponding to the commands. These appear in the left column for the use of Lab Operations Lexmark International, Inc. 740 West New Circle Road Lexington, KY 40550 (859) ...

Setup Guide (881 KB)
Page 3
... sources of information 2 Step 1: Unpack the printer 3 Step 2: Position the optional drawer 4 Step 3: Prepare the printer 6 Positioning the printer 6 Raising the paper rest 7 Attaching an operator panel overlay 7 Step 4: Prepare the print cartridge 8 Removing the packaging 8 Installing the print cartridge 9 Step 5: Install memory cards ...
... sources of information 2 Step 1: Unpack the printer 3 Step 2: Position the optional drawer 4 Step 3: Prepare the printer 6 Positioning the printer 6 Raising the paper rest 7 Attaching an operator panel overlay 7 Step 4: Prepare the print cartridge 8 Removing the packaging 8 Installing the print cartridge 9 Step 5: Install memory cards ...

Setup Guide (881 KB)
Page 4
Step 7: Attach cables 22 Setting up for network printing 22 Setting up for local printing 22 Step 8: Verify printer setup 24 Turning on the printer 24 Printing setup pages 24 Step 9: Configure for TCP/IP 26 Assigning a printer IP address 26 Verifying the IP settings 26 Step 10: Install printer drivers 28 Configuring for network printing 28 Configuring for local printing 31 Step 11: Distribute information to users 33 Discovering printer users 33 Finding helpful information 33 Distributing the information 34 Storing the quick reference card 34 Congratulations 34 iv Contents
Step 7: Attach cables 22 Setting up for network printing 22 Setting up for local printing 22 Step 8: Verify printer setup 24 Turning on the printer 24 Printing setup pages 24 Step 9: Configure for TCP/IP 26 Assigning a printer IP address 26 Verifying the IP settings 26 Step 10: Install printer drivers 28 Configuring for network printing 28 Configuring for local printing 31 Step 11: Distribute information to users 33 Discovering printer users 33 Finding helpful information 33 Distributing the information 34 Storing the quick reference card 34 Congratulations 34 iv Contents

Setup Guide (881 KB)
Page 5
... options for more standard memory (32MB); an Ethernet 10BaseT/ 100BaseTx print server installed; Introduction About the printer Lexmark T420 Base Model and Options Printer page 6 Tray 1 Tray 2: 250-sheet drawer page 4 or Your printer is available in two models: • Lexmark T420, with duplex capabilities, up to 1200 dots per inch (dpi) Image Quality resolution, 16MB of...
... options for more standard memory (32MB); an Ethernet 10BaseT/ 100BaseTx print server installed; Introduction About the printer Lexmark T420 Base Model and Options Printer page 6 Tray 1 Tray 2: 250-sheet drawer page 4 or Your printer is available in two models: • Lexmark T420, with duplex capabilities, up to 1200 dots per inch (dpi) Image Quality resolution, 16MB of...

Setup Guide (881 KB)
Page 6
.... The information on the Publications CD is also available on Lexmark's Web site at www.lexmark.com for administrators. It also provides general information for updated printer drivers, utilities, and other printer documentation. It may also contain printer utilities, screen fonts, and additional documentation. Lexmark T420 Publications CD The Publications CD provides information about loading print media...
.... The information on the Publications CD is also available on Lexmark's Web site at www.lexmark.com for administrators. It also provides general information for updated printer drivers, utilities, and other printer documentation. It may also contain printer utilities, screen fonts, and additional documentation. Lexmark T420 Publications CD The Publications CD provides information about loading print media...

Setup Guide (881 KB)
Page 7
Make sure you need to the Publications CD for the designated Lexmark support phone number for your printer that provides room for the trays, cover, and doors. Remove all items from direct airflow and temperature extremes. What do I do next? Save the carton ... Quick Reference card • Drivers CD • Operator panel overlay (non-English only) If any items are missing or damaged, refer to repack the printer. Step 1: Unpack the printer Warning! Choose a firm, level surface away from the box. Allow at least 7.62 cm (3 in packaging) • Setup Guide with Publications CD and...
Make sure you need to the Publications CD for the designated Lexmark support phone number for your printer that provides room for the trays, cover, and doors. Remove all items from direct airflow and temperature extremes. What do I do next? Save the carton ... Quick Reference card • Drivers CD • Operator panel overlay (non-English only) If any items are missing or damaged, refer to repack the printer. Step 1: Unpack the printer Warning! Choose a firm, level surface away from the box. Allow at least 7.62 cm (3 in packaging) • Setup Guide with Publications CD and...

Setup Guide (881 KB)
Page 8
... optional 250-sheet drawer or one optional 500sheet drawer. If you are adding an optional drawer sometime after setting up the printer, be sure to the location selected for the printer. 4 Reinstall the tray. Remove any packing material and tape from the tray. 3 Grasp the support unit on each side at ...opposite corners and move it fully into the printer. 4 Position the optional drawer Push it to turn the printer off, unplug the power cord, and disconnect all packing material and tape from the back of the support unit. The...
... optional 250-sheet drawer or one optional 500sheet drawer. If you are adding an optional drawer sometime after setting up the printer, be sure to the location selected for the printer. 4 Reinstall the tray. Remove any packing material and tape from the tray. 3 Grasp the support unit on each side at ...opposite corners and move it fully into the printer. 4 Position the optional drawer Push it to turn the printer off, unplug the power cord, and disconnect all packing material and tape from the back of the support unit. The...

Setup Guide (881 KB)
Page 10
...seated securely on the table or optional drawer. Make sure it on the drawer. Handhold Tab Slot Connector 6 Prepare the printer Step 3: Prepare the printer Positioning the printer Once you have selected a location and positioned an optional drawer (if you are ready to install, leave clearance on the... drawer with the underside of the printer. Note: If you have one), you have optional memory to position the printer. To position the printer on an optional drawer: 1 Align the tabs, slots, and connector on the left side ...
...seated securely on the table or optional drawer. Make sure it on the drawer. Handhold Tab Slot Connector 6 Prepare the printer Step 3: Prepare the printer Positioning the printer Once you have selected a location and positioned an optional drawer (if you are ready to install, leave clearance on the... drawer with the underside of the printer. Note: If you have one), you have optional memory to position the printer. To position the printer on an optional drawer: 1 Align the tabs, slots, and connector on the left side ...

Setup Guide (881 KB)
Page 11
Pull the paper rest forward to keep them from sliding out of the output bin. Attaching an operator panel overlay If English is not your preferred language and your printer shipped with an operator panel overlay, attach the overlay that has the appropriately translated light and button names: 1 Peel the protective backing off the overlay. 2 Align the holes in the overlay with the lights and buttons on the operator panel, and then press the overlay into place. Raising the paper rest The paper rest holds printed jobs at an angle to raise it. Prepare the printer 7
Pull the paper rest forward to keep them from sliding out of the output bin. Attaching an operator panel overlay If English is not your preferred language and your printer shipped with an operator panel overlay, attach the overlay that has the appropriately translated light and button names: 1 Peel the protective backing off the overlay. 2 Align the holes in the overlay with the lights and buttons on the operator panel, and then press the overlay into place. Raising the paper rest The paper rest holds printed jobs at an angle to raise it. Prepare the printer 7

Setup Guide (881 KB)
Page 12
Lift the cartridge out of the printer. 8 Prepare the print cartridge Step 4: Prepare the print cartridge Removing the packaging 1 Open the upper front door. Finger grips Handle 2 Grasp the print cartridge by the handle.
Lift the cartridge out of the printer. 8 Prepare the print cartridge Step 4: Prepare the print cartridge Removing the packaging 1 Open the upper front door. Finger grips Handle 2 Grasp the print cartridge by the handle.

Setup Guide (881 KB)
Page 14
c Slide the print cartridge into the printer until it snaps into place. 3 Close the upper front door. Go to page... 11 15 10 Prepare the print cartridge What do I do next? Make sure the door snaps closed on each side of the print cartridge with the slots on both sides, or the printer will not function properly. Task Install memory cards Load print media 2 Install the print cartridge: a Grasp the print cartridge by the handle. b Align the tabs on each side of the print cartridge cradle.
c Slide the print cartridge into the printer until it snaps into place. 3 Close the upper front door. Go to page... 11 15 10 Prepare the print cartridge What do I do next? Make sure the door snaps closed on each side of the print cartridge with the slots on both sides, or the printer will not function properly. Task Install memory cards Load print media 2 Install the print cartridge: a Grasp the print cartridge by the handle. b Align the tabs on each side of the print cartridge cradle.

Setup Guide (881 KB)
Page 15
Step 5: Install memory cards Note: Memory options designed for optional memory cards. Your printer has two memory connectors for other Lexmark printers may not work with your printer. However, the printer only recognizes one flash memory card at a time. Install memory cards 11 Removing the side cover 1 Open the upper front door and the multipurpose feeder...
Step 5: Install memory cards Note: Memory options designed for optional memory cards. Your printer has two memory connectors for other Lexmark printers may not work with your printer. However, the printer only recognizes one flash memory card at a time. Install memory cards 11 Removing the side cover 1 Open the upper front door and the multipurpose feeder...

Setup Guide (881 KB)
Page 16
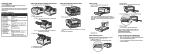
Tab Removing the shield Screw in keyhole 1 Loosen the six screws. 2 Firmly press on the cover. 3 Pull the shield straight out, and set it . 4 Set the cover aside. Do not remove them from Tab their slots. 3 Slide the side cover off of the back of the printer as you swing it out to the left until the screws fit into the keyholes on the two tabs simultaneously to free them completely. 2 Slide the shield to remove it aside. 12 Install memory cards
Tab Removing the shield Screw in keyhole 1 Loosen the six screws. 2 Firmly press on the cover. 3 Pull the shield straight out, and set it . 4 Set the cover aside. Do not remove them from Tab their slots. 3 Slide the side cover off of the back of the printer as you swing it out to the left until the screws fit into the keyholes on the two tabs simultaneously to free them completely. 2 Slide the shield to remove it aside. 12 Install memory cards

Setup Guide (881 KB)
Page 17
Memory cards are easily damaged by static electricity. Touch something metal on the printer before you must have 100-pin connectors. Save the packaging. 2 Push open the latches on both sides of the memory connector you want to use. 3 .... Installing a memory card Follow the instructions in this section to install either end of the connector snap into the connector until the latches on either a printer memory card or a flash memory card.
Memory cards are easily damaged by static electricity. Touch something metal on the printer before you must have 100-pin connectors. Save the packaging. 2 Push open the latches on both sides of the memory connector you want to use. 3 .... Installing a memory card Follow the instructions in this section to install either end of the connector snap into the connector until the latches on either a printer memory card or a flash memory card.

Setup Guide (881 KB)
Page 18
Reattaching the side cover 1 Align the three rear tabs on the side cover with the six screws on the system board. 2 Press the shield against the system board, and then slide the shield to the right. 3 Tighten the six screws. Make sure both doors snap closed on both sides. 14 Install memory cards The top and front tabs snap into their corresponding slots. 1 Align the six keyholes on the shield with the corresponding slots on the printer. 2 Guide the tabs on the top, bottom, and front of the cover into place. 3 Close the upper front door and the multipurpose feeder door.
Reattaching the side cover 1 Align the three rear tabs on the side cover with the six screws on the system board. 2 Press the shield against the system board, and then slide the shield to the right. 3 Tighten the six screws. Make sure both doors snap closed on both sides. 14 Install memory cards The top and front tabs snap into their corresponding slots. 1 Align the six keyholes on the shield with the corresponding slots on the printer. 2 Guide the tabs on the top, bottom, and front of the cover into place. 3 Close the upper front door and the multipurpose feeder door.

Setup Guide (881 KB)
Page 19
... labels, transparencies Paper only Paper only Paper, envelopes, labels, transparencies, card stock Go to either 600 or 850 sheets if you can increase the total printer sheet capacity (including the multipurpose feeder) to page... 16 16 16 19 Load print media 15 Step 6: Load print media Your...
... labels, transparencies Paper only Paper only Paper, envelopes, labels, transparencies, card stock Go to either 600 or 850 sheets if you can increase the total printer sheet capacity (including the multipurpose feeder) to page... 16 16 16 19 Load print media 15 Step 6: Load print media Your...

Setup Guide (881 KB)
Page 23
... specifying the type and size of leaving it fully into the printer. 11 If you to load the appropriate print media before it prints. The printer then prompts you are loading an optional 500- Loading the multipurpose feeder You can use the multipurpose feeder in two ways: • Tray-As a tray, ...
... specifying the type and size of leaving it fully into the printer. 11 If you to load the appropriate print media before it prints. The printer then prompts you are loading an optional 500- Loading the multipurpose feeder You can use the multipurpose feeder in two ways: • Tray-As a tray, ...

Setup Guide (881 KB)
Page 26
... local printing parallel port. 22 Attach cables Setting up for the network speed when turned on the Lexmark T420n. To attach the printer to a network: 1 Turn off the printer and unplug it. 2 Connect the printer to a network using standard cabling that is standard on . Note: A 10BaseT/100BaseTX Fast Ethernet... port is compatible with your printer to a LAN drop or hub using standard network network printing cables. Do not connect or disconnect a communication port, a teleport, ...
... local printing parallel port. 22 Attach cables Setting up for the network speed when turned on the Lexmark T420n. To attach the printer to a network: 1 Turn off the printer and unplug it. 2 Connect the printer to a network using standard cabling that is standard on . Note: A 10BaseT/100BaseTX Fast Ethernet... port is compatible with your printer to a LAN drop or hub using standard network network printing cables. Do not connect or disconnect a communication port, a teleport, ...

