
Quick Reference Guide (410 KB)
Page 2
.... If you see the jam. 2 Remove any jams. 3 Remove any jams. You may have questions about using the finger grips. Do not touch the photoconductor drum on the bottom of jam: 1 Completely remove tray 1. 2 Press down on the rear door and pull the door open the tray until you can jam...
.... If you see the jam. 2 Remove any jams. 3 Remove any jams. You may have questions about using the finger grips. Do not touch the photoconductor drum on the bottom of jam: 1 Completely remove tray 1. 2 Press down on the rear door and pull the door open the tray until you can jam...

Setup Guide (881 KB)
Page 13
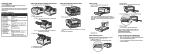
Warning! Retain the packaging material. Installing the print cartridge 1 Hold the print cartridge by the handle and gently shake it to distribute the toner. 3 Remove the packaging material from the cartridge. Do not touch the photoconductor drum on the bottom of the print cartridge. Prepare the print cartridge 9
Warning! Retain the packaging material. Installing the print cartridge 1 Hold the print cartridge by the handle and gently shake it to distribute the toner. 3 Remove the packaging material from the cartridge. Do not touch the photoconductor drum on the bottom of the print cartridge. Prepare the print cartridge 9

User's Reference (3.4 MB)
Page 71
... of the printer. WARNING: Do not touch the transfer roller or the plastic sensors. Red plastic piece Foam Packaging WARNING: Do not touch the photoconductor drum on page 73. Plastic sensor Transfer roller Plastic sensor Installing the new print cartridge 1 Remove the new cartridge from the packaging. Cleaning the printer Using...
... of the printer. WARNING: Do not touch the transfer roller or the plastic sensors. Red plastic piece Foam Packaging WARNING: Do not touch the photoconductor drum on page 73. Plastic sensor Transfer roller Plastic sensor Installing the new print cartridge 1 Remove the new cartridge from the packaging. Cleaning the printer Using...

Service Manual
Page 76
Inspect the transfer roll for signs of proper function. The bearing assemblies should rotate evenly and smoothly. Replace both the transfer roll bearing assemblies if the springs or bearings indicate damage or lack of wear or damage and replace as necessary. 2-40 Service Manual 4048-00x Transfer Roll Service Check FRU Transfer Assembly Roll Transfer Bearing Action Check the springs in the left and right transfer roll bearings. The roll should support the transfer roll, applying even pressure to the PC drum.
Inspect the transfer roll for signs of proper function. The bearing assemblies should rotate evenly and smoothly. Replace both the transfer roll bearing assemblies if the springs or bearings indicate damage or lack of wear or damage and replace as necessary. 2-40 Service Manual 4048-00x Transfer Roll Service Check FRU Transfer Assembly Roll Transfer Bearing Action Check the springs in the left and right transfer roll bearings. The roll should support the transfer roll, applying even pressure to the PC drum.

Service Manual
Page 88
...FRU) Fuser Backup Roll Springs (not a FRU) Fuser Assembly Paper Action Remove the toner cartridge and gently shake the assembly to the PC drum. Check springs at both ends of the backup roller springs and backup roller to the fuser hot roll. Make sure recommended paper is being ... Across Page FRU Toner Cartridge Transfer (Roll)/Bearings Transfer Assembly Roll Action The charge roll may have an unbalanced pressure against the PC drum. Inspect the transfer roller for equal forces at each end of the charge roll. The bearing assemblies should support the transfer roller, ...
...FRU) Fuser Backup Roll Springs (not a FRU) Fuser Assembly Paper Action Remove the toner cartridge and gently shake the assembly to the PC drum. Check springs at both ends of the backup roller springs and backup roller to the fuser hot roll. Make sure recommended paper is being ... Across Page FRU Toner Cartridge Transfer (Roll)/Bearings Transfer Assembly Roll Action The charge roll may have an unbalanced pressure against the PC drum. Inspect the transfer roller for equal forces at each end of the charge roll. The bearing assemblies should support the transfer roller, ...


