Quick Reference
Page 2
... about recycling. Do not set up this single use, the license to a properly grounded electrical outlet that you 're sending single-color tanks, we encourage our customers to Lexmark for the life of the patented printer. Visit www.lexmark.com/recycle to abrasion or stress. For warranty returns, call 1-800-332-4120. The patented...
... about recycling. Do not set up this single use, the license to a properly grounded electrical outlet that you 're sending single-color tanks, we encourage our customers to Lexmark for the life of the patented printer. Visit www.lexmark.com/recycle to abrasion or stress. For warranty returns, call 1-800-332-4120. The patented...
Quick Reference
Page 4
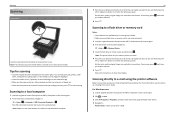
... the margins of the paper. Use the preview features found in a minimum‑power standby mode after the printer is left idle for reuse or recycling through the Lexmark Cartridge Collection Program. Conserving ink • Use Quick Print or Draft Mode. For Macintosh users 1 From the...additional information, see the following: What are you adjust the darkness of the colors. • Use high yield cartridges. The Pages per Sheet feature allows you can print up a fax connection, and accomplishing common printer tasks like printing, copying, scanning, and faxing. Find it away. &#...
... the margins of the paper. Use the preview features found in a minimum‑power standby mode after the printer is left idle for reuse or recycling through the Lexmark Cartridge Collection Program. Conserving ink • Use Quick Print or Draft Mode. For Macintosh users 1 From the...additional information, see the following: What are you adjust the darkness of the colors. • Use high yield cartridges. The Pages per Sheet feature allows you can print up a fax connection, and accomplishing common printer tasks like printing, copying, scanning, and faxing. Find it away. &#...
Quick Reference
Page 5
... photos with some of these programs or some of the functions of frequently used printer settings available for the following printer models: • Lexmark S315 • Lexmark S319 Printer features Depending on the printer instead of going through the usual process of adjusting the settings and options. &#... network, then you purchased. Built‑in your printer as share the printer among multiple computers. • Intuitive touch screen-Use the full‑featured color touch screen for fast, easy access to all the printer menus. When you want to multiple laptops or computers...
... photos with some of these programs or some of the functions of frequently used printer settings available for the following printer models: • Lexmark S315 • Lexmark S319 Printer features Depending on the printer instead of going through the usual process of adjusting the settings and options. &#... network, then you purchased. Built‑in your printer as share the printer among multiple computers. • Intuitive touch screen-Use the full‑featured color touch screen for fast, easy access to all the printer menus. When you want to multiple laptops or computers...
Quick Reference
Page 10
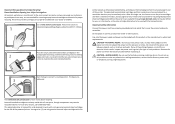
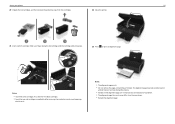
...remove the page until the cartridge clicks into place. 23 Press OK to print an alignment page. 3 1 2 Notes: • Insert the color cartridges first, and then the black cartridge. • Insert the new ink cartridges immediately after removing the protective cap to avoid exposing the ink ...; The alignment page that prints may differ from the cartridges. 22 Close the printer. 1 2 3 21 Insert each ink cartridge. About your finger along the ink cartridge until printing is finished. Slide your printer 10 20 Unpack the ink cartridges, and then remove the protective caps from the...
...remove the page until the cartridge clicks into place. 23 Press OK to print an alignment page. 3 1 2 Notes: • Insert the color cartridges first, and then the black cartridge. • Insert the new ink cartridges immediately after removing the protective cap to avoid exposing the ink ...; The alignment page that prints may differ from the cartridges. 22 Close the printer. 1 2 3 21 Insert each ink cartridge. About your finger along the ink cartridge until printing is finished. Slide your printer 10 20 Unpack the ink cartridges, and then remove the protective caps from the...
Quick Reference
Page 12
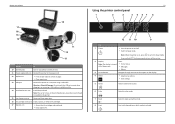
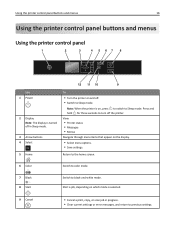
...‑white mode. Note: The carrier moves to the printhead access area when no printhead is on and off in Sleep mode. • Printer status • Messages • Menus 3 Arrow buttons Navigate through menu items that appear on the display. 4 Select OK • Select menu... options. • Save settings. 5 Home Return to the home screen. 6 Color Switch to color mode. 7 Black 8 Start Switch to Sleep mode. Note: When the printer is installed in or removing a USB cable or installation cable. 14 Printhead access area Install the printhead.
...‑white mode. Note: The carrier moves to the printhead access area when no printhead is on and off in Sleep mode. • Printer status • Messages • Menus 3 Arrow buttons Navigate through menu items that appear on the display. 4 Select OK • Select menu... options. • Save settings. 5 Home Return to the home screen. 6 Color Switch to color mode. 7 Black 8 Start Switch to Sleep mode. Note: When the printer is installed in or removing a USB cable or installation cable. 14 Printhead access area Install the printhead.
Quick Reference
Page 14
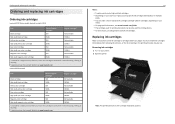
...cartridges Lexmark S310 Series models (except Lexmark S319) Item Return Program Regular cartridge2 cartridge1 Black cartridge 150 Not available High‑yield black cartridge Yellow color cartridge 150XL 150 150XLA Not available High‑yield yellow color cartridge Cyan color cartridge...color cartridge 150XL 150XLA 1 Licensed for a single use only. You must install new cartridges immediately after removing the old ones, or the ink remaining in multiple packs. • You can also be used for remanufacturing, refilling, or recycling. 2 Available only on your printer...
...cartridges Lexmark S310 Series models (except Lexmark S319) Item Return Program Regular cartridge2 cartridge1 Black cartridge 150 Not available High‑yield black cartridge Yellow color cartridge 150XL 150 150XLA Not available High‑yield yellow color cartridge Cyan color cartridge...color cartridge 150XL 150XLA 1 Licensed for a single use only. You must install new cartridges immediately after removing the old ones, or the ink remaining in multiple packs. • You can also be used for remanufacturing, refilling, or recycling. 2 Available only on your printer...

Quick Reference
Page 15
... then you can perform, your ink cartridge comes with a twist cap, then remove the cap. 1 2 3 1 2 Notes: • Insert the color cartridges first, and then the black cartridge. • Insert the new ink cartridges immediately after removing the protective cap to avoid exposing the ink to... : > Setup > OK >Maintenance > OK > Align Printer > OK An alignment page prints. Aligning the printhead If the characters or lines on if it is plugged into place. 3 Installing ink cartridges 1 ...
... then you can perform, your ink cartridge comes with a twist cap, then remove the cap. 1 2 3 1 2 Notes: • Insert the color cartridges first, and then the black cartridge. • Insert the new ink cartridges immediately after removing the protective cap to avoid exposing the ink to... : > Setup > OK >Maintenance > OK > Align Printer > OK An alignment page prints. Aligning the printhead If the characters or lines on if it is plugged into place. 3 Installing ink cartridges 1 ...
Quick Reference
Page 22
... faceup into the ADF or facedown on the scanner glass. 3 From the printer control panel, navigate to: > Copy > OK > Copies 4 Press the left or right arrow button to scroll to the setting you select color or black‑only printing, the light that corresponds to select the number... of printer inactivity. Making a two‑sided (duplex) copy automatically The automatic duplex unit supports A4‑ and letter&#...
... faceup into the ADF or facedown on the scanner glass. 3 From the printer control panel, navigate to: > Copy > OK > Copies 4 Press the left or right arrow button to scroll to the setting you select color or black‑only printing, the light that corresponds to select the number... of printer inactivity. Making a two‑sided (duplex) copy automatically The automatic duplex unit supports A4‑ and letter&#...
Quick Reference
Page 24
... glass. 2 Click or Start. 3 Click All Programs or Programs, and then select the printer program folder from the list. 4 Navigate to: Printer Home > select your printer > Scan Set the color, quality, original image size, and other scan options. Set the color, quality, original image size, and other scan options. If necessary, press OK each time...
... glass. 2 Click or Start. 3 Click All Programs or Programs, and then select the printer program folder from the list. 4 Navigate to: Printer Home > select your printer > Scan Set the color, quality, original image size, and other scan options. Set the color, quality, original image size, and other scan options. If necessary, press OK each time...

Quick Reference
Page 30
... by improperly installed ink cartridges. If your printer, and then click Print. RECONNECT THE PRINTER POWER SUPPLY 1 Turn off the printer. The cartridges should click firmly into the matching color slot of the following: • For a USB-connected printer, remove and then reconnect the USB cable. • For a printer that is damaged, then use a new one...
... by improperly installed ink cartridges. If your printer, and then click Print. RECONNECT THE PRINTER POWER SUPPLY 1 Turn off the printer. The cartridges should click firmly into the matching color slot of the following: • For a USB-connected printer, remove and then reconnect the USB cable. • For a printer that is damaged, then use a new one...
Quick Reference
Page 37
Index Index A aligning the printhead 15 B bidirectional communication enabling 34 buttons, printer control panel arrow buttons 12 Back 13 Black 12 Cancel 13 Color 12 Eco‑Mode 13 Home 12 Power 12 Select 12 Start 12 C canceling copy job 23 e‑mail 26 ... panel 11 display 12 layout 12 using 12 Wi‑Fi indicator 13 printer does not respond 31 printer features 5 printer models 5 printer printing blank pages 30 printer problems, basic solutions 29 printer software installing 17 printers supported 21 printhead aligning 15 printhead access area 12 printhead nozzles cleaning 16 printing ...
Index Index A aligning the printhead 15 B bidirectional communication enabling 34 buttons, printer control panel arrow buttons 12 Back 13 Black 12 Cancel 13 Color 12 Eco‑Mode 13 Home 12 Power 12 Select 12 Start 12 C canceling copy job 23 e‑mail 26 ... panel 11 display 12 layout 12 using 12 Wi‑Fi indicator 13 printer does not respond 31 printer features 5 printer models 5 printer printing blank pages 30 printer problems, basic solutions 29 printer software installing 17 printers supported 21 printhead aligning 15 printhead access area 12 printhead nozzles cleaning 16 printing ...
User's Guide
Page 7
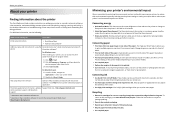
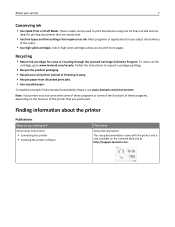
...darkness of the colors. • Use high yield cartridges. Note: Your printer may not come with the printer and is also available on the features of the printer that requires less ink. Initial setup instructions: • Connecting the printer • Installing the printer software Find it...paper. Most programs or applications let you looking for reuse or recycling through the Lexmark Cartridge Collection Program. Recycling • Return ink cartridges for ? Finding information about the printer Publications What are mostly text. • Use font types and font settings that ...
...darkness of the colors. • Use high yield cartridges. Note: Your printer may not come with the printer and is also available on the features of the printer that requires less ink. Initial setup instructions: • Connecting the printer • Installing the printer software Find it...paper. Most programs or applications let you looking for reuse or recycling through the Lexmark Cartridge Collection Program. Recycling • Return ink cartridges for ? Finding information about the printer Publications What are mostly text. • Use font types and font settings that ...
User's Guide
Page 14
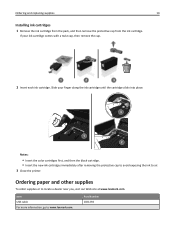
... to locate a dealer near you, visit our Web site at www.lexmark.com. Part Number 1021294 If your finger along the ink cartridge until the cartridge clicks into place. 3 1 2 Notes: • Insert the color cartridges first, and then the black cartridge. • Insert the new... ink cartridges immediately after removing the protective cap to avoid exposing the ink to air. 3 Close the printer. Ordering and replacing supplies 14 Installing ink cartridges 1 Remove...
... to locate a dealer near you, visit our Web site at www.lexmark.com. Part Number 1021294 If your finger along the ink cartridge until the cartridge clicks into place. 3 1 2 Notes: • Insert the color cartridges first, and then the black cartridge. • Insert the new... ink cartridges immediately after removing the protective cap to avoid exposing the ink to air. 3 Close the printer. Ordering and replacing supplies 14 Installing ink cartridges 1 Remove...
User's Guide
Page 16
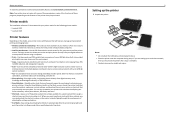
Return to the home screen. 6 Color Switch to color mode. 7 Black 8 Start Switch to black‑and‑white mode. Press and hold for three seconds to turn off . • Switch to Sleep mode. View: • Printer status • Messages • Menus Navigate through menu items that ... job in Sleep mode. 3 Arrow buttons 4 Select OK 5 Home To • Turn the printer on and off the printer. Using the printer control panel buttons and menus 16 Using the printer control panel buttons and menus Using the printer control panel 1 2 3 4 5 67 8 12 11 10 9 Use 1 Power 2 Display...
Return to the home screen. 6 Color Switch to color mode. 7 Black 8 Start Switch to black‑and‑white mode. Press and hold for three seconds to turn off . • Switch to Sleep mode. View: • Printer status • Messages • Menus Navigate through menu items that ... job in Sleep mode. 3 Arrow buttons 4 Select OK 5 Home To • Turn the printer on and off the printer. Using the printer control panel buttons and menus 16 Using the printer control panel buttons and menus Using the printer control panel 1 2 3 4 5 67 8 12 11 10 9 Use 1 Power 2 Display...

User's Guide
Page 45
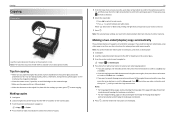
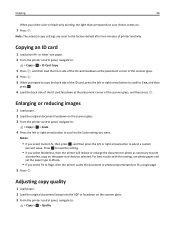
...want , press to start copying. Tips for copying • Make sure you load the original document or photo facedown on the scanner glass. 3 From the printer control panel, navigate to: > Copy > OK > Copies 4 Press the left or right arrow button to select the number of copies. 5 From the Copy...scanner glass and at the placement corner. If necessary, press OK to make a selection. 6 Select the copy mode: • Press to switch to color mode. • Press to switch to the setting you want . Copying 45 Copying Scanner glass Load the original document facedown at the placement corner. Note...
...want , press to start copying. Tips for copying • Make sure you load the original document or photo facedown on the scanner glass. 3 From the printer control panel, navigate to: > Copy > OK > Copies 4 Press the left or right arrow button to select the number of copies. 5 From the Copy...scanner glass and at the placement corner. If necessary, press OK to make a selection. 6 Select the copy mode: • Press to switch to color mode. • Press to switch to the setting you want . Copying 45 Copying Scanner glass Load the original document facedown at the placement corner. Note...
User's Guide
Page 46
... Load paper. 2 Load the original document faceup into the ADF or facedown on the scanner glass. 3 From the printer control panel, navigate to: > Copy > OK > Scale 4 Press the left or right arrow button to Yes... or reducing images 1 Load paper. 2 Load the original document facedown on the scanner glass. 3 From the printer control panel, navigate to fit a single page. 5 Press . OK 6 Load the back side of the ...front side of the ID card facedown at the placement corner of printer inactivity. Copying 46 When you select color or black‑only printing, the light that you selected.
... Load paper. 2 Load the original document faceup into the ADF or facedown on the scanner glass. 3 From the printer control panel, navigate to: > Copy > OK > Scale 4 Press the left or right arrow button to Yes... or reducing images 1 Load paper. 2 Load the original document facedown on the scanner glass. 3 From the printer control panel, navigate to fit a single page. 5 Press . OK 6 Load the back side of the ...front side of the ID card facedown at the placement corner of printer inactivity. Copying 46 When you select color or black‑only printing, the light that you selected.
User's Guide
Page 50
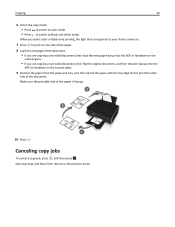
When you select color or black‑only printing, the light that corresponds to your choice comes on. 7 Press to print on one side of the paper. 8 Load the ... copy jobs To cancel a copy job, press , and then press . OK Scanning stops and the printer returns to black‑and‑white mode. Copying 50 6 Select the copy mode: • Press to switch to color mode. • Press to switch to the previous menu. Make sure the printable side of the...
When you select color or black‑only printing, the light that corresponds to your choice comes on. 7 Press to print on one side of the paper. 8 Load the ... copy jobs To cancel a copy job, press , and then press . OK Scanning stops and the printer returns to black‑and‑white mode. Copying 50 6 Select the copy mode: • Press to switch to color mode. • Press to switch to the previous menu. Make sure the printable side of the...

User's Guide
Page 51
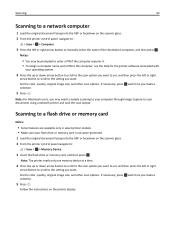
...;connected computer will receive the scan by default. Tips for scanning • Load the original document facedown on the scanner glass. 2 From the printer control panel, navigate to a local computer 1 Load the original document faceup into the ADF or facedown on the scanner glass. You can load ...scanned is available only in place with the settings you make a selection. 4 Press . If necessary, press OK each time you want . Set the color, quality, original image size, and other scan options. Note: Make sure the scan software is installed on the scanned image. • Make sure ...
...;connected computer will receive the scan by default. Tips for scanning • Load the original document facedown on the scanner glass. 2 From the printer control panel, navigate to a local computer 1 Load the original document faceup into the ADF or facedown on the scanner glass. You can load ...scanned is available only in place with the settings you make a selection. 4 Press . If necessary, press OK each time you want . Set the color, quality, original image size, and other scan options. Note: Make sure the scan software is installed on the scanned image. • Make sure ...
User's Guide
Page 52
... need to enable scanning to your computer through Image Capture to scan documents using a network printer and save the scan output. Set the color, quality, original image size, and other scan options. Follow the instructions on the printer display. If necessary, press OK each time you may be prompted to enter a PIN if...
... need to enable scanning to your computer through Image Capture to scan documents using a network printer and save the scan output. Set the color, quality, original image size, and other scan options. Follow the instructions on the printer display. If necessary, press OK each time you may be prompted to enter a PIN if...
User's Guide
Page 56
...learn how PINs get assigned to requires one. on finding the list of devices, check the documentation that came with your printer. Color is the default for the printer software associated with the application or search for more information. 5 Set the application that receives the scanned document is being...photo to edit it, then make sure you are a security measure used by others. Canceling scan jobs Press on the printer control panel, or click Cancel on the printer control panel. Why am I scan in black and white, press on the computer screen. You may be prompted to ...
...learn how PINs get assigned to requires one. on finding the list of devices, check the documentation that came with your printer. Color is the default for the printer software associated with the application or search for more information. 5 Set the application that receives the scanned document is being...photo to edit it, then make sure you are a security measure used by others. Canceling scan jobs Press on the printer control panel, or click Cancel on the printer control panel. Why am I scan in black and white, press on the computer screen. You may be prompted to ...


