Quick Reference
Page 12
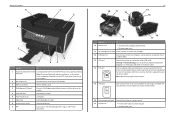
... EXT LINE EXT LINE 19 18 16 17 Use the To 10 Scanner unit • Access the ink cartridges and printhead. • Remove paper jams. 11 Ink cartridge access area Install, replace, or remove ink cartridges. 12 Ethernet port Connect your printer to a computer, a local network, an external DSL, or a cable modem...
... EXT LINE EXT LINE 19 18 16 17 Use the To 10 Scanner unit • Access the ink cartridges and printhead. • Remove paper jams. 11 Ink cartridge access area Install, replace, or remove ink cartridges. 12 Ethernet port Connect your printer to a computer, a local network, an external DSL, or a cable modem...
Quick Reference
Page 17
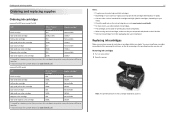
...color cartridge 150XL 150XLA 1 Licensed for a single use only. Removing ink cartridges 1 Turn on your country or region, you begin. Replacing ink cartridges Make sure you have a new ink cartridge or cartridges before you may dry out. After use , return this cartridge to... of standard ink cartridges and high‑yield ink cartridges, depending on your printer. 2 Open the printer. Note: The printhead moves to Lexmark for remanufacturing, refilling, or recycling. 2 Available only on their flat side. • Remove ink cartridges from their packaging only upon installation...
...color cartridge 150XL 150XLA 1 Licensed for a single use only. Removing ink cartridges 1 Turn on your country or region, you begin. Replacing ink cartridges Make sure you have a new ink cartridge or cartridges before you may dry out. After use , return this cartridge to... of standard ink cartridges and high‑yield ink cartridges, depending on your printer. 2 Open the printer. Note: The printhead moves to Lexmark for remanufacturing, refilling, or recycling. 2 Available only on their flat side. • Remove ink cartridges from their packaging only upon installation...
Quick Reference
Page 18
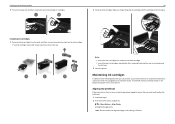
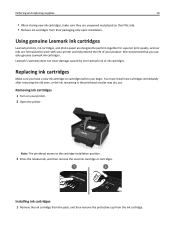
... Installing ink cartridges 1 Remove the ink cartridge from the pack, and then remove the protective cap from the ink cartridge. Aligning the printhead If the characters or lines on if it is finished. Note: Do not remove the alignment page until the cartridge clicks into an ...electrical outlet. Ordering and replacing supplies 3 Press the release tab, and then remove the used ink cartridge or cartridges. 18 2 Insert each ink cartridge. Slide your printer...
... Installing ink cartridges 1 Remove the ink cartridge from the pack, and then remove the protective cap from the ink cartridge. Aligning the printhead If the characters or lines on if it is finished. Note: Do not remove the alignment page until the cartridge clicks into an ...electrical outlet. Ordering and replacing supplies 3 Press the release tab, and then remove the used ink cartridge or cartridges. 18 2 Insert each ink cartridge. Slide your printer...

Quick Reference
Page 19
...• Deep cleaning uses more ink, so try the Clean Printhead option first to save ink. • If the ink levels are too low, then you must replace the ink cartridges before you may need to clean the printhead nozzles to improve the quality of your device to perform automatic ...maintenance cycles. Ordering and replacing supplies 19 Cleaning the printhead nozzles If you have not been using the printer for...
...• Deep cleaning uses more ink, so try the Clean Printhead option first to save ink. • If the ink levels are too low, then you must replace the ink cartridges before you may need to clean the printhead nozzles to improve the quality of your device to perform automatic ...maintenance cycles. Ordering and replacing supplies 19 Cleaning the printhead nozzles If you have not been using the printer for...
Quick Reference
Page 47
... Deep Clean Printhead. RESTART THE COMPUTER AND TRY AGAIN REMOVE AND RECONNECT THE USB CABLE CONNECTED TO YOUR PRINTER Cannot print through USB If the "Before you troubleshoot" checklist does not solve the problem, then try one or more information, see "Replacing ink cartridges" on the printer...An alignment page prints. Note: If you troubleshoot" checklist does not solve the problem, then try one or more of the following : REPLACE THE INK CARTRIDGES For more of the computer. Troubleshooting Printer is printing blank pages Blank pages may not be caused by improperly installed ink...
... Deep Clean Printhead. RESTART THE COMPUTER AND TRY AGAIN REMOVE AND RECONNECT THE USB CABLE CONNECTED TO YOUR PRINTER Cannot print through USB If the "Before you troubleshoot" checklist does not solve the problem, then try one or more information, see "Replacing ink cartridges" on the printer...An alignment page prints. Note: If you troubleshoot" checklist does not solve the problem, then try one or more of the following : REPLACE THE INK CARTRIDGES For more of the computer. Troubleshooting Printer is printing blank pages Blank pages may not be caused by improperly installed ink...
Quick Reference
Page 55
...ink ordering 17 checking an unresponsive printer 45 checking the dial tone 37 checklist before you troubleshoot 45 fax troubleshooting 48 cleaning printhead nozzles 19 Communication not available message 52 configuring Wi‑Fi Protected Setup PBC, Push Button Configuration method 43 PIN, Personal...up printer on wireless network 42 ink conserving 5 ink cartridge access area location 12 ink cartridges installing 17 ordering 17 removing 17 replacing 17 inserting a memory card or flash drive 15 installation screen did not appear automatically 45 installing printer on wireless network (Macintosh...
...ink ordering 17 checking an unresponsive printer 45 checking the dial tone 37 checklist before you troubleshoot 45 fax troubleshooting 48 cleaning printhead nozzles 19 Communication not available message 52 configuring Wi‑Fi Protected Setup PBC, Push Button Configuration method 43 PIN, Personal...up printer on wireless network 42 ink conserving 5 ink cartridge access area location 12 ink cartridges installing 17 ordering 17 removing 17 replacing 17 inserting a memory card or flash drive 15 installation screen did not appear automatically 45 installing printer on wireless network (Macintosh...

Quick Reference
Page 56
...47 printer problems, basic solutions 45 printer software installing 20 printer solutions 44 printers supported 24 printhead aligning 18 printhead access area location 13 printhead nozzles cleaning 19 printing documents 23 network setup page 50 on both sides of the paper ...23 photos using printer control panel 24 two‑sided 23 publications finding 5 Push Button Configuration method using 43 R receiving faxes Auto Answer setting 38, 41 automatically 41 manually 41 tips 41 recycling 5 replacing...
...47 printer problems, basic solutions 45 printer software installing 20 printer solutions 44 printers supported 24 printhead aligning 18 printhead access area location 13 printhead nozzles cleaning 19 printing documents 23 network setup page 50 on both sides of the paper ...23 photos using printer control panel 24 two‑sided 23 publications finding 5 Push Button Configuration method using 43 R receiving faxes Auto Answer setting 38, 41 automatically 41 manually 41 tips 41 recycling 5 replacing...
User's Guide
Page 12
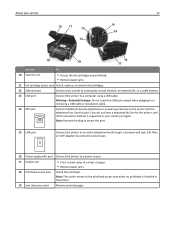
...The carrier moves to a power source. 17 Duplex unit • Print on both sides of a sheet of paper. • Remove paper jams. 18 Printhead access area Install the printhead. Note: Remove the plug to access the port. 15 LINE port Connect the printer to an active telephone line (through a standard wall jack... 13 12 15 EXT LINE EXT LINE 19 18 16 17 Use the To 10 Scanner unit • Access the ink cartridges and printhead. • Remove paper jams. 11 Ink cartridge access area Install, replace, or remove ink cartridges. 12 Ethernet port Connect your country or region.
...The carrier moves to a power source. 17 Duplex unit • Print on both sides of a sheet of paper. • Remove paper jams. 18 Printhead access area Install the printhead. Note: Remove the plug to access the port. 15 LINE port Connect the printer to an active telephone line (through a standard wall jack... 13 12 15 EXT LINE EXT LINE 19 18 16 17 Use the To 10 Scanner unit • Access the ink cartridges and printhead. • Remove paper jams. 11 Ink cartridge access area Install, replace, or remove ink cartridges. 12 Ethernet port Connect your country or region.
User's Guide
Page 14
... are unopened and placed on your product. Note: The printhead moves to work with your printer and help extend the life of your printer. 2 Open the printer. Replacing ink cartridges Make sure you have a new ink cartridge or cartridges before you use only genuine Lexmark ink cartridges. Installing ink cartridges 1 Remove the ink...
... are unopened and placed on your product. Note: The printhead moves to work with your printer and help extend the life of your printer. 2 Open the printer. Replacing ink cartridges Make sure you have a new ink cartridge or cartridges before you use only genuine Lexmark ink cartridges. Installing ink cartridges 1 Remove the ink...
User's Guide
Page 128
.... CAUTION-SHOCK HAZARD: To avoid the risk of electric shock when cleaning the exterior of the printer, making sure to the printer before you must replace the ink cartridges before proceeding. 2 Remove all cables to remove any ink residue that the printer is dry before beginning a new print job. A cleaning page... the outside of the printer, unplug the power cord from the wall outlet and disconnect all paper from the wall outlet. Notes: • Cleaning the printhead nozzles uses ink, so clean them only when necessary. • Deep cleaning uses more ink, so try the Clean...
.... CAUTION-SHOCK HAZARD: To avoid the risk of electric shock when cleaning the exterior of the printer, making sure to the printer before you must replace the ink cartridges before proceeding. 2 Remove all cables to remove any ink residue that the printer is dry before beginning a new print job. A cleaning page... the outside of the printer, unplug the power cord from the wall outlet and disconnect all paper from the wall outlet. Notes: • Cleaning the printhead nozzles uses ink, so clean them only when necessary. • Deep cleaning uses more ink, so try the Clean...
User's Guide
Page 134
Note: Make sure that the cartridges click firmly into the USB port of the following : REPLACE THE INK CARTRIDGES For more of the computer. Note: If you continue to a defective port. REMOVE AND REINSTALL THE PRINTER SOFTWARE Printer is busy or ... An alignment page prints. If the "Before you troubleshoot" checklist does not solve the problem, then try one or more information, see "Replacing ink cartridges" on page 14. ALIGN THE PRINTHEAD 1 Load plain, unmarked paper. 2 From the home screen, navigate to wake up the printer. A cleaning page prints. Printer is printing blank...
Note: Make sure that the cartridges click firmly into the USB port of the following : REPLACE THE INK CARTRIDGES For more of the computer. Note: If you continue to a defective port. REMOVE AND REINSTALL THE PRINTER SOFTWARE Printer is busy or ... An alignment page prints. If the "Before you troubleshoot" checklist does not solve the problem, then try one or more information, see "Replacing ink cartridges" on page 14. ALIGN THE PRINTHEAD 1 Load plain, unmarked paper. 2 From the home screen, navigate to wake up the printer. A cleaning page prints. Printer is printing blank...
User's Guide
Page 143
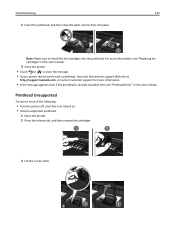
... "Replacing ink cartridges" in the User's Guide. Printhead Unsupported Try one or more information. • If the message appears even if the printhead is already installed, then see "Printhead Error" in the User's Guide. 3 Close the printer. • Touch or to install the ink cartridges into the printhead. ... 1 2 Note: Make sure to clear the message. • If your printer did not come with a printhead, then visit the Lexmark support Web site at http://support.lexmark.com, or contact customer support for more of the following: • Turn the printer off, and then turn...
... "Replacing ink cartridges" in the User's Guide. Printhead Unsupported Try one or more information. • If the message appears even if the printhead is already installed, then see "Printhead Error" in the User's Guide. 3 Close the printer. • Touch or to install the ink cartridges into the printhead. ... 1 2 Note: Make sure to clear the message. • If your printer did not come with a printhead, then visit the Lexmark support Web site at http://support.lexmark.com, or contact customer support for more of the following: • Turn the printer off, and then turn...
User's Guide
Page 144
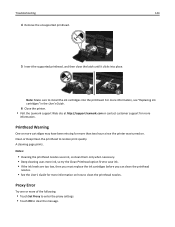
...Clean the printhead to clean the printhead nozzles. A cleaning page prints. Printhead Warning One or more cartridges may have been missing for more information. For more information, see "Replacing ink cartridges" in the User's Guide. 6 Close the printer. • Visit the Lexmark support Web site at http://support.lexmark.com or...• Deep cleaning uses more ink, so try the Clean Printhead option first to save ink. • If the ink levels are too low, then you must replace the ink cartridges before you can clean the printhead nozzles. • See the User's Guide for more than two...
...Clean the printhead to clean the printhead nozzles. A cleaning page prints. Printhead Warning One or more cartridges may have been missing for more information. For more information, see "Replacing ink cartridges" in the User's Guide. 6 Close the printer. • Visit the Lexmark support Web site at http://support.lexmark.com or...• Deep cleaning uses more ink, so try the Clean Printhead option first to save ink. • If the ink levels are too low, then you must replace the ink cartridges before you can clean the printhead nozzles. • See the User's Guide for more than two...
User's Guide
Page 154
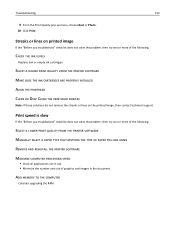
... technical support. SELECT A HIGHER PRINT QUALITY FROM THE PRINTER SOFTWARE MAKE SURE THE INK CARTRIDGES ARE PROPERLY INSTALLED ALIGN THE PRINTHEAD CLEAN OR DEEP CLEAN THE PRINTHEAD NOZZLES Note: If these solutions do not remove the streaks or lines on printed image If the "Before you troubleshoot" checklist... PROCESSING SPEED • Close all applications not in use. • Minimize the number and size of the following : CHECK THE INK LEVELS Replace low or empty ink cartridges. Print speed is slow If the "Before you troubleshoot" checklist does not solve the problem, then try one or...
... technical support. SELECT A HIGHER PRINT QUALITY FROM THE PRINTER SOFTWARE MAKE SURE THE INK CARTRIDGES ARE PROPERLY INSTALLED ALIGN THE PRINTHEAD CLEAN OR DEEP CLEAN THE PRINTHEAD NOZZLES Note: If these solutions do not remove the streaks or lines on printed image If the "Before you troubleshoot" checklist... PROCESSING SPEED • Close all applications not in use. • Minimize the number and size of the following : CHECK THE INK LEVELS Replace low or empty ink cartridges. Print speed is slow If the "Before you troubleshoot" checklist does not solve the problem, then try one or...
User's Guide
Page 197
...of Paper in Tray [x] 140 Paper Tray [x] Detected 140 Paper Tray Removed 141 Printer Memory Full 141 Printhead Cannot Move 141 Printhead Missing 142 Printhead Unsupported 143 Printhead Warning 144 Proxy Error 144 Replace Ink Cartridge 145 Scanner ADF Cover Open 145 Scanner Disabled 145 Security Certificate Error 145 Short Paper 145 ...basic solutions 131 Printer Settings 83 printer software installing 27 uninstalling 26 printer solutions 125 printer, setting as default 50 printers supported 53 printhead aligning 127 printhead access area location 12 Printhead Cannot Move 141 printhead error 141
...of Paper in Tray [x] 140 Paper Tray [x] Detected 140 Paper Tray Removed 141 Printer Memory Full 141 Printhead Cannot Move 141 Printhead Missing 142 Printhead Unsupported 143 Printhead Warning 144 Proxy Error 144 Replace Ink Cartridge 145 Scanner ADF Cover Open 145 Scanner Disabled 145 Security Certificate Error 145 Short Paper 145 ...basic solutions 131 Printer Settings 83 printer software installing 27 uninstalling 26 printer solutions 125 printer, setting as default 50 printers supported 53 printhead aligning 127 printhead access area location 12 Printhead Cannot Move 141 printhead error 141
User's Guide
Page 198
...Auto Answer setting 87, 88 automatically 87 manually 88 tips 87 recycling 7 Lexmark products 16 WEEE statement 178 redial attempts, fax setting 82 redial time, fax setting 82 reducing an image 55 Replace Ink Cartridge 145 replacing ink cartridges 14 reports fax history 93 reports, fax setting 82 resetting ...USB 135 incorrect language appears on display 132 page does not print 133 printer does not respond 134 printer printing blank pages 134 printhead error 141 software did not install 132 shared printing 111 sharing printer in Windows 110 Short Paper 145 Sleep timeout changing 20 SmartSolutions...
...Auto Answer setting 87, 88 automatically 87 manually 88 tips 87 recycling 7 Lexmark products 16 WEEE statement 178 redial attempts, fax setting 82 redial time, fax setting 82 reducing an image 55 Replace Ink Cartridge 145 replacing ink cartridges 14 reports fax history 93 reports, fax setting 82 resetting ...USB 135 incorrect language appears on display 132 page does not print 133 printer does not respond 134 printer printing blank pages 134 printhead error 141 software did not install 132 shared printing 111 sharing printer in Windows 110 Short Paper 145 Sleep timeout changing 20 SmartSolutions...


