Quick Reference
Page 3
... 30 Step 2: Check the dial tone 37 Step 3: Set your fax name and fax number 38 Step 4: Set the printer to receive faxes automatically or manually 38 Step 5: Set the number of rings 38 Step 6: Create a contact list 38 Faxing 40 Sending faxes...40 Receiving faxes...41 Wireless networking 42 Information...
... 30 Step 2: Check the dial tone 37 Step 3: Set your fax name and fax number 38 Step 4: Set the printer to receive faxes automatically or manually 38 Step 5: Set the number of rings 38 Step 6: Create a contact list 38 Faxing 40 Sending faxes...40 Receiving faxes...41 Wireless networking 42 Information...
Quick Reference
Page 4
Contents 4 What is Wi‑Fi Protected Setup 42 Configuring Wi‑Fi Protected Setup manually 43 Using SmartSolutions 44 What are SmartSolutions 44 Troubleshooting 45 Notices 54 Edition notice...54 Index 55
Contents 4 What is Wi‑Fi Protected Setup 42 Configuring Wi‑Fi Protected Setup manually 43 Using SmartSolutions 44 What are SmartSolutions 44 Troubleshooting 45 Notices 54 Edition notice...54 Index 55
Quick Reference
Page 5
...for presentation. For Macintosh users 1 From the Finder, navigate to: Applications > select your printer. To return an ink cartridge, go to www.lexmark.com/recycle, and then follow the instructions to request a postage‑paid bag. • Recycle the product packaging. • Recycle your old ...wireless network, setting up to 16 page images on one side of a sheet of paper. • Print on both sides of the paper manually or automatically (depending on your printer model). • Preview print jobs before printing. For additional information, see the following: What are available...
...for presentation. For Macintosh users 1 From the Finder, navigate to: Applications > select your printer. To return an ink cartridge, go to www.lexmark.com/recycle, and then follow the instructions to request a postage‑paid bag. • Recycle the product packaging. • Recycle your old ...wireless network, setting up to 16 page images on one side of a sheet of paper. • Print on both sides of the paper manually or automatically (depending on your printer model). • Preview print jobs before printing. For additional information, see the following: What are available...
Quick Reference
Page 20
... all the necessary software was installed. b In the Start Search or Run box, type D:\setup.exe, where D is available only at http://support.lexmark.com. 2 Navigate to 500MB of various software programs and what they can help you set up to : SUPPORT & DOWNLOADS > select your printer ... Close all open software programs. 2 Insert the installation software CD. If the installation dialog does not appear after a minute, then launch the CD manually: a Click , or click Start and then click Run. If you did not install these additional programs during printer installation When you do. c ...
... all the necessary software was installed. b In the Start Search or Run box, type D:\setup.exe, where D is available only at http://support.lexmark.com. 2 Navigate to 500MB of various software programs and what they can help you set up to : SUPPORT & DOWNLOADS > select your printer ... Close all open software programs. 2 Insert the installation software CD. If the installation dialog does not appear after a minute, then launch the CD manually: a Click , or click Start and then click Run. If you did not install these additional programs during printer installation When you do. c ...

Quick Reference
Page 26
... a copy job, press . Touch Accept every time you are bound along the long edge of the page (left edge for making a two‑sided copy manually. Tips for multiple‑page documents. Note: The ADF is in place with the settings you purchased a printer without an ADF, then load original documents...
... a copy job, press . Touch Accept every time you are bound along the long edge of the page (left edge for making a two‑sided copy manually. Tips for multiple‑page documents. Note: The ADF is in place with the settings you purchased a printer without an ADF, then load original documents...
Quick Reference
Page 29
... the settings you want to create. 4 Touch an option to enter or select the recipients: • Enter E‑mail Address-Enter the e‑mail address manually. • Address Book-Touch Sort by Name or Sort by Group, and then select the contact. • History-Select the name or e-mail address from...
... the settings you want to create. 4 Touch an option to enter or select the recipients: • Enter E‑mail Address-Enter the e‑mail address manually. • Address Book-Touch Sort by Name or Sort by Group, and then select the contact. • History-Select the name or e-mail address from...

Quick Reference
Page 30
... any number of rings that is available only in select printer models. Do not set the printer to receive faxes automatically (Auto Answer On) or manually (Auto Answer Off). • If you want .
... any number of rings that is available only in select printer models. Do not set the printer to receive faxes automatically (Auto Answer On) or manually (Auto Answer Off). • If you want .
Quick Reference
Page 32
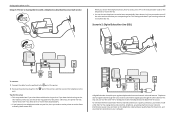
... subscribe to install a DSL filter for the printer, and slow Internet connection on your line, then you need to set the printer to receive faxes manually (Auto Answer Off). This setting works best if you are expecting a fax. Telephone and fax signals travel through the voice channel, and Internet signals... line with a telephone subscribed to voice mail service EXT LINE 32 When you answer the telephone and you hear fax tones, press *9* or the manual answer code on the telephone to receive the fax. • You can use the same line for the printer. Interference causes noise and static on...
... subscribe to install a DSL filter for the printer, and slow Internet connection on your line, then you need to set the printer to receive faxes manually (Auto Answer Off). This setting works best if you are expecting a fax. Telephone and fax signals travel through the voice channel, and Internet signals... line with a telephone subscribed to voice mail service EXT LINE 32 When you answer the telephone and you hear fax tones, press *9* or the manual answer code on the telephone to receive the fax. • You can use the same line for the printer. Interference causes noise and static on...

Quick Reference
Page 38
... the number of rings that you set Auto Answer to Off, then proceed to Step 6. Step 4: Set the printer to receive faxes automatically or manually If the printer is connected to a dedicated fax line, then you can choose any number of rings that you want . 1 From the printer ... faxes without this information in the header and footer of the printer. 2 Listen for fax groups. To set the printer to receive faxes automatically or manually: 1 From the printer control panel, navigate to Auto Answer: > Fax Setup > Ringing and Answering > Auto Answer 2 Select an Auto Answer setting, ...
... the number of rings that you set Auto Answer to Off, then proceed to Step 6. Step 4: Set the printer to receive faxes automatically or manually If the printer is connected to a dedicated fax line, then you can choose any number of rings that you want . 1 From the printer ... faxes without this information in the header and footer of the printer. 2 Listen for fax groups. To set the printer to receive faxes automatically or manually: 1 From the printer control panel, navigate to Auto Answer: > Fax Setup > Ringing and Answering > Auto Answer 2 Select an Auto Answer setting, ...
Quick Reference
Page 40
... File > Print. 2 From the Printer pop‑up to 30 recipients. • Touch More Options to import a contact. Tips: • You can enter fax numbers manually or by using the ADF, adjust the paper guide on the ADF to a working if you add a recipient. Faxing Faxing Note: The fax function is...
... File > Print. 2 From the Printer pop‑up to 30 recipients. • Touch More Options to import a contact. Tips: • You can enter fax numbers manually or by using the ADF, adjust the paper guide on the ADF to a working if you add a recipient. Faxing Faxing Note: The fax function is...

Quick Reference
Page 41
...Potential Damage: Do not touch the cables or the and receiving a fax. For example, if the answering machine picks up after six rings. Receiving faxes manually 1 Make sure that Auto Answer is off: a From the home screen, navigate to: > Fax Setup > Ringing and Answering > Auto Answer b If Auto.... This way, the answering machine picks up on the. The line is working telephone, DSL, or VoIP line. Note: The default code for answering faxes manually is *9*, but for increased security, you set the printer to : > Fax Setup > Ringing and Answering > Auto Answer > On > Accept 2 Set the ...
...Potential Damage: Do not touch the cables or the and receiving a fax. For example, if the answering machine picks up after six rings. Receiving faxes manually 1 Make sure that Auto Answer is off: a From the home screen, navigate to: > Fax Setup > Ringing and Answering > Auto Answer b If Auto.... This way, the answering machine picks up on the. The line is working telephone, DSL, or VoIP line. Note: The default code for answering faxes manually is *9*, but for increased security, you set the printer to : > Fax Setup > Ringing and Answering > Auto Answer > On > Accept 2 Set the ...

Quick Reference
Page 42
... a wireless network: • Personal Identification Number (PIN)-A PIN on the computer screen. If the installation dialog does not appear after a minute, then launch the CD manually: a Click , or click Start and then click Run. Wireless networking Wireless networking Information you will not have a security key. Note: If you cannot find the...
... a wireless network: • Personal Identification Number (PIN)-A PIN on the computer screen. If the installation dialog does not appear after a minute, then launch the CD manually: a Click , or click Start and then click Run. Wireless networking Wireless networking Information you will not have a security key. Note: If you cannot find the...

Quick Reference
Page 43
... the printer control panel, navigate to configure it using WPS, then push the WPS button on the printer display. Configuring Wi‑Fi Protected Setup manually Note: Make sure your access point. Wait for wireless connection and you want to : > Network Setup > Wireless Networking > Wi‑Fi Protected Setup > PIN Method...
... the printer control panel, navigate to configure it using WPS, then push the WPS button on the printer display. Configuring Wi‑Fi Protected Setup manually Note: Make sure your access point. Wait for wireless connection and you want to : > Network Setup > Wireless Networking > Wi‑Fi Protected Setup > PIN Method...

Quick Reference
Page 45
... did not appear during installation If the "Before you troubleshoot" checklist does not solve the problem, then try the following: LAUNCH THE PRINTER CD MANUALLY For Windows users 1 Click , or click Start and then click Run. 2 In the Start Search or Run box, type D:\setup.exe, .... Troubleshooting Troubleshooting Before you troubleshoot Use this setting. If Troubleshooting does not solve your problem Visit our Web site at http://support.lexmark.com to find the following : MAKE SURE THAT YOUR COMPUTER MEETS THE MINIMUM SYSTEM REQUIREMENTS TEMPORARILY DISABLE SECURITY PROGRAMS IN WINDOWS BEFORE ...
... did not appear during installation If the "Before you troubleshoot" checklist does not solve the problem, then try the following: LAUNCH THE PRINTER CD MANUALLY For Windows users 1 Click , or click Start and then click Run. 2 In the Start Search or Run box, type D:\setup.exe, .... Troubleshooting Troubleshooting Before you troubleshoot Use this setting. If Troubleshooting does not solve your problem Visit our Web site at http://support.lexmark.com to find the following : MAKE SURE THAT YOUR COMPUTER MEETS THE MINIMUM SYSTEM REQUIREMENTS TEMPORARILY DISABLE SECURITY PROGRAMS IN WINDOWS BEFORE ...
Quick Reference
Page 49
... to: > Fax Setup > Dialing and Sending > Dial Prefix 2 Check the prefix. Wireless network troubleshooting If you are set the printer to receive faxes manually (Auto Answer Off), then you can configure the fax settings in a private branch exchange, then this can be a specific number that you need a digital... Fax Forward > Off > Accept INCREASE THE RINGER VOLUME If you set the printer to receive faxes manually (Auto Answer Off), then increase the ringer volume. 49 MAKE SURE THAT YOU HAVE THE CORRECT MANUAL ANSWER CODE If you set : • Auto Answer is on. • The printer picks up ...
... to: > Fax Setup > Dialing and Sending > Dial Prefix 2 Check the prefix. Wireless network troubleshooting If you are set the printer to receive faxes manually (Auto Answer Off), then you can configure the fax settings in a private branch exchange, then this can be a specific number that you need a digital... Fax Forward > Off > Accept INCREASE THE RINGER VOLUME If you set the printer to receive faxes manually (Auto Answer Off), then increase the ringer volume. 49 MAKE SURE THAT YOU HAVE THE CORRECT MANUAL ANSWER CODE If you set : • Auto Answer is on. • The printer picks up ...
Quick Reference
Page 53
... IP addresses. Check the printer model in the Printer column to make sure you are not sure how to do this, then refer to the manual that came with Printer Port in the Port column. 7 If the Description column of the selected port indicates that it is configured to Enable bidirectional...
... IP addresses. Check the printer model in the Printer column to make sure you are not sure how to do this, then refer to the manual that came with Printer Port in the Port column. 7 If the Description column of the selected port indicates that it is configured to Enable bidirectional...
Quick Reference
Page 55
... receive faxes 49 cannot run fax software 49 cannot send faxes 48 fax troubleshooting checklist 48 faxing Auto Answer setting 38 receiving automatically 41 receiving manually 41 sending a broadcast fax immediately 40 sending using the printer control panel 40 setting sender information 38 tips, receiving 41 tips, sending 40 using the...
... receive faxes 49 cannot run fax software 49 cannot send faxes 48 fax troubleshooting checklist 48 faxing Auto Answer setting 38 receiving automatically 41 receiving manually 41 sending a broadcast fax immediately 40 sending using the printer control panel 40 setting sender information 38 tips, receiving 41 tips, sending 40 using the...

Quick Reference
Page 56
... printer control panel 24 two‑sided 23 publications finding 5 Push Button Configuration method using 43 R receiving faxes Auto Answer setting 38, 41 automatically 41 manually 41 tips 41 recycling 5 replacing ink cartridges 17 RJ‑11 adapter 35 S safety information 2, 30 scan job canceling 28 scanner unit location 12 scanning...
... printer control panel 24 two‑sided 23 publications finding 5 Push Button Configuration method using 43 R receiving faxes Auto Answer setting 38, 41 automatically 41 manually 41 tips 41 recycling 5 replacing ink cartridges 17 RJ‑11 adapter 35 S safety information 2, 30 scan job canceling 28 scanner unit location 12 scanning...

Quick Reference
Page 57
... on (Windows) 42 troubleshooting 49 wireless setup information needed for 42 wireless troubleshooting cannot print over wireless network 50 Wi‑Fi Protected Setup configuring manually 43 using 42 Wi‑Fi Protected Setup logo identifying 42
... on (Windows) 42 troubleshooting 49 wireless setup information needed for 42 wireless troubleshooting cannot print over wireless network 50 Wi‑Fi Protected Setup configuring manually 43 using 42 Wi‑Fi Protected Setup logo identifying 42
User's Guide
Page 7
...-Mode. This feature sets the screen brightness to low and sets the printer to change to print multiple pages on both sides of the paper manually or automatically (depending on your printer model). • Use recycled paper. • Reduce the margins of time (the Sleep timeout). • Share your printer. The...
...-Mode. This feature sets the screen brightness to low and sets the printer to change to print multiple pages on both sides of the paper manually or automatically (depending on your printer model). • Use recycled paper. • Reduce the margins of time (the Sleep timeout). • Share your printer. The...


