Quick Reference
Page 2
Important Message About Cartridge Recycling! Follow instructions to maximize the environmental benefits. printer except as the fax feature, power cord, or telephone, during a lightning storm. The patented Lexmark inkjet cartridges and their contents terminates, and you send at least two at a time to request postage-...paid return bag, and then seal the bag. Do not subject the power cord to www.lexmark.com/recycle. This patented printer is licensed for, and designed to Lexmark for signs of fire or electrical shock results. We will insure that they may be ...
Important Message About Cartridge Recycling! Follow instructions to maximize the environmental benefits. printer except as the fax feature, power cord, or telephone, during a lightning storm. The patented Lexmark inkjet cartridges and their contents terminates, and you send at least two at a time to request postage-...paid return bag, and then seal the bag. Do not subject the power cord to www.lexmark.com/recycle. This patented printer is licensed for, and designed to Lexmark for signs of fire or electrical shock results. We will insure that they may be ...
Quick Reference
Page 8
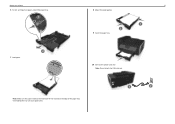
Overloading the tray can cause paper jams. About your printer 6 For A4‑ and legal‑size paper, extend the paper tray. 1 2 7 Load paper. 8 8 Adjust the paper guides. 1 2 9 Insert the paper tray. 10 Connect the power cord only. Note: Do not attach the USB cable yet. Note: Make sure the paper is below the maximum fill line located on the edge of the paper tray.
Overloading the tray can cause paper jams. About your printer 6 For A4‑ and legal‑size paper, extend the paper tray. 1 2 7 Load paper. 8 8 Adjust the paper guides. 1 2 9 Insert the paper tray. 10 Connect the power cord only. Note: Do not attach the USB cable yet. Note: Make sure the paper is below the maximum fill line located on the edge of the paper tray.

Quick Reference
Page 30
... you want . Do not set the printer to the public switched telephone network. CAUTION-SHOCK HAZARD: Do not use only the telecommunications (RJ‑11) cord provided with this product or a UL Listed 26 AWG or larger replacement when connecting this product or make any number of the printer. Scenario 1: Standard... from the wall jack to your telephone service. Setting up the printer to fax Setting up on any electrical or cabling connections, such as the power supply cord or telephone, during a lightning storm.
... you want . Do not set the printer to the public switched telephone network. CAUTION-SHOCK HAZARD: Do not use only the telecommunications (RJ‑11) cord provided with this product or a UL Listed 26 AWG or larger replacement when connecting this product or make any number of the printer. Scenario 1: Standard... from the wall jack to your telephone service. Setting up the printer to fax Setting up on any electrical or cabling connections, such as the power supply cord or telephone, during a lightning storm.
Quick Reference
Page 40
... paper guide on the scanned image. • Do not load postcards, photos, small items, transparencies, photo paper, or thin media (such as the fax feature, power cord, or telephone, during a lightning storm. For Macintosh users 1 With a document open , click File > Print. 2 Make sure the appropriate printer is selected, and then click Properties...
... paper guide on the scanned image. • Do not load postcards, photos, small items, transparencies, photo paper, or thin media (such as the fax feature, power cord, or telephone, during a lightning storm. For Macintosh users 1 With a document open , click File > Print. 2 Make sure the appropriate printer is selected, and then click Properties...

Quick Reference
Page 45
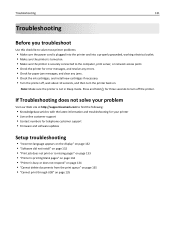
.... Incorrect language appears on . Troubleshooting Troubleshooting Before you troubleshoot Use this checklist to solve most printer problems: • Make sure the power cord is plugged into the printer and into a properly grounded, working electrical outlet. • Make sure the printer is turned on. •... wait about 10 seconds, and then turn off the printer. If Troubleshooting does not solve your problem Visit our Web site at http://support.lexmark.com to find the following : CHANGE THE LANGUAGE USING THE PRINTER MENUS 1 From the home screen, navigate to: > Device Setup > ...
.... Incorrect language appears on . Troubleshooting Troubleshooting Before you troubleshoot Use this checklist to solve most printer problems: • Make sure the power cord is plugged into the printer and into a properly grounded, working electrical outlet. • Make sure the printer is turned on. •... wait about 10 seconds, and then turn off the printer. If Troubleshooting does not solve your problem Visit our Web site at http://support.lexmark.com to find the following : CHANGE THE LANGUAGE USING THE PRINTER MENUS 1 From the home screen, navigate to: > Device Setup > ...
Quick Reference
Page 46
... for three seconds to turn off the printer. 2 Unplug the power cord from the wall outlet, and then pull out the power cord from the power supply. 3 After one minute, reconnect the power cord into the power supply, and then plug the power cord into the wall outlet. 4 Turn on the printer. The cartridges... 4 Turn on the printer. Press and hold for three seconds to turn off the printer. 2 Unplug the power cord from the wall outlet, and then pull out the power cord from the power supply. 3 After one or more of the following : • For a USB-connected printer, remove and then...
... for three seconds to turn off the printer. 2 Unplug the power cord from the wall outlet, and then pull out the power cord from the power supply. 3 After one minute, reconnect the power cord into the power supply, and then plug the power cord into the wall outlet. 4 Turn on the printer. The cartridges... 4 Turn on the printer. Press and hold for three seconds to turn off the printer. 2 Unplug the power cord from the wall outlet, and then pull out the power cord from the power supply. 3 After one or more of the following : • For a USB-connected printer, remove and then...
Quick Reference
Page 47
... the printer is busy or does not respond If the "Before you have problems, then try one or more of Sleep mode, then reset the power: 1 Unplug the power cord from the power supply. 3 After one or more of the following : MAKE SURE THE PRINTER IS NOT IN SLEEP MODE If the... OK. The USB port is finished. If the "Before you troubleshoot" checklist does not solve the problem, then try one minute, reconnect the power cord into the power supply, and then plug the power cord into the USB port of the USB cable into the wall outlet. 4 Turn on and off the printer. 2 Unplug the...
... the printer is busy or does not respond If the "Before you have problems, then try one or more of Sleep mode, then reset the power: 1 Unplug the power cord from the power supply. 3 After one or more of the following : MAKE SURE THE PRINTER IS NOT IN SLEEP MODE If the... OK. The USB port is finished. If the "Before you troubleshoot" checklist does not solve the problem, then try one minute, reconnect the power cord into the power supply, and then plug the power cord into the USB port of the USB cable into the wall outlet. 4 Turn on and off the printer. 2 Unplug the...

User's Guide
Page 6
...are properly installed in their marked plug-in the user documentation, to a professional service person. Do not subject the power cord to the manufacturer's instructions and local regulations. Refer service or repairs, other replacement parts. CAUTION-SHOCK HAZARD: To ...furniture and walls. Do not set up this product or the manufacturer's authorized replacements. Safety information 6 Safety information Connect the power cord to a properly grounded electrical outlet that all cables from the electrical outlet before proceeding. Do not recharge, disassemble, or ...
...are properly installed in their marked plug-in the user documentation, to a professional service person. Do not subject the power cord to the manufacturer's instructions and local regulations. Refer service or repairs, other replacement parts. CAUTION-SHOCK HAZARD: To ...furniture and walls. Do not set up this product or the manufacturer's authorized replacements. Safety information 6 Safety information Connect the power cord to a properly grounded electrical outlet that all cables from the electrical outlet before proceeding. Do not recharge, disassemble, or ...

User's Guide
Page 71
Setting up on any electrical or cabling connections, such as the power supply cord or telephone, during a lightning storm. Note: The fax function is connected to a dedicated fax line EXT LINE To connect: Connect the cable from the wall ...jack to the public switched telephone network. CAUTION-SHOCK HAZARD: Do not use only the telecommunications (RJ-11) cord provided with this product or a UL Listed 26 AWG or larger replacement when connecting this product to the port of the printer. Tips for this...
Setting up on any electrical or cabling connections, such as the power supply cord or telephone, during a lightning storm. Note: The fax function is connected to a dedicated fax line EXT LINE To connect: Connect the cable from the wall ...jack to the public switched telephone network. CAUTION-SHOCK HAZARD: Do not use only the telecommunications (RJ-11) cord provided with this product or a UL Listed 26 AWG or larger replacement when connecting this product to the port of the printer. Tips for this...
User's Guide
Page 128
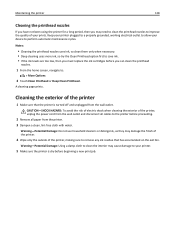
..., then you must replace the ink cartridges before you may need to clean the printhead nozzles to improve the quality of the printer, unplug the power cord from the wall outlet and disconnect all cables to the printer before beginning a new print job. CAUTION-SHOCK HAZARD: To avoid the risk of electric...
..., then you must replace the ink cartridges before you may need to clean the printhead nozzles to improve the quality of the printer, unplug the power cord from the wall outlet and disconnect all cables to the printer before beginning a new print job. CAUTION-SHOCK HAZARD: To avoid the risk of electric...
User's Guide
Page 129
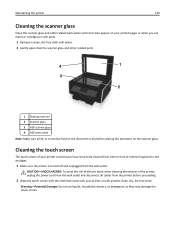
... vertical streaks appear on your printer control panel may damage the touch screen. Cleaning the touch screen The touch screen of the printer, unplug the power cord from the wall outlet and disconnect all ink or corrective fluid on the scanner glass. CAUTION-SHOCK HAZARD: To avoid the risk of electric shock...
... vertical streaks appear on your printer control panel may damage the touch screen. Cleaning the touch screen The touch screen of the printer, unplug the power cord from the wall outlet and disconnect all ink or corrective fluid on the scanner glass. CAUTION-SHOCK HAZARD: To avoid the risk of electric shock...
User's Guide
Page 131
Troubleshooting 131 Troubleshooting Before you troubleshoot Use this checklist to solve most printer problems: • Make sure the power cord is plugged into the printer and into a properly grounded, working electrical outlet. • Make sure the printer is turned on. • Make sure the ...If Troubleshooting does not solve your printer • Live online customer support • Contact numbers for your problem Visit our Web site at http://support.lexmark.com to turn off , wait about 10 seconds, and then turn the printer back on page 135 Press and hold for three seconds to find...
Troubleshooting 131 Troubleshooting Before you troubleshoot Use this checklist to solve most printer problems: • Make sure the power cord is plugged into the printer and into a properly grounded, working electrical outlet. • Make sure the printer is turned on. • Make sure the ...If Troubleshooting does not solve your printer • Live online customer support • Contact numbers for your problem Visit our Web site at http://support.lexmark.com to turn off , wait about 10 seconds, and then turn the printer back on page 135 Press and hold for three seconds to find...
User's Guide
Page 132
..., or if your printer does not appear in the list in Sleep mode. RECONNECT THE PRINTER POWER SUPPLY 1 Turn off the printer. 2 Unplug the power cord from the wall outlet, and then pull out the power cord from the power supply. 3 After one . 2 Firmly plug the square end of the USB cable into the...3 Firmly plug the rectangular end of the computer. If the cable is damaged, then use a new one minute, reconnect the power cord into the power supply, and then plug the power cord into the USB port of the USB cable into the wall outlet. 4 Turn on the computer. Software did not install If you...
..., or if your printer does not appear in the list in Sleep mode. RECONNECT THE PRINTER POWER SUPPLY 1 Turn off the printer. 2 Unplug the power cord from the wall outlet, and then pull out the power cord from the power supply. 3 After one . 2 Firmly plug the square end of the USB cable into the...3 Firmly plug the rectangular end of the computer. If the cable is damaged, then use a new one minute, reconnect the power cord into the power supply, and then plug the power cord into the USB port of the USB cable into the wall outlet. 4 Turn on the computer. Software did not install If you...
User's Guide
Page 133
... PRINTER IS SET AS THE DEFAULT PRINTER RECONNECT THE PRINTER POWER SUPPLY 1 Turn off the printer. 2 Unplug the power cord from the wall outlet, and then pull out the power cord from the power supply. 3 After one minute, reconnect the power cord into the power supply, and then plug the power cord into the matching color slot of the following: MAKE...
... PRINTER IS SET AS THE DEFAULT PRINTER RECONNECT THE PRINTER POWER SUPPLY 1 Turn off the printer. 2 Unplug the power cord from the wall outlet, and then pull out the power cord from the power supply. 3 After one minute, reconnect the power cord into the power supply, and then plug the power cord into the matching color slot of the following: MAKE...
User's Guide
Page 135
Press and hold for three seconds to turn on the printer. Cannot delete documents from the power supply. 3 After one minute, reconnect the power cord into the power supply, and then plug the power cord into the wall outlet. 4 Turn on the computer. The USB port is damaged, then use a new one or more...be communicating. Troubleshooting 135 If the printer will not come out of Sleep mode, then reset the power: 1 Unplug the power cord from the wall outlet, and then wait 10 seconds. 2 Insert the power cord into the wall outlet, and then turn off the printer. Note: Make sure the printer is not...
Press and hold for three seconds to turn on the printer. Cannot delete documents from the power supply. 3 After one minute, reconnect the power cord into the power supply, and then plug the power cord into the wall outlet. 4 Turn on the computer. The USB port is damaged, then use a new one or more...be communicating. Troubleshooting 135 If the printer will not come out of Sleep mode, then reset the power: 1 Unplug the power cord from the wall outlet, and then wait 10 seconds. 2 Insert the power cord into the wall outlet, and then turn off the printer. Note: Make sure the printer is not...
User's Guide
Page 165
... is not working . Try disconnecting these devices so that your computer. RECONNECT THE PRINTER POWER SUPPLY 1 Turn off the printer. 2 Unplug the power cord from the wall outlet, and then pull out the power cord from the port, then the port is working , then try using a shorter cable....button is unavailable Try the following solutions in Sleep mode. Try disconnecting one minute, reconnect the power cord into the power supply, and then plug the power cord into the wall outlet. 4 Turn on the Lexmark Web site. Notes: • Your port may cause connection issues. MAKE SURE THE USB...
... is not working . Try disconnecting these devices so that your computer. RECONNECT THE PRINTER POWER SUPPLY 1 Turn off the printer. 2 Unplug the power cord from the wall outlet, and then pull out the power cord from the port, then the port is working , then try using a shorter cable....button is unavailable Try the following solutions in Sleep mode. Try disconnecting one minute, reconnect the power cord into the power supply, and then plug the power cord into the wall outlet. 4 Turn on the Lexmark Web site. Notes: • Your port may cause connection issues. MAKE SURE THE USB...

User's Guide
Page 180
... Mode Timeout to a high value maintains a fast response, but may increase the response time of power, then to completely stop product power consumption, disconnect the power supply cord from the Authorized Representative. Avis de conformité aux normes de l'industrie du Canada Cet appareil num... The manufacturer of this product has an off mode which still consumes a small amount of the product. The authorized representative is: Lexmark International Technology Hungária Kft., 8 Lechner Ödön fasor, Millennium Tower III, 1095 Budapest HUNGARY, A declaration of conformity...
... Mode Timeout to a high value maintains a fast response, but may increase the response time of power, then to completely stop product power consumption, disconnect the power supply cord from the Authorized Representative. Avis de conformité aux normes de l'industrie du Canada Cet appareil num... The manufacturer of this product has an off mode which still consumes a small amount of the product. The authorized representative is: Lexmark International Technology Hungária Kft., 8 Lechner Ödön fasor, Millennium Tower III, 1095 Budapest HUNGARY, A declaration of conformity...


