User's Guide for Windows
Page 1
3100 Series All-In-One User's Guide • Learning about the All-In-One • Understanding the software • Working with digital photos • Printing, Scanning, Copying and Faxing • Maintenance • Troubleshooting www.lexmark.com
3100 Series All-In-One User's Guide • Learning about the All-In-One • Understanding the software • Working with digital photos • Printing, Scanning, Copying and Faxing • Maintenance • Troubleshooting www.lexmark.com
User's Guide for Windows
Page 3
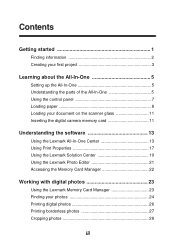
... software 13 Using the Lexmark All-In-One Center 13 Using Print Properties 17 Using the Lexmark Solution Center 19 Using the Lexmark Photo Editor 21 Accessing the Memory Card Manager 22 Working with digital photos 23 Using the Lexmark Memory Card Manager 23 Finding your photos 24 Printing digital photos 26 Printing borderless photos 27 Cropping photos 28 iii
... software 13 Using the Lexmark All-In-One Center 13 Using Print Properties 17 Using the Lexmark Solution Center 19 Using the Lexmark Photo Editor 21 Accessing the Memory Card Manager 22 Working with digital photos 23 Using the Lexmark Memory Card Manager 23 Finding your photos 24 Printing digital photos 26 Printing borderless photos 27 Cropping photos 28 iii
User's Guide for Windows
Page 4
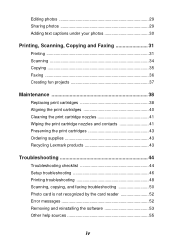
... Adding text captions under your photos 30 Printing, Scanning, Copying and Faxing 31 Printing 31 Scanning 34 Copying 35 Faxing 36 Creating fun projects 37 Maintenance 38 Replacing print cartridges 38 ... the print cartridge nozzles and contacts 41 Preserving the print cartridges 43 Ordering supplies 43 Recycling Lexmark products 43 Troubleshooting 44 Troubleshooting checklist 44 Setup troubleshooting 46 Printing troubleshooting 48 Scanning, copying, and faxing troubleshooting 50 Photo card is not recognized by the card reader 52 Error messages 52 Removing and reinstalling...
... Adding text captions under your photos 30 Printing, Scanning, Copying and Faxing 31 Printing 31 Scanning 34 Copying 35 Faxing 36 Creating fun projects 37 Maintenance 38 Replacing print cartridges 38 ... the print cartridge nozzles and contacts 41 Preserving the print cartridges 43 Ordering supplies 43 Recycling Lexmark products 43 Troubleshooting 44 Troubleshooting checklist 44 Setup troubleshooting 46 Printing troubleshooting 48 Scanning, copying, and faxing troubleshooting 50 Photo card is not recognized by the card reader 52 Error messages 52 Removing and reinstalling...
User's Guide for Windows
Page 6
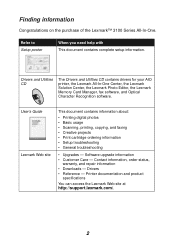
... CD The Drivers and Utilities CD contains drivers for your AIO printer, the Lexmark All-In-One Center, the Lexmark Solution Center, the Lexmark Photo Editor, the Lexmark Memory Card Manager, fax software, and Optical Character Recognition software. Printer documentation and... product specifications You can access the Lexmark Web site at http://support.lexmark.com/. 2 Drivers • Reference - User's Guide Lexmark Web site This document contains information about: • Printing digital photos • Basic usage • Scanning, printing, copying...
... CD The Drivers and Utilities CD contains drivers for your AIO printer, the Lexmark All-In-One Center, the Lexmark Solution Center, the Lexmark Photo Editor, the Lexmark Memory Card Manager, fax software, and Optical Character Recognition software. Printer documentation and... product specifications You can access the Lexmark Web site at http://support.lexmark.com/. 2 Drivers • Reference - User's Guide Lexmark Web site This document contains information about: • Printing digital photos • Basic usage • Scanning, printing, copying...

User's Guide for Windows
Page 7
or 3 Insert your digital camera memory card into the All-In-One (see page 11) or access your photos from your digital camera memory card after saving them to your first project You can print photos from a computer (see page 8. For additional help, see page 24) and then continue with step 6. 4 Select Automatically save all the images in a My Pictures folder with today's date on the computer screen. 3 Letter/A4 Cards or 2 Adjust the paper guide. Creating your computer. 1 Load paper.
or 3 Insert your digital camera memory card into the All-In-One (see page 11) or access your photos from your digital camera memory card after saving them to your first project You can print photos from a computer (see page 8. For additional help, see page 24) and then continue with step 6. 4 Select Automatically save all the images in a My Pictures folder with today's date on the computer screen. 3 Letter/A4 Cards or 2 Adjust the paper guide. Creating your computer. 1 Load paper.
User's Guide for Windows
Page 8
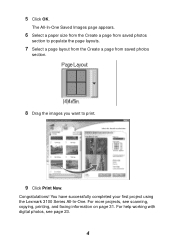
Congratulations! For more projects, see page 23. 4 You have successfully completed your first project using the Lexmark 3100 Series All-In-One. The All-In-One Saved Images page appears. 6 Select a paper size from the Create a page from saved photos section to populate the page layouts. 7 Select a page layout from the Create a page from saved photos section. 8 Drag the images you want to print. 9 Click Print Now. For help working with digital photos, see scanning, copying, printing, and faxing information on page 31. 5 Click OK.
Congratulations! For more projects, see page 23. 4 You have successfully completed your first project using the Lexmark 3100 Series All-In-One. The All-In-One Saved Images page appears. 6 Select a paper size from the Create a page from saved photos section to populate the page layouts. 7 Select a page layout from the Create a page from saved photos section. 8 Drag the images you want to print. 9 Click Print Now. For help working with digital photos, see scanning, copying, printing, and faxing information on page 31. 5 Click OK.
User's Guide for Windows
Page 10
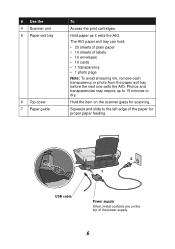
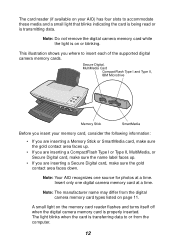
... supply Silver, metal contacts are on the top of labels • 10 envelopes • 10 cards • 1 transparency • 1 photo page Note: To avoid smearing ink, remove each transparency or photo from the paper exit tray before the next one exits the AIO. # Use the 4 Scanner unit 5 Paper exit tray 6 Top... cover 7 Paper guide To Access the print cartridges. Photos and transparencies may require up to 15 minutes to the left edge of the paper for scanning. Hold paper as it exits the AIO. Squeeze...
... supply Silver, metal contacts are on the top of labels • 10 envelopes • 10 cards • 1 transparency • 1 photo page Note: To avoid smearing ink, remove each transparency or photo from the paper exit tray before the next one exits the AIO. # Use the 4 Scanner unit 5 Paper exit tray 6 Top... cover 7 Paper guide To Access the print cartridges. Photos and transparencies may require up to 15 minutes to the left edge of the paper for scanning. Hold paper as it exits the AIO. Squeeze...
User's Guide for Windows
Page 11
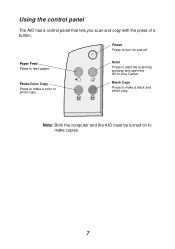
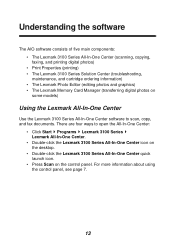
Using the control panel The AIO has a control panel that lets you scan and copy with the press of a button. Paper Feed Press to make a color or photo copy. Photo/Color Copy Press to feed paper. Note: Both the computer and the AIO must be turned on and off. Black Copy Press to make a black and white copy. Power Press to start the scanning process and open the All-In-One Center. Scan Press to turn on to make copies. 7
Using the control panel The AIO has a control panel that lets you scan and copy with the press of a button. Paper Feed Press to make a color or photo copy. Photo/Color Copy Press to feed paper. Note: Both the computer and the AIO must be turned on and off. Black Copy Press to make a black and white copy. Power Press to start the scanning process and open the All-In-One Center. Scan Press to turn on to make copies. 7
User's Guide for Windows
Page 13
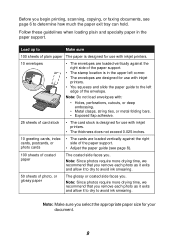
... are loaded vertically against the right side of the paper support. • The stamp location is designed for your document. 9 Note: Since photos require more drying time, we recommend that you remove each photo as it exits and allow it to dry to avoid ink smearing. 50 sheets of...; The cards are loaded vertically against the right cards, postcards, or side of the paper support. Note: Since photos require more drying time, we recommend that you remove each photo as it exits and allow it to dry to avoid ink smearing. Before you begin printing, scanning, copying, or...
... are loaded vertically against the right side of the paper support. • The stamp location is designed for your document. 9 Note: Since photos require more drying time, we recommend that you remove each photo as it exits and allow it to dry to avoid ink smearing. 50 sheets of...; The cards are loaded vertically against the right cards, postcards, or side of the paper support. Note: Since photos require more drying time, we recommend that you remove each photo as it exits and allow it to dry to avoid ink smearing. Before you begin printing, scanning, copying, or...
User's Guide for Windows
Page 16
Note: Do not remove the digital camera memory card while the light is properly inserted. Insert only one source for photos at a time. This illustration shows you where to or from the digital camera memory card types listed on or blinking. Note: The manufacturer name may ...
Note: Do not remove the digital camera memory card while the light is properly inserted. Insert only one source for photos at a time. This illustration shows you where to or from the digital camera memory card types listed on or blinking. Note: The manufacturer name may ...
User's Guide for Windows
Page 17
... Series Solution Center (troubleshooting, maintenance, and cartridge ordering information) • The Lexmark Photo Editor (editing photos and graphics) • The Lexmark Memory Card Manager (transferring digital photos on some models) Using the Lexmark All-In-One Center Use the Lexmark 3100 Series All-In-One Center software to open the All-In-One Center: • Click Start...
... Series Solution Center (troubleshooting, maintenance, and cartridge ordering information) • The Lexmark Photo Editor (editing photos and graphics) • The Lexmark Memory Card Manager (transferring digital photos on some models) Using the Lexmark All-In-One Center Use the Lexmark 3100 Series All-In-One Center software to open the All-In-One Center: • Click Start...

User's Guide for Windows
Page 19
... page to perform tasks with images that are saved on your computer. • Edit text found in a scanned document (OCR). • Modify an image with a photo editor. • Select a region of the preview image to scan. • View an image of creative ideas: • Enlarge or reduce an image. • Repeat...
... page to perform tasks with images that are saved on your computer. • Edit text found in a scanned document (OCR). • Modify an image with a photo editor. • Select a region of the preview image to scan. • View an image of creative ideas: • Enlarge or reduce an image. • Repeat...
User's Guide for Windows
Page 20
...Contact information • Advanced (Skin, voice, and communication options) • View the software version and copyright information For more information about the Lexmark Solution Center, see page 13). 2 Click the Maintain/Troubleshoot link at the top of the screen. Note: You can • Choose ...the quantity and whether to print in color. • Select a blank paper size. • Select a quality setting for your photos (see page 26). • Perform the same creative tasks available from these topics: • Maintain or fix quality problems • Troubleshoot All...
...Contact information • Advanced (Skin, voice, and communication options) • View the software version and copyright information For more information about the Lexmark Solution Center, see page 13). 2 Click the Maintain/Troubleshoot link at the top of the screen. Note: You can • Choose ...the quantity and whether to print in color. • Select a blank paper size. • Select a quality setting for your photos (see page 26). • Perform the same creative tasks available from these topics: • Maintain or fix quality problems • Troubleshoot All...
User's Guide for Windows
Page 21
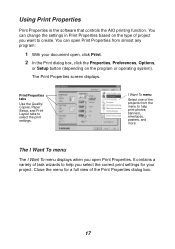
... any program: 1 With your project. Close the menu for your document open Print Properties. You can open Print Properties from the menu to help print photos, banners, envelopes, posters, and more. It contains a variety of task wizards to help you select the correct print settings for a full view of project you...
... any program: 1 With your project. Close the menu for your document open Print Properties. You can open Print Properties from the menu to help print photos, banners, envelopes, posters, and more. It contains a variety of task wizards to help you select the correct print settings for a full view of project you...
User's Guide for Windows
Page 23
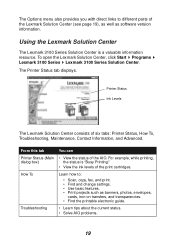
... View the ink levels of the print cartridges. Printer Status Ink Levels The Lexmark Solution Center consists of the AIO. To open the Lexmark Solution Center, click Start Programs Lexmark 3100 Series Lexmark 3100 Series Solution Center. From this tab You can Printer Status (Main &#...Contact Information, and Advanced. The Printer Status tab displays. How To Learn how to different parts of the Lexmark Solution Center (see page 19), as well as banners, photos, envelopes, cards, iron-on transfers, and transparencies. • Find the printable electronic guide. Troubleshooting &#...
... View the ink levels of the print cartridges. Printer Status Ink Levels The Lexmark Solution Center consists of the AIO. To open the Lexmark Solution Center, click Start Programs Lexmark 3100 Series Lexmark 3100 Series Solution Center. From this tab You can Printer Status (Main &#...Contact Information, and Advanced. The Printer Status tab displays. How To Learn how to different parts of the Lexmark Solution Center (see page 19), as well as banners, photos, envelopes, cards, iron-on transfers, and transparencies. • Find the printable electronic guide. Troubleshooting &#...
User's Guide for Windows
Page 25
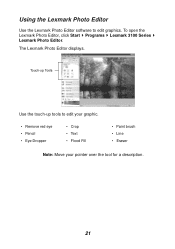
Touch-up Tools Use the touch-up tools to edit graphics. The Lexmark Photo Editor displays. Using the Lexmark Photo Editor Use the Lexmark Photo Editor software to edit your graphic. • Remove red eye • Pencil • Eye Dropper • Crop • Text • Flood Fill • Paint brush • Line • Eraser Note: Move your pointer over the tool for a description. 21 To open the Lexmark Photo Editor, click Start Programs Lexmark 3100 Series Lexmark Photo Editor.
Touch-up Tools Use the touch-up tools to edit graphics. The Lexmark Photo Editor displays. Using the Lexmark Photo Editor Use the Lexmark Photo Editor software to edit your graphic. • Remove red eye • Pencil • Eye Dropper • Crop • Text • Flood Fill • Paint brush • Line • Eraser Note: Move your pointer over the tool for a description. 21 To open the Lexmark Photo Editor, click Start Programs Lexmark 3100 Series Lexmark Photo Editor.

User's Guide for Windows
Page 26
...8226; Right-click the Lexmark 3100 Series All-In-One quick launch icon on some models) gives you several options for transferring photos from your digital camera memory card to your screen, and select Launch Memory Card Manager. • Click Start Programs Lexmark 3100 Series Memory Card ...Manager. Accessing the Memory Card Manager The Lexmark Memory Card Manager (available on the ...
...8226; Right-click the Lexmark 3100 Series All-In-One quick launch icon on some models) gives you several options for transferring photos from your digital camera memory card to your screen, and select Launch Memory Card Manager. • Click Start Programs Lexmark 3100 Series Memory Card ...Manager. Accessing the Memory Card Manager The Lexmark Memory Card Manager (available on the ...
User's Guide for Windows
Page 27
... Card Manager, see page 21. Using the Lexmark Memory Card Manager The Lexmark Memory Card Manager (available on some models) gives you several options for transferring photos from your digital camera memory card to access photos stored on the computer. • Choose whether to display the Lexmark Memory Card Manager message screen each time a card...
... Card Manager, see page 21. Using the Lexmark Memory Card Manager The Lexmark Memory Card Manager (available on some models) gives you several options for transferring photos from your digital camera memory card to access photos stored on the computer. • Choose whether to display the Lexmark Memory Card Manager message screen each time a card...
User's Guide for Windows
Page 28
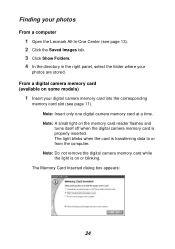
... itself off when the digital camera memory card is properly inserted. Note: Insert only one digital camera memory card at a time. Finding your photos From a computer 1 Open the Lexmark All-In-One Center (see page 13). 2 Click the Saved Images tab. 3 Click Show Folders. 4 In the directory in the right panel... card slot (see page 11). The light blinks when the card is on or blinking. Note: A small light on some models) 1 Insert your photos are stored. Note: Do not remove the digital camera memory card while the light is transferring data to or from the computer. The Memory Card...
... itself off when the digital camera memory card is properly inserted. Note: Insert only one digital camera memory card at a time. Finding your photos From a computer 1 Open the Lexmark All-In-One Center (see page 13). 2 Click the Saved Images tab. 3 Click Show Folders. 4 In the directory in the right panel... card slot (see page 11). The light blinks when the card is on or blinking. Note: A small light on some models) 1 Insert your photos are stored. Note: Do not remove the digital camera memory card while the light is transferring data to or from the computer. The Memory Card...
User's Guide for Windows
Page 29
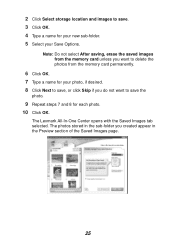
... memory card unless you want to delete the photos from the memory card permanently. 6 Click OK. 7 Type a name for your Save Options. 2 Click Select storage location and images to save the photo. 9 Repeat steps 7 and 8 for each photo. 10 Click OK. The Lexmark All-In-One Center opens with the Saved... Images tab selected. The photos stored in the sub-folder you do not want to save . 3 Click OK. 4 ...
... memory card unless you want to delete the photos from the memory card permanently. 6 Click OK. 7 Type a name for your Save Options. 2 Click Select storage location and images to save the photo. 9 Repeat steps 7 and 8 for each photo. 10 Click OK. The Lexmark All-In-One Center opens with the Saved... Images tab selected. The photos stored in the sub-folder you do not want to save . 3 Click OK. 4 ...


