

User's Guide
Page 21
...select the correct size. For more information about printing on the thickness of the paper. Printing envelopes You can load up to print a borderless photo. - Paper if you want to the edges of the envelopes. Printing envelopes 21 Step 3: Print your cards Click OK. The size of ... Note: Do not use envelopes with holes, windows, deep embossing, metal clasps, string ties, or folding bars. • Load the envelopes vertically against the right side of the photo you . • Make sure the stamp location is facing you want to 10 envelopes at a time, depending on custom size...
...select the correct size. For more information about printing on the thickness of the paper. Printing envelopes You can load up to print a borderless photo. - Paper if you want to the edges of the envelopes. Printing envelopes 21 Step 3: Print your cards Click OK. The size of ... Note: Do not use envelopes with holes, windows, deep embossing, metal clasps, string ties, or folding bars. • Load the envelopes vertically against the right side of the photo you . • Make sure the stamp location is facing you want to 10 envelopes at a time, depending on custom size...
User's Guide for Mac OS X
Page 23
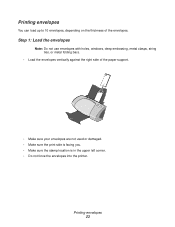
Printing envelopes You can load up to 10 envelopes, depending on the thickness of the paper support. • Make sure your envelopes are not used or damaged. • Make sure the print side is facing you. • Make sure the stamp location is in the upper left corner. • Do not force the envelopes into the printer. Step 1: Load the envelopes Note: Do not use envelopes with holes, windows, deep embossing, metal clasps, string ties, or metal folding bars. • Load the envelopes vertically against the right side of the envelopes. Printing envelopes 23
Printing envelopes You can load up to 10 envelopes, depending on the thickness of the paper support. • Make sure your envelopes are not used or damaged. • Make sure the print side is facing you. • Make sure the stamp location is in the upper left corner. • Do not force the envelopes into the printer. Step 1: Load the envelopes Note: Do not use envelopes with holes, windows, deep embossing, metal clasps, string ties, or metal folding bars. • Load the envelopes vertically against the right side of the envelopes. Printing envelopes 23
User's Guide for Mac OS X
Page 54
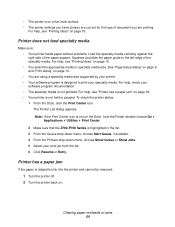
... specialty media vertically against the right side of the specialty media. For help , check your specialty media. For help , see "Printing ideas" on page 10. • You are printing. Clearing paper misfeeds or jams 54 See "Page Setup dialog" on page 9 and "Print dialog" on page 15. •...; You select the appropriate media or specialty media size. For help , see "Printer has a paper jam" on the Dock, from the Finder window choose Go Applications Utilities Print Center. 2 Make sure that the Z700-P700 Series is highlighted in the list. 3 From the Queue drop-down menu, choose...
... specialty media vertically against the right side of the specialty media. For help , check your specialty media. For help , see "Printing ideas" on page 10. • You are printing. Clearing paper misfeeds or jams 54 See "Page Setup dialog" on page 9 and "Print dialog" on page 15. •...; You select the appropriate media or specialty media size. For help , see "Printer has a paper jam" on the Dock, from the Finder window choose Go Applications Utilities Print Center. 2 Make sure that the Z700-P700 Series is highlighted in the list. 3 From the Queue drop-down menu, choose...

Photo Guide
Page 32
...photos 18 I I Want To menu 27 L layouts creating 22 modifying 23 Lexmark Solution Center 28 loading photo paper 9 M Memory Card Inserted dialog box 12 memory cards inserting 6 supported types 6 using 6 P page layout 22 paper guide, adjusting 10 Photo... Center 29 Explore tab 17 Page tab 13 Share tab 24 photo editing tools Color Adjust 19 Drawing 19 Image Size 19 Quick Fixes 19 Photo Editor dialog box 18 photo paper, loading 9 photos...printer software Help, opening 29 printing photos 9 test page 31 S software, printer Lexmark Solution Center 28 Photo Center 29 Print Properties 27 Solution ...
...photos 18 I I Want To menu 27 L layouts creating 22 modifying 23 Lexmark Solution Center 28 loading photo paper 9 M Memory Card Inserted dialog box 12 memory cards inserting 6 supported types 6 using 6 P page layout 22 paper guide, adjusting 10 Photo... Center 29 Explore tab 17 Page tab 13 Share tab 24 photo editing tools Color Adjust 19 Drawing 19 Image Size 19 Quick Fixes 19 Photo Editor dialog box 18 photo paper, loading 9 photos...printer software Help, opening 29 printing photos 9 test page 31 S software, printer Lexmark Solution Center 28 Photo Center 29 Print Properties 27 Solution ...


