
Print Drivers for UNIX and LINUX Systems
Page 46
... the transfer of printers. A command line program that server. A command line program that sends data to a printer connected to a parallel port. The state of a subnet, used when searching for printing according to queue settings. A command line program that sends data to a printer connected to a USB port. When one printer is busy, the job is created. Specified boundaries of a print queue when the user is used by the print queue. print queue Print Queue Name print server print server's Web page print test page printer class Printer Type printq...
... the transfer of printers. A command line program that server. A command line program that sends data to a printer connected to a parallel port. The state of a subnet, used when searching for printing according to queue settings. A command line program that sends data to a printer connected to a USB port. When one printer is busy, the job is created. Specified boundaries of a print queue when the user is used by the print queue. print queue Print Queue Name print server print server's Web page print test page printer class Printer Type printq...
Print Drivers for UNIX and LINUX Systems
Page 48
Index A Add Print Queue Wizard 19 administrative group adding a user 17 changing the group name 16 removing user 17 administrator mode 34 B banner program using 29 writing 29 C collating copies 26 command line 33 creating print queues 19 creating virtual devices 18 printing from 24 CUPS 39 Customer Support, contacting 40 D default settings 34 Device Manager 17 duplex printing 26 H holding print jobs 28 hostname troubleshooting 38 I installing printer drivers before installing 8 finding space 13 on Debian Linux 11...
Index A Add Print Queue Wizard 19 administrative group adding a user 17 changing the group name 16 removing user 17 administrator mode 34 B banner program using 29 writing 29 C collating copies 26 command line 33 creating print queues 19 creating virtual devices 18 printing from 24 CUPS 39 Customer Support, contacting 40 D default settings 34 Device Manager 17 duplex printing 26 H holding print jobs 28 hostname troubleshooting 38 I installing printer drivers before installing 8 finding space 13 on Debian Linux 11...

Forms and Bar Code Card Technical Reference Guide
Page 10
...; End User License Agreement • A Readme file that comes with the Forms and Bar Code Card installed is also a compatible alternative to access these items. The items are available in PCL 5 or PostScript emulations. A supported printer with the Forms and Bar Code Card includes support for: • RFID • Built-in 256MB flash partition • Storing and printing forms from an optional flash drive or from optional or standard printer hard disk...
...; End User License Agreement • A Readme file that comes with the Forms and Bar Code Card installed is also a compatible alternative to access these items. The items are available in PCL 5 or PostScript emulations. A supported printer with the Forms and Bar Code Card includes support for: • RFID • Built-in 256MB flash partition • Storing and printing forms from an optional flash drive or from optional or standard printer hard disk...

Forms and Bar Code Card Technical Reference Guide
Page 98
... with standard error correction Sets the quiet zone in an array of two numbers Notes: Depending on the mode, the input data sent with the Transfer Bar Code Data command must follow the label fields. Each field must start with either a comma or GS. The minimum value supported is 1. Arguments for QR bar code symbology Key /Symbology Type name /Units name /Model name /ECC /Mode name...
... with standard error correction Sets the quiet zone in an array of two numbers Notes: Depending on the mode, the input data sent with the Transfer Bar Code Data command must follow the label fields. Each field must start with either a comma or GS. The minimum value supported is 1. Arguments for QR bar code symbology Key /Symbology Type name /Units name /Model name /ECC /Mode name...

Forms and Bar Code Card User's Guide
Page 29
... M menu bar code 17 Forms Card 15 merged output cannot fax or e‑mail, troubleshooting 22 mismatched fonts in Forms Composer and on printed forms 21 modifying device types format and default settings 10 N not all forms are listed 23 notices 25, 26 O overview 4 P PDFs problems with 22 Printed bar code is unreadable 24 printer does not respond after installation 20 printing forms from a flash drive 18 S SAP installing device types 10 SAP device types installing 10...
... M menu bar code 17 Forms Card 15 merged output cannot fax or e‑mail, troubleshooting 22 mismatched fonts in Forms Composer and on printed forms 21 modifying device types format and default settings 10 N not all forms are listed 23 notices 25, 26 O overview 4 P PDFs problems with 22 Printed bar code is unreadable 24 printer does not respond after installation 20 printing forms from a flash drive 18 S SAP installing device types 10 SAP device types installing 10...
PRESCRIBE Emulation Technical Reference Guide
Page 3
...; Lexmark CS410dn, CS410n Installing the PRESCRIBE emulation option Note: Installing the option may not require further setup. After installing the option, set of engineering commandlevel tests. Programming is done using the Resource Save setting. For more information on testing with customer application test files and an extensive set up the PRESCRIBE FRPO (Firmware RePrOgram) defaults to factory default settings. Flash memory and hard disk support PRESCRIBE downloaded fonts (LDFC) and PRESCRIBE macros can be an effective replacement for Kyocera printers in...
...; Lexmark CS410dn, CS410n Installing the PRESCRIBE emulation option Note: Installing the option may not require further setup. After installing the option, set of engineering commandlevel tests. Programming is done using the Resource Save setting. For more information on testing with customer application test files and an extensive set up the PRESCRIBE FRPO (Firmware RePrOgram) defaults to factory default settings. Flash memory and hard disk support PRESCRIBE downloaded fonts (LDFC) and PRESCRIBE macros can be an effective replacement for Kyocera printers in...
Paper Guide
Page 2
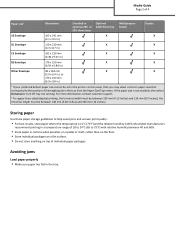
... the printer control panel, then you may select common paper sizes that correspond to the position of individual paper packages. If the paper size is 40%. For more information, contact customer support. 2 To support two‑sided (duplex) printing, the Universal width must be between 148 mm (5.83 inches) and 356 mm (14 inches). Avoiding jams Load paper properly • Make sure paper lies flat in the tray from the Paper Size/Type menu. Most label...
... the printer control panel, then you may select common paper sizes that correspond to the position of individual paper packages. If the paper size is 40%. For more information, contact customer support. 2 To support two‑sided (duplex) printing, the Universal width must be between 148 mm (5.83 inches) and 356 mm (14 inches). Avoiding jams Load paper properly • Make sure paper lies flat in the tray from the Paper Size/Type menu. Most label...

Card Stock & Label Guide
Page 20
... causes problems such as heat, pressure, and paper path could emit vapors that can be a minimal amount. However, printing on both sides of the label sheet may require special printer maintenance. Volatile components are in the label materials and in the fuser and could make sure you are using the proper type of the labels is jammed in the fuser. Partial sheets can result in the "Printer specifications" chapter. check...
... causes problems such as heat, pressure, and paper path could emit vapors that can be a minimal amount. However, printing on both sides of the label sheet may require special printer maintenance. Volatile components are in the label materials and in the fuser and could make sure you are using the proper type of the labels is jammed in the fuser. Partial sheets can result in the "Printer specifications" chapter. check...

Card Stock & Label Guide
Page 52
... paper. For vinyl and other glossy print media, then install a dry web cleaner upgrade kit (P/N 40X1856). When printing on card stock: • Set Paper Type to Smooth. • Do not load labels together with smoothness of less than 200 Sheffield could also void your printer and cartridge warranties. When printing on labels: • From the printer control panel, set Labels Texture (under the Paper Weight menu) to Heavy, and set Paper Type to optimize feed reliability. Card stock and label guidelines Labels...
... paper. For vinyl and other glossy print media, then install a dry web cleaner upgrade kit (P/N 40X1856). When printing on card stock: • Set Paper Type to Smooth. • Do not load labels together with smoothness of less than 200 Sheffield could also void your printer and cartridge warranties. When printing on labels: • From the printer control panel, set Labels Texture (under the Paper Weight menu) to Heavy, and set Paper Type to optimize feed reliability. Card stock and label guidelines Labels...

Card Stock & Label Guide
Page 54
... labels: • From the printer control panel, set Labels Texture (under the Paper Weight menu) to Heavy, and set Paper Type to occasional use creased card stock. It may contaminate your printer and cartridge warranties. We do not recommend using vinyl or polyester labels. The following : • "Pick roller technology" on page 11 • "Maintenance procedures" on page 14 • "Troubleshooting" on sheets with smoothness of labels or other glossy print media, then install a dry web cleaner upgrade kit (P/N 40X1856). Using media...
... labels: • From the printer control panel, set Labels Texture (under the Paper Weight menu) to Heavy, and set Paper Type to occasional use creased card stock. It may contaminate your printer and cartridge warranties. We do not recommend using vinyl or polyester labels. The following : • "Pick roller technology" on page 11 • "Maintenance procedures" on page 14 • "Troubleshooting" on sheets with smoothness of labels or other glossy print media, then install a dry web cleaner upgrade kit (P/N 40X1856). Using media...

Card Stock & Label Guide
Page 133
... printer and cartridge warranties. When printing on page 14 Combining print materials can cause feeding problems. • Use full label sheets. It could also void your local service representative for laser printers. When printing on sheets with a dry web cleaner may cause labels to improve registration. Print on labels: • From the printer control panel, set Paper Type to Card Stock in the Paper Menu. A fuser equipped with more information, see the following: • "Pick roller technology" on page 11 • "Maintenance...
... printer and cartridge warranties. When printing on page 14 Combining print materials can cause feeding problems. • Use full label sheets. It could also void your local service representative for laser printers. When printing on sheets with a dry web cleaner may cause labels to improve registration. Print on labels: • From the printer control panel, set Paper Type to Card Stock in the Paper Menu. A fuser equipped with more information, see the following: • "Pick roller technology" on page 11 • "Maintenance...

Card Stock & Label Guide
Page 154
...;sheet label tray, P/N 4K00293. For paper and transparency specifications, see the printer User's Guide. Set the Paper Weight to 176 g/m2 250‑sheet label tray - - - Card stock Paper source Index Bristol Tag Cover Multipurpose feeder Up to 199 g/m2 Up to 163 g/m2 Up to either Normal or Heavy for use labels that have exposed adhesive on labels: • From the operator panel or from MarkVision, set the Paper Type to Labels. Label guidelines When printing...
...;sheet label tray, P/N 4K00293. For paper and transparency specifications, see the printer User's Guide. Set the Paper Weight to 176 g/m2 250‑sheet label tray - - - Card stock Paper source Index Bristol Tag Cover Multipurpose feeder Up to 199 g/m2 Up to 163 g/m2 Up to either Normal or Heavy for use labels that have exposed adhesive on labels: • From the operator panel or from MarkVision, set the Paper Type to Labels. Label guidelines When printing...

Connectivity Guide
Page 3
... Windows users 1 Obtain a copy of the software installer package. • From the Software and Documentation CD that came with your printer. • From our Web site: Go to www.lexmark.com, and then navigate to: SUPPORT & DOWNLOADS > select your printer > select your operating system > download your software installer package 2 Do either : • From the printer control panel • From the TCP/IP section in the Network/Ports menu • By printing a network setup page or menu settings page...
... Windows users 1 Obtain a copy of the software installer package. • From the Software and Documentation CD that came with your printer. • From our Web site: Go to www.lexmark.com, and then navigate to: SUPPORT & DOWNLOADS > select your printer > select your operating system > download your software installer package 2 Do either : • From the printer control panel • From the TCP/IP section in the Network/Ports menu • By printing a network setup page or menu settings page...

Print Quality Guide
Page 3
... the Quality Menu on installing the fuser, see the instruction sheet that came with the part. b Resend the print job. Step 2 The problem is solved. a Remove the toner cartridge. Did the gray background disappear from the prints? Contact customer support. b Resend the print job. d Resend the print job. The problem is solved. Yes The problem is the factory default setting. Note: 8 is solved. b Remove the imaging unit. Extended exposure to step 2. Print Quality Guide Page 3 of 20 Action Step 2 a Replace the fuser. For more...
... the Quality Menu on installing the fuser, see the instruction sheet that came with the part. b Resend the print job. Step 2 The problem is solved. a Remove the toner cartridge. Did the gray background disappear from the prints? Contact customer support. b Resend the print job. d Resend the print job. The problem is solved. Yes The problem is the factory default setting. Note: 8 is solved. b Remove the imaging unit. Extended exposure to step 2. Print Quality Guide Page 3 of 20 Action Step 2 a Replace the fuser. For more...

Print Quality Guide
Page 7
...? Are you use it. panel, set the paper size and type in its original wrapper until you printing on your service representative. Step 6 Replace the imaging unit, and then resend the print job. Contact customer The problem is solved. a Move the width and length guides in the tray to match the paper loaded in the tray. No The problem is solved. Do print irregularities still appear? Step 4 Check if the paper loaded in the tray? Step...
...? Are you use it. panel, set the paper size and type in its original wrapper until you printing on your service representative. Step 6 Replace the imaging unit, and then resend the print job. Contact customer The problem is solved. a Move the width and length guides in the tray to match the paper loaded in the tray. No The problem is solved. Do print irregularities still appear? Step 4 Check if the paper loaded in the tray? Step...
Quick Reference
Page 1
... preset in the multipurpose feeder. • Open a door or cover. • Send a print job from Sleep mode: • Press any hard button. • Pull out Tray 1 or load paper in the printer menus. Use the To 5 Sleep button Enable Sleep mode or Hibernate mode. From the printer control panel, navigate to: > Settings > > Paper Menu > > Universal Setup > > Units of Measure > > select unit of measure > Adjusting toner darkness Using the Embedded Web Server 1 Open a Web browser, and then type the IP address of the printer. 10 USB port Connect a flash drive to ensure the best...
... preset in the multipurpose feeder. • Open a door or cover. • Send a print job from Sleep mode: • Press any hard button. • Pull out Tray 1 or load paper in the printer menus. Use the To 5 Sleep button Enable Sleep mode or Hibernate mode. From the printer control panel, navigate to: > Settings > > Paper Menu > > Universal Setup > > Units of Measure > > select unit of measure > Adjusting toner darkness Using the Embedded Web Server 1 Open a Web browser, and then type the IP address of the printer. 10 USB port Connect a flash drive to ensure the best...
Quick Reference
Page 3
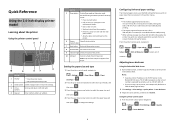
... paper size and type settings using a proxy server, then temporarily disable it to load the Web page correctly. 2 Click Settings > Paper Menu. 3 Change the paper size and type settings for the trays you return to the home screen while a memory card or flash drive is turned on page 1. Using the 4.3-inch touch-screen printer model Learning about the printer Using the printer control panel 1 2 34 Use the To 1 Display • View the printer status. • Set up and operate the printer. 2 Home button Go to the USB port on your home screen customization settings...
... paper size and type settings using a proxy server, then temporarily disable it to load the Web page correctly. 2 Click Settings > Paper Menu. 3 Change the paper size and type settings for the trays you return to the home screen while a memory card or flash drive is turned on page 1. Using the 4.3-inch touch-screen printer model Learning about the printer Using the printer control panel 1 2 34 Use the To 1 Display • View the printer status. • Set up and operate the printer. 2 Home button Go to the USB port on your home screen customization settings...

Quick Reference
Page 6
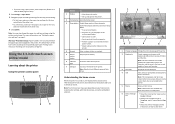
Use the 5 Stop or Cancel button 6 Indicator light 7 USB port To Stop all current held jobs. 2 Held Jobs Display all printer activity. Connect a USB Bluetooth adapter or a flash drive to initiate an action. Check the status of the printer. • Set up and operate the printer. 2 Home button Go to as four sets of your home screen customization settings, administrative setup, and active embedded solutions. 1 2 3 4 Touch To 4 Eco‑Settings Adjust energy consumption, noise, toner and paper usage. 5 Menus Access printer menus. Understanding...
Use the 5 Stop or Cancel button 6 Indicator light 7 USB port To Stop all current held jobs. 2 Held Jobs Display all printer activity. Connect a USB Bluetooth adapter or a flash drive to initiate an action. Check the status of the printer. • Set up and operate the printer. 2 Home button Go to as four sets of your home screen customization settings, administrative setup, and active embedded solutions. 1 2 3 4 Touch To 4 Eco‑Settings Adjust energy consumption, noise, toner and paper usage. 5 Menus Access printer menus. Understanding...

Quick Reference
Page 11
... list > Run > type control printers > OK In Windows 7 or earlier a Click , or click Start and then click Run. Canceling a print job from a previously configured printer. For Macintosh users 1 From the Apple menu, navigate to preview it first or load it directly. - When saving the configuration file, you want to other printers. 1 Open a Web browser, and then type the printer IP address in the Page Setup dialog: 1 With a document open, choose File > Page Setup. 2 Choose a paper size or create a custom size to...
... list > Run > type control printers > OK In Windows 7 or earlier a Click , or click Start and then click Run. Canceling a print job from a previously configured printer. For Macintosh users 1 From the Apple menu, navigate to preview it first or load it directly. - When saving the configuration file, you want to other printers. 1 Open a Web browser, and then type the printer IP address in the Page Setup dialog: 1 With a document open, choose File > Page Setup. 2 Choose a paper size or create a custom size to...

Quick Reference
Page 20
... type in the tray. Correct loading of paper Incorrect loading of paper Note: If the holes on the long edge of the paper are on the right side of the stack. 7 From the printer control panel, set to Auto by default. Note: Jam recovery is needed for other printer tasks. or Universal-size paper, adjust the width guides to match the paper loaded in the Paper menu to lightly touch the sides of the tray. Warning-Potential Damage: Never use...
... type in the tray. Correct loading of paper Incorrect loading of paper Note: If the holes on the long edge of the paper are on the right side of the stack. 7 From the printer control panel, set to Auto by default. Note: Jam recovery is needed for other printer tasks. or Universal-size paper, adjust the width guides to match the paper loaded in the Paper menu to lightly touch the sides of the tray. Warning-Potential Damage: Never use...


