User's Guide
Page 7
... 198 Resetting a Fax Port 199 Disabling a Fax Port 200 11 Memory and Option Cards 201 Accessing the Printer System Board 201 Understanding Memory Options 206 Printer Memory 206 Flash Memory 206 Installing Memory Options 207 Removing Memory Options 210 Understanding Option Cards 211 Internal Print Server... 212 Parallel/USB Interface Option Card 215 Installing an Option Card 216 Removing an Option Card 219 Closing the Printer System Board 220 12 Optional 500-Sheet Drawer 223 Installing the Optional Drawer 223 13 Infrared Adapter 227 Connecting the Cable and Using the Infrared...
... 198 Resetting a Fax Port 199 Disabling a Fax Port 200 11 Memory and Option Cards 201 Accessing the Printer System Board 201 Understanding Memory Options 206 Printer Memory 206 Flash Memory 206 Installing Memory Options 207 Removing Memory Options 210 Understanding Option Cards 211 Internal Print Server... 212 Parallel/USB Interface Option Card 215 Installing an Option Card 216 Removing an Option Card 219 Closing the Printer System Board 220 12 Optional 500-Sheet Drawer 223 Installing the Optional Drawer 223 13 Infrared Adapter 227 Connecting the Cable and Using the Infrared...
User's Guide
Page 13
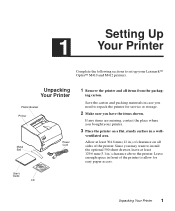
... install the optional 500-sheet drawer, leave at least 304.8 mm (12 in.) of clearance on a flat, sturdy surface in case you need to set up your printer. 3 Place the printer on all items from the packag- Since you bought your Lexmark™ Optra™ M410 and M412 printers. ing carton. Unpacking Your Printer 1 Save the carton and...
... install the optional 500-sheet drawer, leave at least 304.8 mm (12 in.) of clearance on a flat, sturdy surface in case you need to set up your printer. 3 Place the printer on all items from the packag- Since you bought your Lexmark™ Optra™ M410 and M412 printers. ing carton. Unpacking Your Printer 1 Save the carton and...

User's Guide
Page 56
...Tray 2 MP Feeder Manual Paper Manual Env The Paper Source setting identifies the default paper source. Tray 2 is available only if the optional 500-sheet drawer is empty, print material automatically feeds from the other than an envelope through the multipurpose feeder. If Paper Source is set to MP...Paper when manually feeding a sheet of print material in two paper sources (and the Paper Size and Paper Type settings are using with your printer. MP Feeder displays only if Configure MP is set ), the trays are automatically linked. Paper Menu Menu Item Paper Source *Factory default Paper...
...Tray 2 MP Feeder Manual Paper Manual Env The Paper Source setting identifies the default paper source. Tray 2 is available only if the optional 500-sheet drawer is empty, print material automatically feeds from the other than an envelope through the multipurpose feeder. If Paper Source is set to MP...Paper when manually feeding a sheet of print material in two paper sources (and the Paper Size and Paper Type settings are using with your printer. MP Feeder displays only if Configure MP is set ), the trays are automatically linked. Paper Menu Menu Item Paper Source *Factory default Paper...
User's Guide
Page 94
...view the factory default values assigned to factory default values. Off* On Auto LF after CR The Auto CR after LF setting determines if the printer automatically performs a carriage return after a carriage return control command. 82 Chapter 3: Using the Operator Panel and Menus Auto CR after LF Only... the following three values: Off* 0 ... 199 None VIEW FACTORY DEF Restore Defaults Yes No Note: Assign Tray 2 only displays if the optional 500-sheet drawer is set TRAY RENUMBER to Cassette. Select Off to a paper source. See "Paper Sources and Sizes" on page 116 for information on...
...view the factory default values assigned to factory default values. Off* On Auto LF after CR The Auto CR after LF setting determines if the printer automatically performs a carriage return after a carriage return control command. 82 Chapter 3: Using the Operator Panel and Menus Auto CR after LF Only... the following three values: Off* 0 ... 199 None VIEW FACTORY DEF Restore Defaults Yes No Note: Assign Tray 2 only displays if the optional 500-sheet drawer is set TRAY RENUMBER to Cassette. Select Off to a paper source. See "Paper Sources and Sizes" on page 116 for information on...

User's Guide
Page 127
...you use the multipurpose feeder for when you do not keep in the 250-sheet input tray. You may purchase an optional 500-sheet drawer as important information about the paper sources and the output bins. Using Print 4 Materials Multipurpose Feeder 250-Sheet Input Tray Optional... "Optional 500-Sheet Drawer" on different sizes and types of print materials from different paper sources. Using Print Materials 115 Reserve the multipurpose feeder for single page print jobs on letterhead, or other special print material you print on page 223 for each type of your printer, as well...
...you use the multipurpose feeder for when you do not keep in the 250-sheet input tray. You may purchase an optional 500-sheet drawer as important information about the paper sources and the output bins. Using Print 4 Materials Multipurpose Feeder 250-Sheet Input Tray Optional... "Optional 500-Sheet Drawer" on different sizes and types of print materials from different paper sources. Using Print Materials 115 Reserve the multipurpose feeder for single page print jobs on letterhead, or other special print material you print on page 223 for each type of your printer, as well...
User's Guide
Page 128
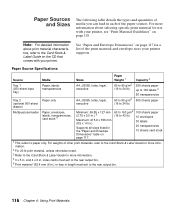
...& Label Guide for more information about print material characteristics, refer to the Card Stock & Label Guide on the CD that comes with your printer supports. Paper Source Specifications Source Media Sizes Paper Weight 1 Capacity 2 Tray 1 (250-sheet input tray) Paper, labels, transparencies A4, ...to 24 lb) 250 sheets paper up to 100 labels 3 50 transparencies Tray 2 Paper only (optional 500-sheet drawer) A4, JIS B5, letter, legal, executive 60 to 90 g/m2 500 sheets paper (16 to 24 lb) Multipurpose feeder Paper, envelopes, labels, transparencies, card stock 4 Minimum:...
...& Label Guide for more information about print material characteristics, refer to the Card Stock & Label Guide on the CD that comes with your printer supports. Paper Source Specifications Source Media Sizes Paper Weight 1 Capacity 2 Tray 1 (250-sheet input tray) Paper, labels, transparencies A4, ...to 24 lb) 250 sheets paper up to 100 labels 3 50 transparencies Tray 2 Paper only (optional 500-sheet drawer) A4, JIS B5, letter, legal, executive 60 to 90 g/m2 500 sheets paper (16 to 24 lb) Multipurpose feeder Paper, envelopes, labels, transparencies, card stock 4 Minimum:...
User's Guide
Page 131
...be sure to set the PAPER TYPE to withstand temperatures of any transparencies you are considering using with the printer before buying large quantities. For best performance and fewer paper jams, do not use envelopes that: -...-sheet input tray, see page 141. Are damaged in any exposed adhesive when the flap is in the optional 500-sheet drawer. Have any way. - Try a sample of 175°C (347°F) without melting, discoloring or... You can feed transparencies from MarkVision. See page 141 for laser printers. Use metal clasps, string ties, or metal folding bars. -
...be sure to set the PAPER TYPE to withstand temperatures of any transparencies you are considering using with the printer before buying large quantities. For best performance and fewer paper jams, do not use envelopes that: -...-sheet input tray, see page 141. Are damaged in any exposed adhesive when the flap is in the optional 500-sheet drawer. Have any way. - Try a sample of 175°C (347°F) without melting, discoloring or... You can feed transparencies from MarkVision. See page 141 for laser printers. Use metal clasps, string ties, or metal folding bars. -
User's Guide
Page 136
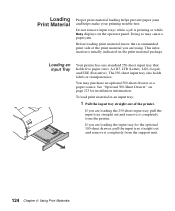
Before loading print material, know the recommended print side of the printer. If you are loading the 250-sheet input tray, pull the input tray straight out and remove it completely from the printer. See "Optional 500-Sheet Drawer" on the operator panel. Do not remove input trays while a... job is usually indicated on the print material package. Loading an Input Tray Your printer has one standard 250-sheet input tray that ...
Before loading print material, know the recommended print side of the printer. If you are loading the 250-sheet input tray, pull the input tray straight out and remove it completely from the printer. See "Optional 500-Sheet Drawer" on the operator panel. Do not remove input trays while a... job is usually indicated on the print material package. Loading an Input Tray Your printer has one standard 250-sheet input tray that ...

User's Guide
Page 138
The paper size indicators are paper size abbreviations used for letter-size paper (LTR). For the 500-sheet input tray, lift the length guide straight up out of the length guide as shown. 126 Chapter 4: Using Print Materials Note: These examples show ...
The paper size indicators are paper size abbreviations used for letter-size paper (LTR). For the 500-sheet input tray, lift the length guide straight up out of the length guide as shown. 126 Chapter 4: Using Print Materials Note: These examples show ...
User's Guide
Page 141
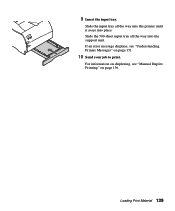
Slide the 500-sheet input tray all the way into the printer until it snaps into the support unit. For information on duplexing, see "Understanding Printer Messages" on page 136. 9 Insert the input tray. Loading Print Material 129 If an error message displays, see "Manual Duplex Printing" on page 151. 10 Send your job to print. Slide the input tray all the way into place.
Slide the 500-sheet input tray all the way into the printer until it snaps into the support unit. For information on duplexing, see "Understanding Printer Messages" on page 136. 9 Insert the input tray. Loading Print Material 129 If an error message displays, see "Manual Duplex Printing" on page 151. 10 Send your job to print. Slide the input tray all the way into place.

User's Guide
Page 147
...up Rear of tray Left side of (enters the tray printer first) Tray Linking If you are the same, the automatic tray linking feature is acceptable for more information. If you have chosen is enabled. Printing on page 47 for laser printers. For example, if you load the same size print... material in the standard 250-sheet tray and the optional 500-sheet drawer, the printer will select print material from one tray when the other becomes empty. Page...
...up Rear of tray Left side of (enters the tray printer first) Tray Linking If you are the same, the automatic tray linking feature is acceptable for more information. If you have chosen is enabled. Printing on page 47 for laser printers. For example, if you load the same size print... material in the standard 250-sheet tray and the optional 500-sheet drawer, the printer will select print material from one tray when the other becomes empty. Page...

User's Guide
Page 170
...optional parallel interface is the active communication link. Tray 1 Missing is available only if the optional 500-sheet drawer is the active communication link. 158 Chapter 6: Understanding Printer Messages The optional USB interface is installed. The following conditions exist, line 2 of a warning...missing. The 250-sheet input tray is the active communication link. The standard USB interface is blank. See "Optional 500-Sheet Drawer" on the operator panel when the printer is in the Ready state: Ready Tray 1 Missing Status Message Fax 1 Infrared 1 LocalTalk 1 Network 1 Parallel ...
...optional parallel interface is the active communication link. Tray 1 Missing is available only if the optional 500-sheet drawer is the active communication link. 158 Chapter 6: Understanding Printer Messages The optional USB interface is installed. The following conditions exist, line 2 of a warning...missing. The 250-sheet input tray is the active communication link. The standard USB interface is blank. See "Optional 500-Sheet Drawer" on the operator panel when the printer is in the Ready state: Ready Tray 1 Missing Status Message Fax 1 Infrared 1 LocalTalk 1 Network 1 Parallel ...

User's Guide
Page 179
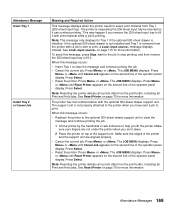
... size () of the following items: • Tray 1 • Tray 2 • MP Feeder Note: Tray 2 only displays if the optional 500-sheet drawer is installed. Attendance Message Change Meaning and Required Action The printer requests a different print material than a custom type. The name is a type other than what is loaded in the tray...
... size () of the following items: • Tray 1 • Tray 2 • MP Feeder Note: Tray 2 only displays if the optional 500-sheet drawer is installed. Attendance Message Change Meaning and Required Action The printer requests a different print material than a custom type. The name is a type other than what is loaded in the tray...

User's Guide
Page 180
...displays: • Reestablish communication by the printer, the message clears. • In case of a hardware failure, turn the printer power Off (O), remove the optional 500-sheet drawer, and call for more information. Go/Stop? The optional 500-sheet drawer may be lost communication with ... message displays if Delete All Jobs is selected from the CONFIDENTIAL JOB menu item or from the printer, for more information. Note: This message only displays if the optional 500-sheet drawer is not installed. See "Entering a Personal Identification Number (PIN)" on the hard disk...
...displays: • Reestablish communication by the printer, the message clears. • In case of a hardware failure, turn the printer power Off (O), remove the optional 500-sheet drawer, and call for more information. Go/Stop? The optional 500-sheet drawer may be lost communication with ... message displays if Delete All Jobs is selected from the CONFIDENTIAL JOB menu item or from the printer, for more information. Note: This message only displays if the optional 500-sheet drawer is not installed. See "Entering a Personal Identification Number (PIN)" on the hard disk...
User's Guide
Page 181
Note: This message only displays for more information. If the optional 500-sheet drawer is not installed and Tray 1 is removed from Tray 1 (250-sheet input tray). When this message...to fill it. See Load on page 170 for Tray 1 if the optional 500-sheet drawer is installed. Press Menu> or or or or or or or or The printer is requesting the 250-sheet input tray be inserted so it with print material while.... Attendance Message Insert Tray 1 Install Tray 2 or Cancel Job Meaning and Required Action This message displays when the printer needs to select print material from the...
Note: This message only displays for more information. If the optional 500-sheet drawer is not installed and Tray 1 is removed from Tray 1 (250-sheet input tray). When this message...to fill it. See Load on page 170 for Tray 1 if the optional 500-sheet drawer is installed. Press Menu> or or or or or or or or The printer is requesting the 250-sheet input tray be inserted so it with print material while.... Attendance Message Insert Tray 1 Install Tray 2 or Cancel Job Meaning and Required Action This message displays when the printer needs to select print material from the...

User's Guide
Page 182
... 1 displays the input source (), which is one of the following items: • Tray 1 • Tray 2 • MP Feeder Note: Tray 2 only displays if the optional 500-sheet drawer is empty. If you , only the print material or envelope size displays. Use the MarkVision utility to continue printing. • Cancel the current... name for more information. • : If the requested type matches the type currently in the input source. Attendance Message Load Meaning and Required Action The printer is trying to feed print material from an input source it detects is installed.
... 1 displays the input source (), which is one of the following items: • Tray 1 • Tray 2 • MP Feeder Note: Tray 2 only displays if the optional 500-sheet drawer is empty. If you , only the print material or envelope size displays. Use the MarkVision utility to continue printing. • Cancel the current... name for more information. • : If the requested type matches the type currently in the input source. Attendance Message Load Meaning and Required Action The printer is trying to feed print material from an input source it detects is installed.

User's Guide
Page 192
Action • Turn the printer power Off (O), wait for more information. See "Verifying the Installation of Options" on page 223 for more information. See "Optional 500-Sheet Drawer" on page 229 for more information. • Make sure the option is selected in the software application you are using . .... If you have the correct cable, that it . If this does not fix the problem, unplug the printer, and check the connection between the optional 500-sheet drawer and the printer is made through the network cable. Hard Disk Option: Check to make sure the hard disk option is securely...
Action • Turn the printer power Off (O), wait for more information. See "Verifying the Installation of Options" on page 223 for more information. See "Optional 500-Sheet Drawer" on page 229 for more information. • Make sure the option is selected in the software application you are using . .... If you have the correct cable, that it . If this does not fix the problem, unplug the printer, and check the connection between the optional 500-sheet drawer and the printer is made through the network cable. Hard Disk Option: Check to make sure the hard disk option is securely...
User's Guide
Page 235
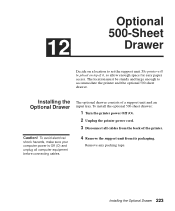
... 12 Drawer Decide on top of the printer. Remove any packing tape. To install the optional 500-sheet drawer: 1 Turn the printer power Off (O). 2 Unplug the printer power cord. 3 Disconnect all computer equipment before connecting cables. 4 Remove the support unit from the back of it, ...enough space for easy paper access. The location must be placed on a location to accommodate the printer and the optional 500-sheet drawer. Caution! Installing the Optional Drawer 223 The printer will be sturdy and large enough to set the support unit. To avoid electrical shock hazards, ...
... 12 Drawer Decide on top of the printer. Remove any packing tape. To install the optional 500-sheet drawer: 1 Turn the printer power Off (O). 2 Unplug the printer power cord. 3 Disconnect all computer equipment before connecting cables. 4 Remove the support unit from the back of it, ...enough space for easy paper access. The location must be placed on a location to accommodate the printer and the optional 500-sheet drawer. Caution! Installing the Optional Drawer 223 The printer will be sturdy and large enough to set the support unit. To avoid electrical shock hazards, ...

User's Guide
Page 236
... the input tray out of the optional support unit: the tab, the round hole, and the four square holes. 8 Lift the printer by the handholds or ask someone to help you set it to the location being used. 7 Notice the following parts located on the top sur- ...Tab Square Holes face of the support unit. Make sure your fin- The bottom surface of the printer has matching holes or feet that accommodate the tab, round hole, and four square holes. Remove any packing material and tape from the input tray...
... the input tray out of the optional support unit: the tab, the round hole, and the four square holes. 8 Lift the printer by the handholds or ask someone to help you set it to the location being used. 7 Notice the following parts located on the top sur- ...Tab Square Holes face of the support unit. Make sure your fin- The bottom surface of the printer has matching holes or feet that accommodate the tab, round hole, and four square holes. Remove any packing material and tape from the input tray...

User's Guide
Page 241
... their default values. • All installed features and options, such as the optional 500-sheet drawer, internal print server (also called an internal network adapter or INA), flash memory option, printer memory option, and hard disk option. • Amount of 14 Options You can ...verify that printer options are properly installed by printing a menu settings page. Verifying the Installation of available printer memory. • Other printer settings. Printing the Menu Settings Page 229 Printing the Menu Settings Page Before ...
... their default values. • All installed features and options, such as the optional 500-sheet drawer, internal print server (also called an internal network adapter or INA), flash memory option, printer memory option, and hard disk option. • Amount of 14 Options You can ...verify that printer options are properly installed by printing a menu settings page. Verifying the Installation of available printer memory. • Other printer settings. Printing the Menu Settings Page 229 Printing the Menu Settings Page Before ...

