
User's Guide
Page 91
... side up in their original packing until you are ready to exhaustion of toner from toner cartridge. Maintaining the printer 91 Ordering an imaging unit Extremely low print coverage for the printer supplies. For more information on the right side of the printer, and then open the front ...door. 1 2 Part name Part number Imaging unit 24B6040 Storing supplies Choose a cool, clean storage area for extended periods of time may cause imaging unit parts to fail prior to use them. Do not expose supplies to: • Direct sunlight ...
... side up in their original packing until you are ready to exhaustion of toner from toner cartridge. Maintaining the printer 91 Ordering an imaging unit Extremely low print coverage for the printer supplies. For more information on the right side of the printer, and then open the front ...door. 1 2 Part name Part number Imaging unit 24B6040 Storing supplies Choose a cool, clean storage area for extended periods of time may cause imaging unit parts to fail prior to use them. Do not expose supplies to: • Direct sunlight ...

User's Guide
Page 92
Extended exposure to redistribute the toner. 5 Insert the toner cartridge into the printer by aligning the side rails of the cartridge with the arrows on the side rails inside the printer. Maintaining the printer 92 2 Pull the toner cartridge out using the handle. 3 Unpack the toner cartridge, and then remove all packing materials. 4 Shake the new cartridge to light may cause print quality problems. 6 Close the front door. Warning-Potential Damage: Do not expose the imaging unit to direct light for more than 10 minutes.
Extended exposure to redistribute the toner. 5 Insert the toner cartridge into the printer by aligning the side rails of the cartridge with the arrows on the side rails inside the printer. Maintaining the printer 92 2 Pull the toner cartridge out using the handle. 3 Unpack the toner cartridge, and then remove all packing materials. 4 Shake the new cartridge to light may cause print quality problems. 6 Close the front door. Warning-Potential Damage: Do not expose the imaging unit to direct light for more than 10 minutes.

User's Guide
Page 93
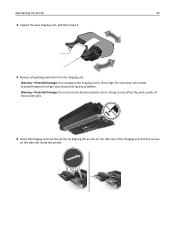
Maintaining the printer 93 Replacing the imaging unit 1 Press the button on the right side of the printer, and then open the front door. 1 2 2 Pull the toner cartridge out using the handle. 3 Lift the green handle, and then pull the imaging unit out of the printer.
Maintaining the printer 93 Replacing the imaging unit 1 Press the button on the right side of the printer, and then open the front door. 1 2 2 Pull the toner cartridge out using the handle. 3 Lift the green handle, and then pull the imaging unit out of the printer.
User's Guide
Page 94
Warning-Potential Damage: Do not expose the imaging unit to light may affect the print quality of future print jobs. 6 Insert the imaging unit into the printer by aligning the arrows on the side rails of the imaging unit with the arrows on the side rails inside the printer. Doing so may cause print quality problems. Warning-Potential Damage: Do not touch the photoconductor drum. Extended exposure to direct light for more than 10 minutes. Maintaining the printer 94 4 Unpack the new imaging unit, and then shake it. 5 Remove all packing materials from the imaging unit.
Warning-Potential Damage: Do not expose the imaging unit to light may affect the print quality of future print jobs. 6 Insert the imaging unit into the printer by aligning the arrows on the side rails of the imaging unit with the arrows on the side rails inside the printer. Doing so may cause print quality problems. Warning-Potential Damage: Do not touch the photoconductor drum. Extended exposure to direct light for more than 10 minutes. Maintaining the printer 94 4 Unpack the new imaging unit, and then shake it. 5 Remove all packing materials from the imaging unit.

User's Guide
Page 98
... be set on the menus page and status page. Managing the printer 98 Notes: • Selectable alerts can be set on the toner cartridge and imaging unit. • All selectable alerts can be set for the end‑of‑life supply condition. E‑mail selectable alert is reached.
... be set on the menus page and status page. Managing the printer 98 Notes: • Selectable alerts can be set on the toner cartridge and imaging unit. • All selectable alerts can be set for the end‑of‑life supply condition. E‑mail selectable alert is reached.

User's Guide
Page 102
... multipurpose feeder, and then remove the jammed paper. 6 Front door Jam, front door. [20y.xx] Open the front door, and then remove the toner cartridge, imaging unit, and jammed paper. Push down blue flap. [23y.xx] Pull tray 1 completely out, then push the front duplex flap down, and then remove the jammed...
... multipurpose feeder, and then remove the jammed paper. 6 Front door Jam, front door. [20y.xx] Open the front door, and then remove the toner cartridge, imaging unit, and jammed paper. Push down blue flap. [23y.xx] Pull tray 1 completely out, then push the front duplex flap down, and then remove the jammed...

User's Guide
Page 103
Warning-Potential Damage: Do not touch the photoconductor drum. Doing so may affect the print quality of the printer might be hot. Clearing jams 103 Jam, front door [20y.xx] CAUTION-HOT SURFACE: The inside of future print jobs. To reduce the risk of injury from a hot component, allow the surface to cool before touching it. 1 Press the button on the right side of the printer, and then open the front door. 1 2 2 Pull the toner cartridge out using the handle. 3 Lift the green handle, and then pull the imaging unit out of the printer.
Warning-Potential Damage: Do not touch the photoconductor drum. Doing so may affect the print quality of the printer might be hot. Clearing jams 103 Jam, front door [20y.xx] CAUTION-HOT SURFACE: The inside of future print jobs. To reduce the risk of injury from a hot component, allow the surface to cool before touching it. 1 Press the button on the right side of the printer, and then open the front door. 1 2 2 Pull the toner cartridge out using the handle. 3 Lift the green handle, and then pull the imaging unit out of the printer.

User's Guide
Page 104
Warning-Potential Damage: Do not expose the imaging unit to light can cause print quality problems. 5 Lift the green flap in front of the printer. 6 Firmly grasp the jammed paper on a flat, smooth surface. Note: Make sure all paper fragments are removed. Clearing jams 104 4 Place the imaging unit aside on each side, and then gently pull it out. Extended exposure to direct light for more than 10 minutes.
Warning-Potential Damage: Do not expose the imaging unit to light can cause print quality problems. 5 Lift the green flap in front of the printer. 6 Firmly grasp the jammed paper on a flat, smooth surface. Note: Make sure all paper fragments are removed. Clearing jams 104 4 Place the imaging unit aside on each side, and then gently pull it out. Extended exposure to direct light for more than 10 minutes.

User's Guide
Page 105
Clearing jams 105 7 Insert the imaging unit by aligning the arrows on the side rails of the unit with the arrows on the side rails inside the printer, and then insert the imaging unit into the printer. 8 Insert the toner cartridge by aligning the side rails of the cartridge with the arrows on the side rails inside the printer, and then insert the cartridge into the printer. 9 Close the front door. 10 From the printer control panel, press to clear the message and continue printing.
Clearing jams 105 7 Insert the imaging unit by aligning the arrows on the side rails of the unit with the arrows on the side rails inside the printer, and then insert the imaging unit into the printer. 8 Insert the toner cartridge by aligning the side rails of the cartridge with the arrows on the side rails inside the printer, and then insert the cartridge into the printer. 9 Close the front door. 10 From the printer control panel, press to clear the message and continue printing.

User's Guide
Page 111
... navigate to: > Settings > > Print Settings > • Install additional printer memory. > Utilities Menu > > Format Flash > > Yes > Cartridge, imaging unit mismatch [41.xy] 1 Check if both are MICR (Magnetic Ink Character Recognition) or non-MICR supplies. Note: For a list of supported supplies, see the...memory [37] Try one or more of the User's Guide or visit www.lexmark.com. 2 Change the toner cartridge or imaging unit so that both the toner cartridge and imaging unit are MICR or non‑MICR supplies. Remove paper. Troubleshooting 111 Troubleshooting Understanding ...
... navigate to: > Settings > > Print Settings > • Install additional printer memory. > Utilities Menu > > Format Flash > > Yes > Cartridge, imaging unit mismatch [41.xy] 1 Check if both are MICR (Magnetic Ink Character Recognition) or non-MICR supplies. Note: For a list of supported supplies, see the...memory [37] Try one or more of the User's Guide or visit www.lexmark.com. 2 Change the toner cartridge or imaging unit so that both the toner cartridge and imaging unit are MICR or non‑MICR supplies. Remove paper. Troubleshooting 111 Troubleshooting Understanding ...

User's Guide
Page 114
... or more information, see the "Replacing supplies" section of paper. • From the printer control panel, press to clear the message and continue printing. Imaging unit very low, [x] estimated pages remain [84.xy] You may need to clear the message and continue printing. If the printer cannot find a tray that... has the correct size and type of paper. • From the printer control panel, press to replace the imaging unit very soon. If the printer cannot find a tray that has the correct size and type of paper, then it prints from that tray...
... or more information, see the "Replacing supplies" section of paper. • From the printer control panel, press to clear the message and continue printing. Imaging unit very low, [x] estimated pages remain [84.xy] You may need to clear the message and continue printing. If the printer cannot find a tray that... has the correct size and type of paper. • From the printer control panel, press to replace the imaging unit very soon. If the printer cannot find a tray that has the correct size and type of paper, then it prints from that tray...

User's Guide
Page 117
... can either be a toner cartridge or imaging unit. All life indicators are not covered by the use of non-genuine supplies or parts in the printer. To accept any and all of these risks, then remove the third‑party supply or part from your Lexmark printer or associated components. Paper too short...
... can either be a toner cartridge or imaging unit. All life indicators are not covered by the use of non-genuine supplies or parts in the printer. To accept any and all of these risks, then remove the third‑party supply or part from your Lexmark printer or associated components. Paper too short...
User's Guide
Page 119
...that came with the supply or see the "Ordering supplies" section of the User's Guide or visit www.lexmark.com. Note: If you do not have a replacement imaging unit, then see the "Replacing supplies" section of the User's Guide. Note: If the message appears after reinstalling... the "Ordering supplies" section of the User's Guide. For information on installing the imaging unit, see the "Replacing supplies" section of the User's Guide or visit www.lexmark.com. If missing, install the imaging unit. If missing, install the toner cartridge. For more of the following : •...
...that came with the supply or see the "Ordering supplies" section of the User's Guide or visit www.lexmark.com. Note: If you do not have a replacement imaging unit, then see the "Replacing supplies" section of the User's Guide. Note: If the message appears after reinstalling... the "Ordering supplies" section of the User's Guide. For information on installing the imaging unit, see the "Replacing supplies" section of the User's Guide or visit www.lexmark.com. If missing, install the imaging unit. If missing, install the toner cartridge. For more of the following : •...

User's Guide
Page 132
... Extended exposure to light may cause print quality problems. 3 Reinstall the imaging unit, and then the cartridge. b Resend the print job. No The problem is properly removed from the imaging unit. Is the printer still printing blank pages? Contact customer support. The... to light may cause print quality problems. 3 Reinstall the imaging unit, and then the cartridge. a Redistribute the toner in the imaging unit. 1 Remove the toner cartridge, and then the imaging unit. 2 Firmly shake the imaging unit. Troubleshooting 132 Printer is printing blank pages Action Yes Step ...
... Extended exposure to light may cause print quality problems. 3 Reinstall the imaging unit, and then the cartridge. b Resend the print job. No The problem is properly removed from the imaging unit. Is the printer still printing blank pages? Contact customer support. The... to light may cause print quality problems. 3 Reinstall the imaging unit, and then the cartridge. a Redistribute the toner in the imaging unit. 1 Remove the toner cartridge, and then the imaging unit. 2 Firmly shake the imaging unit. Troubleshooting 132 Printer is printing blank pages Action Yes Step ...

User's Guide
Page 133
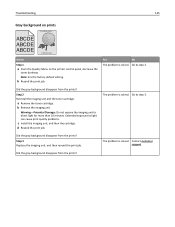
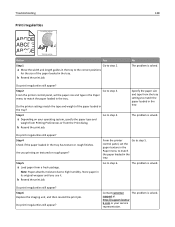
... the paper loaded in the tray settings. Is the page or image clipped? Contact customer support. 1 Remove the toner cartridge. 2 Remove the imaging unit. b Resend the print job. Troubleshooting 133 Clipped pages or images Leading edge ABCDE ABCDE ABCDE Trailing edge Action Yes Step 1 Go...tray. Extended exposure to direct light for the paper loaded. Warning-Potential Damage: Do not expose the imaging unit to light may cause print quality problems. 3 Install the imaging unit, and then the cartridge. b Resend the print job. a Move the width and length guides in...
... the paper loaded in the tray settings. Is the page or image clipped? Contact customer support. 1 Remove the toner cartridge. 2 Remove the imaging unit. b Resend the print job. Troubleshooting 133 Clipped pages or images Leading edge ABCDE ABCDE ABCDE Trailing edge Action Yes Step 1 Go...tray. Extended exposure to direct light for the paper loaded. Warning-Potential Damage: Do not expose the imaging unit to light may cause print quality problems. 3 Install the imaging unit, and then the cartridge. b Resend the print job. a Move the width and length guides in...

User's Guide
Page 134
... AABBCCDD AABBCCDD Trailing edge Action Step 1 Load paper with the correct paper type and weight in the tray. b Resend the print job. Step 4 Replace the imaging unit, and then resend the print job. The problem is solved. The problem is solved. Yes Go to step 3. Step 2 Go to step 2. From the ...match the paper loaded in the tray. Change the paper loaded in the tray to the type and weight of the paper loaded? Do shadow images still appear on prints? Contact customer support. Is paper with the correct paper type and weight in the tray. No Load paper with the ...
... AABBCCDD AABBCCDD Trailing edge Action Step 1 Load paper with the correct paper type and weight in the tray. b Resend the print job. Step 4 Replace the imaging unit, and then resend the print job. The problem is solved. The problem is solved. Yes Go to step 3. Step 2 Go to step 2. From the ...match the paper loaded in the tray. Change the paper loaded in the tray to the type and weight of the paper loaded? Do shadow images still appear on prints? Contact customer support. Is paper with the correct paper type and weight in the tray. No Load paper with the ...
User's Guide
Page 135
... job. Did the gray background disappear from the prints? Note: 8 is solved. Yes No The problem is solved. Step 2 Reinstall the imaging unit and the toner cartridge. The problem is solved. Extended exposure to direct light for more than 10 minutes. Step 3 Replace the... imaging unit, and then resend the print job. Did the gray background disappear from the prints? Warning-Potential Damage: Do not expose the imaging unit to light can cause print quality problems. c Install the imaging unit, and then the cartridge. Did the gray background...
... job. Did the gray background disappear from the prints? Note: 8 is solved. Yes No The problem is solved. Step 2 Reinstall the imaging unit and the toner cartridge. The problem is solved. Extended exposure to direct light for more than 10 minutes. Step 3 Replace the... imaging unit, and then resend the print job. Did the gray background disappear from the prints? Warning-Potential Damage: Do not expose the imaging unit to light can cause print quality problems. c Install the imaging unit, and then the cartridge. Did the gray background...
User's Guide
Page 138
... high humidity. control panel, set the paper size and type in the Paper menu to match the paper loaded in the tray. Step 6 Replace the imaging unit, and then resend the print job. b Resend the print job. Do print irregularities still appear? b Resend the print job. Do print irregularities still appear? support...
... high humidity. control panel, set the paper size and type in the Paper menu to match the paper loaded in the tray. Step 6 Replace the imaging unit, and then resend the print job. b Resend the print job. Do print irregularities still appear? b Resend the print job. Do print irregularities still appear? support...

User's Guide
Page 139
... of the distance, and then contact customer support at http://support.lexma rk.com or your service representative. b Resend the print job. Step 2 Replace the imaging unit, and then resend the print job. Do the repeating defects still appear? The problem is solved. No The problem is solved. Contact customer support at...
... of the distance, and then contact customer support at http://support.lexma rk.com or your service representative. b Resend the print job. Step 2 Replace the imaging unit, and then resend the print job. Do the repeating defects still appear? The problem is solved. No The problem is solved. Contact customer support at...

User's Guide
Page 140
... print still too dark? Store paper in the tray has texture or rough finishes. a From the printer control panel, set to step 5. Step 6 Replace the imaging unit, and then resend the print job.
... print still too dark? Store paper in the tray has texture or rough finishes. a From the printer control panel, set to step 5. Step 6 Replace the imaging unit, and then resend the print job.


