
Quick Reference
Page 4
Understanding Setup mode and menu options 39 Using Setup mode...39 Changing menu settings (an example)...40 Main Menu options...41 Main menu options...41 Forms Macro options...42 Data options ...43 Control options...45 Emulation options ...46 Interface options...47 Maintaining the printer 48 Ordering supplies...48 Removing the ribbon cartridge...48 Cleaning the printer...48 Recycling Lexmark products...49 Contents 4
Understanding Setup mode and menu options 39 Using Setup mode...39 Changing menu settings (an example)...40 Main Menu options...41 Main menu options...41 Forms Macro options...42 Data options ...43 Control options...45 Emulation options ...46 Interface options...47 Maintaining the printer 48 Ordering supplies...48 Removing the ribbon cartridge...48 Cleaning the printer...48 Recycling Lexmark products...49 Contents 4
Quick Reference
Page 7
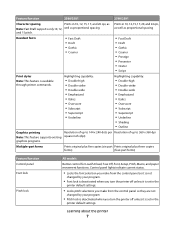
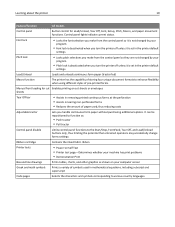
...is deactivated when you turn the printer off unless it is set in the printer default settings. • Locks ...when you turn the printer off unless it is available through printer commands. Learning about the printer 7 Feature/function 2580/2581 2590/2591 Character...and 24 cpi, as well as proportional spacing and 15 pitch. Prints in the printer default settings. Highlighting capability: • Double-high • Double-strike •.... Multiple-part forms Prints original plus five copies (six-part Prints original plus three copies forms) (four-part forms) Feature/function Control...
...is deactivated when you turn the printer off unless it is set in the printer default settings. • Locks ...when you turn the printer off unless it is available through printer commands. Learning about the printer 7 Feature/function 2580/2581 2590/2591 Character...and 24 cpi, as well as proportional spacing and 15 pitch. Prints in the printer default settings. Highlighting capability: • Double-high • Double-strike •.... Multiple-part forms Prints original plus five copies (six-part Prints original plus three copies forms) (four-part forms) Feature/function Control...

Quick Reference
Page 11
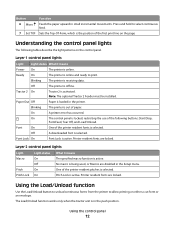
..., and then go into continuous feed. 2 Macro To support different styles of pre-printed forms, selects between Tear Off and Top-Of-Form Communicates the on/off status of printer operation. Using the control panel 11 Feeds the paper downward in small incremental movements. Sets... cpi, or proportional spacing Notes: • On 2590/2591 models, you change the default values and modes of the printer 1 7 1 2 3 4 2 Power Set TOF LineFeed Macro Micro Micro Setup Pitch 10 20 12 24 3 6 15 P5 Lock 17 5 4 Layer 2 control panel buttons Button Function 1 LineFeed...
..., and then go into continuous feed. 2 Macro To support different styles of pre-printed forms, selects between Tear Off and Top-Of-Form Communicates the on/off status of printer operation. Using the control panel 11 Feeds the paper downward in small incremental movements. Sets... cpi, or proportional spacing Notes: • On 2590/2591 models, you change the default values and modes of the printer 1 7 1 2 3 4 2 Power Set TOF LineFeed Macro Micro Micro Setup Pitch 10 20 12 24 3 6 15 P5 Lock 17 5 4 Layer 2 control panel buttons Button Function 1 LineFeed...
Quick Reference
Page 12
... Load/Unload button to unload continuous forms from the printer to select continuous feed. 7 Set TOF Sets the Top-Of-Form, which is receiving data. Ready On The printer is active. Font Lock On Font Lock is online and ready to print. Printer resident fonts are locked. Tractor 2...Feeds the paper upward in the Setup menu. Press and hold to allow printing on the control panel. Blinking Off The printer is the position of the following tables describe the light patterns on either a cut form or an envelope. The printer is selected. On A printer error has occurred. Off A...
... Load/Unload button to unload continuous forms from the printer to select continuous feed. 7 Set TOF Sets the Top-Of-Form, which is receiving data. Ready On The printer is active. Font Lock On Font Lock is online and ready to print. Printer resident fonts are locked. Tractor 2...Feeds the paper upward in the Setup menu. Press and hold to allow printing on the control panel. Blinking Off The printer is the position of the following tables describe the light patterns on either a cut form or an envelope. The printer is selected. On A printer error has occurred. Off A...

Quick Reference
Page 16
...pushes the paper from the front or the rear of the printer. You can set in Setup mode: • On-Sets the Tear Off function to move a continuous form automatically to the Tear Off position • Off-Lets you move a continuous form manually to the tear off position. Front loading paper Bottom loading... paper Using the Tear Off function Pressing the Tear Off button advances the perforation of a continuous form to the Tear Off position Note: On is set the Tear Off function to automatic or manual by adjusting the Auto Tear Off Setting in the Setup menu or from your program.
...pushes the paper from the front or the rear of the printer. You can set in Setup mode: • On-Sets the Tear Off function to move a continuous form automatically to the Tear Off position • Off-Lets you move a continuous form manually to the tear off position. Front loading paper Bottom loading... paper Using the Tear Off function Pressing the Tear Off button advances the perforation of a continuous form to the Tear Off position Note: On is set the Tear Off function to automatic or manual by adjusting the Auto Tear Off Setting in the Setup menu or from your program.
Quick Reference
Page 31
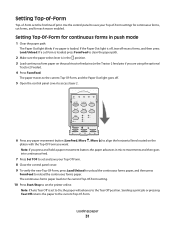
... the optional Tractor 2 Feeder). 4 Press FormFeed. Sending a print job or pressing Tear Off returns the paper to reload the continuous forms paper. The Paper Out light blinks if no paper is off, tear off . 5 Open the control panel cover to access layer... 2. 1 2 3 4 Power Set TOF LineFeed Macro Micro Micro Setup Pitch Lock 10 20 12 24 15 17 6 Press any paper movement button (LineFeed, Micro , Micro ) to align the horizontal... 1 Clear the paper path. Note: If Auto Tear Off is set the printer online.
... the optional Tractor 2 Feeder). 4 Press FormFeed. Sending a print job or pressing Tear Off returns the paper to reload the continuous forms paper. The Paper Out light blinks if no paper is off, tear off . 5 Open the control panel cover to access layer... 2. 1 2 3 4 Power Set TOF LineFeed Macro Micro Micro Setup Pitch Lock 10 20 12 24 15 17 6 Press any paper movement button (LineFeed, Micro , Micro ) to align the horizontal... 1 Clear the paper path. Note: If Auto Tear Off is set the printer online.

Quick Reference
Page 32
...press Load/Unload. Note: Use the second sheet of paper when the printer is off, tear off or runs out of continuous forms paper to set Top-Of-Form. 6 Press Set TOF to set the printer online. Setting Top-Of-Form for continuous forms in pull tractor mode. 8 Press Start/Stop to set to Off,...light goes off. If the Paper Out light is in pull mode 1 Turn the printer on the pull tractor feed pins. 4 Open the control panel cover to access layer 2. 1 2 3 4 Power Set TOF LineFeed Macro Micro Micro Setup Pitch Lock 10 20 12 24 15 17 5 Press any paper movement button (Micro...
...press Load/Unload. Note: Use the second sheet of paper when the printer is off, tear off or runs out of continuous forms paper to set Top-Of-Form. 6 Press Set TOF to set the printer online. Setting Top-Of-Form for continuous forms in pull tractor mode. 8 Press Start/Stop to set to Off,...light goes off. If the Paper Out light is in pull mode 1 Turn the printer on the pull tractor feed pins. 4 Open the control panel cover to access layer 2. 1 2 3 4 Power Set TOF LineFeed Macro Micro Micro Setup Pitch Lock 10 20 12 24 15 17 5 Press any paper movement button (Micro...
Quick Reference
Page 33
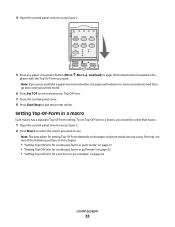
... the control panel cover. 8 Press Start/Stop to put the printer online. Note: If you press and hold a paper movement button, the paper will advance in a macro Each macro has a separate Top-Of-Form setting. Setting Top-Of-Form in micro movements and then go into continuous feed mode. 6 Press Set... pull mode" on page 32 • "Setting Top-Of-Form for a cut form or an envelope" on page 32 Loading paper 33 4 Open the control panel cover to access layer 2. 1 2 3 4 Power Set TOF LineFeed Macro Micro Micro Setup Pitch Lock 10 20 12 24 15 17 5 Press any paper movement button (...
... the control panel cover. 8 Press Start/Stop to put the printer online. Note: If you press and hold a paper movement button, the paper will advance in a macro Each macro has a separate Top-Of-Form setting. Setting Top-Of-Form in micro movements and then go into continuous feed mode. 6 Press Set... pull mode" on page 32 • "Setting Top-Of-Form for a cut form or an envelope" on page 32 Loading paper 33 4 Open the control panel cover to access layer 2. 1 2 3 4 Power Set TOF LineFeed Macro Micro Micro Setup Pitch Lock 10 20 12 24 15 17 5 Press any paper movement button (...

Quick Reference
Page 39
... available options you can change the factory default settings, how to set form length. Understanding Setup mode and menu options 39 This chapter describes how to change . Using Setup mode Note: Make sure continuous forms are called factory default settings. Understanding Setup mode and menu options The printer is preset at the factory for font, pitch...
... available options you can change the factory default settings, how to set form length. Understanding Setup mode and menu options 39 This chapter describes how to change . Using Setup mode Note: Make sure continuous forms are called factory default settings. Understanding Setup mode and menu options The printer is preset at the factory for font, pitch...

Quick Reference
Page 40
...setting. 1 With the printer in the printer when using Setup mode, load more Control Options. Printer Setup mode-Main menu To Select Exit and Save Setup Print All Press Set TOF LineFeed Forms Macro Options Macro Data Options Micro Control Options Micro Emulation Options Setup Interface Options Pitch 4 Select...to Main menu selection. 7 Press Set TOF again to exit Setup mode. Changing menu settings (an example) Note: Make sure continuous forms are saved only when the printer exits Setup mode. New settings are loaded in Setup mode, press Micro to print the Control Options menu. 2 ...
...setting. 1 With the printer in the printer when using Setup mode, load more Control Options. Printer Setup mode-Main menu To Select Exit and Save Setup Print All Press Set TOF LineFeed Forms Macro Options Macro Data Options Micro Control Options Micro Emulation Options Setup Interface Options Pitch 4 Select...to Main menu selection. 7 Press Set TOF again to exit Setup mode. Changing menu settings (an example) Note: Make sure continuous forms are saved only when the printer exits Setup mode. New settings are loaded in Setup mode, press Micro to print the Control Options menu. 2 ...

Quick Reference
Page 41
... button that corresponds to the language you are saved only when the printer exits Setup mode. • If the printer runs out of paper while you want, or press Setup to print more paper into the Tractor pins, and then press Setup to continue. The following list items will appear at the top of... and menu options 41 Menu Language To Select Press No Change Set TOF English LineFeed French Macro German Micro Italian Micro (More) Setup Return to Main menu Pitch Printer menus now print in French. 6 Press Pitch to return to the Main menu or press Set TOF (No Change) to go back ...
... button that corresponds to the language you are saved only when the printer exits Setup mode. • If the printer runs out of paper while you want, or press Setup to print more paper into the Tractor pins, and then press Setup to continue. The following list items will appear at the top of... and menu options 41 Menu Language To Select Press No Change Set TOF English LineFeed French Macro German Micro Italian Micro (More) Setup Return to Main menu Pitch Printer menus now print in French. 6 Press Pitch to return to the Main menu or press Set TOF (No Change) to go back ...
Quick Reference
Page 42
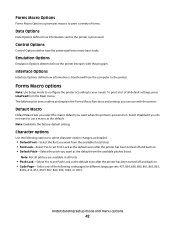
.... The following list items outline and explain the Forms Macro functions and settings you can use a macro as the default. Understanding Setup mode and menu options 42 Emulation Options Emulation Options determine how the printer interacts with the printer: Default Macro Default Macro lets you select the... set Pitch Lock as the default even after the printer has been turned off and back on. • Default Pitch-Select the pitch you want as the default from the computer to the printer. Forms Macro options Note: Use Setup mode to configure the printer according to your needs.
.... The following list items outline and explain the Forms Macro functions and settings you can use a macro as the default. Understanding Setup mode and menu options 42 Emulation Options Emulation Options determine how the printer interacts with the printer: Default Macro Default Macro lets you select the... set Pitch Lock as the default even after the printer has been turned off and back on. • Default Pitch-Select the pitch you want as the default from the computer to the printer. Forms Macro options Note: Use Setup mode to configure the printer according to your needs.

Quick Reference
Page 43
...Lexmark Web site at www.lexmark.com. - 437 is the factory default setting. On-Lets you can use with the printer: Understanding Setup mode and menu options 43 Data options Note: Use Setup mode to configure the printer according to the Tear Off bar position. - To print a list of a continuous form... down specific key combinations when the printer is the factory default setting. • Eject by pressing FormFeed. Note: On is the factory default setting. • Character Set-Select Character Set 1 or Character Set 2. On-Continuous forms automatically advance to your needs. Note...
...Lexmark Web site at www.lexmark.com. - 437 is the factory default setting. On-Lets you can use with the printer: Understanding Setup mode and menu options 43 Data options Note: Use Setup mode to configure the printer according to the Tear Off bar position. - To print a list of a continuous form... down specific key combinations when the printer is the factory default setting. • Eject by pressing FormFeed. Note: On is the factory default setting. • Character Set-Select Character Set 1 or Character Set 2. On-Continuous forms automatically advance to your needs. Note...

Quick Reference
Page 44
... receive buffer for downloading fonts • Disabled-Uses the entire buffer as a receive buffer Note: Enabled is the factory default setting. Understanding Setup mode and menu options 44 Note: Off is the factory default setting. Download to 47.5KB or 480KB, depending on whether Download is enabled... Note: Maximum is the factory default setting. Buffer • Minimum-Sets the receive buffer size to zero • Maximum-For 2580/2581 models, sets the receive buffer size to 64KB or 480KB, depending on whether NLQ II (Near Letter Quality) Download is enabled •...
... receive buffer for downloading fonts • Disabled-Uses the entire buffer as a receive buffer Note: Enabled is the factory default setting. Understanding Setup mode and menu options 44 Note: Off is the factory default setting. Download to 47.5KB or 480KB, depending on whether Download is enabled... Note: Maximum is the factory default setting. Buffer • Minimum-Sets the receive buffer size to zero • Maximum-For 2580/2581 models, sets the receive buffer size to 64KB or 480KB, depending on whether NLQ II (Near Letter Quality) Download is enabled •...
Quick Reference
Page 45
... . Control options Note: Use Setup mode to configure the printer according to the Ready state. Press Start/Stop to return the printer to your needs. Note: Enabled is selected, the printer still prints unidirectionally. Note: English is the factory default setting. TOF Read • Enabled-Verifies the Top-Of-Form before printing begins on continuous...
... . Control options Note: Use Setup mode to configure the printer according to the Ready state. Press Start/Stop to return the printer to your needs. Note: Enabled is selected, the printer still prints unidirectionally. Note: English is the factory default setting. TOF Read • Enabled-Verifies the Top-Of-Form before printing begins on continuous...

Quick Reference
Page 46
... level. • Disabled-The printer prints at www.lexmark.com/publications. Epson mode • Table Select lets you use the high-resolution 24-wire graphics commands. Emulation options Note: Enter Setup mode to configure the printer according to those used by Epson FX850/FX 1050: Japan, Norway, Denmark II, Korea (2580/2581 models only), Spain...
... level. • Disabled-The printer prints at www.lexmark.com/publications. Epson mode • Table Select lets you use the high-resolution 24-wire graphics commands. Emulation options Note: Enter Setup mode to configure the printer according to those used by Epson FX850/FX 1050: Japan, Norway, Denmark II, Korea (2580/2581 models only), Spain...
Quick Reference
Page 47
Interface options Note: Use Setup mode to configure the printer according to your needs. To print a list of all default settings, press LineFeed from the available connection cables. Note: Auto is installed), and network ... Selection Unless turned off, the Auto setting automatically selects the printer interface from the Main menu. Honor Init. • Enabled-Honors the initialization signal on the parallel port • Disabled-Ignores the initialization signal on network models). Understanding Setup mode and menu options 47 The following connection cables are available: parallel...
Interface options Note: Use Setup mode to configure the printer according to your needs. To print a list of all default settings, press LineFeed from the available connection cables. Note: Auto is installed), and network ... Selection Unless turned off, the Auto setting automatically selects the printer interface from the Main menu. Honor Init. • Enabled-Honors the initialization signal on the parallel port • Disabled-Ignores the initialization signal on network models). Understanding Setup mode and menu options 47 The following connection cables are available: parallel...

User Guide
Page 2
Contents 2 Contents Safety information 6 Learning about the printer 7 Printer overview...7 Applying control panel overlays...8 Understanding the printer features and functions 9 Printing a demonstration page...11 Printing a network setup page...13 Printing from Windows or DOS...13 Using IBM emulation mode...13 Using ...22 Setting the forms thickness lever...22 Paper paths...24 Using the Tear Off function...24 Loading continuous paper...25 Loading continuous forms using the push tractor 25 Front loading continuous forms using the pull tractor 28 Bottom loading continuous forms using the ...
Contents 2 Contents Safety information 6 Learning about the printer 7 Printer overview...7 Applying control panel overlays...8 Understanding the printer features and functions 9 Printing a demonstration page...11 Printing a network setup page...13 Printing from Windows or DOS...13 Using IBM emulation mode...13 Using ...22 Setting the forms thickness lever...22 Paper paths...24 Using the Tear Off function...24 Loading continuous paper...25 Loading continuous forms using the push tractor 25 Front loading continuous forms using the pull tractor 28 Bottom loading continuous forms using the ...
User Guide
Page 3
...menu...49 Main menu options...49 Forms Macro options...50 Data options ...51 Control options ...52 Emulation options...54 Interface options...54 Maintaining the printer 56 Ordering supplies...56 Removing the ribbon cartridge...56 Cleaning the printer...56 Recycling Lexmark products...57 Administrative support 58 ... the printer 42 Changing tractor positions 43 Push tractor position...43 Pull tractor position...43 Converting the push tractor to pull tractor position 44 Converting the pull tractor to push tractor position 45 Understanding Setup mode and menu options 47 Using Setup mode......
...menu...49 Main menu options...49 Forms Macro options...50 Data options ...51 Control options ...52 Emulation options...54 Interface options...54 Maintaining the printer 56 Ordering supplies...56 Removing the ribbon cartridge...56 Cleaning the printer...56 Recycling Lexmark products...57 Administrative support 58 ... the printer 42 Changing tractor positions 43 Push tractor position...43 Pull tractor position...43 Converting the push tractor to pull tractor position 44 Converting the pull tractor to push tractor position 45 Understanding Setup mode and menu options 47 Using Setup mode......
User Guide
Page 10
...buttons only, thus limiting the potential that untrained operators may accidentally change forms settings Ribbon cartridge Contains the inked fabric ribbon Printer tests • Power‑on Self Test • Printer test page-Determines whether your machine has print problems • Demonstration...symbols Prints a variety of pre‑printed forms. Manual front loading for Load/Unload, Tear Off, Font, Setup, Pitch, Macro, and paper movement functions. Control panel lights indicate current status. Learning about the printer 10 Feature/function All models Control panel ...
...buttons only, thus limiting the potential that untrained operators may accidentally change forms settings Ribbon cartridge Contains the inked fabric ribbon Printer tests • Power‑on Self Test • Printer test page-Determines whether your machine has print problems • Demonstration...symbols Prints a variety of pre‑printed forms. Manual front loading for Load/Unload, Tear Off, Font, Setup, Pitch, Macro, and paper movement functions. Control panel lights indicate current status. Learning about the printer 10 Feature/function All models Control panel ...


