User's Guide
Page 3
... Main menu options...50 Forms Macro options...51 Data options ...52 Control options...54 Emulation options ...55 Interface options...56 Maintaining the printer 57 Ordering supplies...57 Removing the ribbon cartridge...57 Cleaning the printer...57 Recycling Lexmark products...58 Administrative support 59 Restoring the factory default settings...59 Supporting IPSec...60 Supporting SNMPv3...60 Using 802...
... Main menu options...50 Forms Macro options...51 Data options ...52 Control options...54 Emulation options ...55 Interface options...56 Maintaining the printer 57 Ordering supplies...57 Removing the ribbon cartridge...57 Cleaning the printer...57 Recycling Lexmark products...58 Administrative support 59 Restoring the factory default settings...59 Supporting IPSec...60 Supporting SNMPv3...60 Using 802...
User's Guide
Page 4
... Printer speed slows ...68 Incorrect characters print, left margin changes, or printing stops 69 Printing continues beyond the edges of the continuous forms ...printer entrance 70 Paper jam in the Tractor 2 Feeder...70 Printer does not feed paper ...70 Printer does not feed from the optional Tractor 2 Feeder 71 Printer... Forms are smudged or print is too dark ...74 Incorrect number of lines on , but does not print ...67 Printer alarm sounds...67 Printer ... and Load/Unload 68 Printer power switch is off...68 Left margin moves to the computer 66 Printer is noisy...67 Printer sounds like it is ...
... Printer speed slows ...68 Incorrect characters print, left margin changes, or printing stops 69 Printing continues beyond the edges of the continuous forms ...printer entrance 70 Paper jam in the Tractor 2 Feeder...70 Printer does not feed paper ...70 Printer does not feed from the optional Tractor 2 Feeder 71 Printer... Forms are smudged or print is too dark ...74 Incorrect number of lines on , but does not print ...67 Printer alarm sounds...67 Printer ... and Load/Unload 68 Printer power switch is off...68 Left margin moves to the computer 66 Printer is noisy...67 Printer sounds like it is ...

User's Guide
Page 10
... 360 x 360 dpi square inch (dpi) Prints original plus five copies (six-part Prints original plus three copies forms) (four-part forms) Learning about the printer 10 Resident fonts • Fast Draft • Draft • Gothic • Courier Print styles Highlighting capability: ... • Overscore • Subscript • Superscript • Underline • Shading • Outline Graphics printing Note: This feature supports existing graphics programs. Multiple-part forms Resolution of up to 144 x 240 dots per second (cps) • 520 cps 309 cps • 410 cps •...
... 360 x 360 dpi square inch (dpi) Prints original plus five copies (six-part Prints original plus three copies forms) (four-part forms) Learning about the printer 10 Resident fonts • Fast Draft • Draft • Gothic • Courier Print styles Highlighting capability: ... • Overscore • Subscript • Superscript • Underline • Shading • Outline Graphics printing Note: This feature supports existing graphics programs. Multiple-part forms Resolution of up to 144 x 240 dots per second (cps) • 520 cps 309 cps • 410 cps •...
User's Guide
Page 12
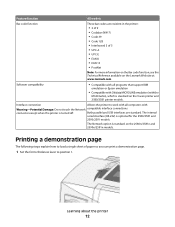
... site at www.lexmark.com. Learning about the printer 12 Both parallel and USB interfaces are resident in the printer: • 3 of 9 • Codabar (NW-7) • Code 39 • Code 128 • Interleaved 2 of paper so you can print a demonstration page. 1 Set the forms thickness lever to work with all programs that support IBM emulation...
... site at www.lexmark.com. Learning about the printer 12 Both parallel and USB interfaces are resident in the printer: • 3 of 9 • Codabar (NW-7) • Code 39 • Code 128 • Interleaved 2 of paper so you can print a demonstration page. 1 Set the forms thickness lever to work with all programs that support IBM emulation...
User's Guide
Page 14
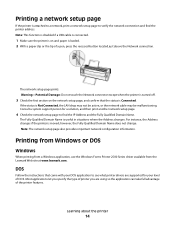
.... Printing from Windows or DOS Windows When printing from a Windows application, use the Windows Forms Printer 2500 Series driver available from the Lexmark Web site at www.lexmark.com. The network setup page prints. Consult a system support person for your level of the printer features. Note: The network setup page also provides important network configuration information. Note...
.... Printing from Windows or DOS Windows When printing from a Windows application, use the Windows Forms Printer 2500 Series driver available from the Lexmark Web site at www.lexmark.com. The network setup page prints. Consult a system support person for your level of the printer features. Note: The network setup page also provides important network configuration information. Note...
User's Guide
Page 15
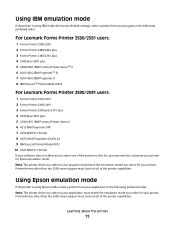
... 2500 series support most , but not all , of the printer capabilities. For Lexmark Forms Printer 2580/2581 users: 1 Forms Printer 2580/2581 2 Forms Printer 2480/2481 plus 3 Forms Printer 2380/2381 plus 4 2380 plus/2381 plus 5 2380/2381 IBM Personal Printer SeriesTM II 6 4201/4202 IBM ProprinterTM III 7 4201/4202 IBM Proprinter II 8 IBM ExecJetTM Printer Model 4072 For Lexmark Forms Printer 2590/2591 users: 1 Forms Printer 2590/2591 2 Forms Printer...
... 2500 series support most , but not all , of the printer capabilities. For Lexmark Forms Printer 2580/2581 users: 1 Forms Printer 2580/2581 2 Forms Printer 2480/2481 plus 3 Forms Printer 2380/2381 plus 4 2380 plus/2381 plus 5 2380/2381 IBM Personal Printer SeriesTM II 6 4201/4202 IBM ProprinterTM III 7 4201/4202 IBM Proprinter II 8 IBM ExecJetTM Printer Model 4072 For Lexmark Forms Printer 2590/2591 users: 1 Forms Printer 2590/2591 2 Forms Printer...
User's Guide
Page 18
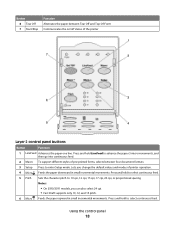
...the on/off status of pre-printed forms, selects between four document formats 3 Setup Press to enter Setup mode. Press and hold LineFeed to advance the paper 5 micro movements, and then go into continuous feed. 2 Macro To support different styles of the printer Layer 2 control panel buttons Button ...• On 2590/2591 models, you change the default values and modes of printer operation. 4 Micro Feeds the paper downward in small incremental movements. Lets you can also select 24 cpi. • Fast Draft supports only 10, 12, and 15 pitch. 6 Micro Feeds the paper upward in...
...the on/off status of pre-printed forms, selects between four document formats 3 Setup Press to enter Setup mode. Press and hold LineFeed to advance the paper 5 micro movements, and then go into continuous feed. 2 Macro To support different styles of the printer Layer 2 control panel buttons Button ...• On 2590/2591 models, you change the default values and modes of printer operation. 4 Micro Feeds the paper downward in small incremental movements. Lets you can also select 24 cpi. • Fast Draft supports only 10, 12, and 15 pitch. 6 Micro Feeds the paper upward in...
User's Guide
Page 43
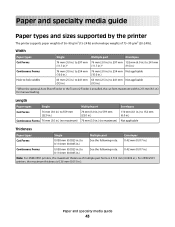
...in.) to 559 mm (22.0 in.) 76 mm (3.0 in.) (no maximum) Envelopes 110 mm (4.1 in.) to 152 mm (6.0 in.) Not applicable Thickness Paper types Cut Forms Single 0.058 mm (0.0023 in.) to 0.114 mm (0.0045 in.) Multiple part See the following note. 0.42 mm (0.017 in.) Note: For 2580/2581...mm (2.5 in.) to 0.114 mm (0.0045 in.) See the following note. For 2590/2591 printers, the maximum thickness is 0.36 mm (0.015 in.). Paper and specialty media guide Paper types and sizes supported by the printer The printer supports paper weights of 56-90 g/m2 (15-24 lb) and envelope weights of multiple part...
...in.) to 559 mm (22.0 in.) 76 mm (3.0 in.) (no maximum) Envelopes 110 mm (4.1 in.) to 152 mm (6.0 in.) Not applicable Thickness Paper types Cut Forms Single 0.058 mm (0.0023 in.) to 0.114 mm (0.0045 in.) Multiple part See the following note. 0.42 mm (0.017 in.) Note: For 2580/2581...mm (2.5 in.) to 0.114 mm (0.0045 in.) See the following note. For 2590/2591 printers, the maximum thickness is 0.36 mm (0.015 in.). Paper and specialty media guide Paper types and sizes supported by the printer The printer supports paper weights of 56-90 g/m2 (15-24 lb) and envelope weights of multiple part...

User's Guide
Page 44
... of the printer. It then functions as a pull tractor and supports front and bottom paper loading. Pull tractor position The front tractor unit can be removed and installed at the front of the printer. Using the front push tractor is the most convenient way to load continuous forms, and allows... you to change the tractor unit position. Changing tractor positions 44 This section describes how to use the Tear Off feature of the printer. Push tractor position The printer comes with the tractor unit installed in the ...
... of the printer. It then functions as a pull tractor and supports front and bottom paper loading. Pull tractor position The front tractor unit can be removed and installed at the front of the printer. Using the front push tractor is the most convenient way to load continuous forms, and allows... you to change the tractor unit position. Changing tractor positions 44 This section describes how to use the Tear Off feature of the printer. Push tractor position The printer comes with the tractor unit installed in the ...

User's Guide
Page 55
... with the Proprinter III. • On-The printer emulates a Proprinter III. • Off-The printer operates with the Epson LQ570/LQ 1070. • On-Graphics commands are available. • Off-Graphics commands are also supported, but only through host commands used with added ...capabilities. Note: USA is the factory default setting. Quiet • Enabled-The printer prints at a quieter noise level. • Disabled-The printer prints at www.lexmark.com/publications. Note: Printing speed...
... with the Proprinter III. • On-The printer emulates a Proprinter III. • Off-The printer operates with the Epson LQ570/LQ 1070. • On-Graphics commands are available. • Off-Graphics commands are also supported, but only through host commands used with added ...capabilities. Note: USA is the factory default setting. Quiet • Enabled-The printer prints at a quieter noise level. • Disabled-The printer prints at www.lexmark.com/publications. Note: Printing speed...

User's Guide
Page 59
...Note: The control panel lights blink on and off several times. Note: The control panel lights blink on and off several times. Administrative support Restoring the factory default settings Restoring the US factory default settings The factory default settings for Europe are : • Code pages: 437 ...• Character Set: 1 • Form length: 11 inches To restore the factory default settings: 1 Make sure the ribbon cartridge is installed and paper is loaded. 2 Turn the printer off. 3 Open the ribbon access cover. 4 Move the printhead over toward the ...
...Note: The control panel lights blink on and off several times. Note: The control panel lights blink on and off several times. Administrative support Restoring the factory default settings Restoring the US factory default settings The factory default settings for Europe are : • Code pages: 437 ...• Character Set: 1 • Form length: 11 inches To restore the factory default settings: 1 Make sure the ribbon cartridge is installed and paper is loaded. 2 Turn the printer off. 3 Open the ribbon access cover. 4 Move the printhead over toward the ...
User's Guide
Page 60
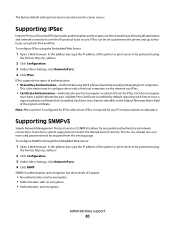
In the address bar, type the IP address of security. Note: After a printer is configured for IPSec with no encryption • Authentication and encryption Administrative support 60 Each host computer must have a signed authority certificate that is required for any host computer... or subnet of hosts for encrypted and authenticated network connections. It also lets a system support person select the desired level of the printer or print server to be protected using the format: http://ip_address/. 2 Click Configuration. 3 Under Other Settings, ...
In the address bar, type the IP address of security. Note: After a printer is configured for IPSec with no encryption • Authentication and encryption Administrative support 60 Each host computer must have a signed authority certificate that is required for any host computer... or subnet of hosts for encrypted and authenticated network connections. It also lets a system support person select the desired level of the printer or print server to be protected using the format: http://ip_address/. 2 Click Configuration. 3 Under Other Settings, ...

User's Guide
Page 61
Support for 802.1x requires the establishment of credentials. In the address bar, type the IP address of the printer or print server to print servers presenting a valid set of credentials for the printer to be known to the Authentication Server (AS). To enable and configure 802.1x after ... as part of the printer or print server to join networks that require authentication before allowing access. In the address bar, type the IP address of the credentials: 1 Open a Web browser. To install and use certificates as certificates. Administrative support 61 You can manage the credentials ...
Support for 802.1x requires the establishment of credentials. In the address bar, type the IP address of the printer or print server to print servers presenting a valid set of credentials for the printer to be known to the Authentication Server (AS). To enable and configure 802.1x after ... as part of the printer or print server to join networks that require authentication before allowing access. In the address bar, type the IP address of the credentials: 1 Open a Web browser. To install and use certificates as certificates. Administrative support 61 You can manage the credentials ...
User's Guide
Page 64
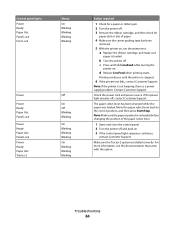
...position of paper. 4 Make sure the carrier packing tape has been removed. 5 With the printer on . Note: Make sure the paper is a power supply problem. Contact Customer Support. Check the power cord and power source. Troubleshooting 64 The paper select lever has been ...loaded. a Replace the ribbon cartridge, and make sure paper is stopped. 6 If the printer test fails, contact Customer Support. b Turn the printer off , contact Customer Support. Printing continues until the printer is loaded. Move the paper select lever back to the correct position, and then press Start...
...position of paper. 4 Make sure the carrier packing tape has been removed. 5 With the printer on . Note: Make sure the paper is a power supply problem. Contact Customer Support. Check the power cord and power source. Troubleshooting 64 The paper select lever has been ...loaded. a Replace the ribbon cartridge, and make sure paper is stopped. 6 If the printer test fails, contact Customer Support. b Turn the printer off , contact Customer Support. Printing continues until the printer is loaded. Move the paper select lever back to the correct position, and then press Start...
User's Guide
Page 65
...nearest service representative, visit the Lexmark Web site at www.lexmark.com. For more information, see "Forms Macro options" on page 51. 1 Turn the printer off . 2 Turn the printer on your printer. Troubleshooting 65 The following steps ...illustrate how to Disabled. If the control panel light sequence returns, contact Customer Support. Notes: • Make sure continuous forms are loaded in the printer...
...nearest service representative, visit the Lexmark Web site at www.lexmark.com. For more information, see "Forms Macro options" on page 51. 1 Turn the printer off . 2 Turn the printer on your printer. Troubleshooting 65 The following steps ...illustrate how to Disabled. If the control panel light sequence returns, contact Customer Support. Notes: • Make sure continuous forms are loaded in the printer...
User's Guide
Page 68
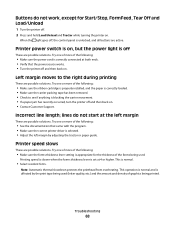
...back on , but the power light is off . 2 Press and hold Load/Unload and Tractor while turning the printer on . lines do not work, except for the thickness of the forms being used (letter quality, etc.) and the amount and density of the following : • Make sure the ...forms thickness lever is normal. • Select resident fonts. Printer speed slows These are active. This is set at 4 or higher. Try one of more of the following : • See the documentation that the power source works. • Turn the printer off , the control panel is on . • Contact Customer Support....
...back on , but the power light is off . 2 Press and hold Load/Unload and Tractor while turning the printer on . lines do not work, except for the thickness of the forms being used (letter quality, etc.) and the amount and density of the following : • Make sure the ...forms thickness lever is normal. • Select resident fonts. Printer speed slows These are active. This is set at 4 or higher. Try one of more of the following : • See the documentation that the power source works. • Turn the printer off , the control panel is on . • Contact Customer Support....

User's Guide
Page 73
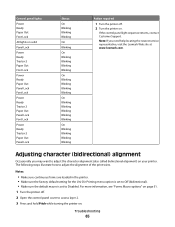
...FORMS THICKNESS LEVER The forms thickness lever may be set to 1. a Make sure the paper and the ribbon cartridge are using. Troubleshooting 73 You may help you solve print quality problems. If these suggestions do not correct the problem, contact Customer Support. Try one or more of print. 3 Replace the ribbon cartridge. 4 Run a printer... test. When the print becomes too light, turn the printer on, and then release LineFeed when printing begins. b Turn the printer off. Dots ...
...FORMS THICKNESS LEVER The forms thickness lever may be set to 1. a Make sure the paper and the ribbon cartridge are using. Troubleshooting 73 You may help you solve print quality problems. If these suggestions do not correct the problem, contact Customer Support. Try one or more of print. 3 Replace the ribbon cartridge. 4 Run a printer... test. When the print becomes too light, turn the printer on, and then release LineFeed when printing begins. b Turn the printer off. Dots ...
User's Guide
Page 74
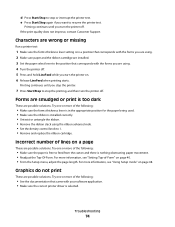
Forms are using the ribbon advance knob. • Set the density control knob to 1. • Remove and replace the ribbon cartridge. If the print quality does not improve, contact Customer Support. Troubleshooting 74 e Press Start/Stop again if you turn the printer on page 40. &#...Set the paper select lever to the position that came with the forms you stop the printer. 7 Press Start/Stop to stop or interrupt the printer test. Printing continues until you turn the printer off. Incorrect number of -Form" on . 6 Release LineFeed when printing starts. For more information,...
Forms are using the ribbon advance knob. • Set the density control knob to 1. • Remove and replace the ribbon cartridge. If the print quality does not improve, contact Customer Support. Troubleshooting 74 e Press Start/Stop again if you turn the printer on page 40. &#...Set the paper select lever to the position that came with the forms you stop the printer. 7 Press Start/Stop to stop or interrupt the printer test. Printing continues until you turn the printer off. Incorrect number of -Form" on . 6 Release LineFeed when printing starts. For more information,...

User's Guide
Page 75
..., see the label on the inside top front cover of the printer. or Canada, call Customer Support, describe the problem you are possible solutions. You need to find a solution. Troubleshooting 75 Contacting Customer Support When you have already taken to know your software application. The ...800-539-6275). For other countries/regions, visit the Lexmark Web site at www.lexmark.com. Try one or more of the following: • Reset the forms thickness lever. • For more information, see the documentation that came with your printer model type and serial number. In the U.S.
..., see the label on the inside top front cover of the printer. or Canada, call Customer Support, describe the problem you are possible solutions. You need to find a solution. Troubleshooting 75 Contacting Customer Support When you have already taken to know your software application. The ...800-539-6275). For other countries/regions, visit the Lexmark Web site at www.lexmark.com. Try one or more of the following: • Reset the forms thickness lever. • For more information, see the documentation that came with your printer model type and serial number. In the U.S.

User's Guide
Page 76
.... Bldg 004-2/CSC 740 New Circle Road NW Lexington, KY 40550 © 2007 Lexmark International, Inc. Some states do not imply that product, program, or service may not apply to the information herein; For Lexmark technical support, visit support.lexmark.com. This publication could include technical inaccuracies or typographical errors. References in later editions. Notices...
.... Bldg 004-2/CSC 740 New Circle Road NW Lexington, KY 40550 © 2007 Lexmark International, Inc. Some states do not imply that product, program, or service may not apply to the information herein; For Lexmark technical support, visit support.lexmark.com. This publication could include technical inaccuracies or typographical errors. References in later editions. Notices...

