
User's Guide
Page 5
Depending on the printer model you have chosen, your printer The Lexmark™ Forms Printer 2400 Series are available in 9- and 24-wire narrow-carriage (2480 and 2490) and 9- Printer models Carriage width Cut forms Continuous forms Narrow 297 mm (11.7 in.) 254 mm (10.0 in.) Wide 419 mm (16.5 in.) 406 mm (16.0 in.) 1 and 24-wire wide-carriage (2481 and 2491) models. About your printer 1 About your printer may look different than those illustrated in this manual.
Depending on the printer model you have chosen, your printer The Lexmark™ Forms Printer 2400 Series are available in 9- and 24-wire narrow-carriage (2480 and 2490) and 9- Printer models Carriage width Cut forms Continuous forms Narrow 297 mm (11.7 in.) 254 mm (10.0 in.) Wide 419 mm (16.5 in.) 406 mm (16.0 in.) 1 and 24-wire wide-carriage (2481 and 2491) models. About your printer 1 About your printer may look different than those illustrated in this manual.

User's Guide
Page 11
... guides Align the margins of a cut forms and envelopes. Printer description Forms thickness lever Ribbon access cover About your printer Front cover Operator panel Paper guides Manual feed door Power switch Paper select lever Printer parts and function Part name Function Forms thickness lever Adjusts the printhead for the thickness of printer functions simple and convenient. Ribbon access...
... guides Align the margins of a cut forms and envelopes. Printer description Forms thickness lever Ribbon access cover About your printer Front cover Operator panel Paper guides Manual feed door Power switch Paper select lever Printer parts and function Part name Function Forms thickness lever Adjusts the printhead for the thickness of printer functions simple and convenient. Ribbon access...
User's Guide
Page 15
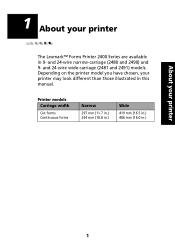
Power switch Manual feed door Paper select lever 5 Move the left and right paper guides. 11 About your printer 3 Open the manual feed door. 4 Move the paper select lever up to the right until it stops. 6 Insert a single sheet of paper into the front of the printer and adjust the right paper guide so the paper is aligned against both the left paper guide to the cut forms position.
Power switch Manual feed door Paper select lever 5 Move the left and right paper guides. 11 About your printer 3 Open the manual feed door. 4 Move the paper select lever up to the right until it stops. 6 Insert a single sheet of paper into the front of the printer and adjust the right paper guide so the paper is aligned against both the left paper guide to the cut forms position.

User's Guide
Page 21
Setting up your printer Connecting the serial cable For installation and connection instructions, see the optional serial interface manual. Note: Instructions for installing drivers are using a Windows program, use the Windows Forms Printer 2400 Series driver available from the Lexmark Web site at www.lexmark.com. About your Windows and DOS application software Windows-based applications If you are in the readme.1st file included in the download package. 17
Setting up your printer Connecting the serial cable For installation and connection instructions, see the optional serial interface manual. Note: Instructions for installing drivers are using a Windows program, use the Windows Forms Printer 2400 Series driver available from the Lexmark Web site at www.lexmark.com. About your Windows and DOS application software Windows-based applications If you are in the readme.1st file included in the download package. 17

User's Guide
Page 33
... bar position.You can set Tear Off to move a continuous form automatically to the Tear Off position (Auto Tear Off set to On or to One Second), or you can use the operator panel to advance the paper when the printer is in the Setup menu or your application software. If you... must set to Off). Note: For the Tear Off function to work properly, you are at the Tear Off bar: • Press LineFeed to move the paper incrementally. • Press Tear Off to move a continuous form manually to the...
... bar position.You can set Tear Off to move a continuous form automatically to the Tear Off position (Auto Tear Off set to On or to One Second), or you can use the operator panel to advance the paper when the printer is in the Setup menu or your application software. If you... must set to Off). Note: For the Tear Off function to work properly, you are at the Tear Off bar: • Press LineFeed to move the paper incrementally. • Press Tear Off to move a continuous form manually to the...
User's Guide
Page 76
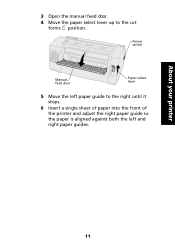
...using the pull tractor. 19 Make sure the printer is online (Ready light is On solid. If not, press Start/Stop until the Ready light is On solid). Loading a cut form or envelope Cut forms can be a single sheet, an envelope, or a multiple-part form. Note: If you have installed the optional Auto... Sheet Feeder or Tractor 2 Feeder, refer to set Top-Of-Form. They are placed one at a time into the manual feeder. Loading paper 16 Open the operator panel cover to access layer 2. 17 Press LineFeed, Micro ↑, or Micro ↓ to move the ...
...using the pull tractor. 19 Make sure the printer is online (Ready light is On solid. If not, press Start/Stop until the Ready light is On solid). Loading a cut form or envelope Cut forms can be a single sheet, an envelope, or a multiple-part form. Note: If you have installed the optional Auto... Sheet Feeder or Tractor 2 Feeder, refer to set Top-Of-Form. They are placed one at a time into the manual feeder. Loading paper 16 Open the operator panel cover to access layer 2. 17 Press LineFeed, Micro ↑, or Micro ↓ to move the ...

User's Guide
Page 77
See "Setting the forms thickness lever" on page 44 for the type of the continuous form and then press Load/Unload to park the continuous forms. The Paper Out light is clear. 3 If continuous forms are currently loaded, tear off the leading edge of paper you are using. Loading paper Loading a cut form or envelope manually 1 Turn the printer On. 2 Make sure the paper path is blinking. 4 Set the forms thickness lever to a suitable setting for more information. 73
See "Setting the forms thickness lever" on page 44 for the type of the continuous form and then press Load/Unload to park the continuous forms. The Paper Out light is clear. 3 If continuous forms are currently loaded, tear off the leading edge of paper you are using. Loading paper Loading a cut form or envelope manually 1 Turn the printer On. 2 Make sure the paper path is blinking. 4 Set the forms thickness lever to a suitable setting for more information. 73
User's Guide
Page 78
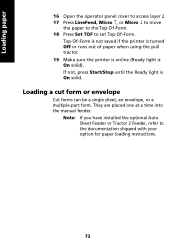
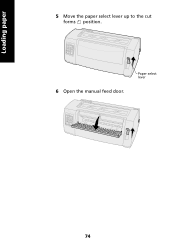
Loading paper 5 Move the paper select lever up to the cut forms position. 6 Open the manual feed door. Paper select lever 74
Loading paper 5 Move the paper select lever up to the cut forms position. 6 Open the manual feed door. Paper select lever 74
User's Guide
Page 81
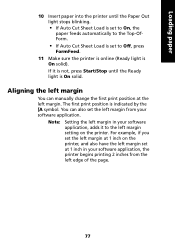
You can manually change the first print position at 1 inch in your software application. Aligning the left margin You can also set the left edge of the page. 77 If it to Off, press FormFeed. 11 Make sure the printer is online (Ready light is On solid). Note: Setting the ...left margin in your software application, the printer begins printing 2 inches from the left margin from your software application, adds it is not,...
You can manually change the first print position at 1 inch in your software application. Aligning the left margin You can also set the left edge of the page. 77 If it to Off, press FormFeed. 11 Make sure the printer is online (Ready light is On solid). Note: Setting the ...left margin in your software application, the printer begins printing 2 inches from the left margin from your software application, adds it is not,...
User's Guide
Page 84
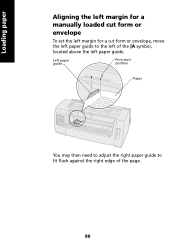
Loading paper Aligning the left margin for a manually loaded cut form or envelope To set the left margin for a cut form or envelope, move the left paper guide to fit flush against the right edge of the [A symbol, located above the left of the page. 80 Left paper guide Print start position Paper You may then need to adjust the right paper guide to the left paper guide.
Loading paper Aligning the left margin for a manually loaded cut form or envelope To set the left margin for a cut form or envelope, move the left paper guide to fit flush against the right edge of the [A symbol, located above the left of the page. 80 Left paper guide Print start position Paper You may then need to adjust the right paper guide to the left paper guide.

User's Guide
Page 89
... ↑, Micro ↓) to the current Top-Of-Form • If Auto Cut Sheet is set to On, the printer moves the paper or envelope to align with the horizontal lines (located on pag e83. For help loading paper, see "Loading a cut form or envelope manually" on pag e73. • If Auto Cut Sheet... is set and save Top-Of-Form: 1 Clear the paper path. See the...
... ↑, Micro ↓) to the current Top-Of-Form • If Auto Cut Sheet is set to On, the printer moves the paper or envelope to align with the horizontal lines (located on pag e83. For help loading paper, see "Loading a cut form or envelope manually" on pag e73. • If Auto Cut Sheet... is set and save Top-Of-Form: 1 Clear the paper path. See the...
User's Guide
Page 101
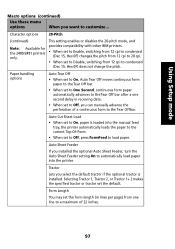
Using Setup mode Macro options (continued) Use these menu options When you want to automatically load paper into the manual feed tray, the printer automatically loads the paper to the current Top-Of-Form. • When set to Disable, switching from 12 cpi to 20 cpi. • When set to Off, press ...advances to the Tear Off bar after a one second delay in lines per page) from one line to a maximum of a continuous form to Off, you can manually advance the perforation of 22 inches. 97 Auto Sheet Feeder If you select the default tractor if the optional tractor is loaded into the...
Using Setup mode Macro options (continued) Use these menu options When you want to automatically load paper into the manual feed tray, the printer automatically loads the paper to the current Top-Of-Form. • When set to Disable, switching from 12 cpi to 20 cpi. • When set to Off, press ...advances to the Tear Off bar after a one second delay in lines per page) from one line to a maximum of a continuous form to Off, you can manually advance the perforation of 22 inches. 97 Auto Sheet Feeder If you select the default tractor if the optional tractor is loaded into the...
User's Guide
Page 113
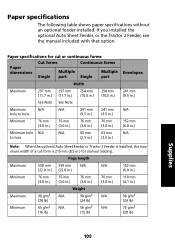
... for manual loading. Page length Maximum 559 mm 559 mm N/A N/A (22.0 in.) (22.0 in.) 152 mm (6.0 in.) Minimum 76 mm (3.0 in.) 76 mm (3.0 in.) 76 mm (3.0 in.) 76 mm (3.0 in.) 110 mm (4.1 in .) for cut or continuous forms Paper dimensions Cut forms Multiple Single part Continuous forms Single ...in.) Envelopes 241 mm (9.5 in.) N/A 152 mm (6.0 in.) N/A Note: When the optional Auto Sheet Feeder or Tractor 2 Feeder is installed, the maximum width of a cut form is 215 mm (8.5 in .) Maximum Minimum Weight 90 g/m2 N/A (24 lb) 90 g/m2 N/A (24 lb) 65 g/m2 N/A (16 lb) 56 g/m2 N/A (...
... for manual loading. Page length Maximum 559 mm 559 mm N/A N/A (22.0 in.) (22.0 in.) 152 mm (6.0 in.) Minimum 76 mm (3.0 in.) 76 mm (3.0 in.) 76 mm (3.0 in.) 76 mm (3.0 in.) 110 mm (4.1 in .) for cut or continuous forms Paper dimensions Cut forms Multiple Single part Continuous forms Single ...in.) Envelopes 241 mm (9.5 in.) N/A 152 mm (6.0 in.) N/A Note: When the optional Auto Sheet Feeder or Tractor 2 Feeder is installed, the maximum width of a cut form is 215 mm (8.5 in .) Maximum Minimum Weight 90 g/m2 N/A (24 lb) 90 g/m2 N/A (24 lb) 65 g/m2 N/A (16 lb) 56 g/m2 N/A (...
User's Guide
Page 118
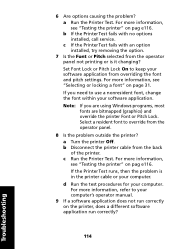
... causing the problem? For more information, see "Selecting or locking a font" on the printer, does a different software application run correctly on page 31. For more information, refer to use a nonresident font, change the font within your computer's operator manual. 9 If a software application does not run correctly? If you are using Windows programs...
... causing the problem? For more information, see "Selecting or locking a font" on the printer, does a different software application run correctly on page 31. For more information, refer to use a nonresident font, change the font within your computer's operator manual. 9 If a software application does not run correctly? If you are using Windows programs...
User's Guide
Page 123
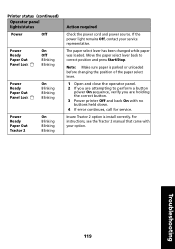
If the power light remains Off, contact your option. Printer status (continued) Operator panel lights/status Power Off Power Ready Paper Out Panel Lock On Off Blinking Blinking Power Ready Paper Out Panel Lock On ... Action required Check the power cord and power source. The paper select lever has been changed while paper was loaded. For instructions, see the Tractor 2 manual that came with no buttons held down. 4 If error continues, call for service. Insure Tractor 2 option is parked or unloaded before changing the position of...
If the power light remains Off, contact your option. Printer status (continued) Operator panel lights/status Power Off Power Ready Paper Out Panel Lock On Off Blinking Blinking Power Ready Paper Out Panel Lock On ... Action required Check the power cord and power source. The paper select lever has been changed while paper was loaded. For instructions, see the Tractor 2 manual that came with no buttons held down. 4 If error continues, call for service. Insure Tractor 2 option is parked or unloaded before changing the position of...
User's Guide
Page 132
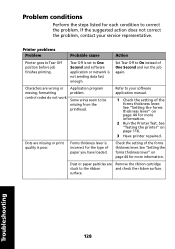
... information. surface. Refer to the ribbon and check the ribbon surface. Forms thickness lever is poor. Printer problems Problem Probable cause Action Printer goes to correct the problem. Characters are Remove the ribbon cartridge stuck ...to your service representative. If the suggested action does not correct the problem, contact your software application manual. 1 Check the setting of paper you have loaded. Dots are missing or print quality is incorrect for the type of the forms...
... information. surface. Refer to the ribbon and check the ribbon surface. Forms thickness lever is poor. Printer problems Problem Probable cause Action Printer goes to correct the problem. Characters are Remove the ribbon cartridge stuck ...to your service representative. If the suggested action does not correct the problem, contact your software application manual. 1 Check the setting of paper you have loaded. Dots are missing or print quality is incorrect for the type of the forms...

User's Guide
Page 134
... loaded. For help , see "Using Setup mode to your software application manual. Refer to change printer settings" on pag e89. Action Refer to see "Setting Top-Of-Form" on something. Top-Of-Form is set too low. Printer page length is set incorrectly. Forms thickness lever is catching on page 81. Software application problem. Adjust page...
... loaded. For help , see "Using Setup mode to your software application manual. Refer to change printer settings" on pag e89. Action Refer to see "Setting Top-Of-Form" on something. Top-Of-Form is set too low. Printer page length is set incorrectly. Forms thickness lever is catching on page 81. Software application problem. Adjust page...

User's Guide
Page 135
... Lock. Action • Refer to your software application manual. • Make sure the correct printer driver is overriding your software applications. Line spacing is wrong; Reset forms thickness lever. application manual. Adjust the left problem. Printer problems (continued) Problem Probable cause Line length is incorrect, or Forms are jamming overprinting occurs. between printing surface and the...
... Lock. Action • Refer to your software application manual. • Make sure the correct printer driver is overriding your software applications. Line spacing is wrong; Reset forms thickness lever. application manual. Adjust the left problem. Printer problems (continued) Problem Probable cause Line length is incorrect, or Forms are jamming overprinting occurs. between printing surface and the...
User's Guide
Page 136
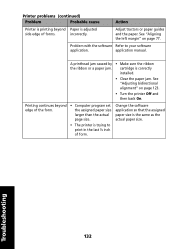
...manual. Printing continues beyond Paper is correctly installed. • Clear the paper jam. Troubleshooting 132 Printer problems (continued) Problem Probable cause Action Printer is printing beyond edge of the form. • Computer program set the assigned paper size larger than the actual page size. • The printer... is the same as the actual paper size. cartridge is adjusted side edge of form. Change the software application so that the assigned paper size is trying to your ...
...manual. Printing continues beyond Paper is correctly installed. • Clear the paper jam. Troubleshooting 132 Printer problems (continued) Problem Probable cause Action Printer is printing beyond edge of the form. • Computer program set the assigned paper size larger than the actual page size. • The printer... is the same as the actual paper size. cartridge is adjusted side edge of form. Change the software application so that the assigned paper size is trying to your ...
User's Guide
Page 139
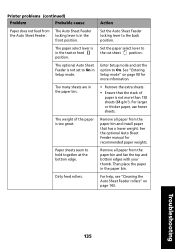
... Feeder is not set the option to On. Enter Setup mode and set to the back position. Remove all paper from the Auto Sheet Feeder. Printer problems (continued) Problem Probable cause Action Paper does not feed from the paper bin and install paper that the stack of the paper is not...
... Feeder is not set the option to On. Enter Setup mode and set to the back position. Remove all paper from the Auto Sheet Feeder. Printer problems (continued) Problem Probable cause Action Paper does not feed from the paper bin and install paper that the stack of the paper is not...


