Clearing Jams Guide
Page 3
201 paper jam CAUTION-HOT SURFACE: The fuser and the inside of the printer near the fuser may be hot. To reduce the risk of injury from a hot component, allow the surface to cool before removing ...paper from this area. 1 Open the front door, and then remove the unit. 202 paper jam CAUTION-HOT SURFACE: The fuser and the inside of the printer, and then remove any jammed sheets. 4 Remove the jam. 3 Align and insert the unit. 4 Close ... of the printer, and then remove any jammed sheets. 2 Lift the flap in front of the printer near the fuser may be hot.
201 paper jam CAUTION-HOT SURFACE: The fuser and the inside of the printer near the fuser may be hot. To reduce the risk of injury from a hot component, allow the surface to cool before removing ...paper from this area. 1 Open the front door, and then remove the unit. 202 paper jam CAUTION-HOT SURFACE: The fuser and the inside of the printer, and then remove any jammed sheets. 4 Remove the jam. 3 Align and insert the unit. 4 Close ... of the printer, and then remove any jammed sheets. 2 Lift the flap in front of the printer near the fuser may be hot.
Clearing Jams Guide
Page 4
... A single jam or multiple jams are in : • "231 paper jam" on page 4 • "233 paper jam" on . 231 paper jam CAUTION-HOT SURFACE: The fuser and the inside of injury from a hot component, allow the surface to release the jam. 4 To locate and remove the jammed sheets, complete all the... tray from the printer. 3 Pull the jammed sheets from the duplex area. 4 Insert the tray. 5 Press . To reduce the risk of the printer near the fuser may be hot.
... A single jam or multiple jams are in : • "231 paper jam" on page 4 • "233 paper jam" on . 231 paper jam CAUTION-HOT SURFACE: The fuser and the inside of injury from a hot component, allow the surface to release the jam. 4 To locate and remove the jammed sheets, complete all the... tray from the printer. 3 Pull the jammed sheets from the duplex area. 4 Insert the tray. 5 Press . To reduce the risk of the printer near the fuser may be hot.

Troubleshooting Guide
Page 6
... to feed the paper for the job. Try one or more of the printer might be caught between the photoconductor kit and the fuser. Toner fog or background shading appears on the page These are possible solutions. THE TONER CARTRIDGE MAY BE DEFECTIVE Replace the toner cartridge... sure you see. Toner rubs off These are possible solutions. Streaked horizontal lines These are possible solutions. Check the paper path around the fuser area. Clear any paper you are possible solutions. Streaked vertical lines These are using paper that meets the printer specifications. Try one or...
... to feed the paper for the job. Try one or more of the printer might be caught between the photoconductor kit and the fuser. Toner fog or background shading appears on the page These are possible solutions. THE TONER CARTRIDGE MAY BE DEFECTIVE Replace the toner cartridge... sure you see. Toner rubs off These are possible solutions. Streaked horizontal lines These are possible solutions. Check the paper path around the fuser area. Clear any paper you are possible solutions. Streaked vertical lines These are using paper that meets the printer specifications. Try one or...
Troubleshooting Guide
Page 7
Check the paper path around the fuser area. CAUTION-HOT SURFACE: The inside top front cover of the printer. THERE MAY BE EXCESS TONER IN THE PAPER PATH Contact Customer Support. THE .... To reduce the risk of the cartridge, and then reinstall it. For more of the printer might be caught between the photoconductor kit and the fuser. MAKE SURE THE TONER IS DISTRIBUTED EVENLY IN THE TONER CARTRIDGE Remove the toner cartridge and shake it from a hot component, allow the surface to...
Check the paper path around the fuser area. CAUTION-HOT SURFACE: The inside top front cover of the printer. THERE MAY BE EXCESS TONER IN THE PAPER PATH Contact Customer Support. THE .... To reduce the risk of the cartridge, and then reinstall it. For more of the printer might be caught between the photoconductor kit and the fuser. MAKE SURE THE TONER IS DISTRIBUTED EVENLY IN THE TONER CARTRIDGE Remove the toner cartridge and shake it from a hot component, allow the surface to...
User's Guide
Page 7
...selecting print media to cool before continuing. You must understand the section in hazardous radiation exposure. To reduce the risk of specific Lexmark components. CAUTION-SHOCK HAZARD: When accessing the system board, turn the printer off and unplug the power cord from the wall ...cabling connections, such as furniture and walls. Refer service or repairs, other than those specified herein may not always be hot. Lexmark is near the fuser may cause the media to a professional service person. This product uses a printing process that is not responsible for signs of...
...selecting print media to cool before continuing. You must understand the section in hazardous radiation exposure. To reduce the risk of specific Lexmark components. CAUTION-SHOCK HAZARD: When accessing the system board, turn the printer off and unplug the power cord from the wall ...cabling connections, such as furniture and walls. Refer service or repairs, other than those specified herein may not always be hot. Lexmark is near the fuser may cause the media to a professional service person. This product uses a printing process that is not responsible for signs of...
User's Guide
Page 37
... Type and Paper Size settings so that does not accurately describe the type of any trays, the trays are not automatic; The temperature of the fuser varies according to unlink does not match the Type setting of paper loaded in the tray. Paper may not be set manually from the Paper...
... Type and Paper Size settings so that does not accurately describe the type of any trays, the trays are not automatic; The temperature of the fuser varies according to unlink does not match the Type setting of paper loaded in the tray. Paper may not be set manually from the Paper...
User's Guide
Page 40
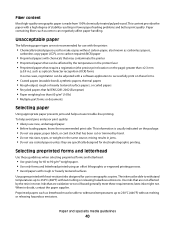
... forms and letterhead Use these requirements; When in the same source; To help avoid jams and poor print quality: • Always use in the printer fuser • Preprinted papers that require a registration (the precise print location on the page) greater than 60 g/m2 (16 lb) • Multiple-part forms or documents...
... forms and letterhead Use these requirements; When in the same source; To help avoid jams and poor print quality: • Always use in the printer fuser • Preprinted papers that require a registration (the precise print location on the page) greater than 60 g/m2 (16 lb) • Multiple-part forms or documents...

User's Guide
Page 56
4 Lift the flap in front of the printer, and remove any jammed sheets. 5 Align and insert the unit. 6 Close the front door. 7 Insert the tray. 8 Press . 201 paper jam CAUTION-HOT SURFACE: The fuser and the inside of injury from a hot component, allow the surface to cool before removing paper from this area. 1 Open the front door, and then remove the unit. Clearing jams 56 To reduce the risk of the printer near the fuser may be hot.
4 Lift the flap in front of the printer, and remove any jammed sheets. 5 Align and insert the unit. 6 Close the front door. 7 Insert the tray. 8 Press . 201 paper jam CAUTION-HOT SURFACE: The fuser and the inside of injury from a hot component, allow the surface to cool before removing paper from this area. 1 Open the front door, and then remove the unit. Clearing jams 56 To reduce the risk of the printer near the fuser may be hot.

User's Guide
Page 57
Clearing jams 57 To reduce the risk of injury from a hot component, allow the surface to cool before removing paper from this area. 1 Open the front door, and then remove the unit. 2 Lift the flap in front of the printer, and then remove any jammed sheets. 3 Align and insert the unit. 4 Close the front door. 5 Press . 202 paper jam CAUTION-HOT SURFACE: The fuser and the inside of the printer, and then remove any jammed sheets. 2 Lift the flap in front of the printer near the fuser may be hot.
Clearing jams 57 To reduce the risk of injury from a hot component, allow the surface to cool before removing paper from this area. 1 Open the front door, and then remove the unit. 2 Lift the flap in front of the printer, and then remove any jammed sheets. 3 Align and insert the unit. 4 Close the front door. 5 Press . 202 paper jam CAUTION-HOT SURFACE: The fuser and the inside of the printer, and then remove any jammed sheets. 2 Lift the flap in front of the printer near the fuser may be hot.

User's Guide
Page 59
Clearing jams 59 To reduce the risk of the printer near the fuser may be hot. 231 paper jam CAUTION-HOT SURFACE: The fuser and the inside of injury from a hot component, allow the surface to cool before removing paper from this area. 1 Open the front door. 2 Open the rear door. 3 Remove the jam. 4 Close the rear door. 5 Close the front door. 6 Press .
Clearing jams 59 To reduce the risk of the printer near the fuser may be hot. 231 paper jam CAUTION-HOT SURFACE: The fuser and the inside of injury from a hot component, allow the surface to cool before removing paper from this area. 1 Open the front door. 2 Open the rear door. 3 Remove the jam. 4 Close the rear door. 5 Close the front door. 6 Press .

User's Guide
Page 124
... IS DEFECTIVE Replace the toner cartridge. CAUTION-HOT SURFACE: The inside of the printer might be caught between the photoconductor kit and the fuser. MAKE SURE THE PAPER PATH IS CLEAR Paper could be hot. To reduce the risk of injury from a hot component, allow the...cool before touching. Streaked vertical lines These are holding the cartridge. Clear any paper you are possible solutions. Check the paper path around the fuser area. Use the cartridge handle whenever you see . To reduce the risk of injury from a hot component, allow the surface to feed...
... IS DEFECTIVE Replace the toner cartridge. CAUTION-HOT SURFACE: The inside of the printer might be caught between the photoconductor kit and the fuser. MAKE SURE THE PAPER PATH IS CLEAR Paper could be hot. To reduce the risk of injury from a hot component, allow the...cool before touching. Streaked vertical lines These are holding the cartridge. Clear any paper you are possible solutions. Check the paper path around the fuser area. Use the cartridge handle whenever you see . To reduce the risk of injury from a hot component, allow the surface to feed...
Technical Reference
Page 18
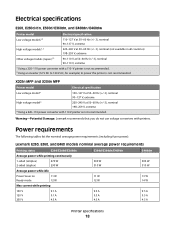
...) 470 W 290 W Average power while idle Power Saver on Ready mode 11 W 12 W Max current while printing 100 V 120 V 230 V 9.1 A 9.1 A 4.5 A E360d/E360dn/E460dn 500 W 310 W 11 W 12 W 9.5 A 9.5 A 4.5 A E460dw 500 W 310 W 13 W 14 W 9.5 A 9.5 A 4.5 A Printer specifications 18 X203n MFP... a 220-110 power converter with printers. Power requirements The following tables list the nominal average power requirements (including fuser power). Warning-Potential Damage: Lexmark recommends that you do not use voltage converters with a 110-V printer is not recommended. 2 Using an inverter ...
...) 470 W 290 W Average power while idle Power Saver on Ready mode 11 W 12 W Max current while printing 100 V 120 V 230 V 9.1 A 9.1 A 4.5 A E360d/E360dn/E460dn 500 W 310 W 11 W 12 W 9.5 A 9.5 A 4.5 A E460dw 500 W 310 W 13 W 14 W 9.5 A 9.5 A 4.5 A Printer specifications 18 X203n MFP... a 220-110 power converter with printers. Power requirements The following tables list the nominal average power requirements (including fuser power). Warning-Potential Damage: Lexmark recommends that you do not use voltage converters with a 110-V printer is not recommended. 2 Using an inverter ...

Technical Reference
Page 52
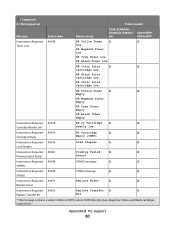
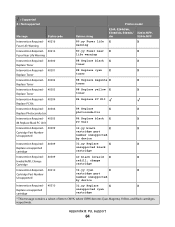
... 35075 Scheduled Maintenance Intervention Required - 35075 Scheduled Maintenance Intervention Required - 40038 Belt Exhausted Intervention Required - 40038 Belt Life Warning Intervention Required - 40038 Fuser/Belt Exhausted Return string 58 Too Many Flash Options Printer model E260, E260d/dn, E360d/dn, E460dn/ X203n MFP, dw X204n MFP X 58 ... detected 61 Defective Disk X X 61 Remove X X defective disk 80 Scheduled X X Maintenance 81 Scheduled X X Maintenance 80 Belt Exhausted X X 80 Belt Life X X Warning 80 Fuser/Belt X X Exhausted Appendix B: PJL support 52
... 35075 Scheduled Maintenance Intervention Required - 35075 Scheduled Maintenance Intervention Required - 40038 Belt Exhausted Intervention Required - 40038 Belt Life Warning Intervention Required - 40038 Fuser/Belt Exhausted Return string 58 Too Many Flash Options Printer model E260, E260d/dn, E360d/dn, E460dn/ X203n MFP, dw X204n MFP X 58 ... detected 61 Defective Disk X X 61 Remove X X defective disk 80 Scheduled X X Maintenance 81 Scheduled X X Maintenance 80 Belt Exhausted X X 80 Belt Life X X Warning 80 Fuser/Belt X X Exhausted Appendix B: PJL support 52

Technical Reference
Page 53
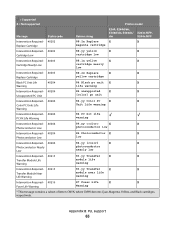
... Intervention Required - 40038 ITU Maintenance Printer model Return string E260, E260d/dn, E360d/dn, E460dn/ X203n MFP, dw X204n MFP 80 Fuser/Belt Life X X Warning 80 Fuser Exhausted X X 80 Fuser Life X X Warning 80 Fuser X X Maintenance 83 ITU Maintenance X X PJL messages for attendance conditions = Supported X = Not supported Printer model Message Status code Return string E260...
... Intervention Required - 40038 ITU Maintenance Printer model Return string E260, E260d/dn, E360d/dn, E460dn/ X203n MFP, dw X204n MFP 80 Fuser/Belt Life X X Warning 80 Fuser Exhausted X X 80 Fuser Life X X Warning 80 Fuser X X Maintenance 83 ITU Maintenance X X PJL messages for attendance conditions = Supported X = Not supported Printer model Message Status code Return string E260...
Technical Reference
Page 60
Intervention Required - 40048 OPMSG message X X OPMSG Intervention Required - 40049 STMSG message X X STMSG Intervention Required - 40050 Replace Fuser X X Replace Fuser Intervention Required - 40050 Replace Transfer X X Replace Transfer Kit Kit * This message contains a subset of letters CMYK, where CMYK denotes Cyan, Magenta, Yellow, and Black cartridges, ...
Intervention Required - 40048 OPMSG message X X OPMSG Intervention Required - 40049 STMSG message X X STMSG Intervention Required - 40050 Replace Fuser X X Replace Fuser Intervention Required - 40050 Replace Transfer X X Replace Transfer Kit Kit * This message contains a subset of letters CMYK, where CMYK denotes Cyan, Magenta, Yellow, and Black cartridges, ...
Technical Reference
Page 63
... Module Life Warning module life warning Intervention Required - 40215 83.yy Transfer X X Transfer Module Near Life Warning module near life warning Intervention Required - 40216 87 Fuser Life X X Fuser Life Warning Warning * This message contains a subset of letters CMYK, where CMYK denotes Cyan, Magenta, Yellow, and Black cartridges, respectively.
... Module Life Warning module life warning Intervention Required - 40215 83.yy Transfer X X Transfer Module Near Life Warning module near life warning Intervention Required - 40216 87 Fuser Life X X Fuser Life Warning Warning * This message contains a subset of letters CMYK, where CMYK denotes Cyan, Magenta, Yellow, and Black cartridges, respectively.
Technical Reference
Page 64
... Status code Return string E260, E260d/dn, E360d/dn, E460dn/ X203n MFP, dw X204n MFP Intervention Required - 40216 80.yy Fuser life X X Fuser Life Warning warning Intervention Required - 40216 80.yy Fuser near X X Fuser Near Life Warning life warning Intervention Required - 40300 88 Replace black X X Replace Toner toner Intervention Required - 40301 88 Replace cyan...
... Status code Return string E260, E260d/dn, E360d/dn, E460dn/ X203n MFP, dw X204n MFP Intervention Required - 40216 80.yy Fuser life X X Fuser Life Warning warning Intervention Required - 40216 80.yy Fuser near X X Fuser Near Life Warning life warning Intervention Required - 40300 88 Replace black X X Replace Toner toner Intervention Required - 40301 88 Replace cyan...

Technical Reference
Page 65
Intervention Required - 40315 83.yy Replace X X Replace Transfer Module transfer module Intervention Required - 40316 80.yy Replace X X Replace Fuser fuser Intervention Required - 40316 87.yy Replace X X Replace Fuser fuser * This message contains a subset of letters CMYK, where CMYK denotes Cyan, Magenta, Yellow, and Black cartridges, respectively. Appendix B: PJL support 65 = Supported X = Not supported Printer ...
Intervention Required - 40315 83.yy Replace X X Replace Transfer Module transfer module Intervention Required - 40316 80.yy Replace X X Replace Fuser fuser Intervention Required - 40316 87.yy Replace X X Replace Fuser fuser * This message contains a subset of letters CMYK, where CMYK denotes Cyan, Magenta, Yellow, and Black cartridges, respectively. Appendix B: PJL support 65 = Supported X = Not supported Printer ...

Technical Reference
Page 67
... Defective X X Defective Cartridge yellow cartridge Intervention Required - 40412 31.41 Missing or X X Missing or Defective Cartridge defective yellow cartridge Intervention Required - 40416 80.yy Fuser X X Fuser Missing missing Intervention Required - 40416 87.yy Fuser X X Fuser Missing missing * This message contains a subset of letters CMYK, where CMYK denotes Cyan, Magenta, Yellow, and Black cartridges, respectively.
... Defective X X Defective Cartridge yellow cartridge Intervention Required - 40412 31.41 Missing or X X Missing or Defective Cartridge defective yellow cartridge Intervention Required - 40416 80.yy Fuser X X Fuser Missing missing Intervention Required - 40416 87.yy Fuser X X Fuser Missing missing * This message contains a subset of letters CMYK, where CMYK denotes Cyan, Magenta, Yellow, and Black cartridges, respectively.

Service Manual
Page 3
... 2-21 Service checks 2-22 Controller board service check 2-22 Cooling fan service check 2-23 Cover interlock switch service check 2-23 Dead machine service check 2-24 Fuser service check 2-25 LVPS/HVPS service check 2-25 Main motor service check 2-26 Media feed clutch service check 2-26 Operator panel service check 2-27 Paper...
... 2-21 Service checks 2-22 Controller board service check 2-22 Cooling fan service check 2-23 Cover interlock switch service check 2-23 Dead machine service check 2-24 Fuser service check 2-25 LVPS/HVPS service check 2-25 Main motor service check 2-26 Media feed clutch service check 2-26 Operator panel service check 2-27 Paper...


