
Menus and Messages Guide
Page 4
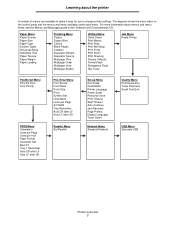
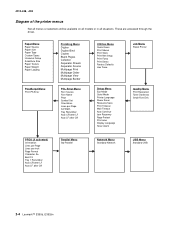
...Set Orientation Lines per Inch Page Format Character Set Best Fit Tray 1 Renumber Auto CR after LF Auto LF after CR Setup Menu Eco-Mode Quiet Mode Printer Language Power Saver Resource Save Print Timeout Wait Timeout Auto Continue Jam Recovery Page Protect Display Language Toner Alarm Quality Menu ...Menu Orientation Lines per Page Lines per Page A4 Width Tray Renumber Auto CR after LF Auto LF after CR Parallel Menu Std Parallel Network Menu Standard Network USB Menu Standard USB 4 The diagram shows the menu index on the control panel, the menus, and items available under each ...
...Set Orientation Lines per Inch Page Format Character Set Best Fit Tray 1 Renumber Auto CR after LF Auto LF after CR Setup Menu Eco-Mode Quiet Mode Printer Language Power Saver Resource Save Print Timeout Wait Timeout Auto Continue Jam Recovery Page Protect Display Language Toner Alarm Quality Menu ...Menu Orientation Lines per Page Lines per Page A4 Width Tray Renumber Auto CR after LF Auto LF after CR Parallel Menu Std Parallel Network Menu Standard Network USB Menu Standard USB 4 The diagram shows the menu index on the control panel, the menus, and items available under each ...
Menus and Messages Guide
Page 14
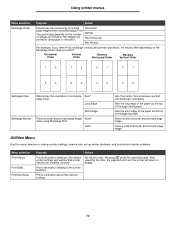
...and whether the images are installed correctly Prints information relating to the printer statistics Prints information about the network settings Values No value for this item, the page will print and the printer will return to Ready. 14 Auto* page sheet Long Edge Short...Menu Use this menu selection to change printer settings, remove jobs, set up printer hardware, and troubleshoot printer problems. Menu selection Print Menus Print Stats Print Net Setup Purpose Prints information relating to the default printer settings and verifies that printer options are portrait or landscape in ...
...and whether the images are installed correctly Prints information relating to the printer statistics Prints information about the network settings Values No value for this item, the page will print and the printer will return to Ready. 14 Auto* page sheet Long Edge Short...Menu Use this menu selection to change printer settings, remove jobs, set up printer hardware, and troubleshoot printer problems. Menu selection Print Menus Print Stats Print Net Setup Purpose Prints information relating to the default printer settings and verifies that printer options are portrait or landscape in ...
Menus and Messages Guide
Page 24
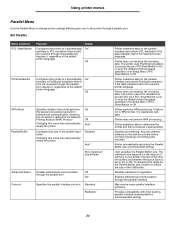
... the special processing required for bidirectional communication, following the conventions defined in the Setup Menu if PS SmartSwitch is the required printer language. Printer does not examine the incoming data. Printer does not perform NPA processing. Disables job buffering. The maximum size depends on...emulation if the data indicates that is On, or uses the default printer language specified in the Network Printing Alliance (NPA) Protocol Changing this menu item automatically resets the printer. The printer uses PostScript emulation to process the job if PS SmartSwitch is the ...
... the special processing required for bidirectional communication, following the conventions defined in the Setup Menu if PS SmartSwitch is the required printer language. Printer does not examine the incoming data. Printer does not perform NPA processing. Disables job buffering. The maximum size depends on...emulation if the data indicates that is On, or uses the default printer language specified in the Network Printing Alliance (NPA) Protocol Changing this menu item automatically resets the printer. The printer uses PostScript emulation to process the job if PS SmartSwitch is the ...
Menus and Messages Guide
Page 26
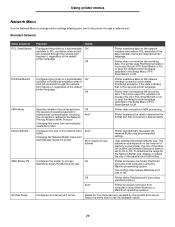
... reduce the size of the network input buffer Changing the Network Buffer menu item automatically resets the printer. Printer does not examine the incoming data. User specifies the Network Buffer size. Standard Network Menu selection PCL SmartSwitch PS SmartSwitch NPA Mode Network Buffer MAC Binary PS Std Net Setup Purpose Values Configures the printer so it automatically On* switches...
... reduce the size of the network input buffer Changing the Network Buffer menu item automatically resets the printer. Printer does not examine the incoming data. User specifies the Network Buffer size. Standard Network Menu selection PCL SmartSwitch PS SmartSwitch NPA Mode Network Buffer MAC Binary PS Std Net Setup Purpose Values Configures the printer so it automatically On* switches...

Menus and Messages Guide
Page 27
... is passed to process the job if PCL SmartSwitch is On, or uses the default printer language specified in the Setup Menu if PCL SmartSwitch is disabled. Printer does not examine the incoming data. The printer will be in the Network Printing Alliance (NPA) Protocol Note: Changing this menu selection to determine the format. Any...
... is passed to process the job if PCL SmartSwitch is On, or uses the default printer language specified in the Setup Menu if PCL SmartSwitch is disabled. Printer does not examine the incoming data. The printer will be in the Network Printing Alliance (NPA) Protocol Note: Changing this menu selection to determine the format. Any...
Menus and Messages Guide
Page 31
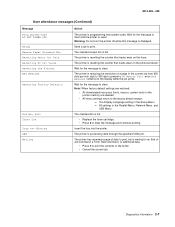
... to activate the link buffer changes. - The Display Language setting in printer memory. • Install additional printer memory. • To clear the message and continue printing, press . All settings in the Parallel Menu, Network Menu, and USB Menu The standard bin is displayed, enable Resource Save... To stop the defragment operation and continue printing, press . • Delete fonts, macros, and other data in the Setup Menu - Insert the tray into the printer. Wait for the message to clear the message and continue printing. When Ready is full. • Replace the toner ...
... to activate the link buffer changes. - The Display Language setting in printer memory. • Install additional printer memory. • To clear the message and continue printing, press . All settings in the Parallel Menu, Network Menu, and USB Menu The standard bin is displayed, enable Resource Save... To stop the defragment operation and continue printing, press . • Delete fonts, macros, and other data in the Setup Menu - Insert the tray into the printer. Wait for the message to clear the message and continue printing. When Ready is full. • Replace the toner ...
Menus and Messages Guide
Page 32
... • To avoid this error in the Setup Menu. - Remove the toner cartridge and install a new cartridge that matches the region of the printer. • To clear the message and continue printing, press . Install additional printer memory. If the error message remains, the ...job may not print correctly. • Program new firmware for the network interface. • Reset the printer. 1 Turn the printer off and unplug the printer. 2 Remove the excess flash memory. 3 Plug in the power cord. 5 Turn the printer on the flash memory. • Install a larger capacity flash memory...
... • To avoid this error in the Setup Menu. - Remove the toner cartridge and install a new cartridge that matches the region of the printer. • To clear the message and continue printing, press . Install additional printer memory. If the error message remains, the ...job may not print correctly. • Program new firmware for the network interface. • Reset the printer. 1 Turn the printer off and unplug the printer. 2 Remove the excess flash memory. 3 Plug in the power cord. 5 Turn the printer on the flash memory. • Install a larger capacity flash memory...
Menus and Messages Guide
Page 34
...CR after LF (PCL Emul Menu) 21, 23 Auto LF after CR (PCL Emul Menu) 21, 23 B Blank Pages 13 buffer sizes, adjusting network 26 parallel 24 Busy 29 C Cancelling Job 29 Close door 29 Collation, enabling 13 complex page errors 18 control panel 5 Copies, specifying number 13 ...custom paper type 9 D Defragmenting Flash 29 diagram, menu 4 Disabling Menus 29 Display Language 19 Download Target (Setup Menu) 17 downloaded resources storing 17 duplex binding 12 duplex enabling 12 E Enabling Menus 29 F Factory Defaults 15 Feed Direction 10 Finishing Menu 12 ...
...CR after LF (PCL Emul Menu) 21, 23 Auto LF after CR (PCL Emul Menu) 21, 23 B Blank Pages 13 buffer sizes, adjusting network 26 parallel 24 Busy 29 C Cancelling Job 29 Close door 29 Collation, enabling 13 complex page errors 18 control panel 5 Copies, specifying number 13 ...custom paper type 9 D Defragmenting Flash 29 diagram, menu 4 Disabling Menus 29 Display Language 19 Download Target (Setup Menu) 17 downloaded resources storing 17 duplex binding 12 duplex enabling 12 E Enabling Menus 29 F Factory Defaults 15 Feed Direction 10 Finishing Menu 12 ...
Menus and Messages Guide
Page 35
interfaces network 26 parallel 24 Invalid Engine Code 29 J Jam Recovery (Setup Menu) 18 jams See paper jams L language, display 19 language, printer 17 Lines per Page (PCL Emul Menu) 20, 22 Load Manual 29 Load Manual 29 Load Manual 29 Load Manual 29 Load, src with, Custom... Border 14 Multipage Order 14 Multipage Print 13 Multipage View 14 N Network Buffer (Network Menu) 26 Index Network interface 30 Network Menu 26 MAC Binary PS 26 Network Buffer 26 NPA Mode 26 PCL SmartSwitch 26 PS SmartSwitch 26 Std Net Setup 26 network port configuring buffer size 26 NPA mode 26 PCL SmartSwitch 26 PS...
interfaces network 26 parallel 24 Invalid Engine Code 29 J Jam Recovery (Setup Menu) 18 jams See paper jams L language, display 19 language, printer 17 Lines per Page (PCL Emul Menu) 20, 22 Load Manual 29 Load Manual 29 Load Manual 29 Load Manual 29 Load, src with, Custom... Border 14 Multipage Order 14 Multipage Print 13 Multipage View 14 N Network Buffer (Network Menu) 26 Index Network interface 30 Network Menu 26 MAC Binary PS 26 Network Buffer 26 NPA Mode 26 PCL SmartSwitch 26 PS SmartSwitch 26 Std Net Setup 26 network port configuring buffer size 26 NPA mode 26 PCL SmartSwitch 26 PS...
Menus and Messages Guide
Page 36
...21 Print Resolution 16 print timeout configuring 18 Print Timeout (Setup Menu) 18 Printer Language 17 Protocol (Parallel Menu) 24 PS emulation See PostScript emulation PS SmartSwitch (Network Menu) 26 PS SmartSwitch (Parallel Menu) 24 PS SmartSwitch, setting network port 26 parallel port 24 PS SmartSwitch, USB 27 ...Index Q Quality Menu 16 R Ready 30 Resetting the Printer 31 Resource Save 17 Restoring Factory Defaults 31 S saving power 17 Separator Sheets 13 Separator Source 13 Setup Menu 16 Auto Continue 18 ...
...21 Print Resolution 16 print timeout configuring 18 Print Timeout (Setup Menu) 18 Printer Language 17 Protocol (Parallel Menu) 24 PS emulation See PostScript emulation PS SmartSwitch (Network Menu) 26 PS SmartSwitch (Parallel Menu) 24 PS SmartSwitch, setting network port 26 parallel port 24 PS SmartSwitch, USB 27 ...Index Q Quality Menu 16 R Ready 30 Resetting the Printer 31 Resource Save 17 Restoring Factory Defaults 31 S saving power 17 Separator Sheets 13 Separator Source 13 Setup Menu 16 Auto Continue 18 ...
Quick Reference
Page 6
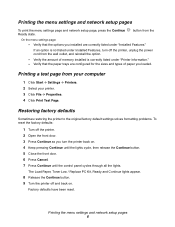
.... To reset the factory defaults: 1 Turn off the printer. 2 Open the front door. 3 Press Continue as you loaded. Printing the menu settings and network setup pages To print the menu settings page and network setup page, press the Continue Ready state. Factory defaults have been... reset. Printing the menu settings and network setup pages 6 Verify the amount of paper you turn off ...
.... To reset the factory defaults: 1 Turn off the printer. 2 Open the front door. 3 Press Continue as you loaded. Printing the menu settings and network setup pages To print the menu settings page and network setup page, press the Continue Ready state. Factory defaults have been... reset. Printing the menu settings and network setup pages 6 Verify the amount of paper you turn off ...
User's Guide
Page 3
......23 Linking trays ...24 Sending a job to print ...24 Canceling a print job ...25 Printing the menu settings page ...26 Printing a network setup page ...27 Printing a font sample list ...27 Chapter 4: Installing options 28 Accessing the system board ...28 Adding a memory card ...31 ...sheet drawer 33 Recognizing installed options ...34 Chapter 5: Maintaining the printer 35 Storing supplies ...35 Conserving supplies ...35 Ordering supplies ...35 Photoconductor kit end-of-life ...39 Maintenance kit ...42 Recycling Lexmark products ...42 Chapter 6: Clearing jams 43 Identifying jams ...43 ...
......23 Linking trays ...24 Sending a job to print ...24 Canceling a print job ...25 Printing the menu settings page ...26 Printing a network setup page ...27 Printing a font sample list ...27 Chapter 4: Installing options 28 Accessing the system board ...28 Adding a memory card ...31 ...sheet drawer 33 Recognizing installed options ...34 Chapter 5: Maintaining the printer 35 Storing supplies ...35 Conserving supplies ...35 Ordering supplies ...35 Photoconductor kit end-of-life ...39 Maintenance kit ...42 Recycling Lexmark products ...42 Chapter 6: Clearing jams 43 Identifying jams ...43 ...
User's Guide
Page 7
...panel and the menus and items available under each menu. Paper Menu Paper Source Paper Size Paper Type Custom Types Universal Setup Substitute Size Paper Texture Paper Weight Paper Loading Finishing Menu Duplex Duplex Bind Copies Blank Pages Collation Separator Sheets Separator Source ...Save Print Timeout Wait Timeout Auto Continue Jam Recovery Page Protect Display Language Toner Alarm Network Menu Standard Network Quality Menu Print Resolution Toner Darkness Small Font Enh. USB Menu Standard USB Printer overview 7 The diagram shows the menu index on the Software and Documentation CD....
...panel and the menus and items available under each menu. Paper Menu Paper Source Paper Size Paper Type Custom Types Universal Setup Substitute Size Paper Texture Paper Weight Paper Loading Finishing Menu Duplex Duplex Bind Copies Blank Pages Collation Separator Sheets Separator Source ...Save Print Timeout Wait Timeout Auto Continue Jam Recovery Page Protect Display Language Toner Alarm Network Menu Standard Network Quality Menu Print Resolution Toner Darkness Small Font Enh. USB Menu Standard USB Printer overview 7 The diagram shows the menu index on the Software and Documentation CD....
User's Guide
Page 27
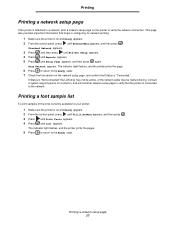
...the Ready state. 7 Check the first section on the network setup page, and confirm that helps in configuring for network printing. 1 Make sure the printer is on and Ready appears. 2 From the control panel, press until Network Menu appears, and then press . If Status is "...return to the Ready state. Consult a system support person for your printer: 1 Make sure the printer is on the printer to verify the network connection. Printing Printing a network setup pag e If the printer is attached to a network, print a network setup page on and Ready appears. 2 From the control panel, press until...
...the Ready state. 7 Check the first section on the network setup page, and confirm that helps in configuring for network printing. 1 Make sure the printer is on and Ready appears. 2 From the control panel, press until Network Menu appears, and then press . If Status is "...return to the Ready state. Consult a system support person for your printer: 1 Make sure the printer is on the printer to verify the network connection. Printing Printing a network setup pag e If the printer is attached to a network, print a network setup page on and Ready appears. 2 From the control panel, press until...
User's Guide
Page 51
...Windows2000, WindowsXP, Windows Vista, or WindowsServer2003. On. For more information, see the drivers CD or the Lexmark Web site. before sending a job to print. 2 Press to return the printer to Normal. The output bin is not connected properly. The paper tray is set to Set Page ...printer off and call for network printing. are using a USB Direct interface, make sure you want to Off from the wrong tray or on the wrong print media. Job takes longer than The job is not 1 Make sure Ready or Power Saver appears on page62. complex. Job prints from the Setup...
...Windows2000, WindowsXP, Windows Vista, or WindowsServer2003. On. For more information, see the drivers CD or the Lexmark Web site. before sending a job to print. 2 Press to return the printer to Normal. The output bin is not connected properly. The paper tray is set to Set Page ...printer off and call for network printing. are using a USB Direct interface, make sure you want to Off from the wrong tray or on the wrong print media. Job takes longer than The job is not 1 Make sure Ready or Power Saver appears on page62. complex. Job prints from the Setup...

User's Guide
Page 71
... 15 F factory default settings restoring 62 FCC statement 65 flash memory card 32 adding 32 G guidelines labels 16 paper 12 I identifying printers 5 indicator light 9 installed options recognizing 34 J jams avoiding 17 clearing 44 identifying 43 L labels 15 guidelines 10, 15, 16...18 manual feeder 23 lock feature, security 64 M maintaining the printer 35 cleaning the printhead lens 59 maintenance kit 42 manual feeder 5, 14 maximum paper fill indicators 13, 19 memory card adding 31 menu settings page printing 26 N network setup page printing 27 O operating modes 62 options 28 ordering supplies...
... 15 F factory default settings restoring 62 FCC statement 65 flash memory card 32 adding 32 G guidelines labels 16 paper 12 I identifying printers 5 indicator light 9 installed options recognizing 34 J jams avoiding 17 clearing 44 identifying 43 L labels 15 guidelines 10, 15, 16...18 manual feeder 23 lock feature, security 64 M maintaining the printer 35 cleaning the printhead lens 59 maintenance kit 42 manual feeder 5, 14 maximum paper fill indicators 13, 19 memory card adding 31 menu settings page printing 26 N network setup page printing 27 O operating modes 62 options 28 ordering supplies...
Service Manual
Page 26
... after LF Auto LF after CR Utilities Menu Quick Demo Print Menus Print Stats Print Net Setup Print Fonts Print Demo Factory Defaults Hex Trace Setup Menu Eco-Mode Quiet Mode Printer Language Power Saver Resource Save Print Timeout Wait Timeout Auto Continue Jam Recovery Page Protect Print ...Renumber Auto CR after LF Auto LF after CR Parallel Menu Std Parallel Network Menu Standard Network USB Menu Standard USB 2-4 Lexmark™ E350d, E352dn These are accessed through the driver. 4512-420, -430 Diagram of the printer menus Not all menus or selections will be available on all models or...
... after LF Auto LF after CR Utilities Menu Quick Demo Print Menus Print Stats Print Net Setup Print Fonts Print Demo Factory Defaults Hex Trace Setup Menu Eco-Mode Quiet Mode Printer Language Power Saver Resource Save Print Timeout Wait Timeout Auto Continue Jam Recovery Page Protect Print ...Renumber Auto CR after LF Auto LF after CR Parallel Menu Std Parallel Network Menu Standard Network USB Menu Standard USB 2-4 Lexmark™ E350d, E352dn These are accessed through the driver. 4512-420, -430 Diagram of the printer menus Not all menus or selections will be available on all models or...
Service Manual
Page 29
... an End of Job command, a Form Feed command, or additional data. • Press to print the contents of a page in the Parallel Menu, Network Menu, and USB Menu The standard bin is full. • Replace the toner cartridge. • Press to prevent a 38 Memory Full error. The... • All menu settings return to the factory default except: - The printer is full. The Display Language setting in the printer memory are restored: • All downloaded resources (fonts, macros, symbol sets) in the Setup Menu - The printer has received a page of data to print, but is resetting the counter ...
... an End of Job command, a Form Feed command, or additional data. • Press to print the contents of a page in the Parallel Menu, Network Menu, and USB Menu The standard bin is full. • Replace the toner cartridge. • Press to prevent a 38 Memory Full error. The... • All menu settings return to the factory default except: - The printer is full. The Display Language setting in the printer memory are restored: • All downloaded resources (fonts, macros, symbol sets) in the Setup Menu - The printer has received a page of data to print, but is resetting the counter ...


